


ndk-build
The ndk-build file is a shell script introduced in Android NDK r4. Its purpose is to invoke the right NDK build script.
Internals
Running the ndk-build script is equivalent to running the following command:
$GNUMAKE -f <ndk>/build/core/build-local.mk
<parameters>
$GNUMAKE points to GNU Make 3.81 or later, and <ndk> points to your NDK installation directory. You can use this information to invoke ndk-build from other shell scripts, or even your own make files.
Invoking from the Command Line
The ndk-build file lives in the top level the NDK installation directory. To run it from the command line, invoke it while in or under your application project directory. For example:
cd <project>
$ <ndk>/ndk-build
In this example, <project> points to your project’s root directory, and <ndk> is the directory where you installed the NDK.
Options
All parameters to ndk-build are passed directly to the underlying GNU make command that runs the NDK build scripts. Combine ndk-build and options in the form ndk-build <option>. For example:
$ ndk-build clean
The following options are available:
- Remove any previously generated binaries.
- Launch build, and display build commands.
- Force a complete rebuild.
- Force a complete rebuild, and display build commands.
- Display internal NDK log messages (used for debugging the NDK itself).
- Force a debuggable build (see Table 1).
- Force a release build (see Table 1).
- Always use the toolchain in 32-bit mode (see 64-bit and 32-bit Toolchains).
-
Build, using a specific
Application.mkfile pointed to by theNDK_APPLICATION_MKvariable. -
Build the native code for the project path located at
<project>. Useful if you don't want tocdto it in your terminal.
clean
V=1
-B
-B V=1
NDK_LOG=1
NDK_DEBUG=1
NDK_DEBUG=0
NDK_HOST_32BIT=1
NDK_APPLICATION_MK=<file>
-C <project>
Invoking from Eclipse
To build from Eclipse, make sure that you have configured it as described in Setup. If you wish to build using the default ndk-build command, with no options, you can just build your project just as you would any Android project. To get Eclipse to add any of the options described above, follow these steps:
- In the Project Explorer pane, right-click your project name.
- Select Properties.
- Click C/C++ Build.
- Under the Builder Settings tab, uncheck Use default build command.
- In the Build command field, enter the entire build string as if you were typing it on the command line.
- Click OK.
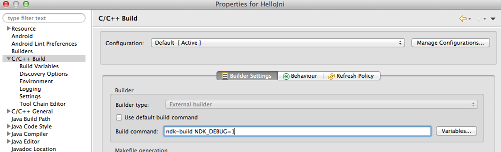
Figure 1. Specifying a debug build from within Eclipse
Debuggable versus Release builds
Use the NDK_DEBUG option and, in certain cases, AndroidManifest.xml to specify debug or release build, optimization-related behavior, and inclusion of symbols. Table 1 shows the results of each possible combination of settings.
Table 1. Results of NDK_DEBUG (command line) and android:debuggable (manifest) combinations.
| NDK_DEBUG=0 | NDK_DEBUG=1 | NDK_DEBUG not specified | |
|---|---|---|---|
| android:debuggble="true" | Debug; Symbols; Optimized*1 | Debug; Symbols; Not optimized*2 | (same as NDK_DEBUG=1) |
| android:debuggable="false" | Release; Symbols; Optimized | Release; Symbols; Not optimized | Release; No symbols; Optimized*3 |
*2: Default for running
ndk-gdb.
*3: Default mode.
Note: NDK_DEBUG=0 is the equivalent of APP_OPTIM=release, and complies with the GCC -O2 option.NDK_DEBUG=1 is the equivalent of APP_OPTIM=debug in Application.mk, and complies with the GCC -O0option. For more information about APP_OPTIM, see Application.mk.
The syntax on the command line is, for example:
$ ndk-build NDK_DEBUG=1
If you are using build tools from prior to SDK r8, you must also modify your AndroidManifest.xml file to specify debug mode. The syntax for doing so resembles the following:
<application android:label="@string/app_name"
android:debuggable="true">
From SDK r8 onward, you do not need to touch
AndroidManifest.xml. Building a debug package (e.g. with ant debug or the corresponding option of the ADT plugin) causes the tool automatically to pick the native debug files generated with
NDK_DEBUG=1.
64-Bit and 32-Bit Toolchains
Some toolchains come with both 64-bit and 32-bit versions. For example, directories<ndk>/toolchain/<name>/prebuilt/ and <ndk>/prebuilt/ may contain both linux-x86 and linux-x86_64 folders for Linux tools in 32-bit and 64-bit modes, respectively. The ndk-build script automatically chooses a 64-bit version of the toolchain if the host OS supports it. You can force the use of a 32-bit toolchain by using NDK_HOST_32BIT=1 either in your environment or on the ndk-build command line.
Note that 64-bit tools utilize host resources better (for instance, they are faster, and handle larger programs), and they can still generate 32-bit binaries for Android.
Requirements
You need GNU Make 3.81 or later to use ndk-build or the NDK in general. The build scripts will detect a non-compliant Make tool, and generate an error message.
If you have GNU Make 3.81 installed, but the default make command doesn’t launch it, define GNUMAKE in your environment to point to it before launching ndk-build. For example:
$ export GNUMAKE=/usr/local/bin/gmake
$ ndk-build
You can override other host prebuilt tools in $NDK/prebuilt/<OS>/bin/ with the following environment variables:
$ export NDK_HOST_AWK=<path-to-awk>
$ export NDK_HOST_ECHO=<path-to-echo>
$ export NDK_HOST_CMP=<path-to-cmp>


 7891
7891


 被折叠的 条评论
为什么被折叠?
被折叠的 条评论
为什么被折叠?
 到【灌水乐园】发言


