


手把手带你部署Elkeid开源项目
Elkied单机部署文档
进行单机部署,有利于更好的理解各个组件。
本人环境
操作系统:Ubuntu 20.04
电脑类型:笔记本
内核版本:5.13.0-35-generic
go版本:1.18
ip地址:192.168.101.97(本人局域网ip地址)
读者在部署时:
需将192.168.101.97替换成你的ip地址!
需将192.168.101.97替换成你的ip地址!
需将192.168.101.97替换成你的ip地址!
读一下官网的部署指南
- 部署所用的后端服务器需要仅供Elkeid使用
- 部署所用的后端服务器需要保证内网互通,也仅支持内网部署
- 部署所用的后端服务器部署时需要有 root 用户权限
- 部署所用的后端服务器只能使用:Centos7 及以上;Ubuntu16 及以上;Debian9 及以上
- 执行elkeidup的服务器需要能以root用户免密码ssh到所有的后端服务器上
- 部署过程不可以手动打断
- 仅可以使用局域网IP,不要使用 127.0.0.1 或者 hostname 或者公网IP
- 访问 Elkeid Console 只能使用安装配置中填写的局域网IP,不可使用其他如公网IP
一、配置ssh免密登录
1、生成密钥
ssh-keygen -t rsa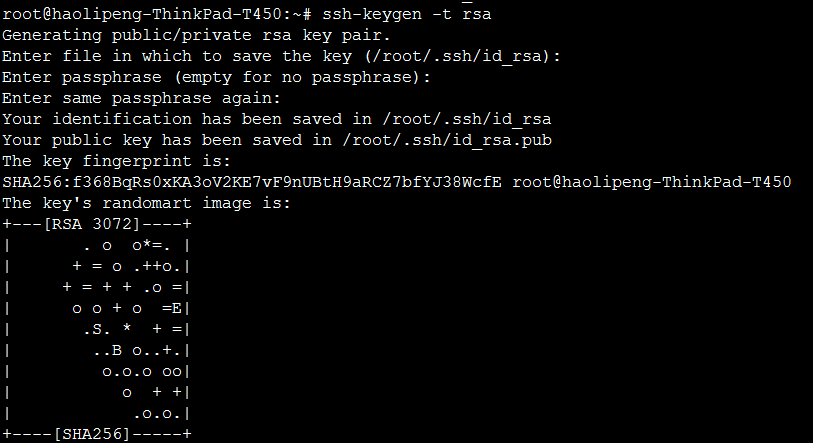

执行上面的命令时,我们直接按三次回车,之后会在用户的根目录下生成一个 .ssh 的文件夹,我们进入该文件夹下面并查看有哪些内容。
我们看到有三个文件,下面分别解释下每个文件是干什么用的。
id_rsa: 生成的私钥文件
id_rsa.pub: 生成的公钥文件
known_hosts: 已知的主机公钥清单
2、拷贝密钥
scp -p ~/.ssh/id_rsa.pub root@:/root/.ssh/authorized_keys以上步骤,我们就完成了免密钥登录.
二、下载安装包和部署脚本
1、下载部署脚本elkeidup
wget https://github.com/bytedance/Elkeid/releases/download/v1.7/elkeidup
chmod a+x ./elkeidup
2、下载package_community安装包
wget https://github.com/bytedance/Elkeid/releases/download/v1.7/package_community.tar.gz
tar -zxf package_community.tar.gz
这个脚本下载的比较慢,大家耐心等待下,可以开启下梯子啥的各种办法。
3、修改脚本(重要!)
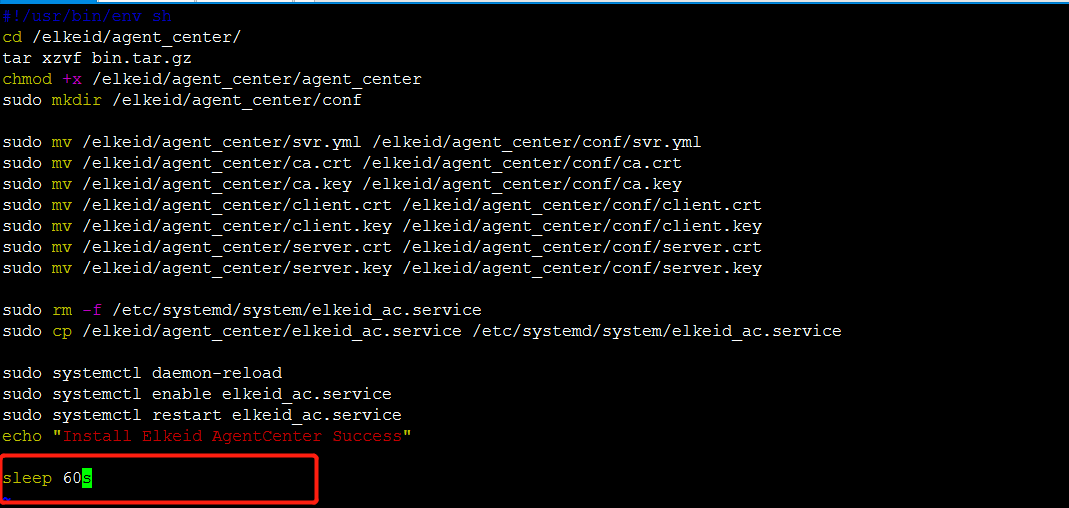
修改agent_center的install.sh脚本,在其末尾处添加sleep 60s

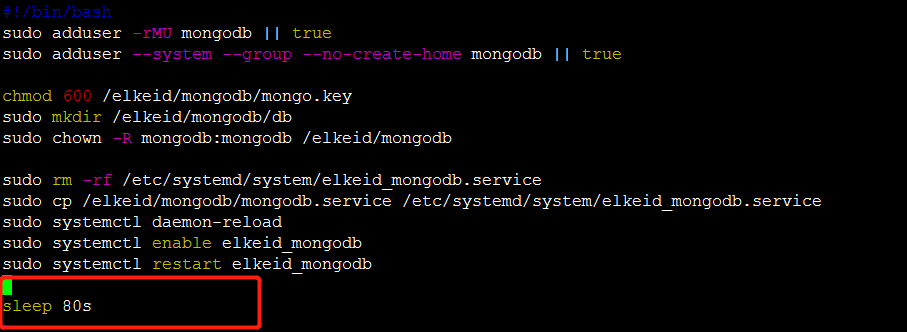
修改mongodb的install.sh脚本,在其末尾处添加sleep 80s

初始化配置并替换ip为本机ip,我的本机ip为192.168.101.97
#生成默认的配置文件
./elkeidup init
#由于是单机部署,所以将elkeid_server.yaml中的ip替换成{your ip}
sed 's/10.225.117.18/192.168.101.97/g' elkeid_server.yaml >> elkeid_server.yaml读者部署时,需将192.168.101.97更换成自己的ip地址。
4、开始部署
#执行部署命令
root@haolipeng-OptiPlex-7090:/home/work#./elkeidup deploy --package package_community/ --config ./elkeid_server.yaml
[INFO] 2022-04-13T16:39:11+08:00 Used ElkeidUP home dir :/root/.elkeidup
[INFO] 2022-04-13T16:39:11+08:00 use config file: ./elkeid_server.yaml
[INFO] 2022-04-13T16:39:11+08:00 Start to check the Checker configuration
[SUCC] 2022-04-13T16:39:11+08:00 The Checker pass the test.
[INFO] 2022-04-13T16:39:11+08:00 Start to check the Redis configuration
[INFO] 2022-04-13T16:39:12+08:00 create random redis password: bndlk8q9447tm3745h
[SUCC] 2022-04-13T16:39:14+08:00 The Redis pass the test.
[INFO] 2022-04-13T16:39:14+08:00 Start to check the Kafka configuration
[SUCC] 2022-04-13T16:39:14+08:00 The Kafka pass the test.
[INFO] 2022-04-13T16:39:14+08:00 Start to check the Mongodb configuration
[SUCC] 2022-04-13T16:39:14+08:00 The Mongodb pass the test.
[INFO] 2022-04-13T16:39:14+08:00 Start to check the Service Discovery configuration
[SUCC] 2022-04-13T16:39:14+08:00 The Service Discovery pass the test.
[INFO] 2022-04-13T16:39:14+08:00 Start to check the Manager configuration
[SUCC] 2022-04-13T16:39:14+08:00 The Manager pass the test.
[INFO] 2022-04-13T16:39:14+08:00 Start to check the Agent Center configuration
[SUCC] 2022-04-13T16:39:14+08:00 The Agent Center pass the test.
[INFO] 2022-04-13T16:39:14+08:00 Start to check the HUB configuration
[SUCC] 2022-04-13T16:39:14+08:00 The HUB pass the test.
[INFO] 2022-04-13T16:39:14+08:00 Start to check the Nginx configuration
[SUCC] 2022-04-13T16:39:14+08:00 The Nginx pass the test.
[INFO] 2022-04-13T16:39:14+08:00 Start to prepare the Checker extra configuration
[SUCC] 2022-04-13T16:39:14+08:00 The Checker pass the test.
[INFO] 2022-04-13T16:39:14+08:00 Start to prepare the Redis extra configuration
[SUCC] 2022-04-13T16:39:14+08:00 The Redis pass the test.
[INFO] 2022-04-13T16:39:14+08:00 Start to prepare the Kafka extra configuration
[SUCC] 2022-04-13T16:39:14+08:00 The Kafka pass the test.
[INFO] 2022-04-13T16:39:14+08:00 Start to prepare the Mongodb extra configuration
[INFO] 2022-04-13T16:39:15+08:00 Create Random 'admin' user Mongodb Password: k01i13051i6ko7l0is
[INFO] 2022-04-13T16:39:16+08:00 Create Random 'elkeid' user Mongodb Password: i1420l0n2nlr97bfi5
[SUCC] 2022-04-13T16:39:16+08:00 The Mongodb pass the test.
[INFO] 2022-04-13T16:39:16+08:00 Start to prepare the Service Discovery extra configuration
[INFO] 2022-04-13T16:39:16+08:00 Generate random AcKeys: 1d7lprc10tsfmo2b, mocckil7ei5eihp4ovqt68ocnkhsyai1
[INFO] 2022-04-13T16:39:16+08:00 Generate random MgKeys: l04mjf7eakdm43le, y9vwtb2x4gj0txcm69he9ooa5a3yzck1
[INFO] 2022-04-13T16:39:16+08:00 Generate random LeaderKeys: ye5kgu2fzczprsti, sxdz09fk0my0ybibcoxti6fdsko4jvf3
[SUCC] 2022-04-13T16:39:16+08:00 The Service Discovery pass the test.
[INFO] 2022-04-13T16:39:16+08:00 Start to prepare the Manager extra configuration
[INFO] 2022-04-13T16:39:17+08:00 Create Random Manger 'root' Password: t1s4t5r1q60sa6p228HO
[SUCC] 2022-04-13T16:39:17+08:00 The Manager pass the test.
[INFO] 2022-04-13T16:39:17+08:00 Start to prepare the Agent Center extra configuration
[SUCC] 2022-04-13T16:39:17+08:00 The Agent Center pass the test.
[INFO] 2022-04-13T16:39:17+08:00 Start to prepare the HUB extra configuration
[SUCC] 2022-04-13T16:39:17+08:00 The HUB pass the test.
[INFO] 2022-04-13T16:39:17+08:00 Start to prepare the Nginx extra configuration
[SUCC] 2022-04-13T16:39:17+08:00 The Nginx pass the test.
[INFO] 2022-04-13T16:39:17+08:00 Start PingCheck. This will take several minutes.
[INFO] 2022-04-13T16:39:17+08:00 --- Start to deploy Elkeid Backend ---
[INFO] 2022-04-13T16:39:17+08:00 Start to deploy the Checker
[INFO] 2022-04-13T16:39:18+08:00 pre check success in host: 192.168.101.97
[INFO] 2022-04-13T16:39:18+08:00 2022/04/13 16:39:18 /elkeid not exist, mkdir or make link
2022/04/13 16:39:18 fetch max mount point, mount at /, size 128G
2022/04/13 16:39:18 disk check done, mount at /, size is 128G, avail is 91.9G
[SUCC] 2022-04-13T16:39:21+08:00 Checker installation is complete.
[INFO] 2022-04-13T16:39:21+08:00 Start to deploy the Redis
[INFO] 2022-04-13T16:39:21+08:00 Redis will be installed at:
[INFO] 2022-04-13T16:39:21+08:00 192.168.101.97
[SUCC] 2022-04-13T16:39:27+08:00 Redis installation is complete.
[INFO] 2022-04-13T16:39:27+08:00 Start to deploy the Kafka
[INFO] 2022-04-13T16:39:27+08:00 Kafka will be installed at:
[INFO] 2022-04-13T16:39:27+08:00 192.168.101.97
[INFO] 2022-04-13T16:39:27+08:00 Create 'admin' for Kafka, Password: 'elkeid'
[SUCC] 2022-04-13T16:39:47+08:00 Kafka installation is complete.
[INFO] 2022-04-13T16:39:47+08:00 Start to deploy the Mongodb
[INFO] 2022-04-13T16:39:47+08:00 Mongodb will be installed at:
[INFO] 2022-04-13T16:39:47+08:00 192.168.101.97
[INFO] 2022-04-13T16:43:09+08:00 Now start restore DB, this will take several minutes.
[SUCC] 2022-04-13T16:43:10+08:00 Mongodb installation is complete.
[INFO] 2022-04-13T16:43:10+08:00 Start to deploy the Service Discovery
[INFO] 2022-04-13T16:43:10+08:00 Service Discovery will be installed at:
[INFO] 2022-04-13T16:43:10+08:00 192.168.101.97
[SUCC] 2022-04-13T16:43:17+08:00 Service Discovery installation is complete.
[INFO] 2022-04-13T16:43:17+08:00 Start to deploy the Manager
[INFO] 2022-04-13T16:43:17+08:00 Manager will be installed at:
[INFO] 2022-04-13T16:43:17+08:00 192.168.101.97
[SUCC] 2022-04-13T16:43:30+08:00 Manager installation is complete.
[INFO] 2022-04-13T16:43:30+08:00 Start to deploy the Agent Center
[INFO] 2022-04-13T16:43:30+08:00 Agent Center will be installed at:
[INFO] 2022-04-13T16:43:30+08:00 192.168.101.97
[SUCC] 2022-04-13T16:44:38+08:00 Agent Center installation is complete.
[INFO] 2022-04-13T16:44:38+08:00 Start to deploy the HUB
[INFO] 2022-04-13T16:44:38+08:00 192.168.101.97
[SUCC] 2022-04-13T16:45:05+08:00 HUB installation is complete.
[INFO] 2022-04-13T16:45:05+08:00 Start to deploy the Nginx
[INFO] 2022-04-13T16:45:05+08:00 Nginx will be installed at: 192.168.101.97
[INFO] 2022-04-13T16:45:19+08:00 Ngixn connect test successfully.
[SUCC] 2022-04-13T16:45:19+08:00 Nginx installation is complete.
[INFO] 2022-04-13T16:45:19+08:00 --- Elkeid Backend installation is complete ---
[WARN] 2022-04-13T16:45:19+08:00 The password file is in /root/.elkeidup/elkeid_passwd, please be sure to transfer, save and delete the file!当你看到上述信息输出时,代表以下组件部署成功。
- Redis
- Mongodb
- Kafka
- Zookeeper
- Nginx
- Elkeid Agent Center
- Elkeid Manager
- Elkeid Console
- Elkeid Service Discovery
- Elkeid HUB Community Version
备注:此处并未部署Agent,Agent需要单独编译部署。
备注:此处并未部署Agent,Agent需要单独编译部署。
5、验证部署是否成功
如何查看是否部署成功呢?
运行elkeidup status命令
root@haolipeng-OptiPlex-7090:/home/work# ./elkeidup status
[INFO]  2022-04-13T20:42:51+08:00   Used ElkeidUP home dir :/root/.elkeidup
[INFO]  2022-04-13T20:42:51+08:00   elkeid has been deployed, using config file: /root/.elkeidup/elkeid_server.yaml
[INFO]  2022-04-13T20:42:51+08:00   Start to check the Checker configuration
[SUCC]  2022-04-13T20:42:51+08:00   The Checker pass the test.
[INFO]  2022-04-13T20:42:51+08:00   Start to check the Redis configuration
[INFO]  2022-04-13T20:42:52+08:00   create random redis password: f9bd3tabl1h6sm54f0
[SUCC]  2022-04-13T20:42:54+08:00   The Redis pass the test.
[INFO]  2022-04-13T20:42:54+08:00   Start to check the Kafka configuration
[SUCC]  2022-04-13T20:42:54+08:00   The Kafka pass the test.
[INFO]  2022-04-13T20:42:54+08:00   Start to check the Mongodb configuration
[SUCC]  2022-04-13T20:42:54+08:00   The Mongodb pass the test.
[INFO]  2022-04-13T20:42:54+08:00   Start to check the Service Discovery configuration
[SUCC]  2022-04-13T20:42:54+08:00   The Service Discovery pass the test.
[INFO]  2022-04-13T20:42:54+08:00   Start to check the Manager configuration
[SUCC]  2022-04-13T20:42:54+08:00   The Manager pass the test.
[INFO]  2022-04-13T20:42:54+08:00   Start to check the Agent Center configuration
[SUCC]  2022-04-13T20:42:54+08:00   The Agent Center pass the test.
[INFO]  2022-04-13T20:42:54+08:00   Start to check the HUB configuration
[SUCC]  2022-04-13T20:42:54+08:00   The HUB pass the test.
[INFO]  2022-04-13T20:42:54+08:00   Start to check the Nginx configuration
[SUCC]  2022-04-13T20:42:54+08:00   The Nginx pass the test.
[WARN]  2022-04-13T20:42:54+08:00   The password file is in /root/.elkeidup/elkeid_passwd, please be sure to transfer, save and delete the file!
[INFO]  2022-04-13T20:42:54+08:00   Redis:
[SUCC]  2022-04-13T20:42:55+08:00       192.168.101.97 elkeid_redis active
[INFO]  2022-04-13T20:42:55+08:00   Mongodb:
[SUCC]  2022-04-13T20:42:55+08:00       192.168.101.97 elkeid_mongodb active
[INFO]  2022-04-13T20:42:55+08:00   Zookeeper:
[SUCC]  2022-04-13T20:42:55+08:00       192.168.101.97 elkeid_zk active
[INFO]  2022-04-13T20:42:55+08:00   Kafka:
[SUCC]  2022-04-13T20:42:56+08:00       192.168.101.97 elkeid_kafka active
[INFO]  2022-04-13T20:42:56+08:00   Nginx:
[SUCC]  2022-04-13T20:42:56+08:00       192.168.101.97 elkeid_nginx active
[INFO]  2022-04-13T20:42:56+08:00   Agent Center:
[SUCC]  2022-04-13T20:42:56+08:00       192.168.101.97 elkeid_ac active
[INFO]  2022-04-13T20:42:56+08:00   Agent Center:
[SUCC]  2022-04-13T20:42:56+08:00       192.168.101.97 elkeid_manager active
[INFO]  2022-04-13T20:42:56+08:00   Service Discovery:
[SUCC]  2022-04-13T20:42:57+08:00       192.168.101.97 elkeid_sd active
[SUCC]  2022-04-13T20:42:57+08:00       192.168.101.97 elkeid_hub active
[INFO]  2022-04-13T20:42:57+08:00   Nginx:
[SUCC]  2022-04-13T20:42:57+08:00       192.168.101.97 elkeid_nginx active
从上述信息得出,以下服务皆是active激活状态,此时除agent和driver外,其他组件都已部署完成。
查看部署过程成功后的用户名和密码
root@haolipeng-OptiPlex-7090:/home/work#cat /root/.elkeidup/elkeid_passwd
Redis: bndlk8q9447tm3745h
Mongodb: admin k01i13051i6ko7l0is
Mongodb: elkeid i1420l0n2nlr97bfi5
elkeid_console: root t1s4t5r1q60sa6p228HO
elkeid_kafka: 192.168.101.97:9092;
elkeid_console: http://192.168.101.97:8082 //重要!!!
kafka admin: elkeid
elkeid_service_discovery: 192.168.101.97:8089其中elkeid_console: root t1s4t5r1q60sa6p228HO很有用,稍后在登录web页面时会用到。
打开浏览器,访问 http://192.168.101.97:8082地址
通过查看你的elkeid_console的用户名和密码(本人的用户名为root,密码为t1s4t5r1q60sa6p228HO)
登录进去后web页面,登录成功后可看到如下板块。
分为安全概览、资产中心、告警处理、任务管理、用户管理、部署帮助板块。
安全概览:
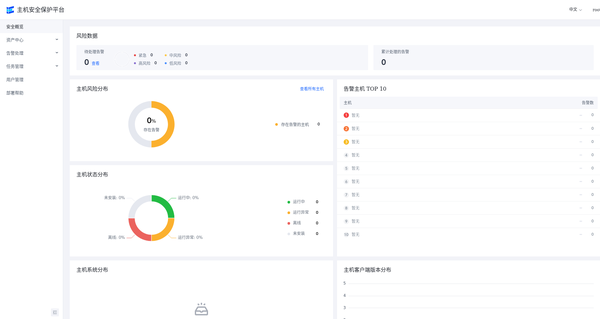

资产中心:


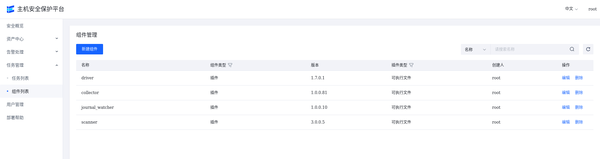
插件列表:

四、编译构建agent
查看自己的操作系统和内核版本是否被支持,请访问https://github.com/bytedance/Elkeid/blob/main/driver/ko_list.md
如果你的服务器在支持的驱动列表列表中,可直接下载对应的驱动ko文件。
我的ubuntu 20.04操作是不受支持的内核版本(也许以后会支持),所以我需要自己手动编译驱动。
0、编译Driver驱动
#下载代码后编译驱动
git clone https://github.com/bytedance/Elkeid.git
cd Elkeid/driver/LKM/
make clean && make
#加载驱动
insmod hids_driver.ko
#查看是否加载成功
dmesg | tail -n 20
#卸载驱动
rmmod hids_driver1、编译后,启动agent
为保证代码版本一致,请务必采用package_community目录下的agent源代码进行调试运行!
为保证代码版本一致,请务必采用package_community目录下的agent源代码进行调试运行!
为保证代码版本一致,请务必采用package_community目录下的agent源代码进行调试运行!
重要的话说三遍。
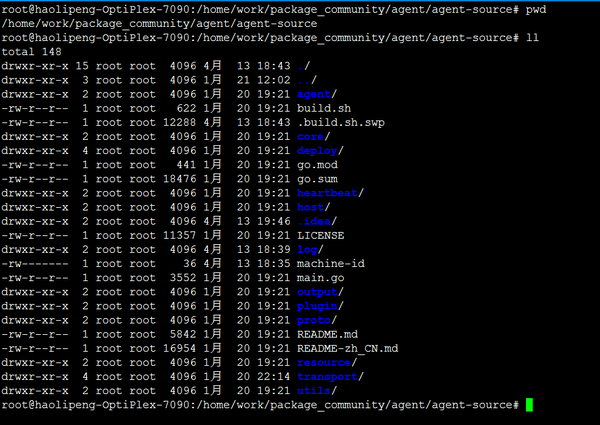

1) build.sh构建脚本(推荐)
build.sh位于package_community/agent/agent-source目录中
从build.sh文件中可知,其agent源代码的构建命令为
go build -tags product -ldflags "-X ${AGENT_PACKAGE}.Version=${BUILD_VERSION}" -o build/elkeid-agent2)Goland 编译启动
本人是采用jetbrains Goland启动并调试agent,所以需要设置下go build -tags product -ldflags参数。
然后你就可以愉快的debug 单步调试了,哈哈。
2、服务方式启动agent
./elkeidup agent build --package package_community/ 中间需要输出elkeid_console的密码!
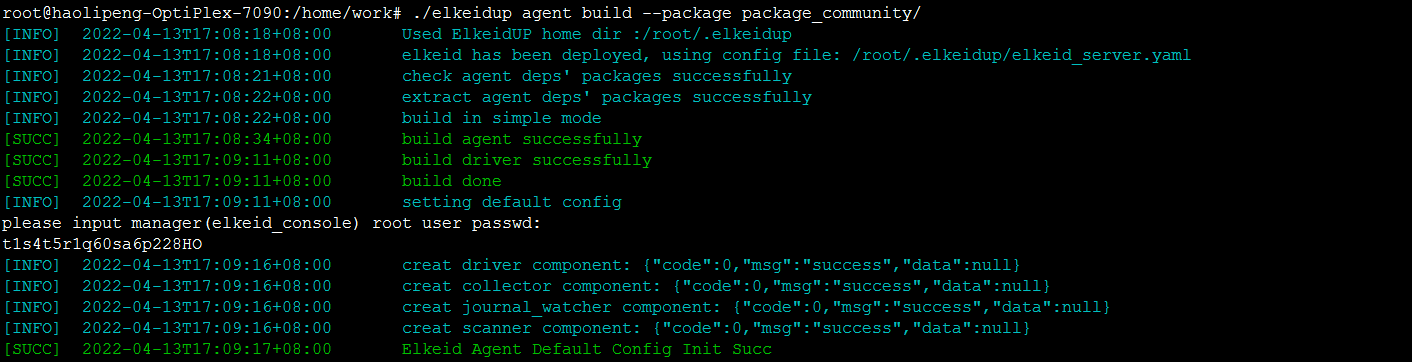

上述表示成功。
根据web页面的提示
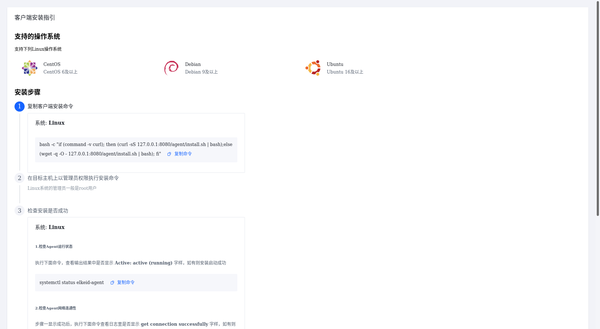

bash -c "if (command -v curl); then (curl -sS 192.168.101.97:8080/agent/install.sh | bash);else (wget -q -O - 192.168.101.97:8080/agent/install.sh | bash); fi"查看agent运行状态
systemctl status elkeid-agent五、常见疑难问题解答
1、采用elkeidup安装后的目录是哪里?
答:/elkeid
2、日志报错 transfer will shutdown because of no avaliable connections: no available region
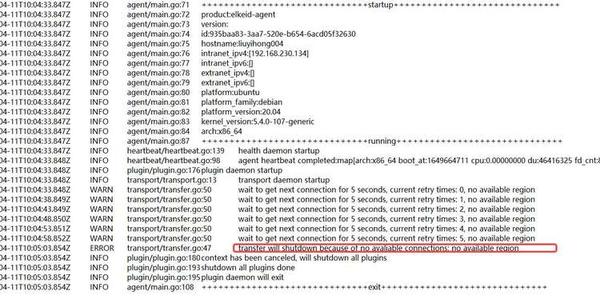

答:采用go build -tags product来构建agent程序
3、debug调试agent时,感觉行数有点对应不上,是怎么回事
答:编译时的代码,要和调试时的agent是同一份代码生成的(看似是废话,但是我躺坑了)
4、transport: authentication handshake failed: x509: certificate signed by unknown authority 错误
transport/transfer.go:47 transfer will shutdown because of no avaliable connections: context deadline exceeded: connection error: desc = "transport: authentication handshake failed: x509: certificate signed by unknown authority (possibly because of \"crypto/rsa: verification error\" while trying to verify candidate authority certificate \"elkeid@elkeid.com\")"
agent/transport/connection 目录中的ca.crt、client.key、client.crt分别是自签名的ca证书,客户端私钥,客户端证书,请与Server生成证书时一同替换修改。
将Agent的agent/transport/connection路径下安全证书(client.crt,client.key,ca.crt)替换为ElkeidUp工具生成的安全证书,位于部署机器的/elkeid/agent_center/cert目录下,相信聪明的你能很快找到并替换。
转载自:https://zhuanlan.zhihu.com/p/498091918


 1137
1137


 到【灌水乐园】发言


