


 这篇文章详细解析了Netty中ChannelPipeline的工作原理,包括事件的入站和出站处理流程,handler的添加顺序,以及Pipeline的双向链表结构。重点讲解了Head和Tail节点的作用,以及ChannelInitializer如何配置自定义pipeline。
netty 中每个 channel 都会绑定了一个 pipeline,当有入站事件或出站操作时,会由 pipeline 中的 handler 进行拦截处理。
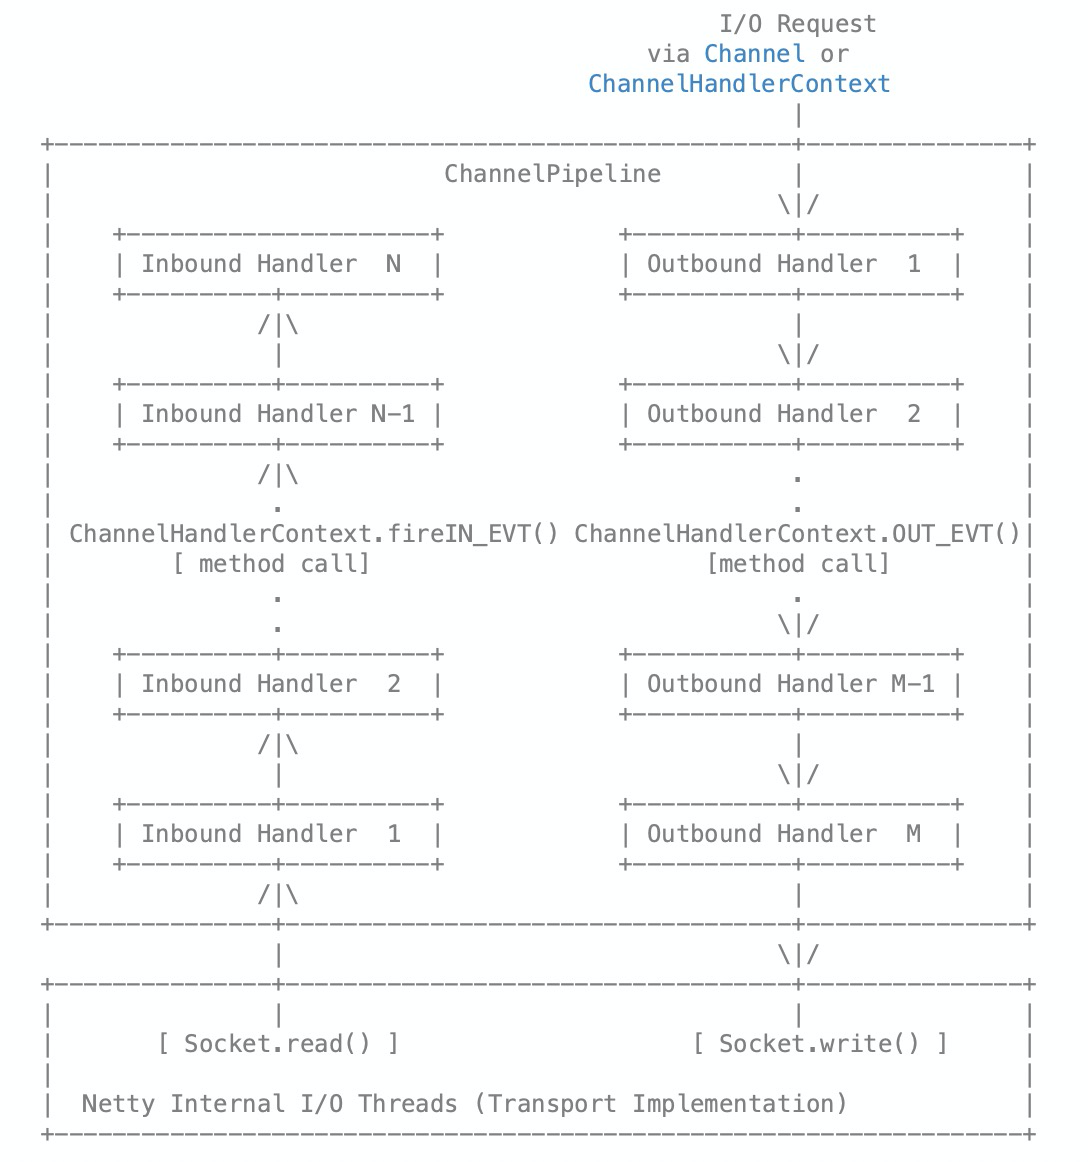
如上图所示,入站事件产生后,通过调用 ChannelHandlerContext.fireXXX API 在 Inbound Handler 链上向后传播,每个 handler 只处理自己关心的逻辑。
同样地,出站事件经 Outbound Handler 处理并向前传播,最终调用 socket 的 API 将数据发送出去
初识pipeline
一个 pipeline 上可以添加多个 handler。这些 handler 既可以是 Inbound Handler ,用于处理入站事件。也可以是 Outbound Handler,用于处理出站事件。还可以是两者的组合,既能处理入站事件,又能处理出站事件。通过组合不同的 handler 可以实现各种功能,例如 netty 的 example 里就有 http、http2、redis、telnet 等不同协议的 demo 供参考。
handler的处理顺序
对于如下的 pipeline 初始化代码
1 2 3 4 5 6 | ChannelPipeline} p = ...;
p.addLast("1", new InboundHandlerA());
p.addLast("2", new InboundHandlerB());
p.addLast("3", new OutboundHandlerA());
p.addLast("4", new OutboundHandlerB());
p.addLast("5", new InboundOutboundHandlerX());
|
当有入站事件时,会依次经过所有的 InbountHandler 处理,处理顺序如下:
InboundHandlerA ---> InboundHandlerB ---> InboundOutboundHandlerX
当有出站事件时,则会经过所有的 OutboundHandler 处理,处理的顺序相反
InboundOutboundHandlerX ---> OutboundHandlerB --> OutboundHandlerA
pipeline的结构
通过上面的说明,相信你已经对 pipeline 的结构有一些想法了,没错,它使用的是双向链表数据结构,用于维护 handler 节点的关系。实际上 pipeline 并没有将链表关系维护在 handler 中,那么它是怎么维护的呢?
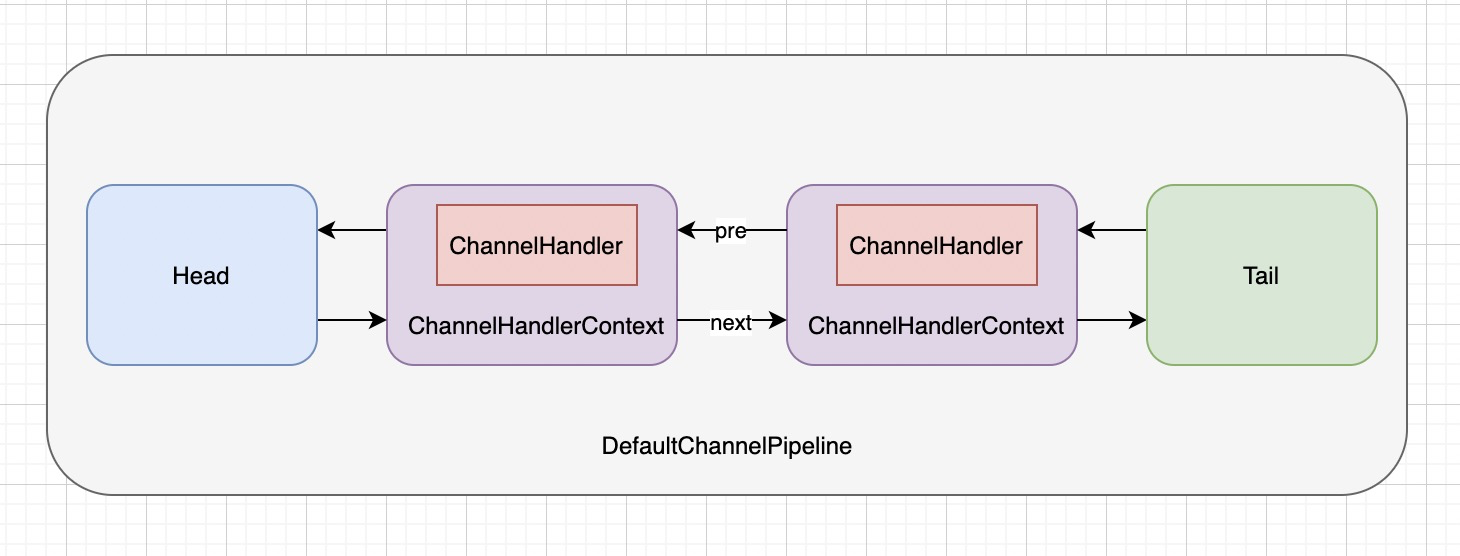
通过这张图可以更快地了解 pipeline 的结构,它是将链表关系维护在 ChannelHandlerContext 对象上的。
有两个比较特殊的节点: Head 和 Tail,它们分别是链表的头节点和尾结点,每个 pipeline 中至少存在这两个节点。它们内部并没有 handler,而是直接完成相应的功能。
1 2 | final AbstractChannelHandlerContext head; final AbstractChannelHandlerContext tail; |
当需要把一个 ChannelHandler 添加到 pipeline 时,并不能直接将其添加到链表中,而是先要通过 ChannelHandlerContext 进行封装,然后再调用 addLast、addFirst 等 API 添加到 pipeline 上。
1 2 3 4 5 6 7 8 9 10 11 12 13 14 15 16 17 18 19 20 21 22 23 24 25 26 27 28 29 30 | // DefaultChannelPipeline#addLast
public final ChannelPipeline addLast(EventExecutorGroup group, String name, ChannelHandler handler) {
final AbstractChannelHandlerContext newCtx;
synchronized (this) {
//忽略其他代码
// 封装为context
newCtx = newContext(group, filterName(name, handler), handler);
// 添加到队尾
addLast0(newCtx);
// 忽略
}
// 忽略
}
// DefaultChannelPipeline#newContext
private AbstractChannelHandlerContext newContext(EventExecutorGroup group, String name, ChannelHandler handler) {
return new DefaultChannelHandlerContext(this, childExecutor(group), name, handler);
}
// DefaultChannelPipeline#addLast0
private void addLast0(AbstractChannelHandlerContext newCtx) {
AbstractChannelHandlerContext prev = tail.prev;
newCtx.prev = prev;
newCtx.next = tail;
prev.next = newCtx;
tail.prev = newCtx;
}
|
HeadContext和TailContext
HeadContext 的类继承结构如下图所示
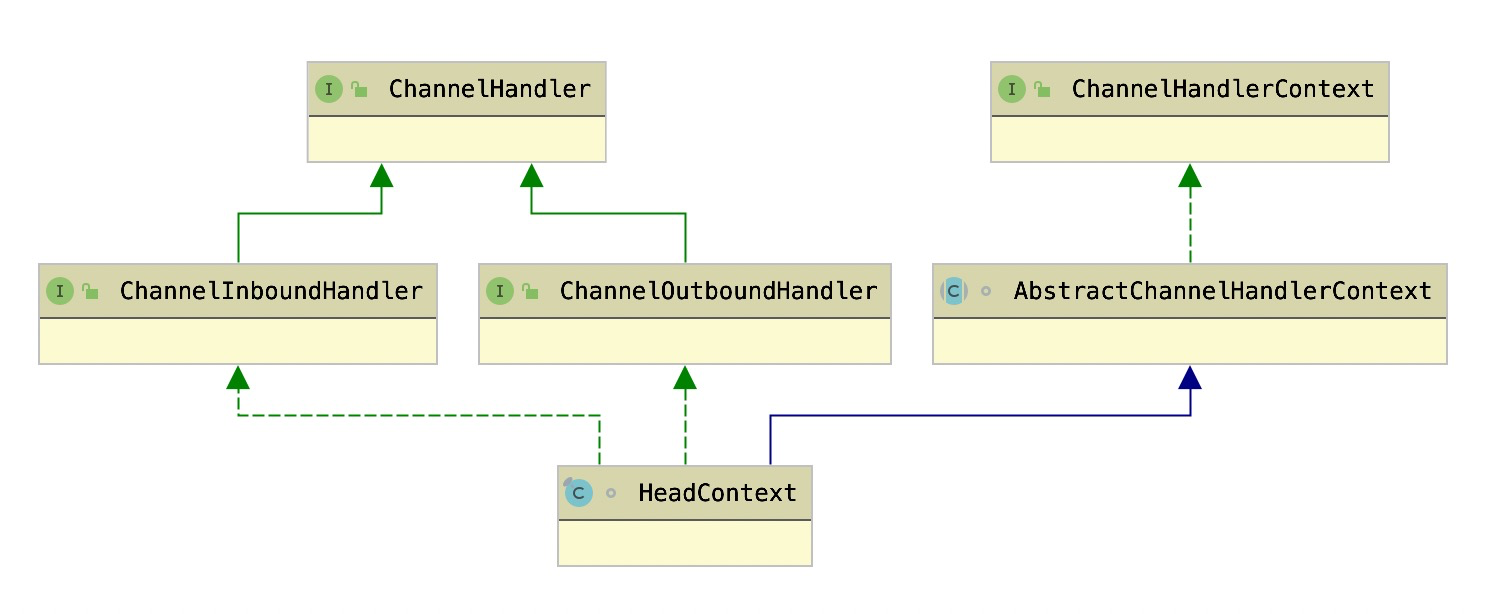
可以看到它同时实现了 ChannelInboundHandler 和 ChannelOutbountHandler 两个接口,说明它既要处理出站事件,又要处理入站事件
处理入站事件的代码如下
1 2 3 4 5 6 7 8 9 10 11 12 13 14 15 16 17 18 19 20 21 22 23 24 25 26 27 28 29 30 31 32 33 34 35 36 37 38 39 40 41 42 43 44 45 46 47 48 49 50 51 52 53 54 55 56 57 58 59 60 61 62 63 | @Override
public void channelRegistered(ChannelHandlerContext ctx) {
// 当channel注册好之后,调用该方法添加用户注册的handler
invokeHandlerAddedIfNeeded();
ctx.fireChannelRegistered();
}
@Override
public void channelUnregistered(ChannelHandlerContext ctx) {
// 向后传播事件
ctx.fireChannelUnregistered();
// Remove all handlers sequentially if channel is closed and unregistered.
if (!channel.isOpen()) {
destroy();
}
}
@Override
public void channelActive(ChannelHandlerContext ctx) {
// 向后传播事件
ctx.fireChannelActive();
readIfIsAutoRead();
}
@Override
public void channelInactive(ChannelHandlerContext ctx) {
// 向后传播事件
ctx.fireChannelInactive();
}
@Override
public void channelRead(ChannelHandlerContext ctx, Object msg) {
// 向后传播事件
ctx.fireChannelRead(msg);
}
@Override
public void channelReadComplete(ChannelHandlerContext ctx) {
// 向后传播事件
ctx.fireChannelReadComplete();
readIfIsAutoRead();
}
private void readIfIsAutoRead() {
if (channel.config().isAutoRead()) {
channel.read();
}
}
@Override
public void userEventTriggered(ChannelHandlerContext ctx, Object evt) {
// 向后传播事件
ctx.fireUserEventTriggered(evt);
}
@Override
public void channelWritabilityChanged(ChannelHandlerContext ctx) {
// 向后传播事件
ctx.fireChannelWritabilityChanged();
}
|
处理出站事件的代码如下
1 2 3 4 5 6 7 8 9 10 11 12 13 14 15 16 17 18 19 20 21 22 23 24 25 26 27 28 29 30 31 32 33 34 35 36 37 38 39 40 41 42 43 44 45 46 47 48 49 | @Override
public void bind(
ChannelHandlerContext ctx, SocketAddress localAddress, ChannelPromise promise) {
// channel绑定地址,用于server端
unsafe.bind(localAddress, promise);
}
@Override
public void connect(
ChannelHandlerContext ctx,
SocketAddress remoteAddress, SocketAddress localAddress,
ChannelPromise promise) {
// channel连接远程地址,用于client端
unsafe.connect(remoteAddress, localAddress, promise);
}
@Override
public void disconnect(ChannelHandlerContext ctx, ChannelPromise promise) {
// 断开连接,用于client端
unsafe.disconnect(promise);
}
@Override
public void close(ChannelHandlerContext ctx, ChannelPromise promise) {
// 关闭连接
unsafe.close(promise);
}
@Override
public void deregister(ChannelHandlerContext ctx, ChannelPromise promise) {
unsafe.deregister(promise);
}
@Override
public void read(ChannelHandlerContext ctx) {
unsafe.beginRead();
}
@Override
public void write(ChannelHandlerContext ctx, Object msg, ChannelPromise promise) {
// 输出数据导缓冲区
unsafe.write(msg, promise);
}
@Override
public void flush(ChannelHandlerContext ctx) {
// 将缓冲区的数据发送出去
unsafe.flush();
}
|
由于 head 是链表的头节点,出站事件最后都会经过该节点处理网络请求。HeadContext 将网络处理交给了 Unsafe 对象。Unsafe 封装了网络处理的功能,它与 Channel 类型相关联,依赖于底层的实现,例如 KQueueSocketChannel 对于的 Unsafe 实现是 KQueueSocketChannelUnsafe,而 NioSocketChannel 对于的 Unsafe 实现则是 NioSocketChannelUnsafe
TailContext 的类继承结构如下图所示
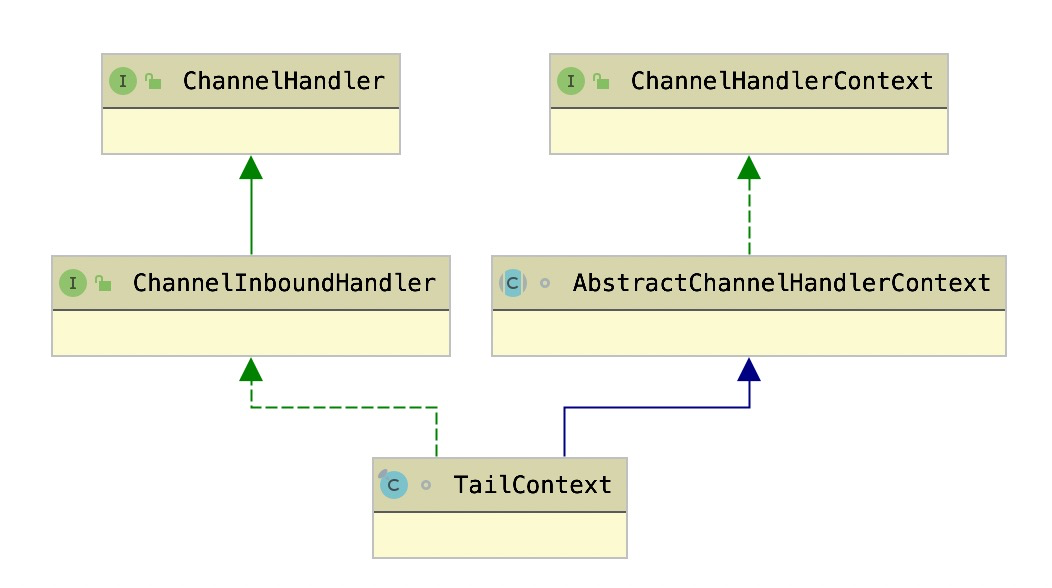
从图中可以看到,和 HeadContext 相比,TailContext 仅实现了 ChannelInboundHandler,也就是说它只处理入站事件。
1 2 3 4 5 6 7 8 9 10 11 12 13 14 15 16 17 18 19 20 21 22 23 24 25 26 27 28 29 30 31 32 33 34 35 36 37 38 39 40 41 42 43 44 45 46 | @Override
public void channelRegistered(ChannelHandlerContext ctx) { }
@Override
public void channelUnregistered(ChannelHandlerContext ctx) { }
@Override
public void channelActive(ChannelHandlerContext ctx) {
onUnhandledInboundChannelActive();
}
@Override
public void channelInactive(ChannelHandlerContext ctx) {
onUnhandledInboundChannelInactive();
}
@Override
public void channelWritabilityChanged(ChannelHandlerContext ctx) {
onUnhandledChannelWritabilityChanged();
}
@Override
public void handlerAdded(ChannelHandlerContext ctx) { }
@Override
public void handlerRemoved(ChannelHandlerContext ctx) { }
@Override
public void userEventTriggered(ChannelHandlerContext ctx, Object evt) {
onUnhandledInboundUserEventTriggered(evt);
}
@Override
public void exceptionCaught(ChannelHandlerContext ctx, Throwable cause) {
onUnhandledInboundException(cause);
}
@Override
public void channelRead(ChannelHandlerContext ctx, Object msg) {
onUnhandledInboundMessage(ctx, msg);
}
@Override
public void channelReadComplete(ChannelHandlerContext ctx) {
onUnhandledInboundChannelReadComplete();
}
|
由于 tail 已经是链表的尾部,所以对于入站事件来说,已经不需要再往后传播。因此,你可以看到 TailContext 的事件处理为空或者仅进行必要的处理,并且不会调用 ctx.fireXXX 方法
pipeline的初始化
通过 ChannelInitializer 可以配置 pipeline 上的 handler。例如要添加一个 EchoServerHandler,可以通过如下代码实现
1 2 3 4 5 6 7 8 9 10 | ServerBootstrap bootstrap = new ServerBootstrap();
bootstrap.group(eventLoopGroup)
.channel(NioServerSocketChannel.class)
.childHandler(new ChannelInitializer<SocketChannel>() {
@Override
protected void initChannel(SocketChannel ch) throws Exception {
// 获取pipeline,添加EchoServerHandler
ch.pipeline().addLast(new EchoServerHandler());
}
});
|
ChannelInitializer 本质上是 ChannelHandler,因此可以添加到 pipeline 上。它提供了一个 initChannel 方法,当 channel 注册好之后会调用该方法,并且只会调用一次,然后 ChannelInitializer 本身会从 pipeline 上移除。在 ChannelInitializer 的 initChannel 方法内对 pipeline 进行配置,就可以实现自定义 pipeline 的目的。
netty 内部也会用到这个机制,例如 ServerBootstrap 在初始化 channel 时,也会通过 ChannelInitializer 往 pipeline 添加特殊的 handler
1 2 3 4 5 6 7 8 9 10 11 12 13 14 15 16 17 18 19 | // ServerBootstrap#init(Channel channel)
p.addLast(new ChannelInitializer<Channel>() {
@Override
public void initChannel(final Channel ch) {
final ChannelPipeline pipeline = ch.pipeline();
ChannelHandler handler = config.handler();
if (handler != null) {
pipeline.addLast(handler);
}
ch.eventLoop().execute(new Runnable() {
@Override
public void run() {
pipeline.addLast(new ServerBootstrapAcceptor(
ch, currentChildGroup, currentChildHandler, currentChildOptions, currentChildAttrs));
}
});
}
});
|
ChannelInitializer是如何生效的?
前面提到,handler 需要封装成 AbstractChannelHandlerContext 之后再添加到 pipeline。当添加 handler 到 pipeline 时,如果 channel 还未注册好,则会调用 callHandlerCallbackLater 方法添加 callBack Task
1 2 3 4 5 6 7 8 9 10 11 12 13 14 15 16 17 18 19 20 21 | // DefaultChannelPipeline#addLast
public final ChannelPipeline addLast(EventExecutorGroup group, String name, ChannelHandler handler) {
final AbstractChannelHandlerContext newCtx;
synchronized (this) {
// 忽略其他代码
newCtx = newContext(group, filterName(name, handler), handler);
addLast0(newCtx);
if (!registered) {
newCtx.setAddPending();
// channel还未注册时,会调用该方法添加 callBack Task
// 注意第二个参数为true
callHandlerCallbackLater(newCtx, true);
return this;
}
// 忽略其他方法
}
// 忽略其他方法
}
|
callHandlerCallbackLater 的实现如下:
1 2 3 4 5 6 7 8 9 10 11 12 13 14 15 16 17 | // DefaultChannelPipeline#callHandlerCallbackLater
private void callHandlerCallbackLater(AbstractChannelHandlerContext ctx, boolean added) {
assert !registered;
// 当added = true时,添加PendingHandlerAddedTask到队尾
PendingHandlerCallback task = added ? new PendingHandlerAddedTask(ctx) : new PendingHandlerRemovedTask(ctx);
PendingHandlerCallback pending = pendingHandlerCallbackHead;
if (pending == null) {
pendingHandlerCallbackHead = task;
} else {
// Find the tail of the linked-list.
while (pending.next != null) {
pending = pending.next;
}
pending.next = task;
}
}
|
它会往 DefaultChannelPipeline 中添加 PendingHandlerCallback,PendingHandlerCallback 以链表形式组织,每次往队尾添加。
当 channel 注册到 selector 上之后,netty 会将 registered 变量设置为 true,表示已完成注册。之后会调用 pipeline 的 invokeHandlerAddedIfNeeded 方法。
需要注意的是:register0 是在 EventLoop 中执行的,也就意味着下面的代码都是在 EventLoop 中执行的。此外这里的 registered 变量定义如下
1 | private volatile boolean registered; |
它是在 AbstractChannel 中定义的
接着跟进 invokeHandlerAddedIfNeeded 查看其代码实现
1 2 3 4 5 6 7 8 9 10 11 12 13 14 15 16 17 18 19 20 21 22 23 24 25 26 27 28 29 30 31 32 33 34 35 | // DefaultChannelPipeline#invokeHandlerAddedIfNeeded
final void invokeHandlerAddedIfNeeded() {
assert channel.eventLoop().inEventLoop();
if (firstRegistration) {
firstRegistration = false;
// We are now registered to the EventLoop. It's time to call the callbacks for the ChannelHandlers,
// that were added before the registration was done.
callHandlerAddedForAllHandlers();
}
}
// DefaultChannelPipeline#callHandlerAddedForAllHandlers
private void callHandlerAddedForAllHandlers() {
final PendingHandlerCallback pendingHandlerCallbackHead;
synchronized (this) {
assert !registered;
// This Channel itself was registered.
// 注意这个registered是在DefaultChannelPipeline中定义的
registered = true;
pendingHandlerCallbackHead = this.pendingHandlerCallbackHead;
// Null out so it can be GC'ed.
this.pendingHandlerCallbackHead = null;
}
// This must happen outside of the synchronized(...) block as otherwise handlerAdded(...) may be called while
// holding the lock and so produce a deadlock if handlerAdded(...) will try to add another handler from outside
// the EventLoop.
PendingHandlerCallback task = pendingHandlerCallbackHead;
while (task != null) {
task.execute();
task = task.next;
}
}
|
上面这段代码比较容易理解,就是在 EventLoop 线程中依次执行所有的 PendingHandlerCallback,执行的顺序与添加的顺序保持一致
ChannelInitializer与childHandler
回顾前面提到的 pipeline 初始化代码,注意这一行
1 | .childHandler(new ChannelInitializer<SocketChannel>() {
|
childHandler 是 ServerBootstrap 的一个属性
1 | private volatile ChannelHandler childHandler; |
此外 ServerBootstrap 的父类 AbstractBootstrap 中还有一个类似属性
1 | private volatile ChannelHandler handler; |
这两个属性分别用于配置 SocketChannel 和 ServerSocketChannel 上绑定的 pipeline
如下图所示,假如一个 netty server 的 channel 配置为 NioServerSocketChannel,当接收到客户端的一个连接请求时,它会创建一个 NioSocketChannel 从而与客户端建立连接并处理后续请求。NioServerSocketChannel 和 NioSocketChannel 上分别会绑定自己的 pipeline,用于对入站、出站事件进行定制处理。
要定制 NioServerSocketChannel 上的 pipeline,可通过为 ServerBootstrap 的 handler 属性设置一个自定义的 ChannelInitializer 来实现。
类似地,可为 ServerBootstrap 的 childHandler 属性设置一个自定义的 ChannelInitializer ,从而对 NioSocketChannel 上的 pipeline 进行定制

handler与childHandler是何时添加到pipeline上的?
ServerBootstrap 的 init 方法用于初始化 channel,在它的最后会调用 pipeline.addLast 方法添加一个 ChannelInitializer。因为此时 SocketChannel 还未注册,所以会先将 ChannelInitializer 封装到PendingHandlerAddedTask 中,待 SocketChannel 注册好之后再调用其 initChannel 方法完成 pipeline 的初始化
1 2 3 4 5 6 7 8 9 10 11 12 13 14 15 16 17 18 19 20 21 22 23 24 | // ServerBootstrap#init(Channel channel)
// 因为此时channel还未注册,所以会先将ChannelInitializer封装到PendingHandlerAddedTask中
// 待channel注册好之后再调用其initChannel方法完成pipeline的初始化
p.addLast(new ChannelInitializer<Channel>() {
@Override
public void initChannel(final Channel ch) {
final ChannelPipeline pipeline = ch.pipeline();
ChannelHandler handler = config.handler();
if (handler != null) {
// 往ServerSocketChannel的pipeline上添加handler
pipeline.addLast(handler);
}
ch.eventLoop().execute(new Runnable() {
@Override
public void run() {
// 在bind之前添加acceptor,用于接收连接请求
// 注意这里把childHandler作为参数传了进去
pipeline.addLast(new ServerBootstrapAcceptor(
ch, currentChildGroup, currentChildHandler, currentChildOptions, currentChildAttrs));
}
});
}
});
|
这里的 initChannel 实现共完成了两个功能:
- 将
ServerBootstrap的 handler 添加到 pipeline 上 - 往 eventLoop 上添加任务,用于往 pipeline 上添加
ServerBootstrapAcceptor
这也就说明,对于 ServerBootstrap 的 handler 属性,它是在 ServerSocketChannel 完成注册后添加到 pipeline 上的。
对于 childHandler 属性,它是当 server 接收到客户端的连接请求并创建好 SocketChannel 时,由 ServerBootstrapAcceptor 添加到 pipeline 上的
1 2 3 4 5 6 7 8 9 10 11 12 13 14 15 16 17 18 19 20 21 22 23 | // ServerBootstrap$ServerBootstrapAcceptor#channelRead
public void channelRead(ChannelHandlerContext ctx, Object msg) {
final Channel child = (Channel) msg;
// 添加到SocketChannel的pipeline上
child.pipeline().addLast(childHandler);
setChannelOptions(child, childOptions, logger);
setAttributes(child, childAttrs);
try {
childGroup.register(child).addListener(new ChannelFutureListener() {
@Override
public void operationComplete(ChannelFuture future) throws Exception {
if (!future.isSuccess()) {
forceClose(child, future.cause());
}
}
});
} catch (Throwable t) {
forceClose(child, t);
}
}
|
此时的调用栈如下图所示

入站事件和出站事件是如何传播的?
入站事件和出站事件在 pipeline 上的传播,由各个 ChannelInboundHandler 或 ChannelOuboundHandler 对事件进行处理,那么它们都是如何传播和处理的呢?
出站事件的传播
出站事件从 tail 向前传播,最终由 head 处理。
Tail -> outboundHandler1 -> outboundHandler2 -> ... -> Head
以 channel.bind 操作为例,它用于绑定 socket 监听的地址和端口,进而完成 server 的启动。它的执行流程如下图所示,我们重点关注对 ChannelHandlerContext 的调用
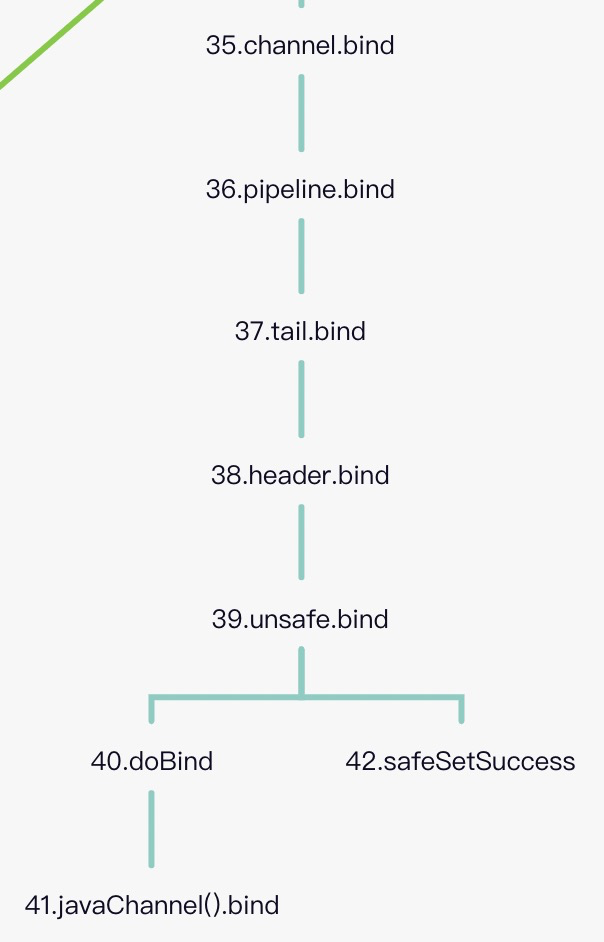
DefaultChannelPipeline 将 bind 操作直接交给 tail 处理
1 2 3 4 | // DefaultChannelPipeline#bind
public final ChannelFuture bind(SocketAddress localAddress, ChannelPromise promise) {
return tail.bind(localAddress, promise);
}
|
TailContext 并未重写 bind 方法,因此是调用其父类 AbstractChannelHandlerContext 的 bind 方法。相关代码如下
1 2 3 4 5 6 7 8 9 10 11 12 13 14 15 16 17 18 19 20 21 22 23 24 25 | // AbstractChannelHandlerContext#bind
public ChannelFuture bind(final SocketAddress localAddress, final ChannelPromise promise) {
ObjectUtil.checkNotNull(localAddress, "localAddress");
if (isNotValidPromise(promise, false)) {
// cancelled
return promise;
}
// 查找下一个实现了bind方法的outboundHandler
final AbstractChannelHandlerContext next = findContextOutbound(MASK_BIND);
EventExecutor executor = next.executor();
if (executor.inEventLoop()) {
// 调用其bind方法
next.invokeBind(localAddress, promise);
} else {
safeExecute(executor, new Runnable() {
@Override
public void run() {
next.invokeBind(localAddress, promise);
}
}, promise, null, false);
}
return promise;
}
|
这段代码的核心功能是向前查找下一个带 bind 方法的 outboundHandler,然后调用其 bind 方法。这里最终会调用到 HeadContext 的 bind 方法,HeadContext 负责与外部的交互
1 2 3 4 | public void bind(
ChannelHandlerContext ctx, SocketAddress localAddress, ChannelPromise promise) {
unsafe.bind(localAddress, promise);
}
|
当然 HeadContext 并不会直接操作 socket,而是交个 Unsafe 类进行处理,这里涉及到底层的 socket bind 操作,就不再展开了。
入站事件的传播
和出站事件相反,入站事件从 head 向 tail 传播。
Head -> inboundHandler1 -> inboundHandler2 -> ... -> Tail
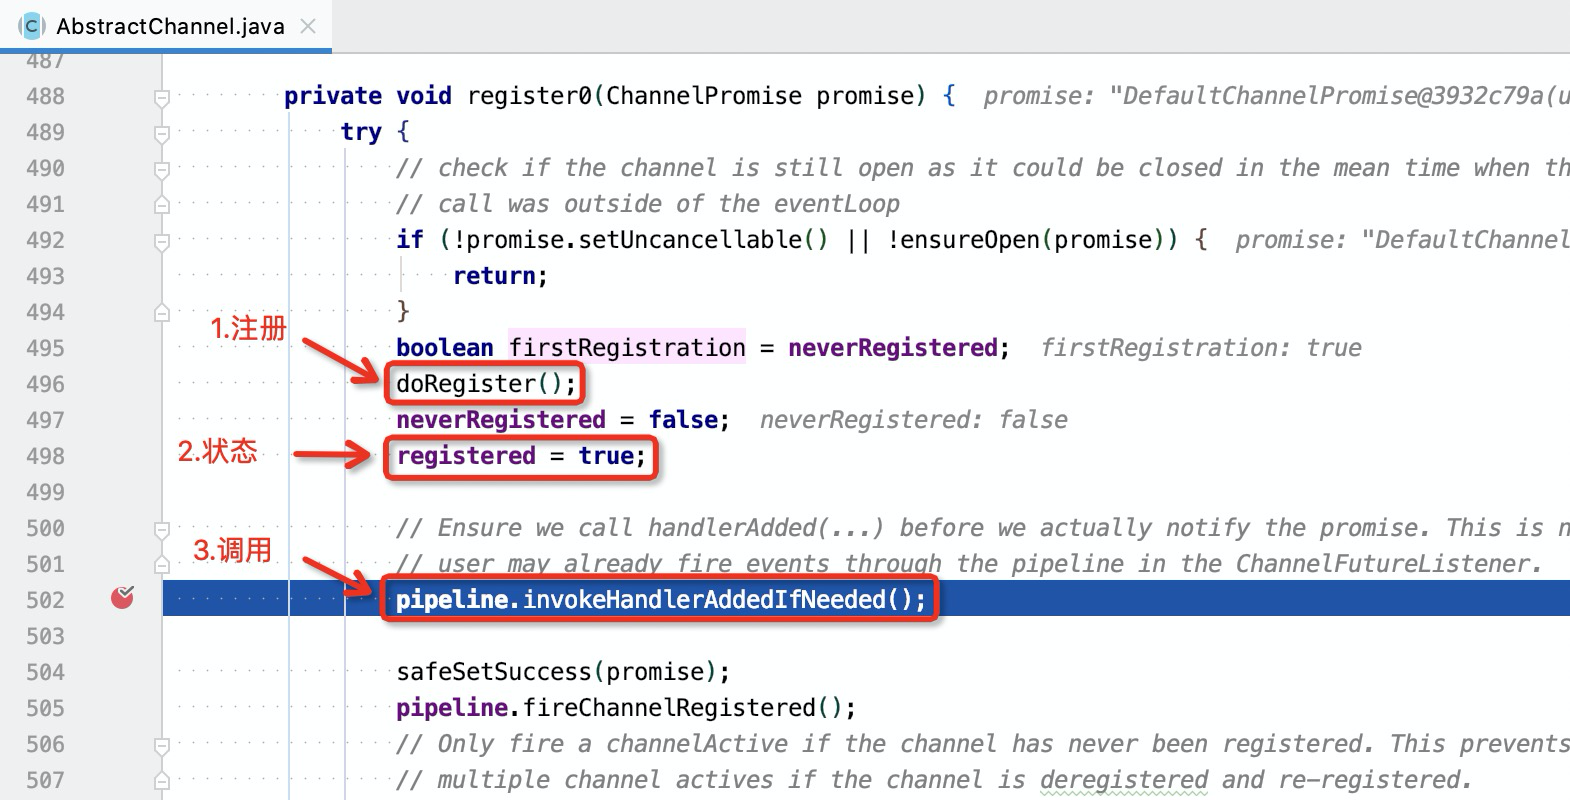
以 channel.register 操作为例,它用于完成注册操作。如下是 AbstractChannel 的 register0 方法的部分代码
1 2 3 4 5 6 7 8 9 10 11 12 13 14 15 16 17 18 19 20 21 22 23 | private void register0(ChannelPromise promise) {
try {
// 忽略
// 完成注册
doRegister();
// 调用callback task添加handler
pipeline.invokeHandlerAddedIfNeeded();
safeSetSuccess(promise);
// 在pipeline上传播注册完成事件
pipeline.fireChannelRegistered();
// 忽略
} catch (Throwable t) {
// Close the channel directly to avoid FD leak.
closeForcibly();
closeFuture.setClosed();
safeSetFailure(promise, t);
}
}
|
注意 pipeline.fireChannelRegistered() 这行代码,它触发了 ChannelRegistered 事件在 pipeline 上的传播
1 2 3 4 5 6 | // DefaultChannelPipeline#fireChannelRegistered
public final ChannelPipeline fireChannelRegistered() {
// 入参为HeadContext
AbstractChannelHandlerContext.invokeChannelRegistered(head);
return this;
}
|
可以看出它是从 head 开始传播的。其调用栈如下:
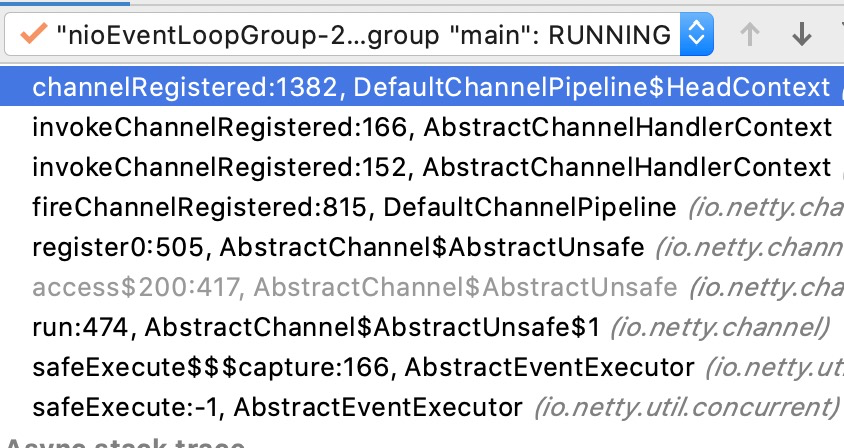
HeadContext 的 channelRegistered 方法实现如下,它会调用 ChannelHandlerContext 的 fireChannelRegistered 方法传播 ChannelRegistered 事件
1 2 3 4 5 6 7 8 9 10 11 | // DefaultChannelPipeline$HeadContext#channelRegistered
public void channelRegistered(ChannelHandlerContext ctx) {
invokeHandlerAddedIfNeeded();
ctx.fireChannelRegistered();
}
// AbstractChannelHandlerContext#fireChannelRegistered
public ChannelHandlerContext fireChannelRegistered() {
invokeChannelRegistered(findContextInbound(MASK_CHANNEL_REGISTERED));
return this;
}
|
fireChannelRegistered 会向后查找带有 channelRegistered 方法的 InboundHandler,然后调用其 channelRegistered 方法
- 本文作者: gorden5566
- 本文链接: netty的ChannelPipeline是如何工作的? - gorden5566
- 版权声明: 本博客所有文章除特别声明外,均采用 BY-NC-SA 许可协议。转载请注明出处!


 266
266

 被折叠的 条评论
为什么被折叠?
被折叠的 条评论
为什么被折叠?
 到【灌水乐园】发言


