


今天做了个桌面小插件,在此记录,以便以后查阅。
以下内容,在此博客基础上修改而来,http://blog.csdn.net/liushuaikobe/article/details/7235233。
先上个图,有图有真相:
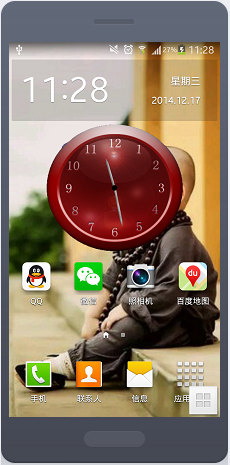
中间这个红色的小时钟就是要实现的效果。
接下来,看下我们的布局文件:
<?xml version="1.0" encoding="utf-8"?>
<RelativeLayout xmlns:android="http://schemas.android.com/apk/res/android"
    android:id="@+id/RelativeLayout1"
    android:layout_width="wrap_content"
    android:layout_height="wrap_content"
    android:background="@drawable/clockmain"
    android:orientation="horizontal" >


    <ImageView
        android:id="@+id/img_h"
        android:layout_width="wrap_content"
        android:layout_height="wrap_content"
        android:layout_centerHorizontal="true"
        android:layout_centerVertical="true"
        android:src="@drawable/clockh" />

    <ImageView
        android:id="@+id/img_m"
        android:layout_width="wrap_content"
        android:layout_height="wrap_content"
        android:layout_centerHorizontal="true"
        android:layout_centerVertical="true"
        android:src="@drawable/clockmin" />
 <ImageView
        android:id="@+id/img_dot"
        android:layout_width="wrap_content"
        android:layout_height="wrap_content"
        android:layout_centerHorizontal="true"
        android:layout_centerVertical="true"
        android:src="@drawable/clockdot" />
</RelativeLayout>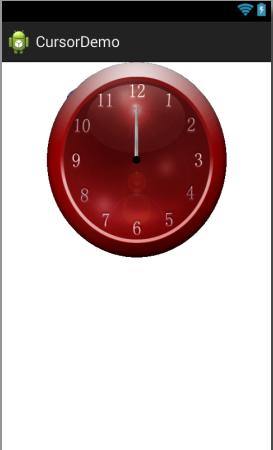
接下来,我们看下AppWidgetProvider这个类,这个类很关键,你在写桌面小控件时只需继承这个类就行。继承了AppWidgetProvider类之后,你可以根据自己的需要覆盖它的不同的生命周期的方法,来达到自己的目的。AppWidgetProvider类的主要提供如下不同生命周期的方法:
void onUpdate(Context context, AppWidgetManager appWidgetManager,int[] appWidgetIds) { }
// 这个方法字面意思是负责更新桌面小控件,只有在小控件被用户放到桌面上时被调用了一次,读者可以自己通过输出Log来测试
// 实现桌面控件是通常都会考虑重写该方法

void onDeleted(Context context, int[] appWidgetIds)
// 在小控件被删除时调用该方法
<pre name="code" class="java">package com.example.desk;

import android.appwidget.AppWidgetManager;
import android.appwidget.AppWidgetProvider;
import android.content.Context;
import android.content.Intent;
import android.util.Log;
import android.app.*;
public class DesktopClock extends AppWidgetProvider {

	@Override
	public void onUpdate(Context context, AppWidgetManager appWidgetManager,
			int[] appWidgetIds) {
		Log.e("appwidget", "--update--");
		// 启动刷新UI的Service
		Intent intent = new Intent(context, UpdateUIService.class);
		context.startService(intent);
	}

	@Override
	public void onDeleted(Context context, int[] appWidgetIds) {
		super.onDeleted(context, appWidgetIds);
		Log.e("appwidget", "--deleted--");
		Intent intent = new Intent(context, UpdateUIService.class);
		context.stopService(intent);
	}

	@Override
	public void onDisabled(Context context) {
		super.onDisabled(context);
		Log.e("aa","onDisabled");
		// 停止数据刷新服务
		Intent intent = new Intent(context, UpdateUIService.class);
		context.stopService(intent);
	}

	@Override
	public void onEnabled(Context context) {
		super.onEnabled(context);
		Log.e("aa","onEnabled");
		// 开启数据刷新服务
		Intent intent = new Intent(context, UpdateUIService.class);
		context.startService(intent);
	}

}
UpdateUIService.java 这个类继承自Service类,是一个后台运行的服务,它的主要职责是在它里面有一个动态注册的BroadcastReceiver的实例(也即调用了Context里面的registerReceiver( )方法注册的一个BroadcastReceiver的实例,而不是在xml中注册),负责监听系统的时间变化的广播,然后更新小控件的UI。
还有一点要注意的是,读者可能会有这样的疑问,不是说AppWidgetProvider本身就是一个BroadcastReceiver吗,为什么不让它直接监听系统的时间变化的广播呢?注意,虽然AppWidgetProvider本身就是一个BroadcastReceiver,但是它是一个“分化”了的BroadcastReceiver,不能再监听其它的系统广播了。一般的BroadcastReceiver是这样的:每次系统的Broadcast事件发生后,系统就会创建对应的BroadcastReceiver的实例,并自动触发它的onReceive( )方法,onReceive( )执行完后,BroadcastReceiver的实例就会被销毁。但是这个“分化”了的BroadcastReceiver——AppWidgetProvider显然做不到这样,也即系统尝试再创建它的实例时会发生异常,因此不能用它之间监听系统的Broadcast了。
那我为什么不在AppWidgetProvider里面新动态注册一个BroadcastReceiver,而是要新开一个Service呢?笔者也曾经尝试过这样做,但是当调用registerReceiver( )方法时编译通不过,此外,如果不在AppWidgetProvider里面新开一个Service,AppWidgetProvider并不是会一直在后台运行的,执行完onUpdate方法后就会退出执行,因此最好的方法就是在onUpdate里面新开一个Service。
<pre name="code" class="java">package com.example.desk;

import java.util.Date;
import java.util.Timer;
import java.util.TimerTask;

import android.app.Service;
import android.appwidget.AppWidgetManager;
import android.content.BroadcastReceiver;
import android.content.ComponentName;
import android.content.Context;
import android.content.Intent;
import android.graphics.Bitmap;
import android.graphics.BitmapFactory;
import android.graphics.Matrix;
import android.os.IBinder;
import android.util.Log;
import android.widget.RemoteViews;

import com.example.cursordemo.R;

public class UpdateUIService extends Service {

	private Timer timer;
	private TimerTask task;
	private AppWidgetManager awm;

	// 覆盖基类的抽象方法
	@Override
	public IBinder onBind(Intent intent) {
		return null;
	}

	// 在本服务创建时将监听系统时间的BroadcastReceiver注册
	@Override
	public void onCreate() {
		super.onCreate();
		Log.e("service", "--service created--");
		startTimer();
	}

	@Override
	public int onStartCommand(Intent intent, int flags, int startId) {
		Log.e("service", "--service started--");
		return START_STICKY;
	}

	// 在服务停止时解注册BroadcastReceiver
	@Override
	public void onDestroy() {
		super.onDestroy();
		stopTimer();
	}

	private void stopTimer() {
		if (timer != null && task != null) {
			timer.cancel();
			task.cancel();
			task = null;
			timer = null;
		}
	}

	// 用于监听系统时间变化Intent.ACTION_TIME_TICK的BroadcastReceiver,此BroadcastReceiver须为动态注册
	private BroadcastReceiver boroadcastReceiver = new BroadcastReceiver() {
		@Override
		public void onReceive(Context acontext, Intent intent) {
		}
	};

	private void startTimer() {
		if (timer == null && task == null) {
			awm = AppWidgetManager.getInstance(this);
			timer = new Timer();
			task = new TimerTask() {

				@Override
				public void run() {
					ComponentName provider = new ComponentName(
							UpdateUIService.this, DesktopClock.class);
					RemoteViews views = new RemoteViews(getPackageName(),
							R.layout.desktop);
					Date dates = new Date();
					int hour = dates.getHours();
					int min = dates.getMinutes();
					int second = dates.getSeconds();
					Bitmap bitmapH = getBitmap(UpdateUIService.this, hour, min, R.drawable.clockh);
					Bitmap bitmapM = getBitmaps(UpdateUIService.this, min, R.drawable.clockmin);
					Bitmap bitmapS = getBitmaps(UpdateUIService.this, second, R.drawable.clocks);
					if (bitmapH != null)
						views.setImageViewBitmap(R.id.img_h, bitmapH);
					if (bitmapM != null)
						views.setImageViewBitmap(R.id.img_m, bitmapM);
					if (bitmapS != null)
						views.setImageViewBitmap(R.id.img_s, bitmapS);
					views.setImageViewResource(R.id.img_dot, R.drawable.clockdot);
					bitmapH = null;
					bitmapM = null;
					bitmapS = null;
					Log.e("time", hour + ":" + min+":"+second);
					awm.updateAppWidget(provider, views);
					System.out.println("====刷新了widget====");
				}
			};
			timer.schedule(task, 0, 1000);
		}
	}


	private Bitmap getBitmap(Context context, int angle, int min, int id) {
		// 加载需要操作的图片,这里是eoeAndroid的logo图片
		Bitmap bitmapOrg = BitmapFactory.decodeResource(context.getResources(),
				id);
		// 获取这个图片的宽和高
		int width = bitmapOrg.getWidth();
		int height = bitmapOrg.getHeight();
		Log.v("A", "width=" + width);
		Log.v("A", "height=" + height);
		Log.v("A", "angle=" + angle);
		// 创建操作图片用的matrix对象
		Matrix matrix = new Matrix();
		float otherAngle = min / 60f * 30;
		// 旋转图片 动作
		matrix.postRotate(360 / 12 * angle + otherAngle);
		// 创建新的图片
		Bitmap resizedBitmap = Bitmap.createBitmap(bitmapOrg, 0, 0, width,
				height, matrix, true);
		bitmapOrg = null;
		return resizedBitmap;

	}

	private Bitmap getBitmaps(Context context, int angle, int id) {
		Bitmap bitmapOrg = BitmapFactory.decodeResource(context.getResources(),
				id);
		int width = bitmapOrg.getWidth();
		int height = bitmapOrg.getHeight();
		Matrix matrix = new Matrix();
		matrix.postRotate(360 / 60 * angle);
		Bitmap resizedBitmap = Bitmap.createBitmap(bitmapOrg, 0, 0, width,
				height, matrix, true);
		bitmapOrg = null;
		return resizedBitmap;
	}

}
AndroidManifest.xml:
<?xml version="1.0" encoding="utf-8"?>
<manifest xmlns:android="http://schemas.android.com/apk/res/android"
    package="org.ls"
    android:versionCode="1"
    android:versionName="1.0" >

    <uses-sdk android:minSdkVersion="10" />

    <application
        android:icon="@drawable/ic_launcher"
        android:label="@string/app_name" >

        <receiver android:name=".DesktopClock"
			android:label="@string/app_name">

			<intent-filter>
				<action android:name="android.appwidget.action.APPWIDGET_UPDATE" />
				<category android:name="android.intent.category.DEFAULT" />
			</intent-filter>

			<meta-data android:name="android.appwidget.provider"
				android:resource="@xml/appwidget_provider" />

		</receiver>

        <service android:name=".UpdateUIService" >

        </service>

    </application>

</manifest>
用于配置时钟小控件属性的appwidget_provider.xml(在 AndroidManifest.xml中被引用):
<pre name="code" class="html"><?xml version="1.0" encoding="utf-8"?>
<appwidget-provider
	xmlns:android="http://schemas.android.com/apk/res/android"
	android:minWidth="147dp"
	android:minHeight="72dp"
	android:updatePeriodMillis="0"
	android:initialLayout="@layout/desktop">
</appwidget-provider>
android:minWidth="147dp" 147是2个cell的宽度
android:minHeight="72dp" 144是1个cell的高度,根据需要自己填写需要在桌面显示几个cell的大小
代码全部在上面了,这里有相关图片的下载,也可以自己画一些,相互学习。


 617
617

 被折叠的 条评论
为什么被折叠?
被折叠的 条评论
为什么被折叠?
 到【灌水乐园】发言


