一、数据库连接池简介
数据库连接池使用的是池化技术,用于管理数据库的多个连接。该技术的主要作用是用于提高数据库访问的效率和性能。通过数据库连接池,应用程序可以重复利用已经建立的数据库连接,避免频繁地创建和销毁连接,从而减少了数据库的负担和提高了系统的响应速度。
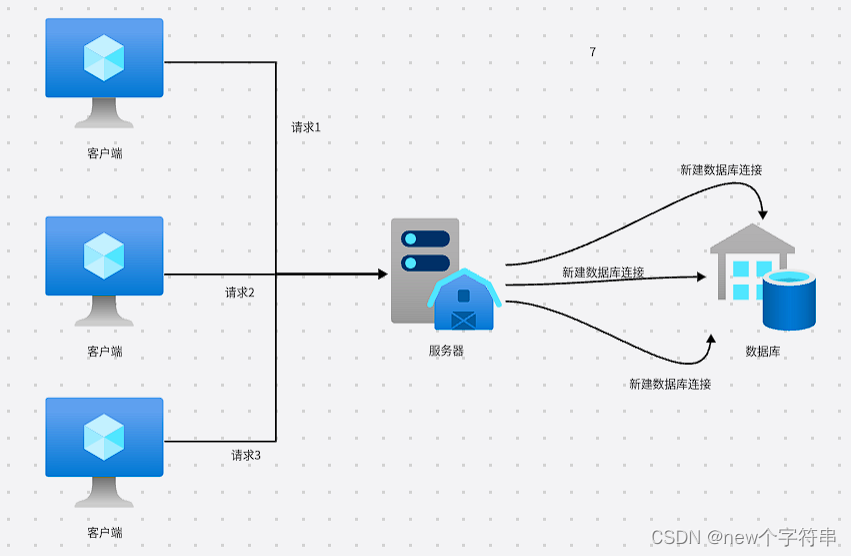
当服务器中不存在数据库连接池时,客户端的数据库请求查询的情形大概如图所示:

如图所示,当没有使用数据库连接池时,服务器和数据库之间需要多次建立连接和销毁连接。从某种程度上来说,当没有使用数据库连接池技术时,有多少个来自客户端的请求就需要建立多少次数据库连接,并且在使用完毕后还需要多次销毁。
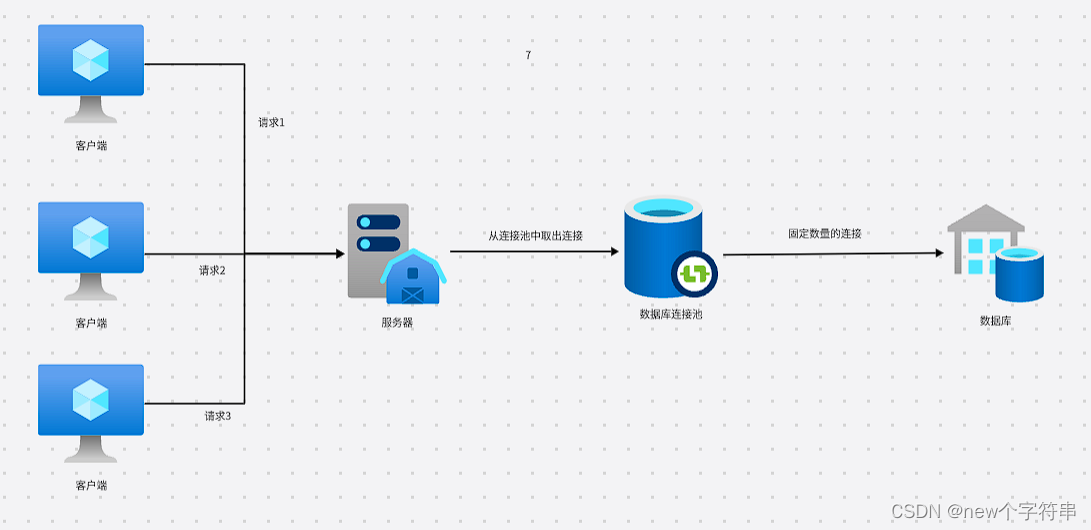
而数据库连接池就可以很好的解决以上问题。
数据库连接池:数据库连接池的根本原理其实并不复杂,其原理就是服务器提前准备好一组可以使用的数据库连接,当客户端的请求到达时,如果数据库连接池里有空闲连接的话,就取出一个空闲连接进行数据库操作,如果已没有空闲连接就进入等待。通过这样的数据库连接复用,可以在很大程度上提高服务器的性能,并减轻数据库的负担。

自己实现一个数据库连接池,可以增强自己对一些底层原理的理解,更好的掌握并发编程,并且能够极大的提升一个程序员的"内功“。
二、数据库连接池的代码实现
1.环境配置
笔者使用的是java17,请确保自己的java版本最好不要低于java11。
开发ide为idea
本项目使用的是maven构建,只需导入一下两个依赖包,junity包看自身情况,可用可不用。
导入maven依赖
<dependencies>
		<!--用于连接数据库-->
        <dependency>
            <groupId>mysql</groupId>
            <artifactId>mysql-connector-java</artifactId>
            <version>8.0.31</version>
            <!--这里的版本号需要和自己的mysql版本适配-->
        </dependency>
        <dependency>
            <groupId>junit</groupId>
            <artifactId>junit</artifactId>
            <version>4.13.2</version>
            <scope>test</scope>
        </dependency>
    </dependencies>
2.数据库连接池的配置文件
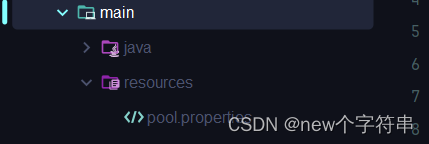
我们首先要确认连接池需要哪些配置信息,根据经验,一个数据库连接池至少要有一下几个必须的配置。首先是必须由用户指定的几项配置,也就是数据库驱动、数据库连接的url、用户名和密码。然后是可以由连接池自己默认指定的几项配置,这些配置一般有:连接池初始大小,连接池最大大小,健康检查开始时间,健康检查间隔时间,以及连接超时时间。这些配置信息我们可以将其写进一个properties文件里,这个文件我们命名为pool.properties,处于项目的resource目录下。在创建数据库连接池时我们需要将这些配置信息读进内存里。这些配置的详细信息如下所示:
pool.properties文件的位置

myPool.driver=com.mysql.cj.jdbc.Driver
myPool.url=jdbc:mysql://**********/****
myPool.username=root
myPool.password=12345678
myPool.initSize=3
myPool.delay=2000
myPool.maxSize=6
myPool.interval=2000
myPool.timeout=10000
myPool.driver:指明数据库的驱动类。
myPool.url:连接数据库的url。
myPool.username: 数据库用户名。
myPool.password:数据库密码。
myPool.initSize:数据库连接池的初始化大小(即初始时有几条默认连接)。
myPool.maxSize:数据库连接池的最大大小(即池中最多能有几条连接)。
myPool.delay=2000:连接池健康检查的开始时间,即当连接池开始工作后多长时间开始连接池的健康检查。
myPool.interval:连接池的健康检查的间隔时间,即每隔多长时间就进行一次连接的健康检查。
myPool.timeout:连接超时时间,当连接超时后,将会由连接池的健康检查来中断改连接。
需要注意的是,以上所有有关于时间的配置单位都是毫秒。
3.DataSourceConfig类
接下来编写数据库连接池的配置类,配置类的主要作用是读取pool.properties文件中的配置信息,将这些信息写进该对象的属性中。并且提供接口将这些信息用于连接池的使用。
该类包含以下属性,前4个属性是必须由外部指定的,剩下的都是可以默认指定的。(如果pool.properties中没有说明,就是用默认值,约定大于配置的思想)
public class DataSourceConfig {
    private String url = null;
    private String username = null;
    private String password = null;
    private String driver = null;
    private String initSize = "3";
    private String maxSize = "6";
    private String interval = "1000";
    private String timeout = "10000";
    private String delay = "800";
}
创建该类的对象可以使用单例模式。这里使用懒汉单例,所以需要额外增加一个静态属性来存储该类的对象,并将构造函数私有化。
//DataSorceConfig
private static volatile DataSourceConfig INSTANCE;
private DataSourceConfig() {}
接下来编写获取该类实例对象的getInstance方法。具体思路如下:
首先由于使用的是懒汉单例,为了保证线程安全,这里需要使用双重检查锁定,然后实例化一个
Properties类来读取pool.properties中的数据。Properties类继承自HashTable,也就是说从pool.properties中读取的数据都是以键值对的方式来存储的。我们需要取出其中键开头为”mypool.“的值将其写如DataSourceConfig对应的属性中。存储到对应属性中的方式这里使用反射。具体代码如下所示。
public static DataSourceConfig getInstance() {
        //检查INSTANCE是否为空
        if (INSTANCE == null) {
            //加锁,防止多次创建对象
            synchronized (DataSourceConfig.class) {
                //再次检查INSTANCE是否为空
                if (INSTANCE == null) {
                    //创建DataSourceConfig实例对象
                    INSTANCE = new DataSourceConfig();
                    //拿到DataSourceConfig的Class对象
                    Class<DataSourceConfig> clazz = DataSourceConfig.class;
                    //获取pool.properties文件的输入流,读取文件的字节流
                    InputStream in = clazz.getClassLoader().getResourceAsStream("pool.properties");
                    //创建Properties对象,用于临时存储pool.properties中的数据
                    Properties prop = new Properties();
                    try {
                        //加载pool.properties中的数据
                        prop.load(in);
                        //获取prop中键的集合
                        Set<Object> keys = prop.keySet();
                        //读取keys中的键
                        for (Object key : keys) {
                            //如果键的开头不是"myPool."则跳过
                            if (!key.toString().startsWith("myPool.")) continue;
                            Object v = prop.get(key);
                            //将键的字符串去掉"myPool.",剩下的字符串用于和对象中的属性进行比对,并通过反射写入对应的值
                            Field field = clazz.getDeclaredField(key.toString().split("\\.")[1]);
                            field.setAccessible(true);
                            field.set(INSTANCE, v);
                        }
                        /*
                        这里需要判断一下,如果必须由外部指定的属性依旧为空(也就是pool.properties中没有给出必要属性)
                        则抛出异常
                         */
                        if (INSTANCE.url == null ||
                                INSTANCE.driver == null ||
                                INSTANCE.password == null ||
                                INSTANCE.username == null)
                            throw new RuntimeException("url or driver or username or password is null");
                    } catch (IOException e) {
                       throw new RuntimeException("No relevant configuration files found: pool.properties.");
                    } catch (Exception e) {
                        throw new RuntimeException(e);
                    }
                }
            }
        }
        return INSTANCE;
    }
最后再为该对象的属性编写get方法和toString方法(方便调试)。
DataSourceConfig类的完整代码如下所示:
public class DataSourceConfig {
    private String url = null;
    private String username = null;
    private String password = null;
    private String driver = null;
    private String initSize = "3";
    private String maxSize = "6";
    private String interval = "1000";
    private String timeout = "10000";
    private String delay = "800";

    private static volatile DataSourceConfig INSTANCE;

    private DataSourceConfig() {
    }

    public static DataSourceConfig getInstance() {
        //检查INSTANCE是否为空
        if (INSTANCE == null) {
            //加锁,防止多次创建对象
            synchronized (DataSourceConfig.class) {
                //再次检查INSTANCE是否为空
                if (INSTANCE == null) {
                    //创建DataSourceConfig实例对象
                    INSTANCE = new DataSourceConfig();
                    //拿到DataSourceConfig的Class对象
                    Class<DataSourceConfig> clazz = DataSourceConfig.class;
                    //获取pool.properties文件的输入流,读取文件的字节流
                    InputStream in = clazz.getClassLoader().getResourceAsStream("pool.properties");
                    //创建Properties对象,用于临时存储pool.properties中的数据
                    Properties prop = new Properties();
                    try {
                        //加载pool.properties中的数据
                        prop.load(in);
                        //获取prop中键的集合
                        Set<Object> keys = prop.keySet();
                        //读取keys中的键
                        for (Object key : keys) {
                            //如果键的开头不是"myPool."则跳过
                            if (!key.toString().startsWith("myPool.")) continue;
                            Object v = prop.get(key);
                            //将键的字符串去掉"myPool.",剩下的字符串用于和对象中的属性进行比对,并通过反射写入对应的值
                            Field field = clazz.getDeclaredField(key.toString().split("\\.")[1]);
                            field.setAccessible(true);
                            field.set(INSTANCE, v);
                        }
                        /*
                        这里需要判断一下,如果必须由外部指定的属性依旧为空(也就是pool.properties中没有给出必要属性)
                        则抛出异常
                         */
                        if (INSTANCE.url == null ||
                                INSTANCE.driver == null ||
                                INSTANCE.password == null ||
                                INSTANCE.username == null)
                            throw new RuntimeException("url or driver or username or password is null");
                    } catch (IOException e) {
                       throw new RuntimeException("No relevant configuration files found: pool.properties.");
                    } catch (Exception e) {
                        throw new RuntimeException(e);
                    }
                }
            }
        }
        return INSTANCE;
    }

    public String getUrl() {
        return url;
    }

    public String getUsername() {
        return username;
    }

    public String getPassword() {
        return password;
    }

    public String getDriver() {
        return driver;
    }

    public String getInitSize() {
        return initSize;
    }

    public String getMaxSize() {
        return maxSize;
    }

    public String getInterval() {
        return interval;
    }

    public String getTimeout() {
        return timeout;
    }

    public String getDelay() {
        return delay;
    }

    @Override
    public String toString() {
        return "DataSourceConfig{" +
                "url='" + url + '\'' +
                ", username='" + username + '\'' +
                ", password='" + password + '\'' +
                ", driver='" + driver + '\'' +
                ", initSize='" + initSize + '\'' +
                ", maxSize='" + maxSize + '\'' +
                ", period='" + interval + '\'' +
                ", timeout='" + timeout + '\'' +
                ", delay='" + delay + '\'' +
                '}';
    }
}
简单测试一下:
测试代码:
@Test
public void test() {
     var conf = DataSourceConfig.getInstance();
     System.out.println(conf);
}
测试结果:

结果表明成功读取到了配置信息。
4.ConnectionProxy类
ConnectionProxy类的主要作用是用于代理真实的Conection(数据库连接类)。之所以要额外构建一个代理类,是因为我们需要对连接进行连接超时检查,也就是健康检查功能,所以我们需要额外一个类型为long的属性来存储连接被取出时的时间。另一个重要的原因是,对于Connection中的一些接口我们并不希望显式的暴露给外部去使用。就比如说Connection中的close方法,就不能显式的暴露给外部使用,因为Connection在连接池中需要被重复使用,我们希望关闭连接的操作是有连接池来负责。在ConnectionProxy中,需要代理Connection中的一些必要的方法。这个可以看具体情况而定,这里笔者只是为了方便演示,就只代理Connection了执行sql语句的接口。具体代码如下:
public class ConnectionProxy {
    //被代理的Connection真实对象
    private final Connection connection;
    //连接被使用时的时间
    private long connectTime;
    //构造函数,传入一个Connection对象
    public ConnectionProxy(Connection connection) {
        this.connection = connection;
    }
    public void setConnectTime(long connectTime) {
        this.connectTime = connectTime;
    }
    //执行sql语句的接口
    public PreparedStatement prepareStatement(String sql)
            throws SQLException {
        return this.connection.prepareStatement(sql);
    }
    //查看连接是否关闭
    public boolean isClosed() throws SQLException {
        return this.connection.isClosed();
    }
    public Connection getConnection() {
        return this.connection;
    }
    public long getConnectTime() {
        return this.connectTime;
    }
    public Statement createStatement() throws SQLException {
        return this.connection.createStatement();
    }
}
5.ConnectionPool
接下来就是最关键的部分,数据库连接池的主体实现。
本着面向接口编程的原则,我们首先定义一个数据库连接池接口
ConnectionPool。该接口主要有三个方法,getConnection、releaseConnection、shutdown,分别用于获取连接,释放连接和关闭连接池。代码如下:
public interface ConnectionPool {
    ConnectionProxy getConnection() throws SQLException, InterruptedException;
    void releaseConnection(ConnectionProxy connection) throws SQLException;
    void shutdown() throws SQLException;
}
之后我们创建ConnectionPool的实现类,ConnectionPoolImp。
关于数据库连接池类,需要两个数据结构,一个是队列,用来存储空闲的连接,另一个是列表,用于存储正在使用的连接。还需要一下额外几个属性:
1.连接计数器:用于记录连接池中连接的总数。
2.连接池配置:DataSourceConfig,用于获取连接池配置。
3.定时任务对象Timer:定时任务对象,用于定期进行连接健康检查。
4.全局锁对象:用于线程加锁保证线程安全
具体代码如下:
public class ConnectionPoolImp implements ConnectionPool {
    //连接计数器,这里使用原子类保证线程安全
    private final AtomicInteger connectionCount = new AtomicInteger(0);
    //连接池配置
    private final DataSourceConfig config;
    //空闲连接队列,用于存储空闲连接
    private final Deque<ConnectionProxy> idleConnectionsPool = new ArrayDeque<>();
    //使用中连接列表,存储正在使用中的连接
    private final List<ConnectionProxy> activeConnectionsPool = new ArrayList<>();
    //定时任务对象,执行健康检查的任务
    private final Timer timer;
    //全局锁对象
    private static final Object lock = new Object();
}
定义一个私有方法用于创建数据库连接的代理对象。返回一个包含
ConnectionProxy的Optional对象。这里使用Optional是因为如果处出现异常,最终会返回null,使用Optional也是为了显式的告诉其调用者可能会返回null。当然这里因为也没有其它多余的调用者,直接返回ConnectionProxy对象也行,看自己喜好。具体代码如下:
private Optional<ConnectionProxy> createConnection() throws SQLException {
        ConnectionProxy conn = null;
        try {
            //创建数据库连接的代理对象
            conn = new ConnectionProxy(
                    DriverManager.
                            getConnection(
                                    this.config.getUrl(),
                                    this.config.getUsername(),
                                    this.config.getPassword())
            );
        } catch (Exception e) {
            throw new SQLException("create connection failed", e);
        }
        return Optional.of(conn);
    }
创建一个用于检查连接是否可用的私有方法
isConnectionValid,其逻辑很简单,如果ConnectionProxy不为空且连接没有关闭则返回true,否则返回false。代码如下:
private boolean isConnectionValid(ConnectionProxy conn) {
        try {
            return conn != null && !conn.getConnection().isClosed();
        } catch (SQLException e) {
            e.printStackTrace();
        }
        return false;
    }
接下来编写
ConnectionPoolImp的构造方法。在构造方法中,我们首先需要依照配置文件中的initSize来首先创建几个空闲连接,并将其加入空闲连接队列,并更新连接计数器的值。具体代码如下:
public ConnectionPoolImp(DataSourceConfig config) throws SQLException, ClassNotFoundException {
        this.config = config;
        //将驱动类加载入jvm
        Class.forName(config.getDriver());
        //循环添加连接进空闲队列
        for (int i = 0; i < Integer.parseInt(config.getInitSize()); i++) {
            this.idleConnectionsPool.addLast(
                    new ConnectionProxy(DriverManager.getConnection(
                            this.config.getUrl(),
                            this.config.getUsername(),
                            this.config.getPassword()))
            );
            //更新计数器,值+1
            this.connectionCount.incrementAndGet();
}
然后是获取连接的方法
getConnection的实现。该方法的实现思路是:如果空闲队列中有空闲连接就让空闲队列的队头出队,将其引用返回,这里尤其需要注意要将该连接从空闲队列中移除,并加入使用中列表。如果空闲队列为空,也就是没有空闲连接时,就需要在多进行一次判断,判断当前连接的总数是否已经达到最大连接数(也就是maxSize的值)。如果没有达到最大连接数,就直接创建一个新连接将其加入使用中列表并返回引用,如果连接数已经达到了maxSize,则进入等待,直到其它线程释放连接时将其唤醒重新获取连接,为保证线程安全,此过程需要加锁。具体代码如下:
@Override
    public ConnectionProxy getConnection() throws SQLException, InterruptedException {
        ConnectionProxy connection = null;
        //判断connection是否为空,为空需要重复获取
        while (connection == null) {
            //加锁
            synchronized (lock) {
                //判断空闲队列是否为空
                if (!this.idleConnectionsPool.isEmpty()) {

                    //若空闲队列不为空则让队头连接出列,并将其加入使用中列表
                    connection = this.idleConnectionsPool.removeFirst();
                    this.activeConnectionsPool.add(connection);
                    System.out.println("[" + Thread.currentThread().getName() + "]" +
                            " - Extract a connection from the idle connection pool.");
                } else {
                    //当空闲队列为空,即没有空闲连接的情况

                    //判断当前连接总数是否已经达到最大值maxSize
                    if (this.connectionCount.get() < Integer.parseInt(this.config.getMaxSize())) {
                        //若没有达到最大值则直接创建有一个新连接

                        Optional<ConnectionProxy> opt = this.createConnection();

                        //判断连接是否创建成功
                        if (opt.isPresent()) {

                            //若创建成功则直接将连接加入使用中列表,并把连接计数器的值+1
                            connection = opt.get();
                            this.activeConnectionsPool.add(opt.get());
                            this.connectionCount.incrementAndGet();
                            System.out.println(Thread.currentThread().getName() +
                                    " - Created a new connection.");
                        } else {
                            System.out.println("[" + Thread.currentThread().getName() + "]" +
                                    " - Failed to obtain a new connection, preparing to try again.");
                        }
                    } else {
                        /*
                        如果连接数量已到达最大值maxSize,
                        这时需要让该线程陷入等待让出cpu时间片,
                        等待其它线程释放连接时再将其唤醒
                         */

                        System.out.println("[" + Thread.currentThread().getName() + "]" +
                                " - The connection pool is full and waiting for other threads to release the connection.");
                        lock.wait();
                    }
                }
            }
        }
        //将获取到连接时的时间戳写进connectionTime属性里
        connection.setConnectTime(System.currentTimeMillis());
        return connection;
    }
有了获取连接的方法后就需要对应的释放连接的方法
releaseConnection。该方法的逻辑很简单,首先判断需要释放的连接还是否可用,如果该连接还可用,就将其从使用中列表中移除,并加入空闲队列的队尾,并唤醒所有正在等待中的线程。如果该连接已经不可用,就将其从使用中队列中移除,并且记住一定要让连接计数器的值-1.具体代码如下:
@Override
    public void releaseConnection(ConnectionProxy conn) {
        //判断连接是否还可用
        if (!this.isConnectionValid(conn)) {
            //如果连接一不可用,则将其从使用中列表中移除,计数器值-1
            synchronized (lock) {
                this.activeConnectionsPool.remove(conn);
                this.connectionCount.decrementAndGet();
                return;
            }
        }

        //如果连接可用,则将从使用中列表中移除并加入空闲队列
        synchronized (lock) {
            this.idleConnectionsPool.add(conn);
            this.activeConnectionsPool.remove(conn);
            System.out.println("[" + Thread.currentThread().getName() + "]" +
                    " - Released a connection.");
            //唤醒其它正在等待的线程
            lock.notifyAll();
        }
    }
然后我们再来实现
shutdown方法用来关闭连接池。关闭连接池要做的事主要有两件:一是关闭空闲队列和使用中列表中所有的连接,二是关闭用于健康检查的定时器任务线程(这个之后会去实现)。具体代码如下:
@Override
    public void shutdown() throws SQLException {

        //循环遍历使用中列表和空闲队列,关闭存放的连接
        System.out.println("[" + Thread.currentThread().getName() + "]" + " - Closing connection pool...");
        for (ConnectionProxy conn : this.activeConnectionsPool) {
            conn.getConnection().close();
        }
        for (ConnectionProxy conn : this.idleConnectionsPool) {
            conn.getConnection().close();
        }

        //将健康检查的定时任务取消
        this.timer.cancel();
    }
最后来编写用于健康检查的定时任务。这里使用
Timer中的schedule方法来开启一个定时任务用于健康检查。该定时任务会按照配置文件中指定的时间间隔进行检查,主要检查线程使用连接的时间是否超时(超时时间也是由配置文件的timeout决定)。具体实现方法其实就是循环检查使用中列表中的连接有没有超时的,如果有超时连接就将其关闭并从使用中列表中移除,并将连接计数器的值-1.关于移除连接需要注意的是,不要用增强for或流来移除连接,因为迭代中移除列表中的元素一定会出问题的。这里要解决这个问题我们用一个简单但却极其有用的方法,那就是倒序来枚举,然后移除超时连接,这样就不会有问题了。然后这个方法我们追加到ConnectionPoolImp的构造方法里面去。具体代码如下:
//创建Timer实例
        this.timer = new Timer();
        //编写定时任务的逻辑
        timer.schedule(new TimerTask() {
            public void run() {
                System.out.println("[" + Thread.currentThread().getName() + "]" +
                        " - Connection health check");

                //加锁,保证线程安全
                synchronized (lock) {
                    //因为要在迭代的过程中移除列表中的元素,所以这里倒着枚举元素,防止出问题
                    for (int i = activeConnectionsPool.size() - 1; i >= 0; i--) {
                        ConnectionProxy c = activeConnectionsPool.get(i);

                        //获取获取连接时的时间戳,也就是连接加入使用中列表时的时间戳
                        long connectTime = c.getConnectTime();
                        //获取当前时间戳
                        long currentTime = System.currentTimeMillis();

                        //根据配置文件中的超时时间判断是否超时
                        if (currentTime - connectTime > Long.parseLong(config.getTimeout())) {
                            //如果超时了就从列表中移除,然会计数器的值-1
                            activeConnectionsPool.remove(i);
                            connectionCount.decrementAndGet();
                            try {

                                //移除连接后切记要将该连接关闭
                                c.getConnection().close();
                                System.out.println("[" + Thread.currentThread().getName() + "]" +
                                        " - A connection timed out and has been closed.");
                            } catch (SQLException e) {
                                throw new RuntimeException(e);
                            }
                        }
                    }
                }
            }
            //指定定时任务在多长时间后开始以及检查的间隔时间
        }, Long.parseLong(this.config.getDelay()), Long.parseLong(this.config.getInterval()));
然后在构造方法里再加一点打印信息,方便调试,最终ConnectionPoolImp类的构造方法完整代码如下所示:
public ConnectionPoolImp(DataSourceConfig config) throws SQLException, ClassNotFoundException {
        this.config = config;
        //将驱动类加载入jvm
        Class.forName(config.getDriver());
        //循环添加连接进空闲队列
        for (int i = 0; i < Integer.parseInt(config.getInitSize()); i++) {
            this.idleConnectionsPool.addLast(
                    new ConnectionProxy(DriverManager.getConnection(
                            this.config.getUrl(),
                            this.config.getUsername(),
                            this.config.getPassword()))
            );
            //更新计数器,值+1
            this.connectionCount.incrementAndGet();
        }

        //创建Timer实例
        this.timer = new Timer();
        //编写定时任务的逻辑
        timer.schedule(new TimerTask() {
            public void run() {
                System.out.println("[" + Thread.currentThread().getName() + "]" +
                        " - Connection health check");

                //加锁,保证线程安全
                synchronized (lock) {
                    //因为要在迭代的过程中移除列表中的元素,所以这里倒着枚举元素,防止出问题
                    for (int i = activeConnectionsPool.size() - 1; i >= 0; i--) {
                        ConnectionProxy c = activeConnectionsPool.get(i);

                        //获取获取连接时的时间戳,也就是连接加入使用中列表时的时间戳
                        long connectTime = c.getConnectTime();
                        //获取当前时间戳
                        long currentTime = System.currentTimeMillis();

                        //根据配置文件中的超时时间判断是否超时
                        if (currentTime - connectTime > Long.parseLong(config.getTimeout())) {
                            //如果超时了就从列表中移除,然会计数器的值-1
                            activeConnectionsPool.remove(i);
                            connectionCount.decrementAndGet();
                            try {

                                //移除连接后切记要将该连接关闭
                                c.getConnection().close();
                                System.out.println("[" + Thread.currentThread().getName() + "]" +
                                        " - A connection timed out and has been closed.");
                            } catch (SQLException e) {
                                throw new RuntimeException(e);
                            }
                        }
                    }
                }
            }
            //指定定时任务在多长时间后开始以及检查的间隔时间
        }, Long.parseLong(this.config.getDelay()), Long.parseLong(this.config.getInterval()));
        System.out.println("[" + Thread.currentThread().getName() + "]" + " - Successfully started connection pool.");
        System.out.println("The initial number of connections in the connection pool is " + this.config.getInitSize());
        System.out.println("The maximum number of connections is " + this.config.getMaxSize());
        System.out.println("The timeout time is " + this.config.getTimeout() + "ms");
        System.out.println("The connection health check will starts in " + this.config.getDelay() + "ms");
        System.out.println("connection health check interval of " + this.config.getInterval() + "ms");
    }
到这我们数据库连接池的编写就结束了,以下是ConnectionPoolImp的完整代码:
public class ConnectionPoolImp implements ConnectionPool {
    //连接计数器,这里使用原子类保证线程安全
    private final AtomicInteger connectionCount = new AtomicInteger(0);
    //连接池配置
    private final DataSourceConfig config;
    //空闲连接队列,用于存储空闲连接
    private final Deque<ConnectionProxy> idleConnectionsPool = new ArrayDeque<>();
    //使用中连接列表,存储正在使用中的连接
    private final List<ConnectionProxy> activeConnectionsPool = new ArrayList<>();
    //定时任务对象,执行健康检查的任务
    private final Timer timer;
    //全局锁对象
    private static final Object lock = new Object();

    public ConnectionPoolImp(DataSourceConfig config) throws SQLException, ClassNotFoundException {
        this.config = config;
        //将驱动类加载入jvm
        Class.forName(config.getDriver());
        //循环添加连接进空闲队列
        for (int i = 0; i < Integer.parseInt(config.getInitSize()); i++) {
            this.idleConnectionsPool.addLast(
                    new ConnectionProxy(DriverManager.getConnection(
                            this.config.getUrl(),
                            this.config.getUsername(),
                            this.config.getPassword()))
            );
            //更新计数器,值+1
            this.connectionCount.incrementAndGet();
        }

        //创建Timer实例
        this.timer = new Timer();
        //编写定时任务的逻辑
        timer.schedule(new TimerTask() {
            public void run() {
                System.out.println("[" + Thread.currentThread().getName() + "]" +
                        " - Connection health check");

                //加锁,保证线程安全
                synchronized (lock) {
                    //因为要在迭代的过程中移除列表中的元素,所以这里倒着枚举元素,防止出问题
                    for (int i = activeConnectionsPool.size() - 1; i >= 0; i--) {
                        ConnectionProxy c = activeConnectionsPool.get(i);

                        //获取获取连接时的时间戳,也就是连接加入使用中列表时的时间戳
                        long connectTime = c.getConnectTime();
                        //获取当前时间戳
                        long currentTime = System.currentTimeMillis();

                        //根据配置文件中的超时时间判断是否超时
                        if (currentTime - connectTime > Long.parseLong(config.getTimeout())) {
                            //如果超时了就从列表中移除,然会计数器的值-1
                            activeConnectionsPool.remove(i);
                            connectionCount.decrementAndGet();
                            try {

                                //移除连接后切记要将该连接关闭
                                c.getConnection().close();
                                System.out.println("[" + Thread.currentThread().getName() + "]" +
                                        " - A connection timed out and has been closed.");
                            } catch (SQLException e) {
                                throw new RuntimeException(e);
                            }
                        }
                    }
                }
            }
            //指定定时任务在多长时间后开始以及检查的间隔时间
        }, Long.parseLong(this.config.getDelay()), Long.parseLong(this.config.getInterval()));
        System.out.println("[" + Thread.currentThread().getName() + "]" + " - Successfully started connection pool.");
        System.out.println("The initial number of connections in the connection pool is " + this.config.getInitSize());
        System.out.println("The maximum number of connections is " + this.config.getMaxSize());
        System.out.println("The timeout time is " + this.config.getTimeout() + "ms");
        System.out.println("The connection health check will starts in " + this.config.getDelay() + "ms");
        System.out.println("connection health check interval of " + this.config.getInterval() + "ms");
    }

    @Override
    public ConnectionProxy getConnection() throws SQLException, InterruptedException {
        ConnectionProxy connection = null;
        //判断connection是否为空,为空需要重复获取
        while (connection == null) {
            //加锁
            synchronized (lock) {
                //判断空闲队列是否为空
                if (!this.idleConnectionsPool.isEmpty()) {

                    //若空闲队列不为空则让队头连接出列,并将其加入使用中列表
                    connection = this.idleConnectionsPool.removeFirst();
                    this.activeConnectionsPool.add(connection);
                    System.out.println("[" + Thread.currentThread().getName() + "]" +
                            " - Extract a connection from the idle connection pool.");
                } else {
                    //当空闲队列为空,即没有空闲连接的情况

                    //判断当前连接总数是否已经达到最大值maxSize
                    if (this.connectionCount.get() < Integer.parseInt(this.config.getMaxSize())) {
                        //若没有达到最大值则直接创建有一个新连接

                        Optional<ConnectionProxy> opt = this.createConnection();

                        //判断连接是否创建成功
                        if (opt.isPresent()) {

                            //若创建成功则直接将连接加入使用中列表,并把连接计数器的值+1
                            connection = opt.get();
                            this.activeConnectionsPool.add(opt.get());
                            this.connectionCount.incrementAndGet();
                            System.out.println(Thread.currentThread().getName() +
                                    " - Created a new connection.");
                        } else {
                            System.out.println("[" + Thread.currentThread().getName() + "]" +
                                    " - Failed to obtain a new connection, preparing to try again.");
                        }
                    } else {
                        /*
                        如果连接数量已到达最大值maxSize,
                        这时需要让该线程陷入等待让出cpu时间片,
                        等待其它线程释放连接时再将其唤醒
                         */

                        System.out.println("[" + Thread.currentThread().getName() + "]" +
                                " - The connection pool is full and waiting for other threads to release the connection.");
                        lock.wait();
                    }
                }
            }
        }
        //将获取到连接时的时间戳写进connectionTime属性里
        connection.setConnectTime(System.currentTimeMillis());
        return connection;
    }

    @Override
    public void releaseConnection(ConnectionProxy conn) {
        //判断连接是否还可用
        if (!this.isConnectionValid(conn)) {
            //如果连接一不可用,则将其从使用中列表中移除,计数器值-1
            synchronized (lock) {
                this.activeConnectionsPool.remove(conn);
                this.connectionCount.decrementAndGet();
                return;
            }
        }

        //如果连接可用,则将从使用中列表中移除并加入空闲队列
        synchronized (lock) {
            this.idleConnectionsPool.add(conn);
            this.activeConnectionsPool.remove(conn);
            System.out.println("[" + Thread.currentThread().getName() + "]" +
                    " - Released a connection.");
            //唤醒其它正在等待的线程
            lock.notifyAll();
        }
    }

    @Override
    public void shutdown() throws SQLException {

        //循环遍历使用中列表和空闲队列,关闭存放的连接
        System.out.println("[" + Thread.currentThread().getName() + "]" + " - Closing connection pool...");
        for (ConnectionProxy conn : this.activeConnectionsPool) {
            conn.getConnection().close();
        }
        for (ConnectionProxy conn : this.idleConnectionsPool) {
            conn.getConnection().close();
        }

        //将健康检查的定时任务取消
        this.timer.cancel();
    }


    private boolean isConnectionValid(ConnectionProxy conn) {
        try {
            return conn != null && !conn.getConnection().isClosed();
        } catch (SQLException e) {
            e.printStackTrace();
        }
        return false;
    }

    private Optional<ConnectionProxy> createConnection() throws SQLException {
        ConnectionProxy conn = null;
        try {
            //创建数据库连接的代理对象
            conn = new ConnectionProxy(
                    DriverManager.
                            getConnection(
                                    this.config.getUrl(),
                                    this.config.getUsername(),
                                    this.config.getPassword())
            );
        } catch (Exception e) {
            throw new SQLException("create connection failed", e);
        }
        return Optional.of(conn);
    }
}
最后我们测试以下。
四、测试
关于测试,笔者已经在数据库中准备了一个简单的表已经两条记录。记录有四个字段。我们开20个线程来使用连接池来做查询,然后再开一条线程故意让其连接超时以查看健康检查是否生效。测试的具体代码如下:
public static void main(String[] args) throws Exception {
        //创建连接池对象
        ConnectionPool pool = new ConnectionPoolImp(DataSourceConfig.getInstance());
        //线程数组
        List<Thread> threads = new ArrayList<>();

        //创建20个线程用于正常查询
        for (int i = 0; i < 20; i++) {
            threads.add(new Thread(() -> {
                try {
                    //获取连接代理对象
                    ConnectionProxy connection = pool.getConnection();
                    //用于查询的sql语句
                    String sql = "select * from user";
                    Statement ps = connection.createStatement();
                    ResultSet resultSet = ps.executeQuery(sql);
                    //将取出来的数据打印一下,为了防止打印串起来难看,这里加个锁
                    synchronized (MainTest.class) {
                        while (resultSet.next()) {
                            System.out.print("[ " +resultSet.getLong("id") + " ");
                            System.out.print(resultSet.getString("name") + " ");
                            System.out.print(resultSet.getString("password") + " ");
                            System.out.println(resultSet.getString("phoneNum") + " ]");
                        }
                    }
                    pool.releaseConnection(connection);
                } catch (Exception e) {
                    throw new RuntimeException(e);
                }
            }));
        }
        //这里再起一条连接超时的线程,让其休眠20秒再释放连接,测试健康检查是否工作正常
        Thread timeout = new Thread(() -> {
            try {
                ConnectionProxy connection = pool.getConnection();
                Thread.sleep(20000);
                pool.releaseConnection(connection);
            } catch (Exception e) {
                throw new RuntimeException(e);
            }
        }, "test thread");
        timeout.start();
        for (Thread thread : threads) {
            thread.start();
        }
        for (Thread thread : threads) {
            thread.join();
        }
        timeout.join();
        Thread.sleep(4000);
        //关闭连接池
        pool.shutdown();
    }
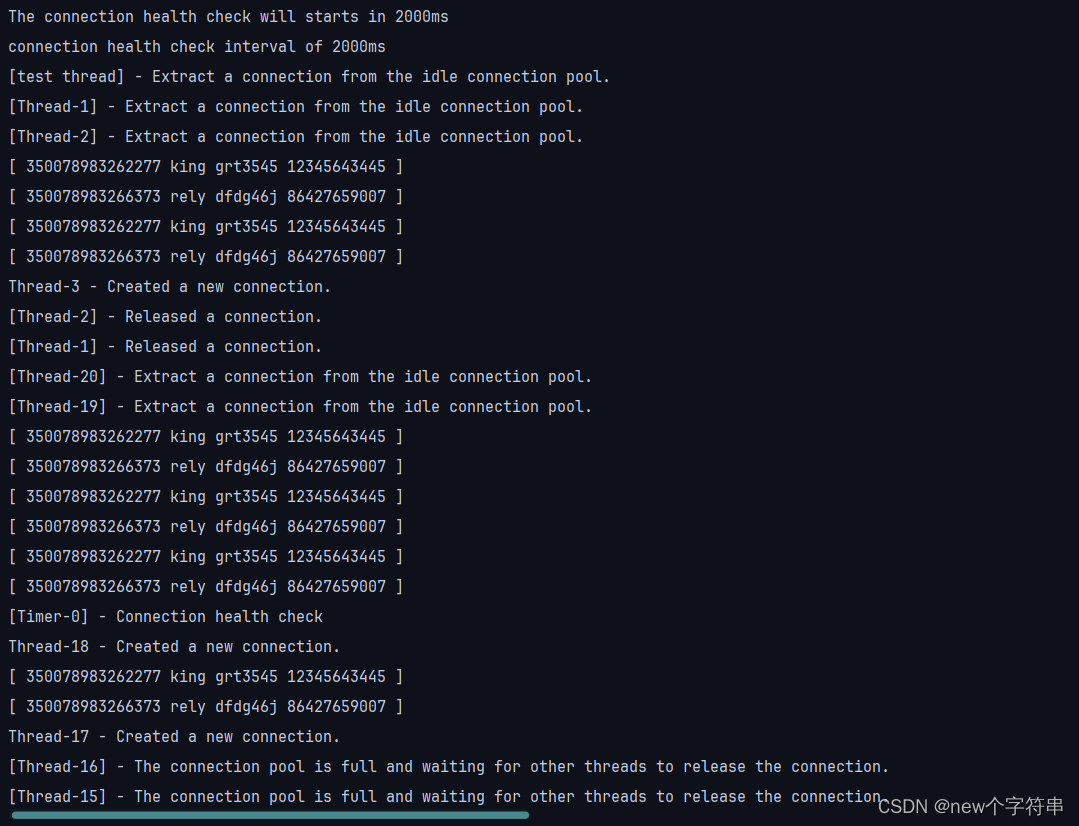
最后运行结果如图,由于打印输出的内容有点多,这里笔者只截了一部分内容。经过多次测试最终没有问题。

五、总结
上述的连接池代码其实还有一定的改进空间,就比如说健康检查是可以由使用者来决定开启或关闭的,可以增加额外的配置属性,其次还有打印日志等级以及日志保存等等。总的来说数据库连接池使用了池化的技术,可以复用数据库连接,减少了重复开启连接和关闭连接带来的性能损耗,减轻了数据库的压力,提高了服务器的处理效能。


 924
924


 被折叠的 条评论
为什么被折叠?


