


📑打牌 : da pai ge的个人主页
🌤️个人专栏 : da pai ge的博客专栏
☁️宝剑锋从磨砺出,梅花香自苦寒来

操作系统版本为CentOS 7
使⽤ MySQL Yum仓库在 Linux 上安装 MySQL
确认当前的系统版本
•
登录系统并切换⾄
root
账号,否则执⾏命令时需要⽤sudo命令,并按提⽰输⼊密码
在终端中运⾏以下命令,查看系统版本。如下所⽰,当前系统版本为
CentOS Linux release
7.9.2009
1 [root@mini-001 ~]# cat /etc/redhat-release
2 CentOS Linux release 7.9.2009 (Core)
添加 MySQL Yum 源
访问MySQL开发者专区
https://dev.mysql.com/downloads/repo/yum
根据当前系统选择对应的发布包
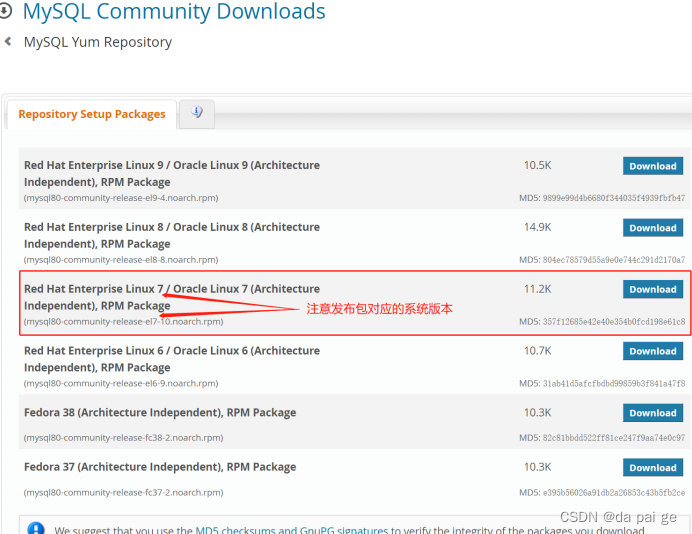
TIPS:
1.
发布包命名规则:
{mysql80}-community-release-
{platform}
-
{version-number}
.noarch.rpm
{mysql80}:MySQL版本号
{platform}:平台(系统)号,⽤来描述系统的版本
{version-number}:
MySQL仓库配置RPM包的版本号
2.
如下所⽰:
mysql80-community-release-el7-10.noarch.rpm
mysql80: MySQL版本号,默认是MySQL8.0版本
el7 : 其中el 是 Enterprise Linux的编写,7表⽰ Linux⼤版本号,⽐如el6 表⽰ Linux6, el7表⽰
Linux7, e8表⽰Linux8, el9表⽰Linux9, 'fc' 则表⽰ Fedora
el7-10:表⽰MySQL仓库配置RPM包的第10次更新
3.
选择⽅式:
针对当前演⽰系统版本Linux7,以及我们要安装的MySQL数据库版本8.0,选择对应RPM包的最近⼀
次更新,所以下载mysql80-community-release-el7-10.noarch.rpm即可
4.
其他版本
如果默认下载⻚⾯没有你所需要的RPM包,可以通过
http://repo.mysql.com/
查找
下载后上传到Linux服务器
TIPS: 安装 rz 插件以⽀持拖拽上传
[root@mini-001 ~]#
yum -y install lrzsz
•
上传完成后查看是否成功
[root@centos-001 ~]# ll
-rwxrw-rw-. 1 root root 11472 Aug 25 01:12 mysql80-community-release-el7-
10.noarch.rpm
安装发布包
•
在终端执⾏:
yum -y install mysql80-community-release-el7-10.noarch.rpm
[root@centos-001 ~]# yum -y install mysql80-community-release-el7-10.noarch.rpm
Loaded plugins: fastestmirror, langpacks
Examining mysql80-community-release-el7-10.noarch.rpm: mysql80-community
release-el7-10.noarch
Marking mysql80-community-release-el7-10.noarch.rpm to be installed
Resolving Dependencies
--> Running transaction check
---> Package mysql80-community-release.noarch 0:el7-10 will be installed

--> Finished Dependency Resolution
Dependencies Resolved
===============================================================================
===============================================================================
===============================
Package Arch
Version Repository
Size
===============================================================================
===============================================================================
===============================
Installing:
mysql80-community-release noarch
el7-10 /mysql80-community-release-el7-10.noarch
12 k
Transaction Summary
===============================================================================
===============================================================================
===============================
Install 1 Package
Total size: 12 k
Installed size: 12 k
Downloading packages:
Running transaction check
Running transaction test
Transaction test succeeded
Running transaction
Installing : mysql80-community-release-el7-10.noarch

1/1
Verifying : mysql80-community-release-el7-10.noarch

1/1
Installed:
mysql80-community-release.noarch 0:el7-10


Complete!
•
通过以下命令检查是否已成功添加 MySQL Yum 源
在终端执⾏:
yum repolist enabled | grep mysql.*-community
[root@centos-001 ~]# yum repolist enabled | grep mysql.*-community
mysql-connectors-community/x86_64 MySQL Connectors Community
227
mysql-tools-community/x86_64 MySQL Tools Community
100
mysql80-community/x86_64 MySQL 8.0 Community Server
426 # 说明已安装
1
2
3
4
选择发布系列
•
在终端执⾏
yum repolist all | grep mysql
• mysql80-community/x86_64、mysql-connectors-community/x86_64、mysql-tools
community/x86_64 为启⽤状态
[root@centos-001 ~]# yum repolist all | grep mysql
mysql-cluster-7.5-community/x86_64 MySQL Cluste disabled
mysql-cluster-7.5-community-source MySQL Cluste disabled
mysql-cluster-7.6-community/x86_64 MySQL Cluste disabled
mysql-cluster-7.6-community-source MySQL Cluste disabled
mysql-cluster-8.0-community/x86_64 MySQL Cluste disabled
mysql-cluster-8.0-community-debuginfo/x86_64 MySQL Cluste disabled
mysql-cluster-8.0-community-source MySQL Cluste disabled
mysql-cluster-innovation-community/x86_64 MySQL Cluste disabled
mysql-cluster-innovation-community-debuginfo/x86_64 MySQL Cluste disabled
mysql-cluster-innovation-community-source MySQL Cluste disabled
mysql-connectors-community/x86_64 MySQL Connec enabled:
227 #启⽤
mysql-connectors-community-debuginfo/x86_64 MySQL Connec disabled
mysql-connectors-community-source MySQL Connec disabled
mysql-innovation-community/x86_64 MySQL Innova disabled
mysql-innovation-community-debuginfo/x86_64 MySQL Innova disabled
mysql-innovation-community-source MySQL Innova disabled
mysql-tools-community/x86_64 MySQL Tools enabled:
100 #启⽤
mysql-tools-community-debuginfo/x86_64 MySQL Tools disabled
mysql-tools-community-source MySQL Tools disabled
mysql-tools-innovation-community/x86_64 MySQL Tools disabled
mysql-tools-innovation-community-debuginfo/x86_64 MySQL Tools disabled
mysql-tools-innovation-community-source MySQL Tools disabled
mysql-tools-preview/x86_64 MySQL Tools disabled
mysql-tools-preview-source MySQL Tools disabled
mysql57-community/x86_64 MySQL 5.7 Co disabled
mysql57-community-source MySQL 5.7 Co disabled
mysql80-community/x86_64 MySQL 8.0 Co enabled:
426 #启⽤
mysql80-community-debuginfo/x86_64 MySQL 8.0 Co disabled
mysql80-community-source MySQL 8.0 Co disabled
安装 MySQL
•
在终端执⾏:
yum install mysql-community-server
安装过程提⽰是否继续,选y即可
将安装 MySQL 服务器包 (
mysql-community-server
) 以及运⾏服务器所需的组件,包括:
客⼾端包 (
mysql-community-client
)
客⼾端和服务器常⻅错误消息和字符集 (
mysql-community-common
)
共享客⼾端库 (
mysql-community-libs
) .
[root@centos-001 ~]# yum install mysql-community-server
# ....省略
6/6
Installed: # 服务器程序
mysql-community-server.x86_64 0:8.0.34-1.el7


Dependency Installed: # 相关依赖
mysql-community-client.x86_64 0:8.0.34-1.el7
mysql-community-client-plugins.x86_64 0:8.0.34-1.el7
mysql-community-common.x86_64 0:8.0.34-1.el7
mysql-community-icu-data-files.x86_64 0:8.0.34-1.el7
mysql-community-libs.x86_64 0:8.0.34-1.el7
Complete!
启动 MySQL 服务器
•
在终端执⾏:
systemctl start mysqld
1
[root@centos-001 ~]#
systemctl start mysqld
查看MySQL 服务状态
•
在终端执⾏:
systemctl status mysqld
[root@centos-001 ~]# systemctl status mysqld
● mysqld.service - MySQL Server
Loaded: loaded (/usr/lib/systemd/system/mysqld.service; enabled; vendor
preset: disabled)
Active: active (running) since Tue 2023-08-29 00:39:04 PDT; 2min 6s ago
Docs: man:mysqld(8)
http://dev.mysql.com/doc/refman/en/using-systemd.html
Process: 4080 ExecStartPre=/usr/bin/mysqld_pre_systemd (code=exited,
status=0/SUCCESS)
Main PID: 4107 (mysqld)
Status: "Server is operational"
Tasks: 37
CGroup: /system.slice/mysqld.service
└─4107 /usr/sbin/mysqld
Aug 29 00:39:00 centos-001 systemd[1]: Starting MySQL Server...
Aug 29 00:39:04 centos-001 systemd[1]: Started MySQL Server.
•
可以使⽤ systemctl [stop| start| restart| status] mysqld, 命令对MySQL服务进⾏[停⽌| 启动|重
启|查看服务状态]操作
开启⾃启动
•
在终端执⾏:
systemctl enable mysqld
[root@centos-001 ~]# systemctl enable mysqld #设置⾃启动
[root@centos-001 ~]# systemctl list-unit-files|grep mysqld #查看状态
mysqld.service enabled
登录MySQL
⾸次安装成功,MySQL把root⽤⼾的默认密码保存在错误⽇志中
•
可以通过在终端执⾏:
grep 'temporary password' /var/log/mysqld.log
进⾏查看
[root@centos-001 log]# grep 'temporary password' /var/log/mysqld.log
2023-08-25T08:32:10.905479Z 6 [Note] [MY-010454] [Server] A temporary password
is generated for root@localhost: IRDMJQ_.v566 #这个就是默认⽣成的密码
1
2
• 使⽤密码进⾏登录
[root@centos-001 log]# mysql -uroot -p
Enter password:
Welcome to the MySQL monitor. Commands end with ; or \g.
Your MySQL connection id is 10
Server version: 8.0.34 MySQL Community Server - GPL
Copyright (c) 2000, 2023, Oracle and/or its affiliates.
Oracle is a registered trademark of Oracle Corporation and/or its
affiliates. Other names may be trademarks of their respective
owners.
Type 'help;' or '\h' for help. Type '\c' to clear the current input statement.
mysql>
修改密码
TIPS:
validate_password
组件是默认安装的,实现的默认密码策略,要求密码⾄少包含1个⼤写字
⺟、1个⼩写字⺟、1个数字和1个特殊字符,密码总⻓度⾄少为8个字符。
默认密码策略
密码策略分为
LOW
、
MEDIUM
(默认)和
STRONG
,分别⽤0,1(默认),2表⽰。
0表⽰只校验密码⻓度,⻓度最⼩为8,所以以后要设置简单密码时还需要修改密码的⻓度限制。
他们分别⽤两个系统变量validate-password.policy和validate_password.length表⽰
在MySQL 客⼾端运⾏以下命令查看当前设置
mysql> show variables like 'validate_password.policy'; #查看当前密码策略
+--------------------------+--------+
| Variable_name | Value |
+--------------------------+--------+
| validate_password.policy | MEDIUM | # 中等
1
2
3
4
5
+--------------------------+--------+
1 row in set (0.00 sec)
mysql> show variables like 'validate_password.length'; #查看当前密码⻓度限制
+--------------------------+-------+
| Variable_name | Value |
+--------------------------+-------+
| validate_password.length | 8 | # 最⼩为8个字符
+--------------------------+-------+
1 row in set (0.00 sec)
设置简单密码
如果我们要在开发环境设置如123456的简单密码那么就要修改默认密码策略,
我们只需要设置validate-password.policy和validate_password.length对应的值即可。
•
在终端执⾏以下命令:
mysql> set global validate_password.policy=0; #策略设置为LOW
Query OK, 0 rows affected (0.00 sec)
mysql> set global validate_password.length=4; #密码⻓度最少为4位(系统限制不能⼩于4
位)
Query OK, 0 rows affected (0.00 sec)

• 重新查看系统变量的值:
mysql> show variables like 'validate_password.policy';
+--------------------------+-------+
| Variable_name | Value |
+--------------------------+-------+
| validate_password.policy | LOW | # LOW级
+--------------------------+-------+
1 row in set (0.00 sec)
mysql> show variables like 'validate_password.length';
+--------------------------+-------+
| Variable_name | Value |
+--------------------------+-------+
| validate_password.length | 4 | # 最⼩⻓度为4
+--------------------------+-------+
1 row in set (0.00 sec)
•
设置新密码
mysql> ALTER USER 'root'@'localhost' IDENTIFIED BY '123456';
ALTER USER 'root'@'localhost' IDENTIFIED BY 'Qs1!Ed3#';
Query OK, 0 rows affected (0.03 sec)


 2231
2231


 被折叠的 条评论
为什么被折叠?
被折叠的 条评论
为什么被折叠?
 到【灌水乐园】发言


