


代驾APP_第一章_项目环境搭建_第二节
文章目录
华夏代驾系统由若干个子系统(服务)组成的,这些子系统都是隶属于hxds根项目的,所以这节课我们把根项目创建出来。上一节
1-11 创建bff-driver服务
之前我们创建的都是华夏代驾的基础模块服务,这节课我们要创建bff层的子系统。在第二章的视频中我讲到了,客户端不能直接调用微服务的子系统,必须通过bff层调用其他服务。这样的好处可以降低外网和内网的HTTP请求数量,还有我们做鉴权更简单,只需要bff层添加认证与授权的代码。
一、创建项目
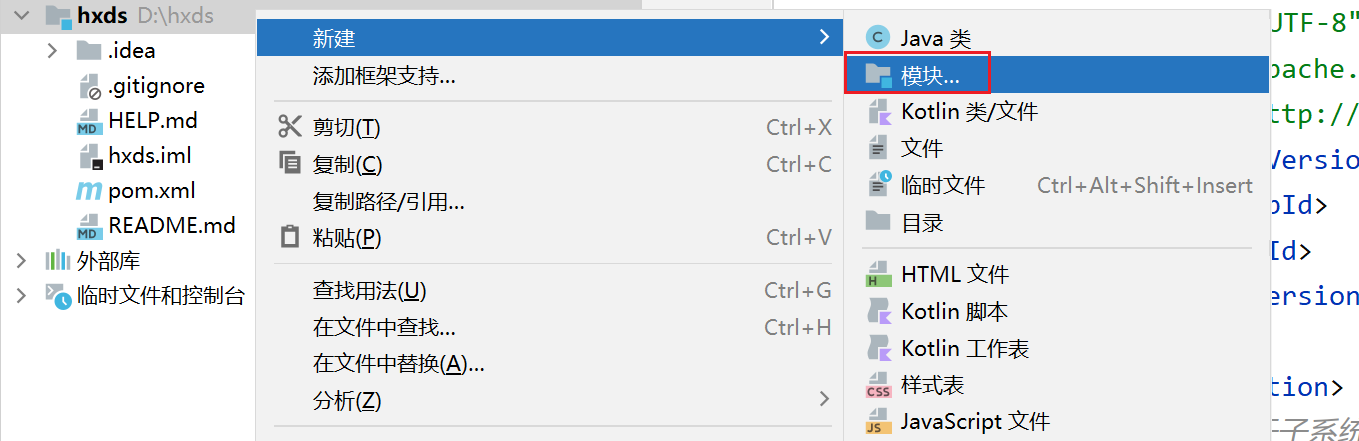
我们在根项目上面点击鼠标右键,然后选择“新建”->“模块”
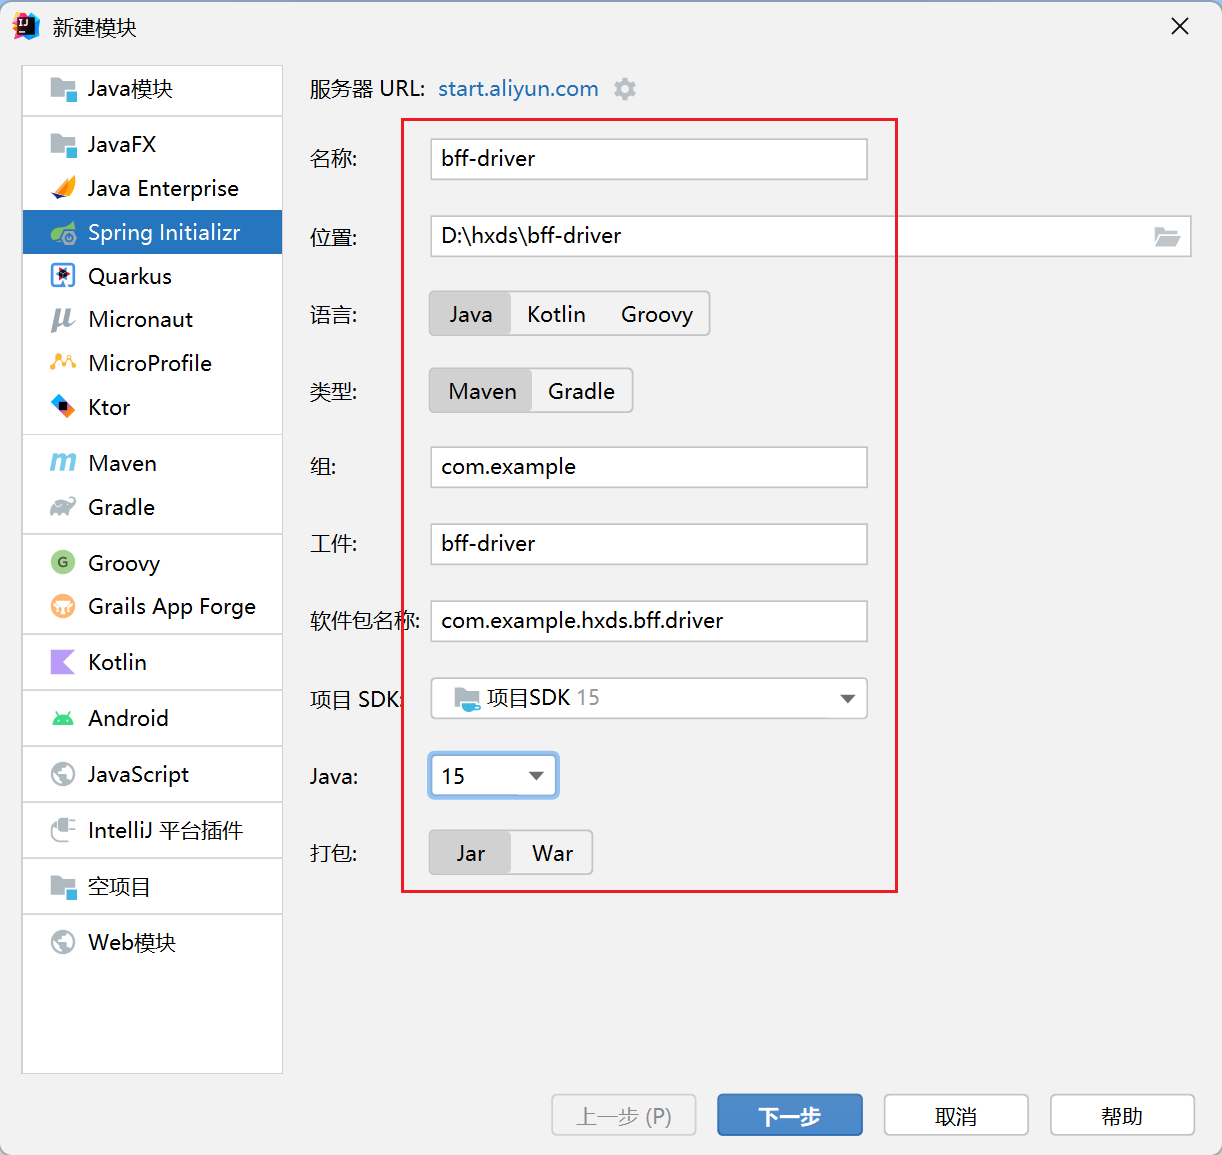
新建的子系统叫做bff-driver,也是SpringBoot类型的项目。
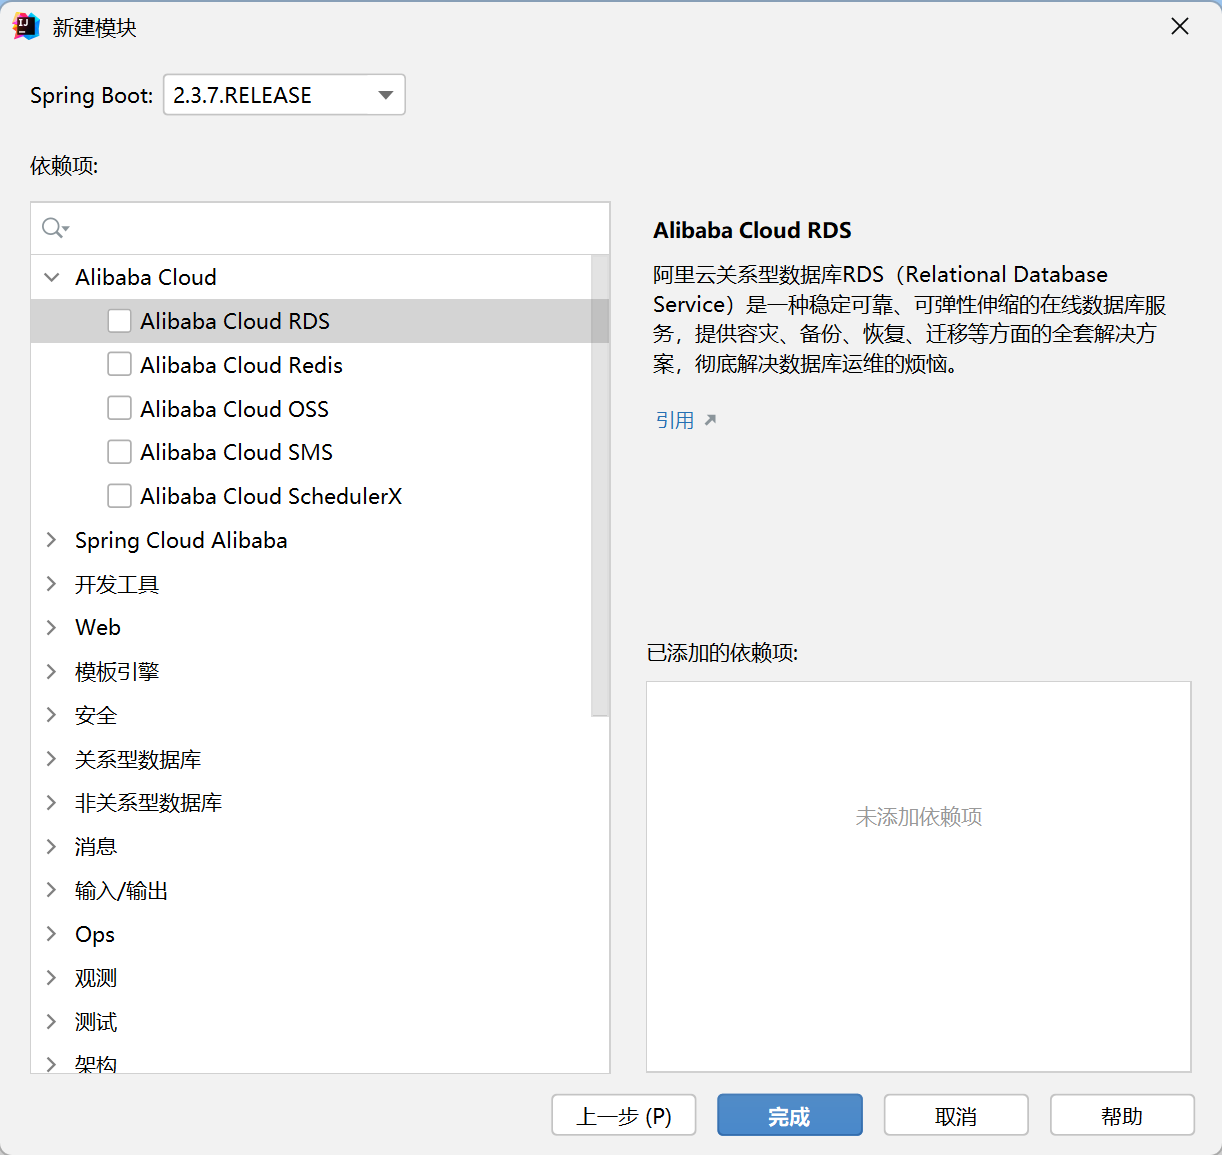
依赖项目界面依然什么都不需要勾选,我们一会儿覆盖pom.xml文件即可。
二、配置pom.xml文件
把pom.xml文件覆盖成下面的样子:
<?xml version="1.0" encoding="UTF-8"?>
<project xmlns="http://maven.apache.org/POM/4.0.0" xmlns:xsi="http://www.w3.org/2001/XMLSchema-instance"
         xsi:schemaLocation="http://maven.apache.org/POM/4.0.0 https://maven.apache.org/xsd/maven-4.0.0.xsd">
    <modelVersion>4.0.0</modelVersion>
    <groupId>com.example</groupId>
    <artifactId>bff-driver</artifactId>
    <version>0.0.1-SNAPSHOT</version>
    <name>bff-driver</name>
    <description>bff-driver</description>
    <parent>
        <groupId>com.example</groupId>
        <artifactId>hxds</artifactId>
        <version>0.0.1-SNAPSHOT</version>
    </parent>

    <properties>
        <java.version>15</java.version>
        <project.build.sourceEncoding>UTF-8</project.build.sourceEncoding>
        <project.reporting.outputEncoding>UTF-8</project.reporting.outputEncoding>
        <spring-boot.version>2.3.7.RELEASE</spring-boot.version>
        <spring-cloud-alibaba.version>2.2.2.RELEASE</spring-cloud-alibaba.version>
        <codingapi.version>5.0.2.RELEASE</codingapi.version>
    </properties>

    <dependencies>
        <dependency>
            <groupId>org.springframework.boot</groupId>
            <artifactId>spring-boot-starter-web</artifactId>
            <exclusions>
                <exclusion>
                    <groupId>org.springframework.boot</groupId>
                    <artifactId>spring-boot-starter-tomcat</artifactId>
                </exclusion>
            </exclusions>
        </dependency>
        <dependency>
            <groupId>org.springframework.boot</groupId>
            <artifactId>spring-boot-starter-jetty</artifactId>
        </dependency>
        <dependency>
            <groupId>com.alibaba.cloud</groupId>
            <artifactId>spring-cloud-starter-alibaba-nacos-config</artifactId>
        </dependency>
        <dependency>
            <groupId>com.alibaba.cloud</groupId>
            <artifactId>spring-cloud-starter-alibaba-nacos-discovery</artifactId>
        </dependency>
        <dependency>
            <groupId>org.springframework.cloud</groupId>
            <artifactId>spring-cloud-starter-openfeign</artifactId>
        </dependency>
        <!-- Feign进行跨服务传递文件依赖 -->
        <dependency>
            <groupId>io.github.openfeign.form</groupId>
            <artifactId>feign-form</artifactId>
            <version>3.8.0</version>
        </dependency>
        <dependency>
            <groupId>io.github.openfeign.form</groupId>
            <artifactId>feign-form-spring</artifactId>
            <version>3.8.0</version>
        </dependency>
        <!--Redis-->
        <dependency>
            <groupId>org.springframework.boot</groupId>
            <artifactId>spring-boot-starter-data-redis</artifactId>
        </dependency>
        <!--Sa-Token核心库-->
        <dependency>
            <groupId>cn.dev33</groupId>
            <artifactId>sa-token-spring-boot-starter</artifactId>
            <version>1.28.0</version>
        </dependency>
        <!--用Redis缓存授权信息-->
        <dependency>
            <groupId>cn.dev33</groupId>
            <artifactId>sa-token-dao-redis</artifactId>
            <version>1.28.0</version>
        </dependency>
        <!--注解式权限验证-->
        <dependency>
            <groupId>cn.dev33</groupId>
            <artifactId>sa-token-spring-aop</artifactId>
            <version>1.28.0</version>
        </dependency>
        <!--后端验证-->
        <dependency>
            <groupId>org.springframework.boot</groupId>
            <artifactId>spring-boot-starter-validation</artifactId>
        </dependency>
        <!--SpringDoc-->
        <dependency>
            <groupId>org.springdoc</groupId>
            <artifactId>springdoc-openapi-spring-boot-2-webmvc</artifactId>
            <version>3.1.5</version>
        </dependency>
        <!--依赖common模块-->
        <dependency>
            <groupId>com.example</groupId>
            <artifactId>common</artifactId>
            <version>0.0.1-SNAPSHOT</version>
        </dependency>
        <dependency>
            <groupId>org.springframework.boot</groupId>
            <artifactId>spring-boot-starter-test</artifactId>
            <scope>test</scope>
            <exclusions>
                <exclusion>
                    <groupId>org.junit.vintage</groupId>
                    <artifactId>junit-vintage-engine</artifactId>
                </exclusion>
            </exclusions>
        </dependency>
        <!-- txlcn 分布式事务 -->
        <dependency>
            <groupId>com.codingapi.txlcn</groupId>
            <artifactId>txlcn-tc</artifactId>
            <version>${codingapi.version}</version>
        </dependency>
        <dependency>
            <groupId>com.codingapi.txlcn</groupId>
            <artifactId>txlcn-txmsg-netty</artifactId>
            <version>${codingapi.version}</version>
        </dependency>
        <dependency>
            <groupId>org.mybatis.spring.boot</groupId>
            <artifactId>mybatis-spring-boot-starter</artifactId>
            <version>2.2.0</version>
        </dependency>
        <dependency>
            <groupId>mysql</groupId>
            <artifactId>mysql-connector-java</artifactId>
            <scope>runtime</scope>
        </dependency>
        <dependency>
            <groupId>com.alibaba</groupId>
            <artifactId>druid-spring-boot-starter</artifactId>
            <version>1.1.13</version>
        </dependency>
    </dependencies>

    <dependencyManagement>
        <dependencies>
            <dependency>
                <groupId>org.springframework.boot</groupId>
                <artifactId>spring-boot-dependencies</artifactId>
                <version>${spring-boot.version}</version>
                <type>pom</type>
                <scope>import</scope>
            </dependency>
        </dependencies>
    </dependencyManagement>

    <build>
        <plugins>
            <plugin>
                <groupId>org.apache.maven.plugins</groupId>
                <artifactId>maven-compiler-plugin</artifactId>
                <version>3.8.1</version>
                <configuration>
                    <source>15</source>
                    <target>15</target>
                    <encoding>UTF-8</encoding>
                </configuration>
            </plugin>
            <plugin>
                <groupId>org.springframework.boot</groupId>
                <artifactId>spring-boot-maven-plugin</artifactId>
                <version>2.3.7.RELEASE</version>
                <configuration>
                    <mainClass>com.example.hxds.bff.driver.BffDriverApplication</mainClass>
                </configuration>
                <executions>
                    <execution>
                        <id>repackage</id>
                        <goals>
                            <goal>repackage</goal>
                        </goals>
                    </execution>
                </executions>
            </plugin>
        </plugins>
    </build>

</project>
覆盖好pom.xml文件之后,在pom.xml文件中任意位置点击鼠标右键,然后选择“Maven”->“重新加载项目”,这样Maven才会引用你pom.xml文件中引用的依赖库。
三、编写YML配置文件
把resources目录下的application.properties文件改成application.yml,然后编写文件的内容。
server:
  jetty:
    threads:
      acceptors: 4
      selectors: 8
  port: 8101
  servlet:
    context-path: /

spring:
  profiles:
    #引用application-common.yml文件
    include: common
  application:
    name: bff-driver
  redis:
    database: 3
    host: localhost
    port: 6379
    password: abc123456
    jedis:
      pool:
        max-active: 1000
        max-wait: -1ms
        max-idle: 16
        min-idle: 8
  cloud:
    inetutils:
      #子系统注册到Nacos上的IP地址
      preferred-networks: 127.0.0.1
    nacos:
      #配置子系统在Web管理页面上的注册信息
      config:
        group: DEFAULT_GROUP
        file-extension: yaml
        server-addr: 127.0.0.1:8848
        prefix: ${
   spring.application.name}
        namespace: hxds
      #配置子系统在Nacos上的注册信息
      discovery:
        namespace: hxds
        username: nacos
        password: nacos
        server-addr: 127.0.0.1:8848
        heart-beat-interval: 1000
        heart-beat-timeout: 1000
        group: DEFAULT_GROUP
  datasource:
    type: com.alibaba.druid.pool.DruidDataSource
    druid:
      driver-class-name: com.mysql.cj.jdbc.Driver
      url: jdbc:mysql://127.0.0.1:3307/hxds?useUnicode=true&characterEncoding=UTF-8&serverTimezone=Asia/Shanghai&nullCatalogMeansCurrent=true
      username: root
      password: abc123456
      initial-size: 4
      max-active: 8
      min-idle: 8
      max-wait: 60000
      test-while-idle: true
      test-on-borrow: false
      test-on-return: false
  servlet:
    multipart:
      enabled: true
      max-file-size: 20MB
      max-request-size: 20MB

sa-token:
  # HTTP请求头中token的名称
  token-name: token
  # token有效期,单位s 默认30天, -1代表永不过期
  timeout: 864000
  # token临时有效期 (指定时间内无操作就视为token过期) 单位: 秒
  activity-timeout: -1
  # 是否允许同一账号并发登录 (为true时允许一起登录, 为false时新登录挤掉旧登录)
  allow-concurrent-login: true
  # 在多人登录同一账号时,是否共用一个token (为true时所有登录共用一个token, 为false时每次登录新建一个token)
  is-share: false
  # token风格
  token-style: uuid
  #读取Cookie中Token
  isReadCookie: false

springdoc:
  api-docs:
    enabled: true
    path: /doc-api.html
  swagger-ui:
    path: /swagger-ui.html
    disable-swagger-default-url: on

tx-lcn:
  client:
    #连接TM节点
    manager-address: 127.0.0.1:8070
feign:
  client:
    config:
      default:
        connectTimeout: 10000
        readTimeout: 300000
四、全局处理异常
在当前子系统中,各处代码出了异常应该集中统一处理,所以我们要创建Java类捕获当前子系统出现的各种异常,然后加以处理。
在com.example.hxds.bff.driver.config包中,创建ExceptionAdvice.java类,然后写入下面的代码,注意bff层的全局异常处理跟基础子系统的异常处理多了一个新方法。
package com.example.hxds.bff.driver.config;

import cn.dev33.satoken.exception.NotLoginException;
import cn.hutool.json.JSONObject;
import com.example.hxds.common.exception.HxdsException;
import lombok.extern.slf4j.Slf4j;
import org.springframework.http.HttpStatus;
import org.springframework.http.converter.HttpMessageNotReadableException;
import org.springframework.web.HttpRequestMethodNotSupportedException;
import org.springframework.web.bind.MethodArgumentNotValidException;
import org.springframework.web.bind.annotation.ExceptionHandler;
import org.springframework.web.bind.annotation.ResponseBody;
import org.springframework.web.bind.annotation.ResponseStatus;
import org.springframework.web.bind.annotation.RestControllerAdvice;

@Slf4j
@RestControllerAdvice
public class ExceptionAdvice {


    @ResponseBody
    @ResponseStatus(HttpStatus.INTERNAL_SERVER_ERROR)
    @ExceptionHandler(Exception.class)
    public String exceptionHandler(Exception e) {

        JSONObject json = new JSONObject();
        //处理后端验证失败产生的异常
        if (e instanceof MethodArgumentNotValidException) {

            MethodArgumentNotValidException exception = (MethodArgumentNotValidException) e;
            json.set("error", exception.getBindingResult().getFieldError().getDefaultMessage());
        }
        //HTTP请求类型不正确的异常
        else if (e instanceof HttpRequestMethodNotSupportedException) {

            json.set("error", "Web方法不支持当前的请求类型");
        }
        //缺少必须提交的表单数据
        else if (e instanceof HttpMessageNotReadableException) {

            json.set("error", "缺少提交的数据");
        }
        //处理业务异常
        else if (e instanceof HxdsException) {

            log.error("执行异常", e);
            HxdsException exception = (HxdsException) e;
            json.set("error", exception.getMsg());
        }
        //司机已经注册异常
        else if (e.getMessage().contains("该微信无法注册")) {

            log.error("执行异常", e);
            json.set("error", "该微信无法注册");
        }
        //处理其余的异常
        else {

            log.error("执行异常", e);
            json.set("error", "执行异常");
        }
        return json.toString();
    }

    /**
     * 捕获并处理客户端未登录的异常
     */
    @ResponseBody
    @ResponseStatus(HttpStatus.UNAUTHORIZED)
    @ExceptionHandler(NotLoginException.class)
    public String unLoginHandler(Exception e) {

        JSONObject json = new JSONObject();
        json.set("error", e.getMessage());
        return json.toString();
    }

}
因为bff层有鉴权功能,所以如果客户端没有登陆,那么bff层是要返回异常消息的,而且这个异常消息还要做简化才能返回给客户端,否则把后端执行栈信息直接返回给客户端你觉得妥当吗?
HTTP的500状态码,大家都知道是什么意思。如果客户端没有登陆,与之对应的HTTP状态码则是403。bff层整合了SaToken之后,如果客户端没有登陆,产生的异常是NotLoginException。上面ExceptionAdvice里面的exceptionHandler()方法处理的异常,返回的是500状态码。注意看,该方法添加的注解是@ResponseStatus(HttpStatus.INTERNAL_SERVER_ERROR),这就代表响应的状态码是500。
未登录的状态码是403,所以我们要新写一个方法处理异常并返回403状态码。看来我必须定义新的方法处理异常,于是我就创建了unLoginHandler()方法,并添加了@ResponseStatus(HttpStatus.UNAUTHORIZED)注解。
五、允许Feign远程调用服务可以传输文件
因为bff程序调用华夏代驾其他基础子系统的时候,有可能要传递文件,所以我们必须定义配置类,Feign才可以传输文件。
在com.example.hxds.bff.driver.config包中创建MultipartSupportConfig.java类,写入下面这些代码。
package com.example.hxds.bff.driver.config;

import feign.codec.Encoder;
import feign.form.spring.SpringFormEncoder;
import org.springframework.beans.factory.ObjectFactory;
import org.springframework.beans.factory.annotation.Autowired;
import org.springframework.boot.autoconfigure.http.HttpMessageConverters;
import org.springframework.cloud.openfeign.support.SpringEncoder;
import org.springframework.context.annotation.Bean;
import org.springframework.context.annotation.Configuration;

@Configuration
public class MultipartSupportConfig {


    @Autowired
    private ObjectFactory<HttpMessageConverters> messageConverters;

    @Bean
    public Encoder feignFormEncoder () {

        return new SpringFormEncoder(new SpringEncoder(messageConverters));
    }

}
六、配置Swagger功能
我们为当前的子系统配置Swagger功能,其他人就可以用浏览器很容易的测试我们编写的Web方法。在SpringBoot中配置Swagger其实很简单,只需要声明Java配置类即可,等测试Web方法的时候我再告诉你怎么用Swagger。
在com.example.hxds.bff.driver.config包中创建SpringDocConfig.java类,写入下面的代码:
package com.example.hxds.bff.driver.config;

import io.swagger.v3.oas.annotations.OpenAPIDefinition;
import io.swagger.v3.oas.annotations.enums.SecuritySchemeIn;
import io.swagger.v3.oas.annotations.enums.SecuritySchemeType;
import io.swagger.v3.oas.annotations.info.Info;
import io.swagger.v3.oas.annotations.security.SecurityRequirement;
import io.swagger.v3.oas.annotations.security.SecurityScheme;
import org.springframework.context.annotation.Configuration;

@OpenAPIDefinition(
        info = @Info(
                title = "bff-driver",
                description = "华夏代驾司机端BFF",
                version = "1.0"
        ),
        security = @SecurityRequirement(name = "token")
)
@SecurityScheme(
        name = "token",
        type = SecuritySchemeType.APIKEY,
        in = SecuritySchemeIn.HEADER,
        bearerFormat = "JWT",
        scheme = "bearer"
)
@Configuration
public class SpringDocConfig {


}
bff层的Swagger配置和基础模块的不一样,多了security = @SecurityRequirement(name = "token")和@SecurityScheme注解。因为基础子系统不对客户端开放,就没配置鉴权功能,我们用Swagger自然也就不需要先登录了。但是bff层面对的是客户端,这就意味着想要调用bff层的Web接口,必须要先登录才可以,这就是@SecurityRequirement和@SecurityScheme注解的作用。
七、配置SaToken
1. “认证”和“授权”
SaToken是一种认证与授权框架。这里不得不说一下“认证”和“授权”是怎么回事。“认证”通常指的是登陆,“授权”指的是权限验证。
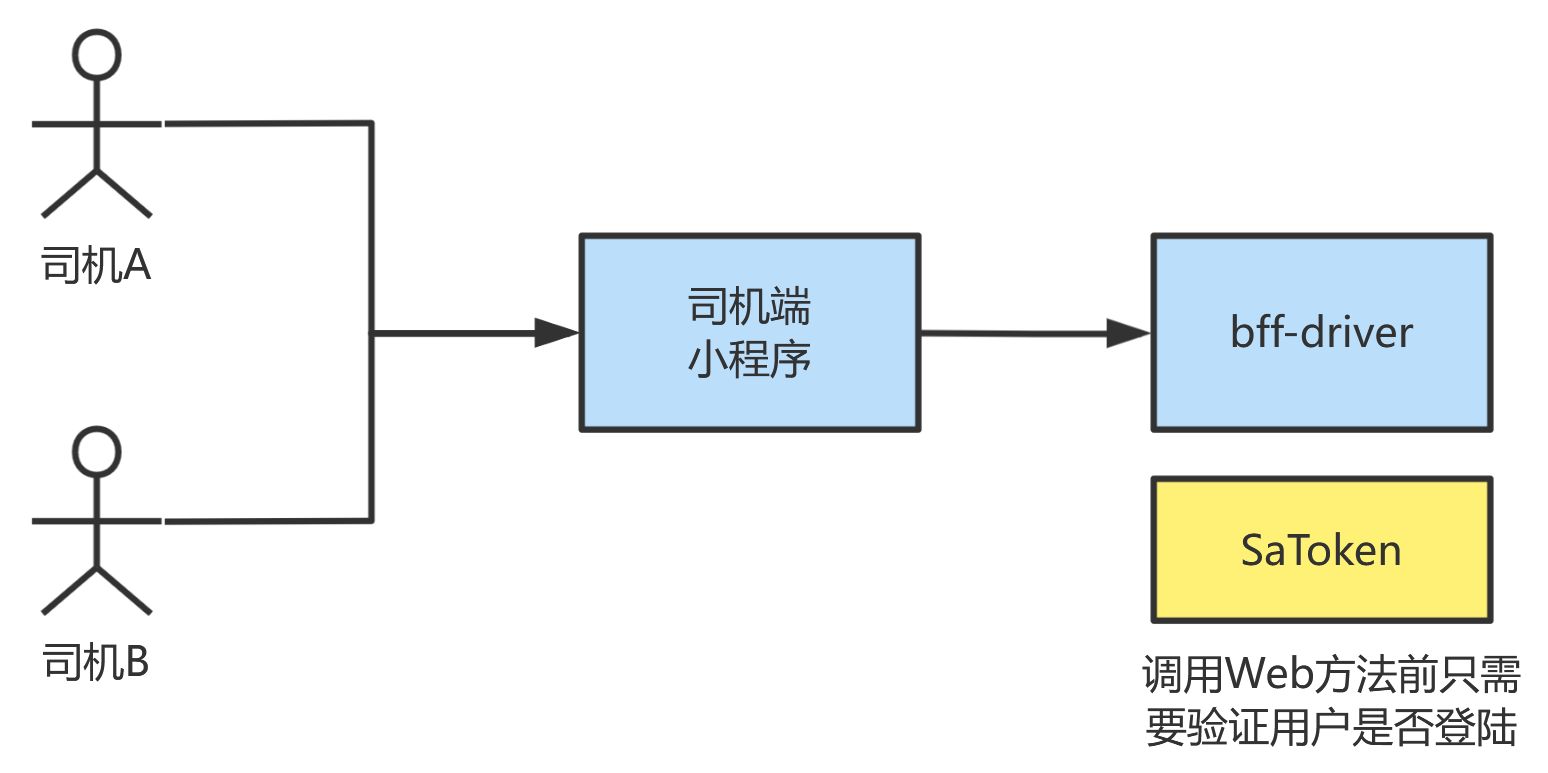
例如华夏代驾司机端小程序,只有代驾司机在使用,而且这些代驾司机都是同一个角色,所以我们只验证代驾司机是否登陆就可以了,不用去验证权限。因为使用司机端小程序的人都是同一个角色,具有相同的权限,所以根本不需要去判断A司机有什么权限,B司机有什么权限。
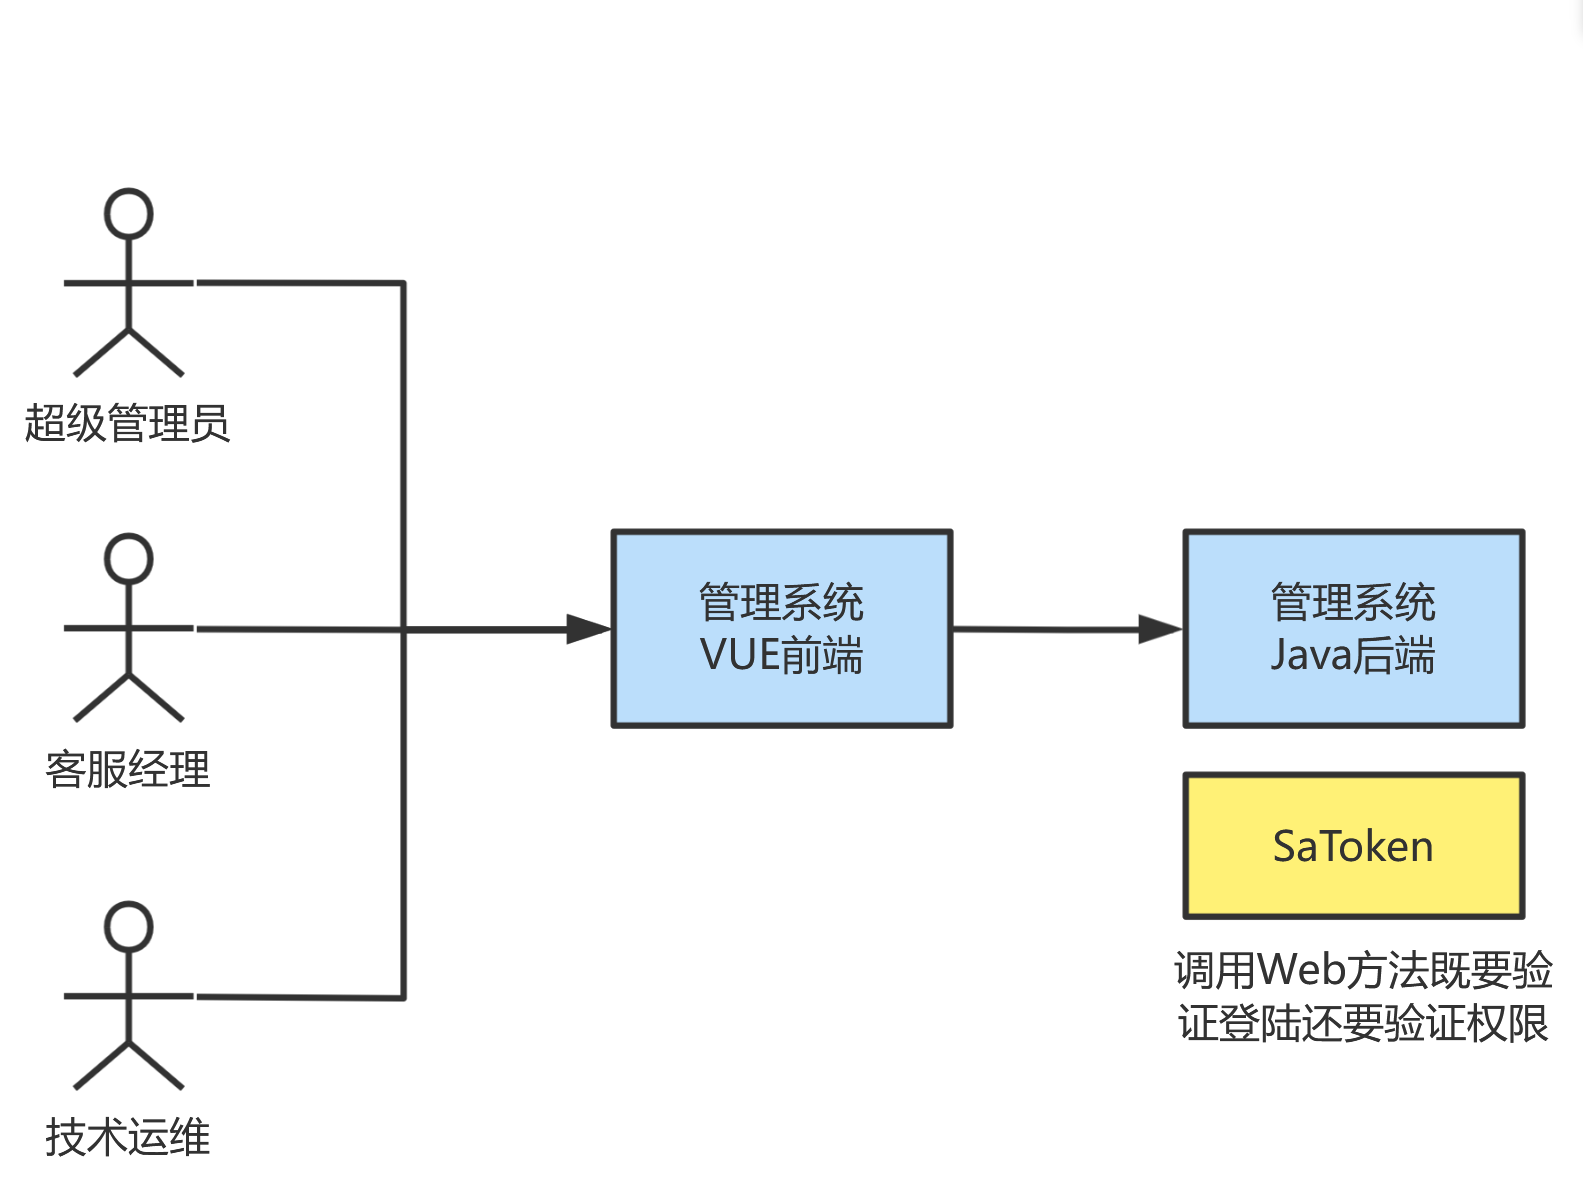
作为MIS管理系统,登陆系统的用户身份可是有区别的,有超级管理员、普通管理员、普通客服、客服经理等等,所以这些人使用MIS系统的时候我们不仅要判断他们是否已经登陆,而且还要判断他们是否具备相关权限。
2. Token令牌
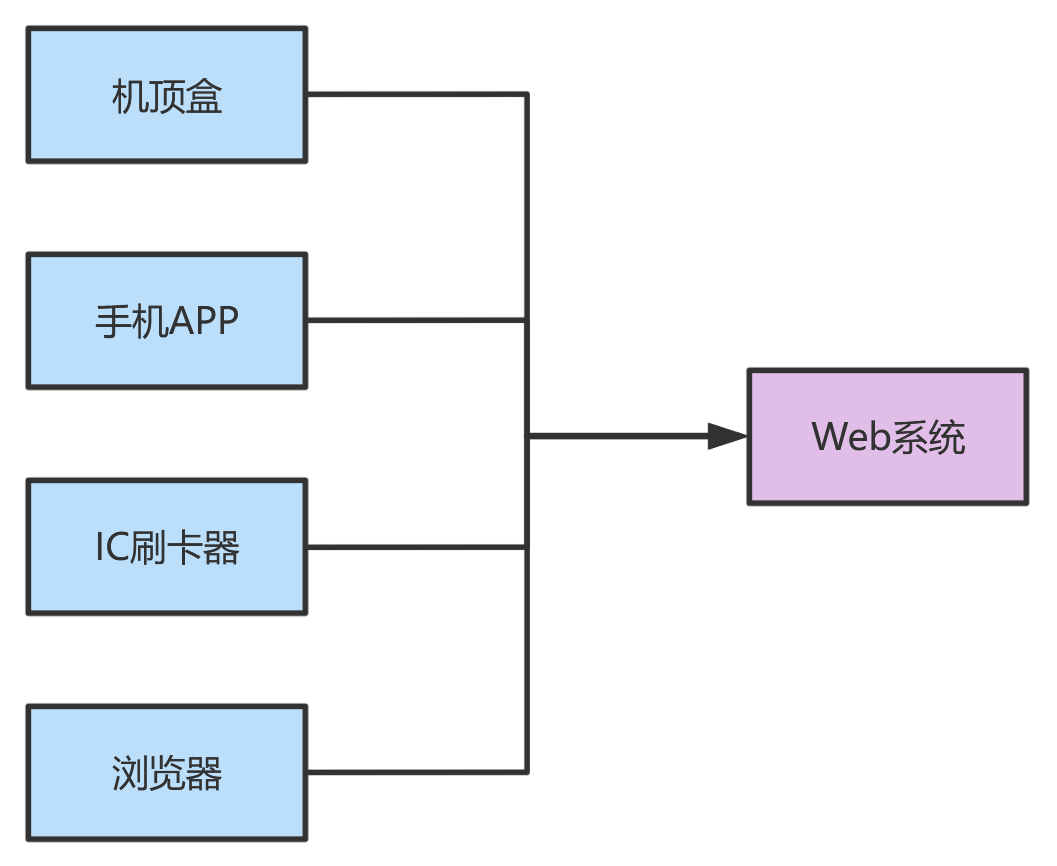
为了兼容更多类别的客户端,所以我们选择把“认证”结果加密保存在客户端,这个保存在客户端的“认证”凭证叫做令牌(Token)。因为令牌仅仅是一个加密后的字符串,所以任何客户端系统都能存储字符串。例如电视机顶盒、手机APP、IC刷卡器、浏览器等等。甚至说你的小米手环也能保存Token令牌(仅是个字符串而已),所以小米手环就能接入小米健康,把你的健康数据上传到网站。
如果我们采用传统方式,把“认证”凭证保存到HttpSession中,那么Web系统的客户端只能是浏览器了。因为HttpSession要依靠浏览器的Cookie机制才能运行,现在只有浏览器有Cookie。这样你就把嵌入式设备、移动端设备、智能家电拒之门外。你觉得HttpSession和Token哪个更好呢?
3. 验证是否登陆
如果我们给某个Web方法加上@SaCheckLogin注解,那么有HTTP请求这个Web方法的时候,SaToken框架会自动拦截请求,然后判断用户的请求头中是否包含了Token令牌。如果核对令牌无误,那么说明发出HTTP请求的客户端是已经登陆过的。

我就以司机取消订单的Web方法举例,该方法只能被司机端小程序调用,所以我们必须验证司机是否登陆。只要Token没有问题,就允许你调用Web方法取消订单。
@RestController
@RequestMapping("/order/cancel")
@Tag(name = "CancelOrderController", description = "取消订单的Web接口")
public class CancenlOrderController {

    @Resource
    private CancelOrderService cancelOrderService;

    @PostMapping("/driverCancelOrder")
    @SaCheckLogin
    @Operation(summary = "司机取消订单的Web方法"
最低0.47元/天 解锁文章


 445
445


 被折叠的 条评论
为什么被折叠?
被折叠的 条评论
为什么被折叠?
 到【灌水乐园】发言


