


NotificationCompat.Builder or Notification.Builder
support v4中引入NotificationCompat.Builder,Notification.Builder在api11开始支持,通过两个简单的对比例子,对他们有一个感性的认识。
1.NotificationCompat.Builder
package com.example.notificationdemo;

import android.app.Activity;
import android.app.Notification;
import android.app.NotificationManager;
import android.app.PendingIntent;
import android.content.Context;
import android.content.Intent;
import android.graphics.BitmapFactory;
import android.os.Bundle;
import android.support.v4.app.NotificationCompat;

public class WelcomeActivity extends Activity {
    String TAG = WelcomeActivity.class.getSimpleName();

    @Override
    protected void onCreate(Bundle savedInstanceState) {
        super.onCreate(savedInstanceState);
        // 1.展示的内容
        NotificationCompat.Builder notificationBuilder = new NotificationCompat.Builder(
                this)
                .setContentTitle("title title title ")
                .setContentText("text text text")
                .setSmallIcon(R.drawable.ic_launcher)
                .setLargeIcon(
                        BitmapFactory.decodeResource(getResources(),
                                R.drawable.ic_launcher));
        // 2.点击通知栏的跳转
        Intent intent = new Intent(WelcomeActivity.this, MainActivity.class);
        PendingIntent pendingIntent = PendingIntent.getActivity(this, 0,
                intent, PendingIntent.FLAG_UPDATE_CURRENT);
        notificationBuilder.setContentIntent(pendingIntent);
        // 3.发出通知
        Notification notification = null;
        notification = notificationBuilder.build();

        NotificationManager notificationManager = (NotificationManager) getSystemService(Context.NOTIFICATION_SERVICE);

        notificationManager.notify(0, notification);

    }

}
2.Notification.Builder
package com.example.notificationdemo;

import android.app.Activity;
import android.app.Notification;
import android.app.NotificationManager;
import android.app.PendingIntent;
import android.content.Context;
import android.content.Intent;
import android.graphics.BitmapFactory;
import android.os.Build;
import android.os.Bundle;

public class WelcomeActivity extends Activity {
    String TAG = WelcomeActivity.class.getSimpleName();

    @Override
    protected void onCreate(Bundle savedInstanceState) {
        super.onCreate(savedInstanceState);

        // 1.展示的内容
        Notification.Builder notificationBuilder = new Notification.Builder(
                this)
                .setContentTitle("title title title ")
                .setContentText("text text text")
                .setSmallIcon(R.drawable.ic_launcher)
                .setLargeIcon(
                        BitmapFactory.decodeResource(getResources(),
                                R.drawable.ic_launcher));
        // 2.点击通知栏的跳转
        Intent intent = new Intent(WelcomeActivity.this, MainActivity.class);
        PendingIntent pendingIntent = PendingIntent.getActivity(this, 0,
                intent, PendingIntent.FLAG_UPDATE_CURRENT);
        notificationBuilder.setContentIntent(pendingIntent);
        // 3.发出通知
        Notification notification = null;

        if(Build.VERSION.SDK_INT>=16){
            notification=notificationBuilder.build();
        }else{
            notification=notificationBuilder.getNotification();
        }

        NotificationManager notificationManager = (NotificationManager) getSystemService(Context.NOTIFICATION_SERVICE);

        notificationManager.notify(0, notification);

    }

}
这两者使用方法相同,就是通过Builder生成Notification的方式有差别!
这两个是一样的显示效果,这里就不贴第二张图片了!

启动 Activity 时保留导航
这里面分两种情况,
1.点击通知栏打开的页面是正常使用app流程的一部分eg.点击通知栏查看邮件详情;
2.要打开的页面仅仅是对通知内容的补充,在其他操作中不会出现。
下面分别以例子来说明一下
1.通知栏打开的页面是正常流程的一部分,这是点击返回,要跳转到主页面,如果为邮件则是邮件列表页面。
package com.example.notificationdemo;

import android.app.Activity;
import android.app.NotificationManager;
import android.app.PendingIntent;
import android.content.Context;
import android.content.Intent;
import android.graphics.BitmapFactory;
import android.os.Bundle;
import android.support.v4.app.NotificationCompat;
import android.support.v4.app.TaskStackBuilder;

public class WelcomeActivity extends Activity {
    String TAG = WelcomeActivity.class.getSimpleName();
    @Override
    protected void onCreate(Bundle savedInstanceState) {
        super.onCreate(savedInstanceState);
         Intent resultIntent = new Intent(this, NotificationActivity.class);
         resultIntent.putExtra("name", "gch");
         TaskStackBuilder stackBuilder = TaskStackBuilder.create(this);
         // Adds the back stack
         stackBuilder.addParentStack(NotificationActivity.class);
         // Adds the Intent to the top of the stack
         stackBuilder.addNextIntent(resultIntent);
         // Gets a PendingIntent containing the entire back stack
         PendingIntent resultPendingIntent = stackBuilder.getPendingIntent(0,
         PendingIntent.FLAG_UPDATE_CURRENT);
         NotificationCompat.Builder builder = new NotificationCompat.Builder(
         this);
         builder.setContentIntent(resultPendingIntent);

         builder.setSmallIcon(R.drawable.ic_launcher);
         builder.setContentTitle("title...");
         builder.setContentText("content...");
         builder.setLargeIcon(BitmapFactory.decodeResource(getResources(), R.drawable.ic_launcher));
         builder.setAutoCancel(true);

         NotificationManager mNotificationManager = (NotificationManager)
         getSystemService(Context.NOTIFICATION_SERVICE);
         mNotificationManager.notify(0, builder.build());


    }
}
NotificationActivity是点击通知栏跳转到的页面,而MainActivity是APP的主页面
<activity
            android:name=".NotificationActivity"
            android:parentActivityName=".MainActivity" >
            <meta-data
                android:name="android.support.PARENT_ACTIVITY"
                android:value=".MainActivity" />
        </activity>
对 Android 4.0.3 及更低版本的支持,添加 元素作为 的子项来指定正在启动的 Activity 的父项。
package com.example.notificationdemo;

import android.app.Activity;
import android.os.Bundle;
import android.view.Gravity;
import android.widget.TextView;

public class NotificationActivity extends Activity {

    @Override
    protected void onCreate(Bundle savedInstanceState) {
        super.onCreate(savedInstanceState);
        TextView tv = new TextView(this);
        setContentView(tv);
        tv.setTextSize(40);
        tv.setGravity(Gravity.CENTER);
        String name=getIntent().getStringExtra("name");

        tv.setText("这是从通知栏,跳转过来的~"+name);
    }
}
跳转到该页面后,按返回键,就会跳转到MainActivity
package com.example.notificationdemo;

import android.app.Activity;
import android.os.Bundle;
import android.view.Gravity;
import android.widget.TextView;

public class MainActivity extends Activity {

    @Override
    protected void onCreate(Bundle savedInstanceState) {
        super.onCreate(savedInstanceState);
        TextView tv = new TextView(this);
        tv.setTextSize(30);
        tv.setGravity(Gravity.CENTER);
        tv.setText("这是主页面");
        setContentView(tv);

    }
}
2.Notification跳转的页面仅仅是对通知的补充,在其他操作中不会出现
package com.example.notificationdemo;

import android.app.Activity;
import android.app.NotificationManager;
import android.app.PendingIntent;
import android.content.Context;
import android.content.Intent;
import android.os.Bundle;
import android.support.v4.app.NotificationCompat;

public class WelcomeActivity extends Activity {
    String TAG = WelcomeActivity.class.getSimpleName();

    @Override
    protected void onCreate(Bundle savedInstanceState) {
        // TODO Auto-generated method stub
        super.onCreate(savedInstanceState);
        // 1.定义notificationCompactBuilder对象,添加icon/title/content简单属性
        NotificationCompat.Builder notificationCompactBuilder = new NotificationCompat.Builder(
                this);
        notificationCompactBuilder.setSmallIcon(R.drawable.ic_launcher);
        notificationCompactBuilder.setContentTitle("title...");
        notificationCompactBuilder.setContentText("content...");
        // 定义点击通知栏时,跳转的页面
        Intent intent = new Intent(getApplicationContext(),
                NotificationActivity.class);
        PendingIntent pendingIntent = PendingIntent.getActivity(
                getApplicationContext(), 0, intent,
                PendingIntent.FLAG_CANCEL_CURRENT);
        // 用户点击通知栏后后取消
        notificationCompactBuilder.setAutoCancel(true);

        notificationCompactBuilder.setContentIntent(pendingIntent);
        // 2.使用NotificationManager.notify发出通知
        NotificationManager notificationManager = (NotificationManager) getSystemService(Context.NOTIFICATION_SERVICE);
        notificationManager.notify(0, notificationCompactBuilder.build());
        this.finish();
    }
}
为了测试其效果,在发送通知后,将当前页面关闭。
    <activity
            android:name=".NotificationActivity"
            android:excludeFromRecents="true"
            android:launchMode="singleTask"
            android:taskAffinity="" >
        </activity>
1.android:taskAffinity=””
与代码中设置的 FLAG_ACTIVITY_NEW_TASK 标志相结合,确保此 Activity 不会进入应用的默认任务。任何具有应用默认关联的现有任务均不受影响。
2.android:excludeFromRecents=”true”
将新任务从“最新动态”中排除,这样用户就不会在无意中导航回它。
NotificationActivity代码同上,这里就不再啰嗦了,点击通知栏进入通知详情页面,然后点击导航栏中的返回,点击导航栏中查看后台任务的按钮,看不到当前应用。
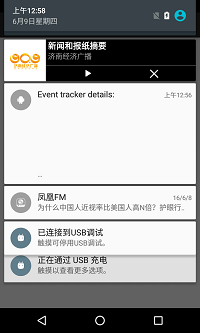
扩展布局通知栏
注意:仅仅是在Android4.1之后才支持
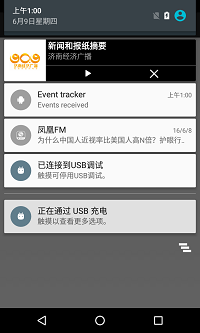
初始情况如下:
在通知栏上使用两个分开的手指,平行向下滑动,就会出现下面的效果
下面是关键的代码片段
    NotificationCompat.InboxStyle inboxStyle =
            new NotificationCompat.InboxStyle();
    String[] events = new String[]{"\n","\n","\n","\n","\n","\n","\n","\n","\n","\n"};
    // Sets a title for the Inbox in expanded layout
    inboxStyle.setBigContentTitle("Event tracker details:");
    // Moves events into the expanded layout
    for (int i=0; i < events.length; i++) {

        inboxStyle.addLine(events[i]);
    }
    // Moves the expanded layout object into the notification object.
    mBuilder.setStyle(inboxStyle);
更新通知(常见于未读消息)
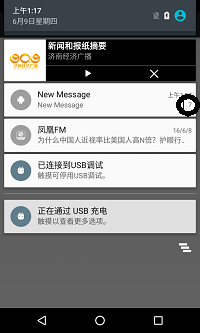
关键代码:
mNotificationManager.notify(notifyID, mNotifyBuilder.build());
更新通知,只要发送新通知的时候,使用旧通知的Id即可。
更新下载进度
注意:这里是Android4.0及其以上系统支持的ProgressBar
Key Code
  int incr;
                    for (incr = 0; incr <= 100; incr+=10) {
                            mBuilder.setProgress(100, incr, false);
                            mNotifyManager.notify(notifyID, mBuilder.build());
                                try {
                                                                Thread.sleep(1000);
                                } catch (InterruptedException e) {
                                    Log.d(TAG, "sleep failure");
                                }
                    }
                    // When the loop is finished, updates the notification
                    mBuilder.setContentText("Download complete")
                    // Removes the progress bar
                            .setProgress(0,0,false);
                    mNotifyManager.notify(notifyID, mBuilder.build());
                }
如果不知道明确的进度使用 mBuilder.setProgress(0, 0, true);即可。
RemoteViews——自定义通知栏
这里一定要注意一下:在同一个RemoteView中,一个key,仅仅可以对应一个value,否则后来设置的,将修改原来的数据。比如:如果要通过RemoteView Notification对播放进行控制,就不能对所有的按钮的PendingIntent添加同一个Key,根据其对应的值进行判断要进行的操作。找到的一个办法是,定义直接通过intent.putExtra(String ,boolean)来进行处理!
getService(Context context, int requestCode, Intent intent, int flags)注意同一个RemoteView中不同的组件之间 requestCode,也不能相同,否则,后来设置的无效!
    RemoteViews remoteViews=new RemoteViews(this.getPackageName(),R.layout.activity_main);

        remoteViews.setTextViewText(R.id.tv, "from remoteView");
        //add click listener
        Intent pauseIntent = new Intent(getApplicationContext(), MusicService.class);
        PendingIntent pendingItent = PendingIntent.getService(getApplicationContext(), PAUSE, pauseIntent, 0);
        rm.setOnClickPendingIntent(R.id.tv, pendingItent);


         Notification noti = new Notification.Builder(this)
            .setSmallIcon(R.drawable.ic_launcher)
            .setContent(remoteViews)
            .setAutoCancel(true)
         .build();

         NotificationManager notificationManager=(NotificationManager)getSystemService(Context.NOTIFICATION_SERVICE);
         notificationManager.notify(0, noti);
定义RemoteViews后,使用Notification.Builder.setContent可以设置进去。
注意:这里setSmallIcon虽然不会显示在最终的通知栏,请务必设置,否则通知栏显示不出来!
发送通知支持震动/声音
 noti.defaults |= Notification.DEFAULT_SOUND;
 noti.defaults |= Notification.DEFAULT_VIBRATE;
转载地址
https://developer.android.com/guide/topics/ui/notifiers/notifications.html#Design


 196
196

 被折叠的 条评论
为什么被折叠?
被折叠的 条评论
为什么被折叠?
 到【灌水乐园】发言


