


将XML布局文件转化为View或者Widget时,经常使用LayoutInfater.infate()&&View.inflate()
View.inflate()源代码如下:
 /**
     * Inflate a view from an XML resource.  This convenience method wraps the {@link
     * LayoutInflater} class, which provides a full range of options for view inflation.
     *
     * @param context The Context object for your activity or application.
     * @param resource The resource ID to inflate
     * @param root A view group that will be the parent.  Used to properly inflate the
     * layout_* parameters.
     * @see LayoutInflater
     */
    public static View inflate(Context context, @LayoutRes int resource, ViewGroup root) {
        LayoutInflater factory = LayoutInflater.from(context);
        return factory.inflate(resource, root);
    }
可见View.inflate()是通过LayoutInfater.inflate()实现了xml文件到View或者Widget的转化的。下面讲述一下LayoutInfater.inflate()中关于attachToRoot参数的注意事项。
    /**
     * Inflate a new view hierarchy from the specified xml resource. Throws
     * {@link InflateException} if there is an error.
     *
     * @param resource ID for an XML layout resource to load (e.g.,
     *        <code>R.layout.main_page</code>)
     * @param root Optional view to be the parent of the generated hierarchy (if
     *        <em>attachToRoot</em> is true), or else simply an object that
     *        provides a set of LayoutParams values for root of the returned
     *        hierarchy (if <em>attachToRoot</em> is false.)
     * @param attachToRoot Whether the inflated hierarchy should be attached to
     *        the root parameter? If false, root is only used to create the
     *        correct subclass of LayoutParams for the root view in the XML.
     * @return The root View of the inflated hierarchy. If root was supplied and
     *         attachToRoot is true, this is root; otherwise it is the root of
     *         the inflated XML file.
     */
    public View inflate(@LayoutRes int resource, @Nullable ViewGroup root, boolean attachToRoot) {
        final Resources res = getContext().getResources();
        if (DEBUG) {
            Log.d(TAG, "INFLATING from resource: \"" + res.getResourceName(resource) + "\" ("
                    + Integer.toHexString(resource) + ")");
        }

        final XmlResourceParser parser = res.getLayout(resource);
        try {
            return inflate(parser, root, attachToRoot);
        } finally {
            parser.close();
        }
    }
这一段注释有点长,再摘抄一下,大家请看下面的内容:
 * @param attachToRoot Whether the inflated hierarchy should be attached to
     *        the root parameter? If false, root is only used to create the
* correct subclass of LayoutParams for the root view in the XML.如果attachToRoot=true,则布局文件将转化为View并绑定到root,然后返回root作为根节点的整个View;如果attachToRoot=false,则布局文件转化为View但不绑定到root,返回以布局文件根节点为根节点的View。在这两种情况下,root的LayoutParams***都*会影响布局文件的显示样式。下面分情况对attachToRoot的参数的设置进行讲解。
attachToRoot=true
- 将一个xml布局文件放入组件
item_linearout.xml
<?xml version="1.0" encoding="utf-8"?>
<LinearLayout xmlns:android="http://schemas.android.com/apk/res/android"
    android:id="@+id/ll"
    android:layout_width="match_parent"
    android:layout_height="match_parent"
    android:background="@android:color/white"
    android:orientation="vertical" >
</LinearLayout>
非常简单的布局,注意它的背景颜色是白色!
item_btn.xml
<Button xmlns:android="http://schemas.android.com/apk/res/android"
    android:id="@+id/btn"
    android:layout_width="match_parent"
    android:layout_height="match_parent"
    android:background="#ff0000" >
</Button>
注意他的背景是红色
MainActivity主要代码:
@Override
    protected void onCreate(Bundle savedInstanceState) {
        super.onCreate(savedInstanceState);
        setContentView(R.layout.item_linearout);
        final LinearLayout outLayout = (LinearLayout) findViewById(R.id.ll);
        LayoutInflater inflater = LayoutInflater.from(this);
        inflater.inflate(R.layout.item_btn, outLayout, true);

    }
运行效果
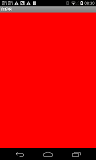
ok,将他放入了linearlaout中。
- 自定义组件
view_with_merge_tag.xml文件
<?xml version="1.0" encoding="utf-8"?>
<merge xmlns:android="http://schemas.android.com/apk/res/android"
    android:layout_width="match_parent"
    android:layout_height="match_parent"
     >
    <TextView
        android:layout_width="match_parent"
        android:layout_height="match_parent"
        android:background="#0f0"
        android:text="Hello World!" >
    </TextView>
</merge>
为了减少布局参差的嵌套,这是用了merge.注意其背景会绿色。
CustomLinear.java
package com.example.androidtest;

import android.content.Context;
import android.util.AttributeSet;
import android.view.LayoutInflater;
import android.widget.LinearLayout;

public class CustomLinear extends LinearLayout {

    public CustomLinear(Context context, AttributeSet attrs) {
        super(context, attrs);
        init();
    }

    public CustomLinear(Context context) {
        super(context);
        init();
    }

    private void init() {
        LayoutInflater inflater = LayoutInflater.from(getContext());
        inflater.inflate(R.layout.view_with_merge_tag, this);
    }

}
MainActivity.java主要代码
    @Override
    protected void onCreate(Bundle savedInstanceState) {
        super.onCreate(savedInstanceState);
        setContentView(new CustomLinear(this));
    }
运行效果:
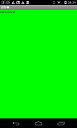
ok!
attachToRoot =false
attacheToRoot就是暂时不将布局文件放入root中。现在修改第一个例子,将attachToRoot设置为false,实现同样的效果。
MainActivity的主要代码:
@Override
    protected void onCreate(Bundle savedInstanceState) {
        super.onCreate(savedInstanceState);

        setContentView(R.layout.item_linearout);
        final LinearLayout outLayout = (LinearLayout) findViewById(R.id.ll);
        LayoutInflater inflater = LayoutInflater.from(this);

        Button button = (Button) inflater.inflate(R.layout.item_btn, outLayout,
                false);
        outLayout.addView(button);
    }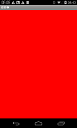
这里将attachToRoot设置为false,没有将button立即加入linearlayout中,稍后的addView,将button添加到了linearlayout中。
布局文件转换为View,不都是为了放在组件,显示在界面上吗?为何还要多此一举,分两步来做这样的事情呢?Android中有些组件有其自身的”add View”机制,如:Fragment.onCreateView
package com.example.androidtest;

import android.app.Fragment;
import android.os.Bundle;
import android.view.LayoutInflater;
import android.view.View;
import android.view.ViewGroup;

public class CustomFragment extends Fragment {
    @Override
    public View onCreateView(LayoutInflater inflater, ViewGroup container,
            Bundle savedInstanceState) {

        View view = inflater.inflate(R.layout.item_btn, container, false);
        return view;
    }
}
在Activty中,
@Override
protected void onCreate(Bundle savedInstanceState) {
super.onCreate(savedInstanceState);
setContentView(R.layout.item_linearout);
FragmentManager fragmentManager = getFragmentManager();
FragmentTransaction fragmentTransaction = fragmentManager
.beginTransaction();
fragmentTransaction.replace(R.id.ll, new CustomFragment());
fragmentTransaction.commit();
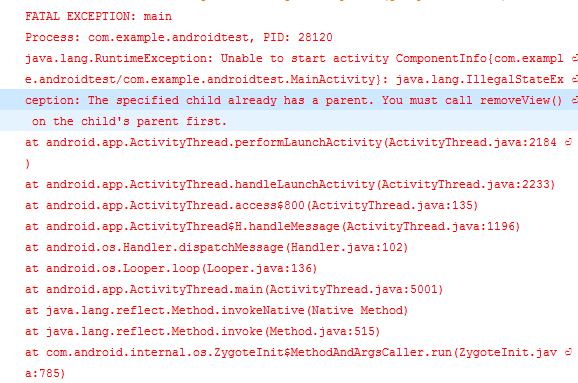
}“add View”的逻辑由FragmentTransaction 进行处理了,如果我们这里将attachToRoot设置为true,就会有IllegalStateException.
所以组件自己有“add View”的机制,我们就不要再画蛇添足了。
可能会有疑问既然没有将创建的View 添加到root中,为什么还要添加root参数呢?直接使用
View view = inflater.inflate(R.layout.item_btn,null);
不是更简单吗?如果这样写,lint会给出警告
Avoid passing null as the view root (needed to resolve layout parameters on the inflated layout’s root element)。
xml布局文件在解析成View的时候,需要root的布局信息(View的布局参数要受到root的限制)。如果不填写root,使用xml布局文件生成View的时候就会使用默认的LayoutParams.而这个不一定是符合要求的,View可能比设定的要小。
不设置root
有些时候无法明确的知道View的root,eg.当你实例化一个AlterDialog.
@Override
    protected void onCreate(Bundle savedInstanceState) {
        super.onCreate(savedInstanceState);

        setContentView(R.layout.item_linearout);

        LayoutInflater inflater = LayoutInflater.from(this);
        AlertDialog.Builder dialogBuilder = new AlertDialog.Builder(this);
        View customView = inflater.inflate(R.layout.item_btn, null);
        dialogBuilder.setView(customView);
        dialogBuilder.show();
        }
在这种情况下,传递null 就可以了。通用的规则是,如果可以知道root,一定要传递这个参数。
结论
- 如果知道root,一定要传,尽量避免传null
- 当不需要将布局文件生成的View添加到组件中时(组件有其自身的添加逻辑),attachToRoot设置成false.
- 当View已经添加到一个root中时,attachToRoot设置成false.
- 自定义组件应该将attachToRoot设置成true.
翻译地址
https://www.bignerdranch.com/blog/understanding-androids-layoutinflater-inflate/


 751
751

 被折叠的 条评论
为什么被折叠?
被折叠的 条评论
为什么被折叠?
 到【灌水乐园】发言


