


linux系统网络设置
一.查看网络配置
1.使用ifconfig命令查看网络接口的信息
(1)ifconfig命令查看所有活动的网络接口信息
[root@localhost ~]# ifconfig
ens33: flags=4163<UP,BROADCAST,RUNNING,MULTICAST>  mtu 1500
        inet 192.168.206.128  netmask 255.255.255.0  broadcast 192.168.206.255
        inet6 fe80::3339:805:9ff3:5382  prefixlen 64  scopeid 0x20<link>
        ether 00:0c:29:f7:67:91  txqueuelen 1000  (Ethernet)
        RX packets 10834  bytes 14982280 (14.2 MiB)
        RX errors 0  dropped 0  overruns 0  frame 0
        TX packets 5283  bytes 343978 (335.9 KiB)
        TX errors 0  dropped 0 overruns 0  carrier 0  collisions 0

lo: flags=73<UP,LOOPBACK,RUNNING>  mtu 65536
        inet 127.0.0.1  netmask 255.0.0.0
        inet6 ::1  prefixlen 128  scopeid 0x10<host>
        loop  txqueuelen 1000  (Local Loopback)
        RX packets 356  bytes 30848 (30.1 KiB)
        RX errors 0  dropped 0  overruns 0  frame 0
        TX packets 356  bytes 30848 (30.1 KiB)
        TX errors 0  dropped 0 overruns 0  carrier 0  collisions 0

virbr0: flags=4099<UP,BROADCAST,MULTICAST>  mtu 1500
        inet 192.168.122.1  netmask 255.255.255.0  broadcast 192.168.122.255
        ether 52:54:00:b5:13:98  txqueuelen 1000  (Ethernet)
        RX packets 0  bytes 0 (0.0 B)
        RX errors 0  dropped 0  overruns 0  frame 0
        TX packets 0  bytes 0 (0.0 B)
        TX errors 0  dropped 0 overruns 0  carrier 0  collisions 0
查看的信息详细说明
ens33:第一块以太网卡的名称,en表示以太网卡,s表示热插拔
inet:表示网路接口的IP地址
netmask:表示网络接口的子网掩码
broadcast:表示网络接口的所在网络的广播地址
inet6:表示IPv6
ether:表示网络接口的物理地址(MAC地址)
RX,TX:表示网路接口的接收发送的数据流量等信息
lo:表示loopback,回环网络接口
virbr0:表示虚拟网卡
(2)查看单个网路接口信息
ipconfig 网卡名 显示单个网卡信息
[root@localhost ~]# ifconfig ens33
ens33: flags=4163<UP,BROADCAST,RUNNING,MULTICAST>  mtu 1500
        inet 192.168.206.128  netmask 255.255.255.0  broadcast 192.168.206.255
        inet6 fe80::3339:805:9ff3:5382  prefixlen 64  scopeid 0x20<link>
        ether 00:0c:29:f7:67:91  txqueuelen 1000  (Ethernet)
        RX packets 10840  bytes 14982952 (14.2 MiB)
        RX errors 0  dropped 0  overruns 0  frame 0
        TX packets 5289  bytes 344680 (336.6 KiB)
        TX errors 0  dropped 0 overruns 0  carrier 0  collisions 0
(3)查看所有网路接口信息
ifconfig -a 全部显示 包括活动和不活动的接口
[root@localhost ~]# ifconfig -a
ens33: flags=4163<UP,BROADCAST,RUNNING,MULTICAST>  mtu 1500
        inet 192.168.206.128  netmask 255.255.255.0  broadcast 192.168.206.255
        inet6 fe80::3339:805:9ff3:5382  prefixlen 64  scopeid 0x20<link>
        ether 00:0c:29:f7:67:91  txqueuelen 1000  (Ethernet)
        RX packets 10841  bytes 14983012 (14.2 MiB)
        RX errors 0  dropped 0  overruns 0  frame 0
        TX packets 5289  bytes 344680 (336.6 KiB)
        TX errors 0  dropped 0 overruns 0  carrier 0  collisions 0

lo: flags=73<UP,LOOPBACK,RUNNING>  mtu 65536
        inet 127.0.0.1  netmask 255.0.0.0
        inet6 ::1  prefixlen 128  scopeid 0x10<host>
        loop  txqueuelen 1000  (Local Loopback)
        RX packets 356  bytes 30848 (30.1 KiB)
        RX errors 0  dropped 0  overruns 0  frame 0
        TX packets 356  bytes 30848 (30.1 KiB)
        TX errors 0  dropped 0 overruns 0  carrier 0  collisions 0

virbr0: flags=4099<UP,BROADCAST,MULTICAST>  mtu 1500
        inet 192.168.122.1  netmask 255.255.255.0  broadcast 192.168.122.255
        ether 52:54:00:b5:13:98  txqueuelen 1000  (Ethernet)
        RX packets 0  bytes 0 (0.0 B)
        RX errors 0  dropped 0  overruns 0  frame 0
        TX packets 0  bytes 0 (0.0 B)
        TX errors 0  dropped 0 overruns 0  carrier 0  collisions 0

virbr0-nic: flags=4098<BROADCAST,MULTICAST>  mtu 1500
        ether 52:54:00:b5:13:98  txqueuelen 1000  (Ethernet)
        RX packets 0  bytes 0 (0.0 B)
        RX errors 0  dropped 0  overruns 0  frame 0
        TX packets 0  bytes 0 (0.0 B)
        TX errors 0  dropped 0 overruns 0  carrier 0  collisions 0
网路管理工具
NetworkManager
network
查看状态
[root@localhost ~]# systemctl status NetworkManager
● NetworkManager.service - Network Manager
   Loaded: loaded (/usr/lib/systemd/system/NetworkManager.service; enabled; vendor preset: enabled)
   Active: active (running) since 一 2021-05-24 10:16:20 CST; 4h 9min ago
     Docs: man:NetworkManager(8)
 Main PID: 6235 (NetworkManager)
    Tasks: 4
   CGroup: /system.slice/NetworkManager.service
           ├─6235 /usr/sbin/NetworkManager --no-daemon
           └─8991 /sbin/dhclient -d -q -sf /usr/libexec/nm-dhcp-helper -pf /v...

5月 24 14:18:56 localhost.localdomain dhclient[8991]: DHCPREQUEST on ens33 t...
5月 24 14:18:56 localhost.localdomain dhclient[8991]: DHCPACK from 192.168.2...
5月 24 14:18:56 localhost.localdomain NetworkManager[6235]: <info>  [1621837...
5月 24 14:18:56 localhost.localdomain NetworkManager[6235]: <info>  [1621837...
5月 24 14:18:56 localhost.localdomain NetworkManager[6235]: <info>  [1621837...
5月 24 14:18:56 localhost.localdomain NetworkManager[6235]: <info>  [1621837...
5月 24 14:18:56 localhost.localdomain NetworkManager[6235]: <info>  [1621837...
5月 24 14:18:56 localhost.localdomain NetworkManager[6235]: <info>  [1621837...
5月 24 14:18:56 localhost.localdomain NetworkManager[6235]: <info>  [1621837...
5月 24 14:18:56 localhost.localdomain dhclient[8991]: bound to 192.168.206.1...
Hint: Some lines were ellipsized, use -l to show in full.
[root@localhost ~]# systemctl status network
● network.service - LSB: Bring up/down networking
   Loaded: loaded (/etc/rc.d/init.d/network; bad; vendor preset: disabled)
   Active: active (exited) since 一 2021-05-24 10:16:50 CST; 4h 10min ago
     Docs: man:systemd-sysv-generator(8)
    Tasks: 0

5月 24 10:16:50 localhost.localdomain systemd[1]: Starting LSB: Bring up/dow...
5月 24 10:16:50 localhost.localdomain network[6549]: 正在打开环回接口: [  确…]
5月 24 10:16:50 localhost.localdomain network[6549]: 正在打开接口 ens33: [ … ]
5月 24 10:16:50 localhost.localdomain systemd[1]: Started LSB: Bring up/down...
Hint: Some lines were ellipsized, use -l to show in full.
[root@localhost ~]#
2.使用route命令查看路由表条目
route
route -n
可以将路由记录中的地址显示为数字形式,可以跳过解析主机名的过程,在路由条目较多的情况下能够加快执行速度。
[root@localhost ~]# route
Kernel IP routing table
Destination     Gateway         Genmask         Flags Metric Ref    Use Iface
default         gateway         0.0.0.0         UG    100    0        0 ens33
192.168.122.0   0.0.0.0         255.255.255.0   U     0      0        0 virbr0
192.168.206.0   0.0.0.0         255.255.255.0   U     100    0        0 ens33

[root@localhost ~]# route -n
Kernel IP routing table
Destination     Gateway         Genmask         Flags Metric Ref    Use Iface
0.0.0.0         192.168.206.2   0.0.0.0         UG    100    0        0 ens33
192.168.122.0   0.0.0.0         255.255.255.0   U     0      0        0 virbr0
192.168.206.0   0.0.0.0         255.255.255.0   U     100    0        0 ens33
说明
目标网段是Default时,表示此行是默认网关记录
getway下一跳为*时,表示目标网段是与本机直接相连的
3.使用ip/ethtool命令查看网络接口
ip link
查看网络接口数据链路层信息
[root@localhost ~]# ip link
1: lo: <LOOPBACK,UP,LOWER_UP> mtu 65536 qdisc noqueue state UNKNOWN mode DEFAULT group default qlen 1000
    link/loopback 00:00:00:00:00:00 brd 00:00:00:00:00:00
2: ens33: <BROADCAST,MULTICAST,UP,LOWER_UP> mtu 1500 qdisc pfifo_fast state UP mode DEFAULT group default qlen 1000
    link/ether 00:0c:29:f7:67:91 brd ff:ff:ff:ff:ff:ff
3: virbr0: <NO-CARRIER,BROADCAST,MULTICAST,UP> mtu 1500 qdisc noqueue state DOWN mode DEFAULT group default qlen 1000
    link/ether 52:54:00:b5:13:98 brd ff:ff:ff:ff:ff:ff
4: virbr0-nic: <BROADCAST,MULTICAST> mtu 1500 qdisc pfifo_fast master virbr0 state DOWN mode DEFAULT group default qlen 1000
    link/ether 52:54:00:b5:13:98 brd ff:ff:ff:ff:ff:ff
ip address
查看网络接口网络层信息
[root@localhost ~]# ip address
1: lo: <LOOPBACK,UP,LOWER_UP> mtu 65536 qdisc noqueue state UNKNOWN group default qlen 1000
    link/loopback 00:00:00:00:00:00 brd 00:00:00:00:00:00
    inet 127.0.0.1/8 scope host lo
       valid_lft forever preferred_lft forever
    inet6 ::1/128 scope host
       valid_lft forever preferred_lft forever
2: ens33: <BROADCAST,MULTICAST,UP,LOWER_UP> mtu 1500 qdisc pfifo_fast state UP group default qlen 1000
    link/ether 00:0c:29:f7:67:91 brd ff:ff:ff:ff:ff:ff
    inet 192.168.206.128/24 brd 192.168.206.255 scope global noprefixroute dynamic ens33
       valid_lft 1033sec preferred_lft 1033sec
    inet6 fe80::3339:805:9ff3:5382/64 scope link noprefixroute
       valid_lft forever preferred_lft forever
3: virbr0: <NO-CARRIER,BROADCAST,MULTICAST,UP> mtu 1500 qdisc noqueue state DOWN group default qlen 1000
    link/ether 52:54:00:b5:13:98 brd ff:ff:ff:ff:ff:ff
    inet 192.168.122.1/24 brd 192.168.122.255 scope global virbr0
       valid_lft forever preferred_lft forever
4: virbr0-nic: <BROADCAST,MULTICAST> mtu 1500 qdisc pfifo_fast master virbr0 state DOWN group default qlen 1000
    link/ether 52:54:00:b5:13:98 brd ff:ff:ff:ff:ff:ff
ethtool 网卡
查看指定网络接口的速率模式等信息
[root@localhost ~]# ethtool ens33
Settings for ens33:
	Supported ports: [ TP ]
	Supported link modes:   10baseT/Half 10baseT/Full
	                        100baseT/Half 100baseT/Full
	                        1000baseT/Full
	Supported pause frame use: No
	Supports auto-negotiation: Yes
	Supported FEC modes: Not reported
	Advertised link modes:  10baseT/Half 10baseT/Full
	                        100baseT/Half 100baseT/Full
	                        1000baseT/Full
	Advertised pause frame use: No
	Advertised auto-negotiation: Yes
	Advertised FEC modes: Not reported
	Speed: 1000Mb/s
	Duplex: Full
	Port: Twisted Pair
	PHYAD: 0
	Transceiver: internal
	Auto-negotiation: on
	MDI-X: off (auto)
	Supports Wake-on: d
	Wake-on: d
	Current message level: 0x00000007 (7)
			       drv probe link
	Link detected: yes
4.使用netstat命令查看网络连接情况
netstat命令
选项说明
netstat
-a 查看所有活动的网络连接信息
-u 查看udp协议的相关信息
-t 查看tcp协议的相关信息
-l 查看监听状态的网络连接及端口信息
-n 以数字形式显示相关的主机地址多扣信息
-p 显示与网路哦连接相关联的进程号进程名信息
-r 显示路由表信息
可以选项进行组合使用
netstat -a | head
[root@localhost ~]# netstat -a | head
Active Internet connections (servers and established)
Proto Recv-Q Send-Q Local Address           Foreign Address         State
tcp        0      0 0.0.0.0:sunrpc          0.0.0.0:*               LISTEN
tcp        0      0 0.0.0.0:x11             0.0.0.0:*               LISTEN
tcp        0      0 localhost.locald:domain 0.0.0.0:*               LISTEN
tcp        0      0 0.0.0.0:ssh             0.0.0.0:*               LISTEN
tcp        0      0 localhost:ipp           0.0.0.0:*               LISTEN
tcp        0      0 localhost:smtp          0.0.0.0:*               LISTEN
tcp6       0      0 [::]:sunrpc             [::]:*                  LISTEN
tcp6       0      0 [::]:x11                [::]:*                  LISTEN
[root@localhost ~]#
netstat -apu | head
[root@localhost ~]# netstat -apu | head
Active Internet connections (servers and established)
Proto Recv-Q Send-Q Local Address           Foreign Address         State       PID/Program name
udp        0      0 localhost.locald:domain 0.0.0.0:*                           7093/dnsmasq
udp        0      0 0.0.0.0:bootps          0.0.0.0:*                           7093/dnsmasq
udp        0      0 0.0.0.0:bootpc          0.0.0.0:*                           8991/dhclient
udp        0      0 0.0.0.0:sunrpc          0.0.0.0:*                           1/systemd
udp        0      0 0.0.0.0:mdns            0.0.0.0:*                           6117/avahi-daemon:
udp        0      0 localhost:323           0.0.0.0:*                           6120/chronyd
udp        0      0 0.0.0.0:40307           0.0.0.0:*                           6117/avahi-daemon:
udp        0      0 0.0.0.0:quotad          0.0.0.0:*                           6101/rpcbind
netstat -anpu | head
[root@localhost ~]# netstat -anpu | head
Active Internet connections (servers and established)
Proto Recv-Q Send-Q Local Address           Foreign Address         State       PID/Program name
udp        0      0 192.168.122.1:53        0.0.0.0:*                           7093/dnsmasq
udp        0      0 0.0.0.0:67              0.0.0.0:*                           7093/dnsmasq
udp        0      0 0.0.0.0:68              0.0.0.0:*                           8991/dhclient
udp        0      0 0.0.0.0:111             0.0.0.0:*                           1/systemd
udp        0      0 0.0.0.0:5353            0.0.0.0:*                           6117/avahi-daemon:
udp        0      0 127.0.0.1:323           0.0.0.0:*                           6120/chronyd
udp        0      0 0.0.0.0:40307           0.0.0.0:*                           6117/avahi-daemon:
udp        0      0 0.0.0.0:762             0.0.0.0:*                           6101/rpcbind
netstat -anpt | grep sshd
[root@localhost ~]# netstat -anpt | grep sshd
tcp        0      0 0.0.0.0:22              0.0.0.0:*               LISTEN      6700/sshd
tcp6       0      0 :::22                   :::*                    LISTEN      6700/sshd
netstat -r 显示路由表信息
[root@localhost ~]# netstat -r
Kernel IP routing table
Destination     Gateway         Genmask         Flags   MSS Window  irtt Iface
default         gateway         0.0.0.0         UG        0 0          0 ens33
192.168.122.0   0.0.0.0         255.255.255.0   U         0 0          0 virbr0
192.168.206.0   0.0.0.0         255.255.255.0   U         0 0          0 ens33
5.查看系统网络连接情况,获取socket统计信息ss命令
选项说明
-a 查看所有的端口号的状态
-t 查看tcp已连接的状态
-l 查看LISTEN状态的端口号
-n 端口号显示数字;把服务解析成数字
-p 显示进程的状态,即PID进程号
-u 查看udp协议端口状态
-r 查看路由表
-o 查看状态有个计算器,存活时间
-4 - 6 只显示v4或v6V版本的
-s 打印出统计信息。这个选项不解析从各种源获得的socket。对于解析/proc/net/top大量的sockets计数时很有效
-0 显示PACKET sockets
-w 只显示RAW sockets
-x 只显示UNIX域sockets
-i 只查看监听(linsten状态)连接
ss -antp |grep 22
看执行命令使用的时间
[root@localhost ~]# ss -antp |grep 22
LISTEN     0      5      192.168.122.1:53                       *:*                   users:(("dnsmasq",pid=8541,fd=6))
LISTEN     0      128          *:22                       *:*                   users:(("sshd",pid=6858,fd=3))
LISTEN     0      128         :::22                      :::*                   users:(("sshd",pid=6858,fd=4))


[root@localhost ~]# time ss -antp |grep 22
LISTEN     0      5      192.168.122.1:53                       *:*                   users:(("dnsmasq",pid=8541,fd=6))
LISTEN     0      128          *:22                       *:*                   users:(("sshd",pid=6858,fd=3))
LISTEN     0      128         :::22                      :::*                   users:(("sshd",pid=6858,fd=4))

real	0m0.104s
user	0m0.010s
sys	0m0.097s
[root@localhost ~]#
查看tcp已连接的状态有哪些
ss -t state established
[root@localhost ~]# ss -t state established
Recv-Q Send-Q Local Address:Port                 Peer Address:Port
0      0      192.168.206.129:ssh                  192.168.206.1:53824
查看并发量
[root@localhost ~]# ss -o state established | wc -l
1302
[root@localhost ~]# netstat -ant |grep EST |wc -l
1
[root@localhost ~]#
二.测试网络连接
1.使用ping命令测试网络的连通性
ping 192.168.206.129 连通正常
[root@localhost ~]# ping 192.168.206.129
PING 192.168.206.129 (192.168.206.129) 56(84) bytes of data.
64 bytes from 192.168.206.129: icmp_seq=1 ttl=64 time=0.531 ms
64 bytes from 192.168.206.129: icmp_seq=2 ttl=64 time=0.960 ms
64 bytes from 192.168.206.129: icmp_seq=3 ttl=64 time=3.12 ms
64 bytes from 192.168.206.129: icmp_seq=4 ttl=64 time=0.735 ms
64 bytes from 192.168.206.129: icmp_seq=5 ttl=64 time=1.13 ms
64 bytes from 192.168.206.129: icmp_seq=6 ttl=64 time=0.529 ms
64 bytes from 192.168.206.129: icmp_seq=7 ttl=64 time=3.37 ms
64 bytes from 192.168.206.129: icmp_seq=8 ttl=64 time=2.49 ms
64 bytes from 192.168.206.129: icmp_seq=9 ttl=64 time=2.04 ms
64 bytes from 192.168.206.129: icmp_seq=10 ttl=64 time=3.45 ms
64 bytes from 192.168.206.129: icmp_seq=11 ttl=64 time=0.661 ms
64 bytes from 192.168.206.129: icmp_seq=12 ttl=64 time=2.68 ms
^C //按ctrl+C组合键终止执行
--- 192.168.206.129 ping statistics ---
12 packets transmitted, 12 received, 0% packet loss, time 11045ms
rtt min/avg/max/mdev = 0.529/1.810/3.450/1.121 ms
ping 192.168.206.20 主机不可达
[root@localhost ~]# ping 192.168.206.20
PING 192.168.206.20 (192.168.206.20) 56(84) bytes of data.
From 192.168.206.128 icmp_seq=1 Destination Host Unreachable
From 192.168.206.128 icmp_seq=2 Destination Host Unreachable
From 192.168.206.128 icmp_seq=3 Destination Host Unreachable
From 192.168.206.128 icmp_seq=4 Destination Host Unreachable
From 192.168.206.128 icmp_seq=5 Destination Host Unreachable
From 192.168.206.128 icmp_seq=6 Destination Host Unreachable
From 192.168.206.128 icmp_seq=7 Destination Host Unreachable
From 192.168.206.128 icmp_seq=8 Destination Host Unreachable
From 192.168.206.128 icmp_seq=9 Destination Host Unreachable
From 192.168.206.128 icmp_seq=10 Destination Host Unreachable
From 192.168.206.128 icmp_seq=11 Destination Host Unreachable
From 192.168.206.128 icmp_seq=12 Destination Host Unreachable
^C
--- 192.168.206.20 ping statistics ---
12 packets transmitted, 0 received, +12 errors, 100% packet loss, time 11018ms
pipe 4
2.使用tarceroute命令跟踪数据包的路由途径
使用traceroute命令可以测试当前主机到目的主机之间经过了哪些网络节点,并显示各中间节点的连接状态(响应时间),其中*表示无法显示的节点。
[root@localhost ~]# traceroute 192.168.206.129
traceroute to 192.168.206.129 (192.168.206.129), 30 hops max, 60 byte packets
 1  192.168.206.129 (192.168.206.129)  0.363 ms !X  0.335 ms !X  0.296 ms !X

[root@localhost ~]# traceroute www.baidu.com
traceroute to www.baidu.com (180.101.49.11), 30 hops max, 60 byte packets
 1  gateway (192.168.206.2)  0.068 ms  0.059 ms  0.061 ms
 2  * * *
 3  * * *
 4  * * *
 5  * * *
 6  * * *
 7  *^C
[root@localhost ~]#
3.使用nslookup命令测试DNS域名解析
[root@localhost ~]# nslookup www.baidu.com
Server:		192.168.206.2                     //所使用的的DNS服务器
Address:	192.168.206.2#53

Non-authoritative answer:                    //DNS解析反馈的结果
www.baidu.com	canonical name = www.a.shifen.com.
Name:	www.a.shifen.com
Address: 180.101.49.11
Name:	www.a.shifen.com
Address: 180.101.49.12
使用host和dig也可以用于域名解析
[root@localhost ~]# host www.baidu.com
www.baidu.com is an alias for www.a.shifen.com.
www.a.shifen.com has address 180.101.49.12
www.a.shifen.com has address 180.101.49.11


[root@localhost ~]# dig www.baidu.com

; <<>> DiG 9.9.4-RedHat-9.9.4-72.el7 <<>> www.baidu.com
;; global options: +cmd
;; Got answer:
;; ->>HEADER<<- opcode: QUERY, status: NOERROR, id: 16126
;; flags: qr rd ra; QUERY: 1, ANSWER: 3, AUTHORITY: 0, ADDITIONAL: 0

;; QUESTION SECTION:
;www.baidu.com.			IN	A

;; ANSWER SECTION:
www.baidu.com.		5	IN	CNAME	www.a.shifen.com.
www.a.shifen.com.	5	IN	A	180.101.49.12
www.a.shifen.com.	5	IN	A	180.101.49.11

;; Query time: 12 msec
;; SERVER: 192.168.206.2#53(192.168.206.2)
;; WHEN: 二 5月 25 16:23:12 CST 2021
;; MSG SIZE  rcvd: 90
三.使用网络配置命令
修改网络配置参数有临时配置和固定配置。
1.使用ifconfig命令
(1)修改网卡的IP地址和子网掩码
[root@localhost ~]# ifconfig ens33 192.168.166.21/24

[root@localhost ~]# ifconfig
ens33: flags=4163<UP,BROADCAST,RUNNING,MULTICAST>  mtu 1500
        inet 192.168.166.21  netmask 255.255.255.0  broadcast 192.168.166.255
        inet6 fe80::3339:805:9ff3:5382  prefixlen 64  scopeid 0x20<link>
        ether 00:0c:29:f7:67:91  txqueuelen 1000  (Ethernet)
        RX packets 11943  bytes 15076650 (14.3 MiB)
        RX errors 0  dropped 0  overruns 0  frame 0
        TX packets 5818  bytes 391915 (382.7 KiB)
        TX errors 0  dropped 0 overruns 0  carrier 0  collisions 0

lo: flags=73<UP,LOOPBACK,RUNNING>  mtu 65536
        inet 127.0.0.1  netmask 255.0.0.0
        inet6 ::1  prefixlen 128  scopeid 0x10<host>
        loop  txqueuelen 1000  (Local Loopback)
        RX packets 369  bytes 32241 (31.4 KiB)
        RX errors 0  dropped 0  overruns 0  frame 0
        TX packets 369  bytes 32241 (31.4 KiB)
        TX errors 0  dropped 0 overruns 0  carrier 0  collisions 0

virbr0: flags=4099<UP,BROADCAST,MULTICAST>  mtu 1500
        inet 192.168.122.1  netmask 255.255.255.0  broadcast 192.168.122.255
        ether 52:54:00:b5:13:98  txqueuelen 1000  (Ethernet)
        RX packets 0  bytes 0 (0.0 B)
        RX errors 0  dropped 0  overruns 0  frame 0
        TX packets 0  bytes 0 (0.0 B)
        TX errors 0  dropped 0 overruns 0  carrier 0  collisions 0
(2)禁用,激活网络接口
ifconfig ens33 down禁用网卡
ifconfig ens33 up 启用网卡
ifdown ens33 ifup ens33 也可以
[root@localhost ~]# ifconfig ens33 down
[root@localhost ~]# ifconfig ens33 up
[root@localhost ~]#
(3)为网卡绑定虚拟接口
一般用于调试,临时使用测试用,添加虚拟网络接口。
[root@localhost ~]# ifconfig ens33:0 192.168.1.1/24

[root@localhost ~]# ifconfig
ens33: flags=4163<UP,BROADCAST,RUNNING,MULTICAST>  mtu 1500
        inet 192.168.166.21  netmask 255.255.255.0  broadcast 192.168.166.255
        ether 00:0c:29:f7:67:91  txqueuelen 1000  (Ethernet)
        RX packets 12009  bytes 15082641 (14.3 MiB)
        RX errors 0  dropped 0  overruns 0  frame 0
        TX packets 5918  bytes 402741 (393.3 KiB)
        TX errors 0  dropped 0 overruns 0  carrier 0  collisions 0

ens33:0: flags=4163<UP,BROADCAST,RUNNING,MULTICAST>  mtu 1500
        inet 192.168.1.1  netmask 255.255.255.0  broadcast 192.168.1.255
        ether 00:0c:29:f7:67:91  txqueuelen 1000  (Ethernet)

lo: flags=73<UP,LOOPBACK,RUNNING>  mtu 65536
        inet 127.0.0.1  netmask 255.0.0.0
        inet6 ::1  prefixlen 128  scopeid 0x10<host>
        loop  txqueuelen 1000  (Local Loopback)
        RX packets 369  bytes 32241 (31.4 KiB)
        RX errors 0  dropped 0  overruns 0  frame 0
        TX packets 369  bytes 32241 (31.4 KiB)
        TX errors 0  dropped 0 overruns 0  carrier 0  collisions 0

virbr0: flags=4099<UP,BROADCAST,MULTICAST>  mtu 1500
        inet 192.168.122.1  netmask 255.255.255.0  broadcast 192.168.122.255
        ether 52:54:00:b5:13:98  txqueuelen 1000  (Ethernet)
        RX packets 0  bytes 0 (0.0 B)
        RX errors 0  dropped 0  overruns 0  frame 0
        TX packets 0  bytes 0 (0.0 B)
        TX errors 0  dropped 0 overruns 0  carrier 0  collisions 0
2.使用route命令添加,删除静态路由记录
(1)添加,删除到指定网段的路由记录
[root@localhost ~]# route add -net 192.168.3.0/24 gw 192.168.206.2 //添加静态路由
[root@localhost ~]# route -n                                  //查询确认添加的条目
Kernel IP routing table
Destination     Gateway         Genmask         Flags Metric Ref    Use Iface
0.0.0.0         192.168.206.2   0.0.0.0         UG    100    0        0 ens33
192.168.3.0     192.168.206.2   255.255.255.0   UG    0      0        0 ens33
192.168.122.0   0.0.0.0         255.255.255.0   U     0      0        0 virbr0
192.168.206.0   0.0.0.0         255.255.255.0   U     100    0        0 ens33

[root@localhost ~]# route del -net 192.168.3.0/24                //删除静态路由
[root@localhost ~]# route -n                                  //查询确认路由条目
Kernel IP routing table
Destination     Gateway         Genmask         Flags Metric Ref    Use Iface
0.0.0.0         192.168.206.2   0.0.0.0         UG    100    0        0 ens33
192.168.122.0   0.0.0.0         255.255.255.0   U     0      0        0 virbr0
192.168.206.0   0.0.0.0         255.255.255.0   U     100    0        0 ens33
[root@localhost ~]#
(2)添加,删除默认网关记录
[root@localhost ~]# route
Kernel IP routing table
Destination     Gateway         Genmask         Flags Metric Ref    Use Iface
default         gateway         0.0.0.0         UG    100    0        0 ens33
192.168.122.0   0.0.0.0         255.255.255.0   U     0      0        0 virbr0
192.168.206.0   0.0.0.0         255.255.255.0   U     100    0        0 ens33

[root@localhost ~]# route -n
Kernel IP routing table
Destination     Gateway         Genmask         Flags Metric Ref    Use Iface
0.0.0.0         192.168.206.2   0.0.0.0         UG    100    0        0 ens33
192.168.122.0   0.0.0.0         255.255.255.0   U     0      0        0 virbr0
192.168.206.0   0.0.0.0         255.255.255.0   U     100    0        0 ens33

[root@localhost ~]# route del default gw 192.168.206.2   //删除默认网关记录

[root@localhost ~]# route
Kernel IP routing table
Destination     Gateway         Genmask         Flags Metric Ref    Use Iface
192.168.122.0   0.0.0.0         255.255.255.0   U     0      0        0 virbr0
192.168.206.0   0.0.0.0         255.255.255.0   U     100    0        0 ens33

[root@localhost ~]# route add default gw 192.168.206.254//添加新的默认网关记录

[root@localhost ~]# route
Kernel IP routing table
Destination     Gateway         Genmask         Flags Metric Ref    Use Iface
default         gateway         0.0.0.0         UG    0      0        0 ens33
192.168.122.0   0.0.0.0         255.255.255.0   U     0      0        0 virbr0
192.168.206.0   0.0.0.0         255.255.255.0   U     100    0        0 ens33

[root@localhost ~]# route -n
Kernel IP routing table
Destination     Gateway         Genmask         Flags Metric Ref    Use Iface
0.0.0.0         192.168.206.254 0.0.0.0         UG    0      0        0 ens33
192.168.122.0   0.0.0.0         255.255.255.0   U     0      0        0 virbr0
192.168.206.0   0.0.0.0         255.255.255.0   U     100    0        0 ens33
四.网络配置文件
1.网络接口配置文件
默认目录/etc/sysconfig/network-scripts
[root@localhost ~]# cd /etc/sysconfig/network-scripts/

[root@localhost network-scripts]# ll
总用量 252
-rw-r--r--. 1 root root   279 5月  24 19:46 ifcfg-ens33
-rw-r--r--. 1 root root   254 8月  24 2018 ifcfg-lo
lrwxrwxrwx. 1 root root    24 5月  23 19:58 ifdown -> ../../../usr/sbin/ifdown
-rwxr-xr-x. 1 root root   654 8月  24 2018 ifdown-bnep
-rwxr-xr-x. 1 root root  6532 8月  24 2018 ifdown-eth
-rwxr-xr-x. 1 root root  6190 10月 31 2018 ifdown-ib
-rwxr-xr-x. 1 root root   781 8月  24 2018 ifdown-ippp
-rwxr-xr-x. 1 root root  4540 8月  24 2018 ifdown-ipv6
lrwxrwxrwx. 1 root root    11 5月  23 19:58 ifdown-isdn -> ifdown-ippp
-rwxr-xr-x. 1 root root  2130 8月  24 2018 ifdown-post
-rwxr-xr-x. 1 root root  1068 8月  24 2018 ifdown-ppp
-rwxr-xr-x. 1 root root   870 8月  24 2018 ifdown-routes
-rwxr-xr-x. 1 root root  1456 8月  24 2018 ifdown-sit
-rwxr-xr-x. 1 root root  1621 3月  18 2017 ifdown-Team
-rwxr-xr-x. 1 root root  1556 3月  18 2017 ifdown-TeamPort
-rwxr-xr-x. 1 root root  1462 8月  24 2018 ifdown-tunnel
lrwxrwxrwx. 1 root root    22 5月  23 19:58 ifup -> ../../../usr/sbin/ifup
-rwxr-xr-x. 1 root root 12415 8月  24 2018 ifup-aliases
-rwxr-xr-x. 1 root root   910 8月  24 2018 ifup-bnep
-rwxr-xr-x. 1 root root 13475 8月  24 2018 ifup-eth
-rwxr-xr-x. 1 root root 10114 10月 31 2018 ifup-ib
-rwxr-xr-x. 1 root root 12075 8月  24 2018 ifup-ippp
-rwxr-xr-x. 1 root root 11893 8月  24 2018 ifup-ipv6
lrwxrwxrwx. 1 root root     9 5月  23 19:58 ifup-isdn -> ifup-ippp
-rwxr-xr-x. 1 root root   650 8月  24 2018 ifup-plip
-rwxr-xr-x. 1 root root  1064 8月  24 2018 ifup-plusb
-rwxr-xr-x. 1 root root  4997 8月  24 2018 ifup-post
-rwxr-xr-x. 1 root root  4154 8月  24 2018 ifup-ppp
-rwxr-xr-x. 1 root root  2001 8月  24 2018 ifup-routes
-rwxr-xr-x. 1 root root  3303 8月  24 2018 ifup-sit
-rwxr-xr-x. 1 root root  1755 3月  18 2017 ifup-Team
-rwxr-xr-x. 1 root root  1876 3月  18 2017 ifup-TeamPort
-rwxr-xr-x. 1 root root  2711 8月  24 2018 ifup-tunnel
-rwxr-xr-x. 1 root root  1836 8月  24 2018 ifup-wireless
-rwxr-xr-x. 1 root root  5419 8月  24 2018 init.ipv6-global
-rw-r--r--. 1 root root 20671 8月  24 2018 network-functions
-rw-r--r--. 1 root root 31027 8月  24 2018 network-functions-ipv6
网卡的配置文件在ifcfg-ens33
[root@localhost network-scripts]# cat ifcfg-ens33
TYPE=Ethernet
PROXY_METHOD=none
BROWSER_ONLY=no
BOOTPROTO=dhcp
DEFROUTE=yes
IPV4_FAILURE_FATAL=no
IPV6INIT=yes
IPV6_AUTOCONF=yes
IPV6_DEFROUTE=yes
IPV6_FAILURE_FATAL=no
IPV6_ADDR_GEN_MODE=stable-privacy
NAME=ens33
UUID=b9592403-d0c6-40a3-bada-dc870e9f0774
DEVICE=ens33
ONBOOT=no
[root@localhost ~]# cat /etc/sysconfig/network-scripts/ifcfg-ens33
TYPE=Ethernet
PROXY_METHOD=none
BROWSER_ONLY=no
BOOTPROTO=none
DEFROUTE=yes
IPV4_FAILURE_FATAL=no
IPV6INIT=yes
IPV6_AUTOCONF=yes
IPV6_DEFROUTE=yes
IPV6_FAILURE_FATAL=no
IPV6_ADDR_GEN_MODE=stable-privacy
NAME=ens33
UUID=9a718045-9427-4cac-8e9c-bb62516b443e
DEVICE=ens33
ONBOOT=yes
IPADDR=192.168.206.202
PREFIX=24
GATEWAY=192.168.206.254
DNS1=114.114.114.114
[root@localhost ~]#
说明
TYPE 类型以太网卡
BOOTPROTO dhcp自动获取 或者静态static
NAME 网卡名称
UUID号
DEVICE 和name一样
ONBOOT=yes 开机自启
IPADDR=192.168.245.101 写入ip地址
NETMASK=255.255.255.0 子网掩码
GATEWAY=192.168.245.2 网关
DNS1=114.114.114.114
DNS2 有的话就是备用
PREFIX=24 路由前缀 可以不写
2.主机名称配置文件
主机名配置文件位置 /etc/hostname
hostname 名称 修改主机名 bash立即生效
只是临时的,重启会失效
[root@localhost ~]# hostname xu   //修改主机名
[root@localhost ~]# bash            //立即生效
[root@xu ~]#
如果要修改主机名永久生效要写入配置文件
有两种方法
①vim /etc/hostname
②hostnamectl set-hostname xu
[root@localhost ~]# hostnamectl set-hostname xu
[root@localhost ~]# bash
[root@xu ~]# cat /etc/hostname
xu
[root@xu ~]#
hostname -i 可以查看本机的IPV6的地址
echo $HOSTNAME 可以查看hostname的环境变量
[root@xu ~]# hostname -i
fe80::3339:805:9ff3:5382%ens33 192.168.206.128 192.168.122.1

[root@xu ~]# echo $HOSTNAME
localhost.localdomain
[root@xu ~]#
3.域名解析配置文件
/etc/resolv.conf记录本机默认使用的DNS服务器地址信息,对该文件所做的修改会立刻生效。
/etc/hosts 本地主机映射文件,记录主机与ip的映射关系。
4.hosts文件和DNS服务器的比较
默认情况下,系统首先从hosts文件查找解析记录
hosts文件只对当前的主机有效
hosts文件可减少DNS查询过程,从而加快访问速度
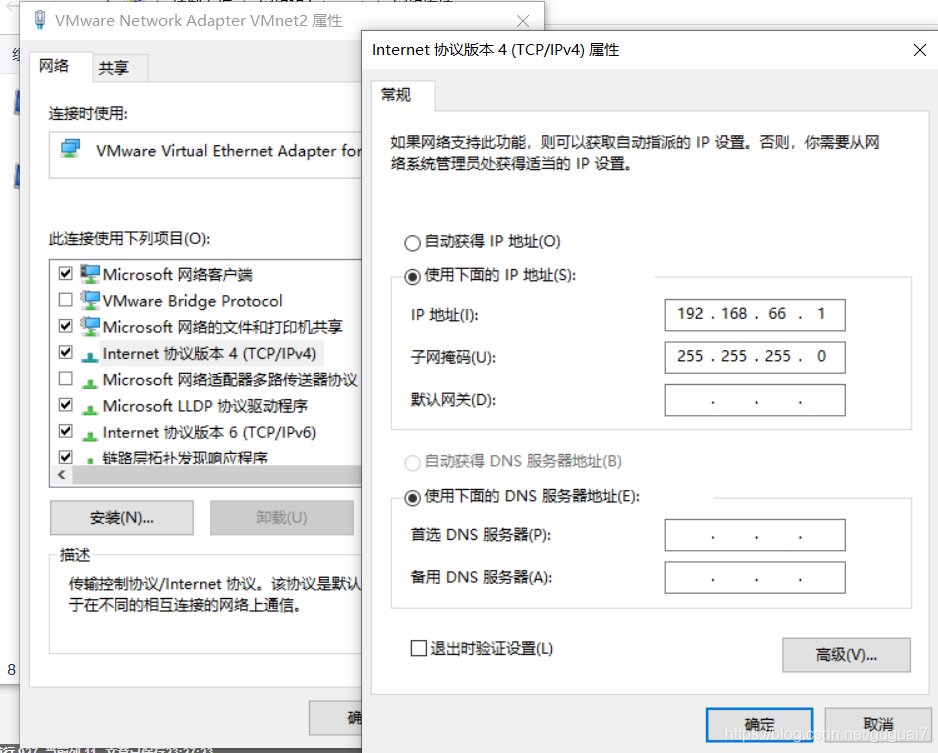
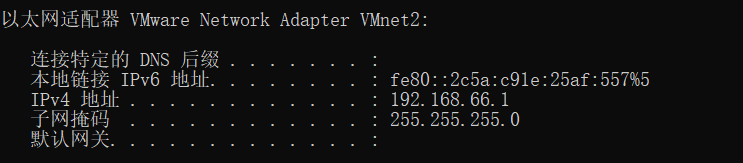
五.实例应用
将虚拟机模拟添加一块网卡并进行配置使得能够ping通本机
1.添加网卡
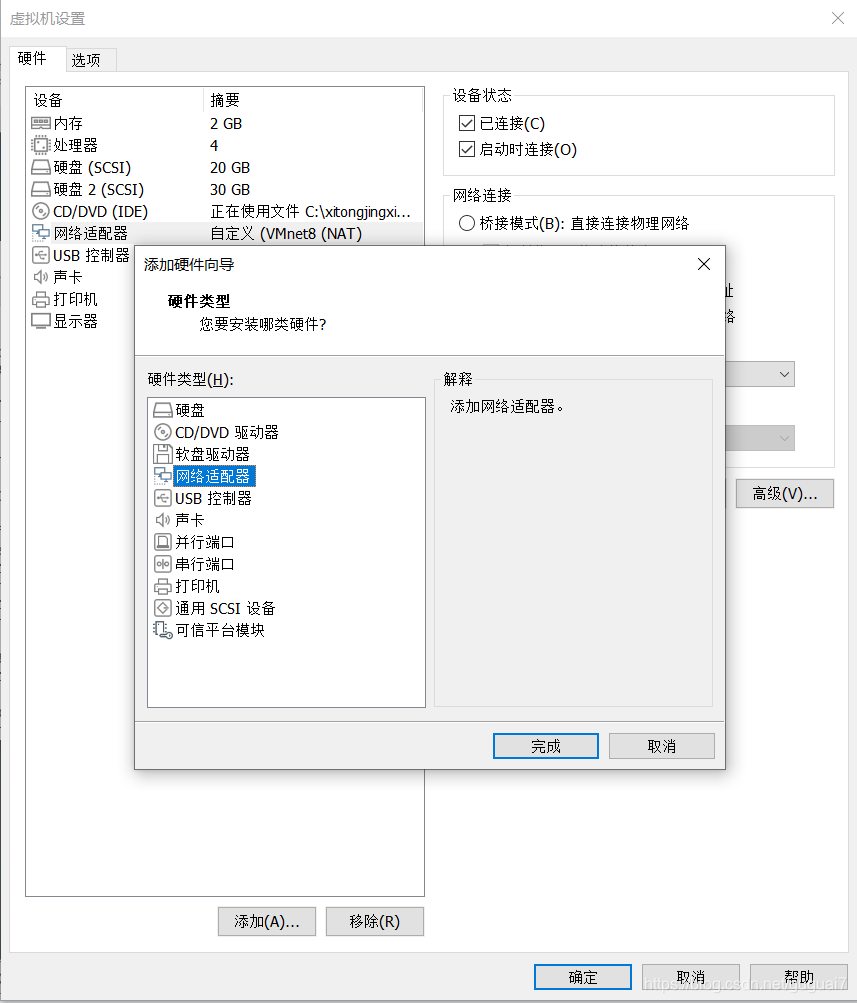

需要关闭网络管理服务和重启网络服务
[root@localhost ~]# systemctl stop NetworkManager
[root@localhost ~]# systemctl restart network
查询网卡是否添加成功
[root@localhost ~]# ifconfig
ens33: flags=4163<UP,BROADCAST,RUNNING,MULTICAST>  mtu 1500
        ether 00:0c:29:00:b0:8c  txqueuelen 1000  (Ethernet)
        RX packets 3547  bytes 333547 (325.7 KiB)
        RX errors 0  dropped 0  overruns 0  frame 0
        TX packets 1031  bytes 97322 (95.0 KiB)
        TX errors 0  dropped 0 overruns 0  carrier 0  collisions 0

ens37: flags=4163<UP,BROADCAST,RUNNING,MULTICAST>  mtu 1500
        inet 192.168.66.128  netmask 255.255.255.0  broadcast 192.168.66.255
        inet6 fe80::8a45:4cbd:660c:64fd  prefixlen 64  scopeid 0x20<link>
        ether 00:0c:29:00:b0:96  txqueuelen 1000  (Ethernet)
        RX packets 3  bytes 746 (746.0 B)
        RX errors 0  dropped 0  overruns 0  frame 0
        TX packets 27  bytes 4561 (4.4 KiB)
        TX errors 0  dropped 0 overruns 0  carrier 0  collisions 0

lo: flags=73<UP,LOOPBACK,RUNNING>  mtu 65536
        inet 127.0.0.1  netmask 255.0.0.0
        inet6 ::1  prefixlen 128  scopeid 0x10<host>
        loop  txqueuelen 1000  (Local Loopback)
        RX packets 1492  bytes 129680 (126.6 KiB)
        RX errors 0  dropped 0  overruns 0  frame 0
        TX packets 1492  bytes 129680 (126.6 KiB)
        TX errors 0  dropped 0 overruns 0  carrier 0  collisions 0

virbr0: flags=4099<UP,BROADCAST,MULTICAST>  mtu 1500
        inet 192.168.122.1  netmask 255.255.255.0  broadcast 192.168.122.255
        ether 52:54:00:e4:fb:93  txqueuelen 1000  (Ethernet)
        RX packets 0  bytes 0 (0.0 B)
        RX errors 0  dropped 0  overruns 0  frame 0
        TX packets 0  bytes 0 (0.0 B)
        TX errors 0  dropped 0 overruns 0  carrier 0  collisions 0
2.编辑网卡ens37的配置文件
vim /etc/sysconfig/network-scripts/ifcfg-ens37
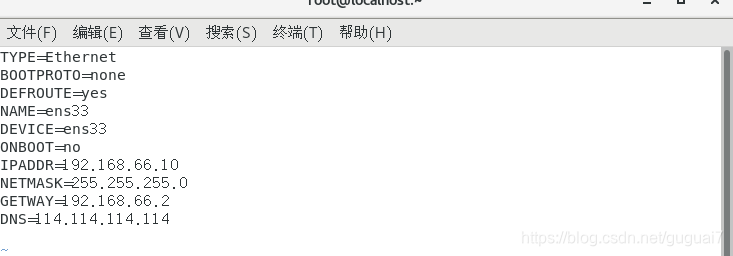
[root@localhost ~]# systemctl restart network
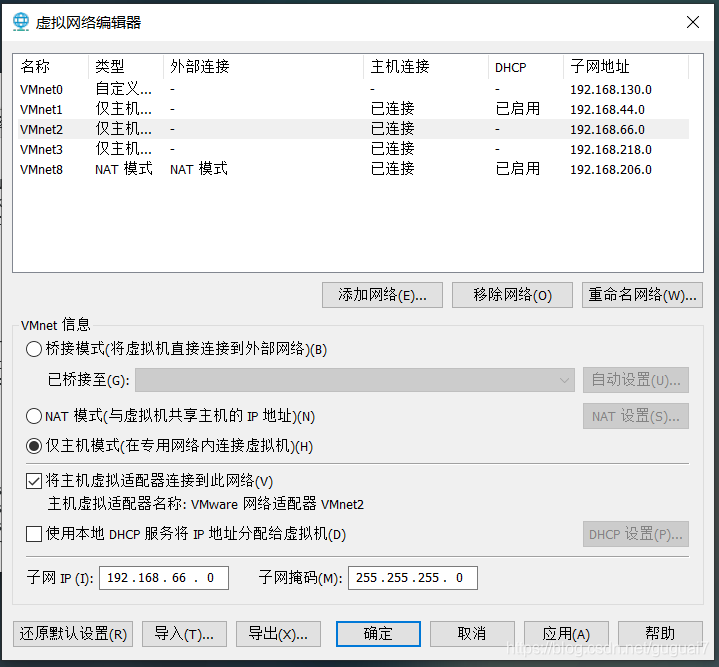
说明几个模式
桥接模式
相当于在网络中虚拟一个真实的主机,和我的主机共享一个网络,同一个网络当中的机器可以互相ping通虚拟机
仅主机模式
只能真机和虚拟机互通,或者虚拟机之间互通,不可以上网
NAT模式
可上网,虚拟机之间可互通,真机和虚拟机可互通,网络上的机器是ping不了虚拟机的
3.验证

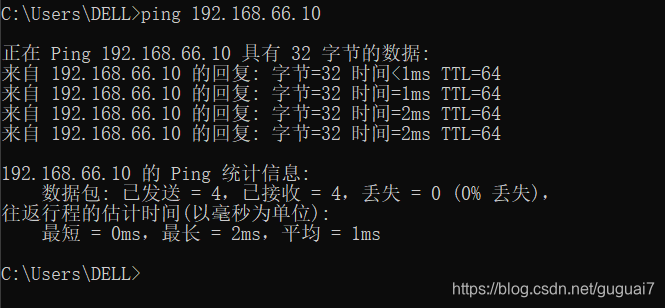


 2万+
2万+

 被折叠的 条评论
为什么被折叠?
被折叠的 条评论
为什么被折叠?
 到【灌水乐园】发言


