


本文介绍2种linux配置路由实现。
一、linux配置静态路由实现路由转发
1.启用Linux路由功能
1.配置文件在 /etc/sysctl.conf 里的 net.ipv4.ip_forwartd=1启用路由功能
[root@localhost ~]# cat /proc/sys/net/ipv4/ip_forward
0 ipv4/ip_forward =0 表示没有启用路由功能
[root@localhost ~]# echo '1'>/proc/sys/net/ipv4/ip_forward 启用路由功能(零时生效)
[root@localhost ~]# cat /proc/sys/net/ipv4/ip_forward
1
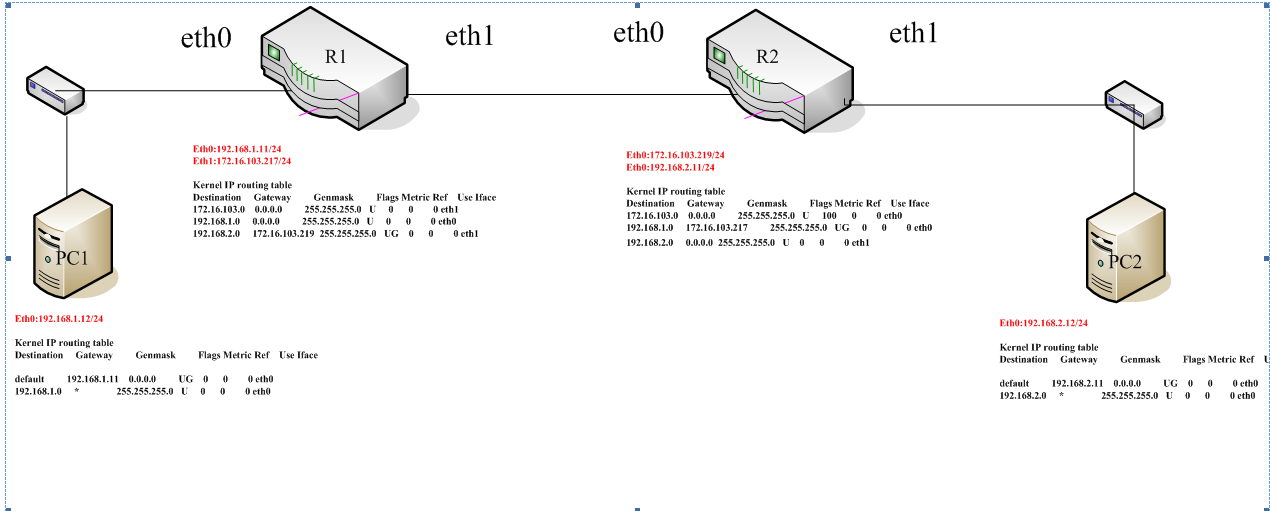
PC1网络配置:
Eth0:192.168.1.12/24
Kernel IP routing table
Destination Gateway Genmask Flags Metric Ref Use Iface
default 192.168.1.11 0.0.0.0 UG 0 0 0 eth0
192.168.1.0 * 255.255.255.0 U 0 0 0 eth0
PC2网络配置:
Eth0:192.168.2.12/24
Kernel IP routing table
Destination Gateway Genmask Flags Metric Ref Use Iface
default 192.168.2.11 0.0.0.0 UG 0 0 0 eth0
192.168.2.0 * 255.255.255.0 U 0 0 0 eth0
R1路由器配置:
Eth0:192.168.1.11/24
Eth1:172.16.103.217/24
Kernel IP routing table
Destination Gateway Genmask Flags Metric Ref Use Iface
172.16.103.0 0.0.0.0 255.255.255.0 U 0 0 0 eth1
192.168.1.0 0.0.0.0 255.255.255.0 U 0 0 0 eth0
192.168.2.0 172.16.103.219 255.255.255.0 UG 0 0 0 eth1
R2路由器配置:
Eth0:172.16.103.219/24
Eth0:192.168.2.11/24
Kernel IP routing table
Destination Gateway Genmask Flags Metric Ref Use Iface
172.16.103.0 0.0.0.0 255.255.255.0 U 100 0 0 eth0
192.168.1.0 172.16.103.217 255.255.255.0 UG 0 0 0 eth0
192.168.2.0 0.0.0.0 255.255.255.0 U 0 0 0 eth1
实验结果:
PC2#tracert 192.168.1.11
Tracing the route to 192.168.1.11
1 192.168.2.11 2 ms * 1 ms * 1 ms *
2 172.16.103.217 1 ms * 1 ms * 1 ms *
3 * * *
4 * * *
5 * * *
参考:http://linux.vbird.org/linux_server/0230router.php
二、quagga实现动态路由。
以quagga(zebra+ospf)为例。实现上述静态路由配置的动态配置。
Quagga软件原名是Zebra是由一个日本开发团队编写的一个以GNU版权方式发布的软件。Quagga项目开始与1996年,当前版本是0.99.22版 可以使用Quagga将linux机器打造成一台功能完备的路由器。
Quagga能够同时支持RIPv1、RIPv2、RIPng、OSPFv2、OSPFv3、BGP-4和 BGP-4+等诸多TCP/IP协议。
1.安装quagga。
yum install quagga
2.配置quagga.
配置文件都保存在/etc/quagga/目录。
[root@linuxroute1 /]# ls /etc/quagga/
zebra.conf vtysh.conf ospfd.conf
在/usr/share/doc/quagga-0.99.22.4目录有系统预设的配置文件可以拷到/etc/quagga中使用。
其中:vtysh.conf为配置Quagga所使用的shell的配置文件,zebra.conf是Quagga的主要配置文件。
Quagga对每钟路由选择协议有单独的配置文件:
RIP 所需的 ripd.conf
OSPF所需的ospf.conf
BGP所需的 bgp.conf
3. 启动Quagga
//启动Quagga
# service zebra start
Starting zebra: [ OK ]
软件Quagga的总控制台启动了,管理端口号2601。
# telnet localhost 2601
Trying 127.0.0.1...
Connected to vpntest.huatech.com (127.0.0.1).
Escape character is '^]'.
Hello, this is quagga (version 0.96.2).
Copyright 1996-2002 Kunihiro Ishiguro.
User Access Verification
Password:
Quagga会提示输入口令,我们通过/etc/quagga/zebra可以看到口令是zebra,enable口令也是zebra。输 入口令zebra,得到路由器用户模式提示符:
Router>
进入特权模式:
Router> enable
Password:
Router#
4.启动ospfd
#service ospfd start
# telnet localhost 2604
Password:
ospfd> enable
ospfd# configure terminal
ospfd(config)# hostname r1_ospfd
r1_ospfd(config)# router ospf !启动ospf
r1_ospfd(config-router)# ospf router-id 172.16.103.217 !设置router-id
r1_ospfd(config-router)# network 172.16.103.0/24 area 0.
r1_ospfd(config-router)# network 192.168.1.0/24 area 1
r2路由器quagga的配置步骤同上。。
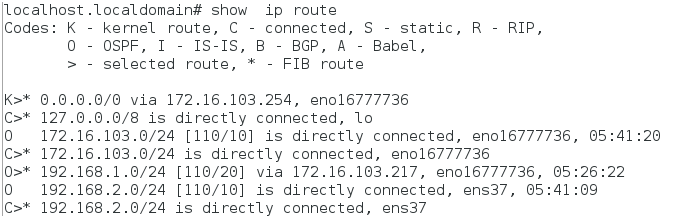
5.实验结果:
R1路由结果-->

R2路由结果-->


 1169
1169

 被折叠的 条评论
为什么被折叠?
被折叠的 条评论
为什么被折叠?
 到【灌水乐园】发言


