


1.队列和主题
1.1概念
在MQ中,消息模型有两种,一种是队列(Queue),一种是主题(Topic)。队列是Point-To-Point的,队列中的消息,仅能被消费一次。主题是Pub/Sub模型,主题中的消息,可以由多个订阅者消费;订阅者只能消费它订阅以后的消息。这是遵循的JMS规范。
1.2收发消息对象创建过程
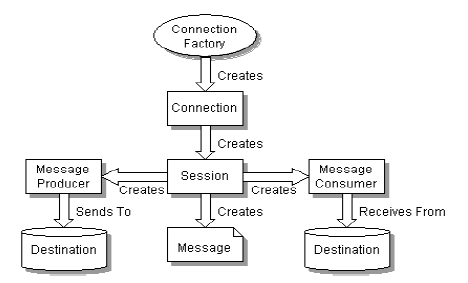
如上图所示,JMS规范中,收发消息的对象创建过程如下,下面的示例代码中也将注释这些过程:
1. 初始化ConnetionFactory
2. ConnetionFactory创建Connection
3. Connection创建Session
4. Session创建Destination(包括Queue 和 Topic两种)
5.发: Session创建消息生产者MessageProducer(收:Session创建消息消费者MessageConsumer)
6.Seesion创建Message,(发:)MessageProducer发送到Destination,(收:)MessageConsumer从Destination接受消息。
1.3接口间的关系
JMS规范定义了通用接口(JMS Common Interfaces)、队列接口(PTP-specific Interfaces)和 主题接口(Pub/Sub-specific Interfaces),队列接口和主题接口分别继承于通用接口,具体关系如下表所示。

ActiveMQ对这些规范接口都有相应的实现。在实际的编程过程中,声明通用接口基本就够用了。如何区分Queue和Topic也很简单,参看下面的代码。
|
1
2
3
4
5
|
//Queue,队列
Destination destination = session.createQueue(subject);
//Topic,主题
Destination destination = session.createTopic(subject);
|
2.通过队列发送和接受消息
运行代码的时候,可以先run起来接受消息的程序,再run发送消息的程序,来观察消息发送的过程。
别忘记启动ActiveMQ服务器,安装部署和启动的办法,参见http://my.oschina.net/xiaoxishan/blog/380352
2.1通过Queue发送消息
|
1
2
3
4
5
6
7
8
9
10
11
12
13
14
15
16
17
18
19
20
21
22
23
24
25
26
27
28
29
30
31
32
33
34
35
36
37
38
39
40
41
42
43
44
45
46
47
48
49
50
51
52
53
54
55
56
57
58
59
60
61
62
63
64
65
66
67
68
69
70
71
72
73
74
75
76
77
78
79
80
81
82
83
84
85
86
87
88
|
package
guo.examples.mq01.queue;
import
javax.jms.Connection;
import
javax.jms.ConnectionFactory;
import
javax.jms.Destination;
import
javax.jms.JMSException;
import
javax.jms.MessageProducer;
import
javax.jms.Session;
import
javax.jms.TextMessage;
import
org.apache.activemq.ActiveMQConnection;
import
org.apache.activemq.ActiveMQConnectionFactory;
/**
* 演示如何向MQ发送消息,和JDBC操作数据库的过程很像
*
* 1.初始化连接工厂ConnectionFactory
*
* 2.创建连接Connection
*
* 3. 创建会话session
*
* 4.打开队列createQueue
*
* 5.获得消息生产者MessageProducer
*
* 6.使用消息生产者发送消息
*
* 7. 关闭会话session和连接Connection
*
* 可以看出,使用JMS发送一个这么简单的消息,需要这么多的步骤,不方便。
*
*/
public
class
Sender {
public
static
void
main(String[] args) {
Sender sender =
new
Sender();
String msg =
"Hello World!"
;
sender.sendMessage(msg);
System.out.println(
"发送消息结束:"
+ msg);
}
/**
* 使用JMS向MQ发送消息
*
* @param msg 消息内容
*/
public
void
sendMessage(String msg) {
// defualt user & password both are null
String user = ActiveMQConnection.DEFAULT_USER;
String password = ActiveMQConnection.DEFAULT_PASSWORD;
// DEFAULT_BROKER_URL =failover://tcp://localhost:61616
String url = ActiveMQConnection.DEFAULT_BROKER_URL;
String subject =
"TOOL.DEFAULT"
;
// 1. 初始化连接工厂
ConnectionFactory contectionFactory =
new
ActiveMQConnectionFactory(user, password, url);
try
{
// 2. 创建连接
Connection connection = contectionFactory.createConnection();
connection.start();
// 3.创建会话
Session session = connection.createSession(Boolean.TRUE, Session.AUTO_ACKNOWLEDGE);
// 4. 打开队列
Destination destination = session.createQueue(subject);
// 5. MessageProducer负责发送消息
MessageProducer producer = session.createProducer(destination);
TextMessage message = session.createTextMessage();
for
(
int
i =
0
; i <
10
; i++) {
String tmp = i +
":"
+ msg;
message.setStringProperty(
"hello"
, tmp);
// 6. 发送消息
producer.send(message);
System.out.println(
"send: "
+ tmp);
Thread.sleep(
3000
);
//只有commit之后,消息才会进入队列
session.commit();
}
// 7. 关闭会话和连接
session.close();
connection.close();
}
catch
(JMSException e) {
e.printStackTrace();
}
catch
(InterruptedException e) {
e.printStackTrace();
}
}
}
|
2.2通过Queue接受消息
|
1
2
3
4
5
6
7
8
9
10
11
12
13
14
15
16
17
18
19
20
21
22
23
24
25
26
27
28
29
30
31
32
33
34
35
36
37
38
39
40
41
42
43
44
45
46
47
48
49
50
51
52
53
54
55
56
57
58
59
60
61
62
63
64
65
66
67
68
69
70
71
|
package
guo.examples.mq01.queue;
import
javax.jms.Connection;
import
javax.jms.ConnectionFactory;
import
javax.jms.Destination;
import
javax.jms.JMSException;
import
javax.jms.Message;
import
javax.jms.MessageConsumer;
import
javax.jms.MessageListener;
import
javax.jms.Session;
import
javax.jms.TextMessage;
import
org.apache.activemq.ActiveMQConnection;
import
org.apache.activemq.ActiveMQConnectionFactory;
/**
* 演示如何从MQ接受消息,和发送差不多
*
* 1.初始化连接工厂ConnectionFactory
*
* 2.创建连接Connection
*
* 3. 创建会话session
*
* 4.打开队列createQueue
*
* 5.获得消息消费者MessageConsumer
*
* 6.使用MessageConsumer接受消息
*
* 7. 关闭会话session和连接Connection
*
*/
public
class
Receiver {
public
static
void
main(String[] args) {
String user = ActiveMQConnection.DEFAULT_USER;
String password = ActiveMQConnection.DEFAULT_PASSWORD;
String url = ActiveMQConnection.DEFAULT_BROKER_URL;
String subject =
"TOOL.DEFAULT"
;
ConnectionFactory connectionFactory =
new
ActiveMQConnectionFactory(user, password, url);
Connection connection;
try
{
connection = connectionFactory.createConnection();
connection.start();
final
Session session = connection.createSession(Boolean.TRUE, Session.AUTO_ACKNOWLEDGE);
Destination destination = session.createQueue(subject);
// MessageConsumer负责接受消息
MessageConsumer consumer = session.createConsumer(destination);
consumer.setMessageListener(
new
MessageListener() {
public
void
onMessage(Message msg) {
TextMessage message = (TextMessage) msg;
try
{
String hello = message.getStringProperty(
"hello"
);
System.out.println(
"收到消息:\t"
+ hello);
session.commit();
}
catch
(JMSException e) {
e.printStackTrace();
}
}
});
// 为了演示接受消息,这里把关闭会话和连接注释掉了。
// session.close();
// connection.close();
}
catch
(JMSException e) {
e.printStackTrace();
}
}
}
|
3.通过Topic发布和订阅消息
为了使订阅者能够订阅消息,在运行程序时,需要先运行订阅者(Subscriber),后运行发布者(Publisher)。
3.1通过Topic发布消息
|
1
2
3
4
5
6
7
8
9
10
11
12
13
14
15
16
17
18
19
20
21
22
23
24
25
26
27
28
29
30
31
32
33
34
35
36
37
38
39
40
41
42
43
44
45
46
47
48
49
50
51
52
53
54
55
56
57
58
59
60
61
62
63
64
65
66
67
68
69
70
71
72
73
74
75
76
77
78
79
80
|
package
guo.examples.mq01.topic;
import
javax.jms.Connection;
import
javax.jms.ConnectionFactory;
import
javax.jms.Destination;
import
javax.jms.JMSException;
import
javax.jms.MessageProducer;
import
javax.jms.Session;
import
javax.jms.TextMessage;
import
org.apache.activemq.ActiveMQConnection;
import
org.apache.activemq.ActiveMQConnectionFactory;
/**
* 演示如何向MQ发送消息,和JDBC操作数据库的过程很像
*
* 1.初始化连接工厂ConnectionFactory
*
* 2.创建连接Connection
*
* 3. 创建会话session
*
* 4.创建topic
*
* 5.获得消息生产者MessageProducer
*
* 6.使用消息生产者发送消息
*
* 7. 关闭会话session和连接Connection
*
* 只有那些在线的订阅者可以收到消息,所以我们需要先启动Subscriber
*
*/
public
class
Publisher {
public
static
void
main(String[] args) {
Publisher pb =
new
Publisher();
String msg =
"Hello World!~~~~~"
;
pb.sendMessage(msg);
System.out.println(
"发送消息结束:"
+ msg);
}
/**
* 使用JMS向MQ发送消息
*
* @param msg 消息内容
*/
public
void
sendMessage(String msg) {
// defualt user & password both are null
String user = ActiveMQConnection.DEFAULT_USER;
String password = ActiveMQConnection.DEFAULT_PASSWORD;
// DEFAULT_BROKER_URL =failover://tcp://localhost:61616
String url = ActiveMQConnection.DEFAULT_BROKER_URL;
String subject =
"MQ.TOPIC"
;
// 1. 初始化连接工厂
ConnectionFactory contectionFactory =
new
ActiveMQConnectionFactory(user, password, url);
try
{
// 2. 创建连接
Connection connection = contectionFactory.createConnection();
connection.start();
// 3.创建会话
Session session = connection.createSession(Boolean.TRUE, Session.AUTO_ACKNOWLEDGE);
// 4. 创建要发布的主题,和Queue的区别就在此
Destination destination = session.createTopic(subject);
// 5. MessageProducer负责发送消息
MessageProducer producer = session.createProducer(destination);
TextMessage message = session.createTextMessage();
message.setStringProperty(
"hello"
, msg);
// 6. 发送消息
producer.send(message);
// 7. 关闭会话和连接
session.commit();
session.close();
connection.close();
}
catch
(JMSException e) {
e.printStackTrace();
}
}
}
|
3.2通过Topic订阅消息
这里我们只有1个订阅者,想要验证多个订阅者,拷贝多份代码,改个类名即可。再次提醒,先运行订阅者。
|
1
2
3
4
5
6
7
8
9
10
11
12
13
14
15
16
17
18
19
20
21
22
23
24
25
26
27
28
29
30
31
32
33
34
35
36
37
38
39
40
41
42
43
44
45
46
47
48
49
50
51
52
53
54
55
56
57
58
59
60
61
62
63
64
65
66
67
68
69
70
|
package
guo.examples.mq01.topic;
import
javax.jms.Connection;
import
javax.jms.ConnectionFactory;
import
javax.jms.JMSException;
import
javax.jms.Message;
import
javax.jms.MessageConsumer;
import
javax.jms.MessageListener;
import
javax.jms.Session;
import
javax.jms.TextMessage;
import
javax.jms.Topic;
import
org.apache.activemq.ActiveMQConnection;
import
org.apache.activemq.ActiveMQConnectionFactory;
/**
* 演示如何从MQ接受消息,和发送差不多
*
* 1.初始化连接工厂ConnectionFactory
*
* 2.创建连接Connection
*
* 3. 创建会话session
*
* 4.打开队列createQueue
*
* 5.获得消息消费者MessageConsumer
*
* 6.使用MessageConsumer接受消息
*
* 7. 关闭会话session和连接Connection
*
*/
public
class
Subscriber {
public
static
void
main(String[] args) {
String user = ActiveMQConnection.DEFAULT_USER;
String password = ActiveMQConnection.DEFAULT_PASSWORD;
String url = ActiveMQConnection.DEFAULT_BROKER_URL;
String subject =
"MQ.TOPIC"
;
ConnectionFactory connectionFactory =
new
ActiveMQConnectionFactory(user, password, url);
Connection connection;
try
{
connection = connectionFactory.createConnection();
connection.start();
final
Session session = connection.createSession(Boolean.TRUE, Session.AUTO_ACKNOWLEDGE);
Topic topic = session.createTopic(subject);
// MessageConsumer负责接受消息
MessageConsumer consumer = session.createConsumer(topic);
consumer.setMessageListener(
new
MessageListener() {
public
void
onMessage(Message msg) {
TextMessage message = (TextMessage) msg;
try
{
String hello = message.getStringProperty(
"hello"
);
System.out.println(
"订阅者---SecondSubscriber---收到消息:\t"
+ hello);
session.commit();
}
catch
(JMSException e) {
e.printStackTrace();
}
}
});
// 为了测试效果,注释掉了两行代码,使Session和connection一直处于打开状态
//session.close();
//connection.close();
}
catch
(JMSException e) {
e.printStackTrace();
}
}
}
|
4.总结和代码地址
向ActiveMQ收发消息的编码过程和JDBC操作数据库的过程很相似,也有同样的毛病,就是重复代码很多,Spring-JMS为我们提供了更为便利的解决方案,我们后续再谈。
本文中的代码见 http://pan.baidu.com/s/1c02GTDQ 。


 1453
1453


 被折叠的 条评论
为什么被折叠?
被折叠的 条评论
为什么被折叠?
 到【灌水乐园】发言


