


1. 先安装docker 和docker-composer
1.1安装docker 直接使用快捷一键安装
$ curl -fsSL get.docker.com -o get-docker.sh
$ sudo sh get-docker.sh --mirror Aliyun
1.2等待一分钟docker安装完成启动docker
$ sudo systemctl enable docker
$ sudo systemctl start docker
1.3 测试docker 安装 和镜像加速
直接参考文章安装和调试 CentOS 安装 Docker | Docker 从入门到实践
2.安装php 运行环境
2.1 选用最简单 的拥有 php-fpm 和 nginx 的 镜像 webdevops/php-nginx webdevops/php-nginx — Dockerfile Documentation documentation 直接使用 docker pull 拉取最新镜像
docker pull webdevops/php-nginx
2.2 拉完了之后docker images 查看镜像文件是否成功
docker images
显示如下就说明pull 下来了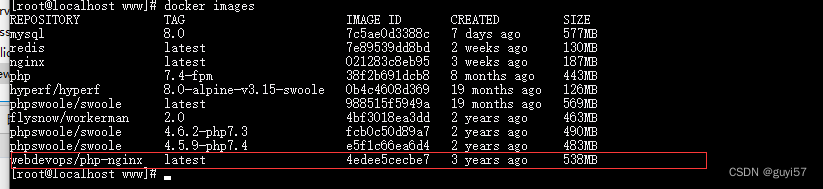
2.3 运行下webdevops/php-nginx的镜像文件
docker run -itd --name php-ngins-thinkphp6 -p 89:80 -v /home/guyi/www/thinkphp6/:/app/ webdevops/php-nginx
-itd 交互终端方式打开具体参数解读可阅读该篇文章 docker run参数详解_docker run 参数详解_日日行不惧千万里的博客-CSDN博客
--name 给容器取一个名字
-p 89 :就是虚拟机可以访问的端口(后面 ip:89 就可以访问) 80是容器里面的80端口
-v /home/guyi/www/thinkphp6/ 虚拟机目录映射的目录(指向放项目的目录即可) /app/ 虚拟机 的容器路径。 还可增加 配置文件目录 修改配置文件的时候就无须进入容器修改: -v nginx 的 配置目录/conf.d : /opt/docker/etc/nginx/conf.d 其他挂载配置路径看下表
容器内php 配置文件路径
| File/Directory | Description |
/opt/docker/etc/php/php.webdevops.ini | PHP settings from WebDevOps image |
/opt/docker/etc/php/php.ini | php.ini for custom settings |
/opt/docker/etc/php/fpm/php-fpm.conf | PHP-FPM main configuration file |
/opt/docker/etc/php/fpm/pool.d/application.conf | Application PHP-FPM pool configuration file |
/opt/docker/etc/supervisor.d/php-fpm.conf | Supervisord configuration file for PHP-FPM |
容器内nginx 配置路径
| File/Directory | Description |
/opt/docker/etc/nginx/conf.d | Main global configuration directory (automatically included files) |
/opt/docker/etc/nginx/conf.d/10-php.conf | PHP cgi configuration |
/opt/docker/etc/nginx/ssl | SSL configuration directory for certifications and keys |
/opt/docker/etc/nginx/ssl/server.crt | Example SSL certification (*.vm) |
/opt/docker/etc/nginx/ssl/server.csr | Example SSL certification request (*.vm) |
/opt/docker/etc/nginx/ssl/server.key | Example SSL key (.vm) |
/opt/docker/etc/nginx/vhost.common.d | Vhost configuration directory (automatically included files) |
/opt/docker/etc/nginx/vhost.common.d/10-location-root.conf | Redirect requests to DOCUMENT_INDEX |
/opt/docker/etc/nginx/vhost.common.d/10-php.conf | PHP cgi configuration for vhost |
/opt/docker/etc/nginx/global.conf | Global nginx configuration |
/opt/docker/etc/nginx/main.conf | Main Nginx configuration |
/opt/docker/etc/nginx/php.conf | Deprecated PHP configuration |
/opt/docker/etc/nginx/vhost.common.conf | Deprecated vhost common include |
/opt/docker/etc/nginx/vhost.conf | Vhost configuration |
/opt/docker/etc/nginx/vhost.ssl.conf | Vhost SSL configuration |
/opt/docker/etc/supervisor.d/nginx.conf | Supervisord configuration file for Nginx |
webdevops/php-nginx 镜像名字
2.4 运行后 访问虚拟机ip:89 访问192.168.199.1:89 或者 直接curl ip:89 出现centos 的欢迎页面即可 。到此环境搭建好了。
3. 安装 thinkphp6 框架 可选择 直接下载源码放到 run 挂载的目录下 
或者 cd /home/guyi/www/thinkphp6 下 直接用官网的composer 安装 tp6框架
composer create-project topthink/think thinkphp6
4.项目搭建好后需要在nginx 配置文件中修改入口目录
4.1 挂载过 /opt/docker/etc/nginx/vhost.conf 直接在虚拟机对应目录修改即可
4.2运行时run 没有 -v 挂载的直接 进入容器修改
docker ps //查看虚拟机的容器id 或者名字
docker exec -it 78b4726227a1 /bin/bash //进入容器的命令 78b4726227a1 容器的id

vim /opt/docker/etc/nginx/vhost.conf //修改vhost.conf
server {
listen 80 default_server;server_name _ *.vm docker;
root "/app/public";
index index.php;
# 隐藏 index.php 以及使得Nginx支持pathinfo模式
if (!-e $request_filename) {
rewrite ^/index.php(.*)$ /index.php?s=$1 last;
rewrite ^(.*)$ /index.php?s=$1 last;
}include /opt/docker/etc/nginx/vhost.common.d/*.conf;
}##############
# SSL
##############server {
listen 443 default_server;server_name _ *.vm docker;
root "/app/public";
index index.php;include /opt/docker/etc/nginx/vhost.common.d/*.conf;
include /opt/docker/etc/nginx/vhost.ssl.conf;
}
进入后 按 i 进入插入模式 将配置文件放入 按esc 输入 :wq!

然后 exit 退出容器 重启下nigix docker restart 78b4726227a1
重启后访问 ip:89 出现tp6欢迎页面 至此 tp6搭建完成
5.安装swoole 最简单的方式实现
5.1 拉取swoole 镜像 版本可自行配置
docker pull phpswoole/swoole:4.6.2-php7.3
5.2 测试镜像环境:
docker run --rm phpswoole/swoole:4.6.2-php7.3 "php -m"
docker run --rm phpswoole/swoole:4.6.2-php7.3 "php --ri swoole"
docker run --rm phpswoole/swoole:4.6.2-php7.3 "composer --version
5.3 建一个websocket 启动方法 更多方法查看git或者官方文档:
swoole-src: Coroutine-based concurrency library for PHP - Gitee.comj
创建一个server.php 放到你指定的swoole的虚拟机目录
<?php
# /usr/local/swoole//server.php 路径由自己指定 启动容器的时候会用
declare(strict_types=1);
$server = new swoole_websocket_server("0.0.0.0",9502);
$server->on('open',function(swoole_websocket_server $server,$request){
echo "server: handshake success with fd{$request->fd}\n";
});
$server->on('message',function(swoole_websocket_server $server,$frame){
echo "receive from {$frame->fd}:{$frame->data}";
echo "opcode:{$frame->opcode}";
echo "fin: {$frame->finish}\n";
// $server->push($frame->fd,"this is a server");
foreach ($server->connections as $fd) {
// 需要先判断是否是正确的websocket连接,否则有可能会push失败
if ($server->isEstablished($fd)) {
$server->push($fd, $frame->data);
}
}
});
$server->on('close',function($ser,$fd){
echo "client {$fd} closed\n";
});
$server->start();
5.4 启动swoole容器
docker run --rm -p 9502:9502 --name swoole -v /usr/local/swoole/:/var/www phpswoole/swoole:4.6.2-php7.3
/usr/local/swoole/ 就是你刚刚创建的 server.php 的虚拟机目录
5.5测试访问:
curl http://127.0.0.1:9502
容器启动后会尝试执行 php server.php 命令启动服务,所以无需手动进入容器执行,出现问题请进入容器目录 执行 php server.php 命令; 到此swoole 运行成功了。
网上copy 了段弹幕代码:
<!DOCTYPE html>
<html>
<head>
<meta charset="utf-8">
<title></title>
</head>
<style type="text/css">
*{
margin: 0;
padding: 0;
}
#navBar{
width: 50%;
height: 400px;
padding-bottom:40px;
border: 1px solid #000;
margin: 5% auto 0;
position: relative;
background: #ccc;
}
#navBar #video{
width:100%;
height:100%;
background:#fcfcfc;
text-align:center;
}
#navBar .dm_tool{
width: 100%;
height: 40px;
background: #ccc;
margin-top:1px;
bottom: 0;
display: flex;
}
#navBar .dm_tool .dm_con{
width: 89%;
height: 38px;
outline: none;
border: 1px solid #ccc;
padding-left: 10px;
float: left;
}
#navBar .dm_tool .sendToDm{
width: 9.7%;
background: limegreen;
color: white;
outline: none;
border: 0;
cursor:pointer;
}
#navBar .dmArea{
width:100%;
height:400px;
top:0;
left:0;
position:absolute;
z-index:10;
overflow:hidden;
}
#navBar .dmArea span{
white-space:nowrap;
position:absolute;
}
</style>
<body>
<div id="navBar">
<div id="video"><span style="position:absolute;top:45%;left:45%;">假装在播放视频</span></div>
<div class="dm_tool">
<input type="text" placeholder="say something..." name="dm_con" class="dm_con" />
<button class="sendToDm">发一弹</button>
</div>
<div class="dmArea">
<!--span>假装在播放视频 假装在播放视频 </span-->
</div>
</div>
</body>
<script src="http://libs.baidu.com/jquery/1.9.1/jquery.js"></script>
<script type="text/javascript">
var DmClass = {
"Dm_H":0, //弹幕区域高度
"Dm_W":0,//弹幕区域宽度
"DmObj":"",//弹幕区对象
//初始化方法
init : function(){
var _this = this;
_this.DmObj = $(".dmArea");
_this.Dm_H = _this.DmObj.height();
_this.Dm_W = _this.DmObj.width();
//发送弹幕方法
_this.sendToDmFunc();
},
sendToDmFunc : function(){
var _this = this;
$(".sendToDm").click(function(){
var sendCon = $('input[name="dm_con"]').val();
if($.trim(sendCon) == "") {
var testList = ["hello world!","你好","视频真好看","吹牛我就服你!!","哈哈哈"];
var _s = Math.floor(Math.random()*5);
sendCon = testList[_s];
//return false;
}
//json 数据格式
var sData = '{"data":"'+sendCon+'"}';
//发送到sockey服务器
SocketClass.websocket.send(sData);
});
},
//往弹幕区域添加从服务器广播过来的弹幕数据
addToDm : function(rdata){
var _this = this;
//json转对象
var newObj = eval('(' + rdata + ')');
//定义新的弹幕对象
var newDom = $("<span></span>");
//随机取一个位置
var p = _this.randPosition();
//放入弹幕内容
newDom.html(newObj.data);
_this.DmObj.append(newDom);
//设置初始位置为弹幕区的最右边
newDom.css({"left":_this.Dm_W+"px","top":p+"px"});
//当前单条弹幕位置
var tR = _this.Dm_W;
//定时器 20毫秒执行一次
var newTimer = setInterval(function(){
tR -= 2;
//当弹幕走出弹幕区将之删除,并清除当前的定时器
if(tR <= -newDom.width()){
newDom.remove();
clearInterval(newTimer);
}
//新位置
newDom.css("left",tR+"px");
},20);
},
//随机获取位置
randPosition : function(){
var _this = this;
var rn = Math.floor(Math.random()*(_this.Dm_H - 20));
return rn;
},
}
//sockey 服务
var SocketClass = {
"wsServer":"ws://ip地址:9502", //服务地址
"websocket":"", //socket 对象
init : function(){
var _this = this;
//连接docket
_this.socketServerInit();
},
socketServerInit : function(){
var _this = this;
_this.websocket = new WebSocket(_this.wsServer);
//连接上socket
_this.websocket.onopen = function (evt) {
alert("socket server connected");
console.log("Connected to WebSocket server.");
};
//socket 服务器关闭
/*_this.websocket.onclose = function (evt) {
alert("socket server closed");
console.log("Disconnected");
};*/
//接收socket服务器的广播数据
_this.websocket.onmessage = function (evt) {
console.log('Retrieved data from server: ' + evt.data);
//将接收到的弹幕数据调用addToDm方法 添加到弹幕区域
DmClass.addToDm(evt.data);
};
//连接错误
_this.websocket.onerror = function (evt, e) {
console.log('Error occured: ' + evt.data);
};
},
}
//初始执行方法
$(function(){
DmClass.init();
SocketClass.init();
});
</script>
</html>


 1809
1809


 被折叠的 条评论
为什么被折叠?
被折叠的 条评论
为什么被折叠?
 到【灌水乐园】发言


