


相关链接
Java & Eclipse & Maven 使用配置方法
Eclipse平台上新建Java项目使用Junit测试
如何在Eclipse平台使用git从GitHub上下载文件至本地及管理本地git项目
Eclipse汉化 中文语言包下载安装 Babel Language Pack
Java & Eclipse & Maven 使用配置方法
- 本文为Java初学者学习使用经验收集
下载Eclipse
- Eclipse Downloads
- Download 64 bit

- Select Another Mirror
- China - University of Science and Technology of China
- 作者选择中科大USTC镜像

下载JDK13
- Java SE Development Kit 13 Downloads
- 点击 Accept License Agreement 后,点击灰条选项

官网JDK/Eclipse下载很慢!!!
- 解决方案:作者Github仓库Java-Tools
- 打开文件夹 -> 全选 -> 解压到当前文件夹 -> 运行.exe
配置 JDK
- 点击 : Window -> Prefernces -> Java -> Installed JREs -> Add -> Standard VM -> 选择 JDK 目录 D:\Program Files\jdk-13.0.2 -> Finish -> 在列表勾选刚刚添加的 JDK -> Apply
自定义工具栏
- 点击 : Window -> Perspective -> Customize Perspective -> Tool Bar Visibility , 选择对应的选项即可
编辑器字体修改
- 点击:Window -> Prefernces -> General -> Appearance -> Colors and Fonts -> Java -> Java Editor Text Font
- 推荐:Consolas+小四号字体
修改默认编码
- 点击 : Windows -> Preferences -> General -> Workspace , 在右侧的 Text file encoding 中选择 UTF-8
- 点击 : Windows -> Preferences -> General -> Content Types , 在右侧点开 Text , 选择 Java Source File , Java Properties File , JSP , 在下面的 Default encoding 输入 UTF-8 , 点击 Update
- 点击 : Windows -> Preferences -> Web -> JSP Files , 面板选择 ISO 10646/Unicode(UTF-8) 右键选择项目 -> Properties -> Resource -> 设置编码为 UTF-8
设置代码自动提示
- 点击 Window -> Preferences -> Java -> Editor -> Content Assist , 在右侧的 Auto Activation 选项的 Auto activation triggers for Java 中输入
.abcdefghijklmnopqrstuvwxyz即可
配置 Maven
- 首先配置系统环境变量 :
- 右键计算机 -> 属性 -> 高级系统设置 -> 高级 -> 环境变量 , 在下方的 系统变量 添加 MAVEN_HOME , 值是 Maven 文件夹路径 , 如 : C:\MyProgram\Maven , 修改 Path 变量 , 添加 %MAVEN_HOME%\bin; , 注意分号 ; 配置完成之后查看是否成功 : 运行 CMD 输入 mvn -v

- 右键计算机 -> 属性 -> 高级系统设置 -> 高级 -> 环境变量 , 在下方的 系统变量 添加 MAVEN_HOME , 值是 Maven 文件夹路径 , 如 : C:\MyProgram\Maven , 修改 Path 变量 , 添加 %MAVEN_HOME%\bin; , 注意分号 ; 配置完成之后查看是否成功 : 运行 CMD 输入 mvn -v
- 然后配置 Eclipse :
- 打开 Eclipse -> Window -> Preferences -> Maven -> User Settings -> Global Settings: 和 User Settings: -> Browse… , 选择 Maven 目录下的 \conf\settings.xml 文件 , 然后点击 Update Settings 按钮即可
- 添加镜像(国内阿里云镜像)
- conf/setting.xml中插入代码
- 在mirrors中间插入
    <mirror>
      <id>nexus-aliyun</id>
      <mirrorOf>central</mirrorOf>
      <name>Nexus aliyun</name>
      <url>http://maven.aliyun.com/nexus/content/groups/public/</url>
    </mirror>
    <mirror>
      <id>nexus-aliyun-thirdparty</id>
      <mirrorOf>thirdparty</mirrorOf>
      <name>Nexus aliyun thirdparty</name>
      <url>http://maven.aliyun.com/nexus/content/repositories/thirdparty/</url>
    </mirror>

- 在profiles中间插入
    <profile>
      <id>jdk-1.4</id>
      <activation>
        <jdk>1.4</jdk>
      </activation>
      <repositories>
        <repository>
          <id>nexus</id>
          <name>local private nexus</name>
          <url>http://maven.aliyun.com/nexus/content/groups/public/</url>
          <releases>
            <enabled>true</enabled>
          </releases>
          <snapshots>
            <enabled>false</enabled>
          </snapshots>
        </repository>
      </repositories>
      <pluginRepositories>
        <pluginRepository>
              <id>nexus</id>
              <name>local private nexus</name>
              <url>http://maven.aliyun.com/nexus/content/groups/public/</url>
              <releases>
                <enabled>true</enabled>
              </releases>
              <snapshots>
                <enabled>false</enabled>
              </snapshots>
        </pluginRepository>
      </pluginRepositories>
    </profile>

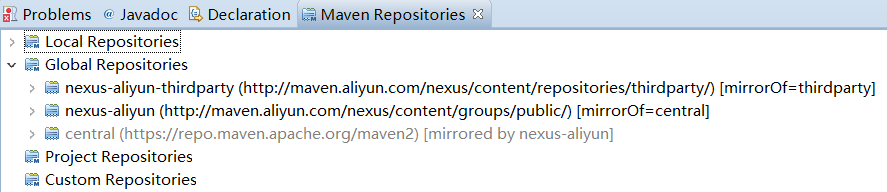
- 查看是否成功
- Window -> Show View -> Other -> Maven -> Maven Repositories -> Open
- 若打开后更改,可以点击Maven Repositories查看视图右边的
Reload setting.xml


 7603
7603


 被折叠的 条评论
为什么被折叠?
被折叠的 条评论
为什么被折叠?
 到【灌水乐园】发言


