


Use a custom style(使用自定义样式)
Image, terrain, and vector layers now come with default styles. These are default sources which provide a way to access Mapbox's rich data. You can select one of the generic Mapbox styles, or select Custom to use a custom style. For a walkthrough on how to configure a custom style, follow the Custom maps style for Unity tutorial.
图像、地形和矢量图层现在带有默认样式。 这些是提供访问 Mapbox 丰富数据的方法的默认源。 您可以选择一种通用 Mapbox 样式,或选择自定义以使用自定义样式。 有关如何配置自定义样式的演练,请遵循 Unity 自定义地图样式教程。
For image layers, select Custom to use a custom style from Mapbox Studio.
对于图像层,选择自定义以使用 Mapbox Studio 中的自定义样式。
There are two ways to specify a custom style:
- Copy a style URL from your Mapbox Studio account and paste it into the
Idfield of your image factory. - Search for a style linked to your account.
- Note: To search for a style, you may have to generate a new access token with
styles:listscope enabled. If you had to create a new access token, remember to swap it out with the old token in your Mapbox Setup panel.
- Note: To search for a style, you may have to generate a new access token with
有两种方法可以指定自定义样式:
从您的 Mapbox Studio 帐户复制样式 URL 并将其粘贴到图像工厂的 Id 字段中。
搜索与您的帐户关联的样式。
注意:要搜索样式,您可能必须生成一个启用了 styles:list 范围的新访问令牌。 如果您必须创建一个新的访问令牌,请记住在您的 Mapbox 设置面板中将其替换为旧令牌。
After specifying a custom style, the map will render the new style when you play the scene. You can further customize your map style in Mapbox Studio. Note that there may be some differences in color quality and resolution between Mapbox Studio and Unity: this is expected.
指定自定义样式后,地图将在您播放场景时呈现新样式。 您可以在 Mapbox Studio 中进一步自定义您的地图样式。 请注意,Mapbox Studio 和 Unity 之间的颜色质量和分辨率可能存在一些差异:这是预期的。
"Mapbox Streets With Building IDs" combines Mapbox-Streets-v7 vector data with our experimental 3D buildings data, which assigns unique IDs to building features to avoid visual artifacts for buildings at tile borders.
“带有建筑物 ID 的 Mapbox 街道”将 Mapbox-Streets-v7 矢量数据与我们的实验性 3D 建筑物数据相结合,它为建筑物特征分配了唯一的 ID,以避免瓷砖边界处建筑物的视觉伪影。
Use custom data
You can use your own data with a custom tileset using the Maps SDK for Mapbox Unity. To do so, you'll need to first create a dataset and export it to a tileset using Mapbox Studio.
您可以使用 Maps SDK for Mapbox Unity 将您自己的数据与自定义瓦片集一起使用。 为此,您需要先创建一个数据集,然后使用 Mapbox Studio 将其导出到 tileset。
For example: This custom population density tileset contains a layer outgeojson, which contains the properties id, p, and pkm2. The tileset contains the population per square kilometer in the property (pkm2) for all areas of the United States. You can configure your AbstractMap component in the following way to render extrusions of various blocks of a city and visualize that data on a map.
例如:此自定义人口密度图块集包含一个图层 outgeojson,其中包含属性 id、p 和 pkm2。 tileset 包含美国所有区域的属性 (pkm2) 中每平方公里的人口。 您可以按以下方式配置您的 AbstractMap 组件,以渲染城市各个街区的拉伸并在地图上可视化该数据。
- Right click MAP LAYERS on the AbstractMap component.(右键单击 AbstractMap 组件上的 MAP LAYERS。)
- Select Custom for the Data Source(为数据源选择自定义)
- Enter the tileset IDs
peterqliu.d0vin3elin the Map Id field. Note that you can specify any tileset ID in this field. (在 Map Id 字段中输入 tileset IDs peterqliu.d0vin3el。 请注意,您可以在此字段中指定任何 tileset ID。) - Click Add Visualizer to create a new visualizer. Next, name it by clicking Untitled once, specifying a title and pressing
Enter.PopulationDensityis used for this example, but you can name this whatever you want.(单击添加可视化工具以创建新的可视化工具。 接下来,通过单击 Untitled 一次命名它,指定一个标题并按 Enter。 PopulationDensity 用于此示例,但您可以随意命名。) - In the Vector Layer Visualizer settings, set the
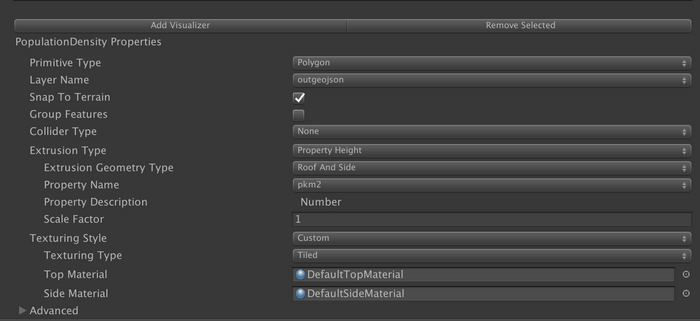
Primitive Typeto Polygon.(在 Vector Layer Visualizer 设置中,将 Primitive Type 设置为 Polygon。)(输入 outgeojson 作为图层名称。 这必须与指定图块集的图层详细信息相匹配。 对于这个 tileset,它是 outgeojson。) - Enter
outgeojsonfor the Layer Name. This must match the Layer details for the specified tileset. For this tileset, it isoutgeojson.(输入 outgeojson 作为图层名称。 这必须与指定图块集的图层详细信息相匹配。 对于这个 tileset,它是 outgeojson。) - Set the Extrusion Type to Property Height.(将拉伸类型设置为属性高度。)
- Enter
pkm2for the Property Name. This value must equal the name of a property on the specified tileset. For this tileset, it ispkm2.(输入 pkm2 作为属性名称。 该值必须等于指定 tileset 上的属性名称。 对于这个 tileset,它是 pkm2。) - Change the Texturing Style to Custom, and add a material of your choice to the Top Material and Side Material fields. Note that the
PopulationMatmaterial file is what produces the gradient style seen below. It is from custom code that uses thepkm2value to style the blocks differently. It is not included in the Maps SDK for Unity.(将纹理样式更改为自定义,并将您选择的材料添加到顶部材料和侧面材料字段。 请注意,PopulationMat 材料文件是产生如下所示的渐变样式的文件。 它来自使用 pkm2 值以不同方式设置块样式的自定义代码。 它不包含在 Maps SDK for Unity 中。)
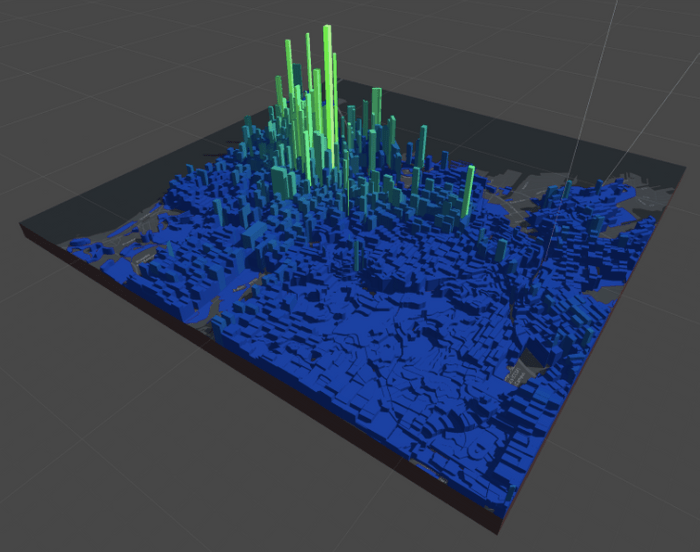
Here’s the output of that configuration when you play the scene. The screenshot below shows the population density of different blocks in San Francisco.
这是您播放场景时该配置的输出。 下面的截图显示了旧金山不同街区的人口密度。


 251
251


 被折叠的 条评论
为什么被折叠?
被折叠的 条评论
为什么被折叠?
 到【灌水乐园】发言


