


最近研究了一段时间的openvpn组网技术,也试着搭建了一个openvpn环境,大概理解了其中使用的一些技术原理,还是记录一下。本篇文章对专业搞网络的人也许用处不大,但是对于初次接触这些技术(比如vpn,代理技术,加密隧道,防火墙,路由,局域网组网)的人还是有一定价值的,便于理清整个vpn组网技术的脉络,也可以在遇到问题的时候自己排查。
openvpn是众多vpn种类的一种,是一个开源的产品,也是应用最广泛的一种vpn。支持的平台很多,我们常用的系统平台linux,window,安卓都支持。我搭建的openvpn服务端是运行在centos上,客户端是运行在安卓手机上的。其实不管运行在哪个平台,配置基本都是一样的。openvpn还有一个重要的功能是可以使用UDP协议传输数据,这相对于使用TCP传输数据的vpn,速度要快很多。
openvpn能构建一个虚拟专用网络(VPN),很多人也许不是很了解这句话包含的内容。一个是“虚拟的”,说的是这个网络内的各个主机在地理位置上,可能不是在相邻的地域,可能在地球的两端,可能横跨了整个互联网。这样看起来,这个网络就不像一个局域网,但是在逻辑上,是真正意义上的一个局域网。”虚拟“其实重点是指数据传输的通道上,这个通道是虚拟的,主机的网卡也是虚拟的,不是真实的网卡。还有一个形容词”专用“,这个就是指能和外部网络隔绝起来,为了不被外部网络影响,数据不被窥伺窃取篡改,VPN网络中两个主机之间的通信数据都会经过加密,这样的加密通信通道我们就称之为加密隧道。并且任何一台主机想要加入这个网络,都需要经过严格的认证授权。
VPN的数据包是在TCP/UDP数据包的基础上做了一层封装,这个封装的数据里就是VPN网络里面的局域网数据包,其中和正常的TCP/UDP数据包一样,也有源ip端口,目的ip端口。当然,这些局域网的数据包信息,只有解密了才能看到,外部即使截获了这个数据包,也解密不了其中的数据。这个数据包(也许是在互联网上)经过了漫长的传输后,到达最终目的地后才会能被正确的解密,递交给上层应用。
安装VPN客户端的主机上,当认证授权成功后加入VPN网络,都会新增一个虚拟网卡,作为VPN网络通信的专用网卡,VPN服务器启动成功后也一样虚拟出这个专用网卡。网卡的名称一般为tun0,就像下面的:

一、openvpn数据收发工作原理
其中openvpn收发数据处理过程,我大致画了一下,如下图:
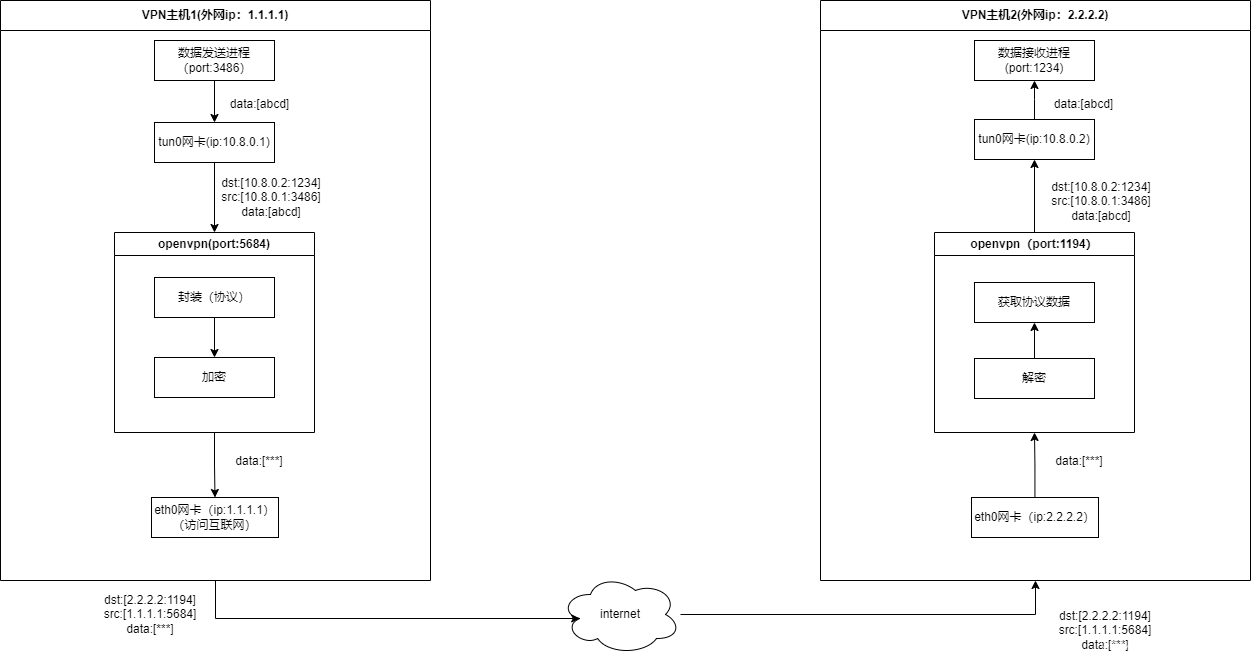
上面的VPN主机1就相当于openvpn的客户端,VPN主机2就相当于openvpn的服务器。其中eth0网卡是真实的网卡,对外连接外部网络,tun0是openvpn的虚拟出来的网卡,专门处理openvpn的数据。
数据发送进程,想要给VPN网络中的其他节点发送数据,就使用对端局域网的ip来发送,也就是10.8.0.2这个ip。这个数据发送进程发送的数据,先交给内核的协议栈进行TCP/IP数据包的封装,这个TCP/IP数据包经过本地路由后,本地的路由会直接交给tun0网卡(注意,此处还有一个重要的角色本地路由表),因为tun0网卡是openvpn这个进程虚拟出来的网卡,数据包交给tun0网卡后都会经过openvpn这个进程的处理,openvpn会把收到的数据用自己的openvpn协议进行封装,然后加密成密文(这个加密过程应该是使用开源的ssl或者tls协议),加密完成后就发送给对端(数据接收端)的openvpn进程。至于是怎么知道接收端的openvpn进程的ip端口的,是在开始的时候openvpn客户端和服务端的一些列认证完成后,这个连接才能建立成功的。发送端的openvpn进行把密文数据发出后,也会经过内核的协议栈,进行TCP/IP的协议组包,然后再次经过本地的路由表进行路由,路由表会把这个TCP/IP包交给外网出口网卡eth0发送出去。此时,整个数据的发送过程结束。
VPN主机1从网卡eth0发送的TCP/IP数据包,经过漫长的路由和转发,最终到达目的地,也就是,数据包通过VPN主机2的外网网卡eth0进入,内核协议栈解析这个TCP/IP数据包,知道这个数据包的目的ip端口号(2.2.2.2:1194),于是交给了openvpn进程(openvpn接收进程)处理。openvpn进程对接收到的数据先进行解密,得到openvpn协议数据,然后把VPN主机1数据发送进程发送的数据,转发到tun0网卡(这个转发的处理过程不是很清楚,究竟是重新组TCP/IP包还是原样把发送进程经过tun0网卡后的TCP/IP包转发,我们不去深究,最终的到达VPN主机2的tun0网卡时都是一样的),数据到达tun0网卡后也会经过内核去分发,内核协议栈把TCP/IP的包头都去掉,只把数据部分交给数据接收进程。
至此,数据收发的过程完成。
二、openvpn认证(加密隧道建立)
上面的章节,介绍了openvpn网络中两个主机的数据收发过程,但是两个主机在能进行数据收发前,要先建立数据传输通道,这个就是加入openvpn网络的认证过程。数据通道的建立的过程,也是openvpn客户端和服务端进行协商的过程。openvpn采用ssl协议通信,既然采用ssl,那么就会有证书验证,协商对称加密密钥的过程。需要生成ca证书,服务端证书客户端证书等。具体的原理这里不细说,可以自行去谷歌。openvpn客户端认证通过后就和服务端建立了一条加密隧道,也就是一条安全的数据通道。
三、路由表在openvpn组网中的作用
在第一部分介绍原理的时候,说发往数据接收端ip10.8.0.2的数据包,都转发给tun0网卡处理,这是怎么做到的?答案就是路由表。在openvpn客户端和服务器之间认证通过后,openvpn客户端就会修改我们本地的路由表,添加一条路由记录,指示本地路由收到发往ip10.8.0.2的数据包,都交给tun0网卡转发。
除了上面提到的第一个作用之外,在openvpn工作的过程中,路由表还有一个作用,就是把本地所有的数据包(流量)都路由到openvpn服务端的机器上,也就是把openvpn服务端的机器,作为本地机器的网关。把openvpn服务端作为网关的一个作用是,可以让openvpn局域网中的节点,通过openvpn服务端机器访问互联网,作为外网的出口。就类似我们平常用路由器上网的网络拓扑结构,路由器(openvpn服务端所在机器)作为NAT设备,代理接入互联网。真正起到NAT作用的是服务端所在主机的防火墙进程,而不是openvpn服务端进程。linux下的防火墙也是一门高深的技术,功能十分强大。
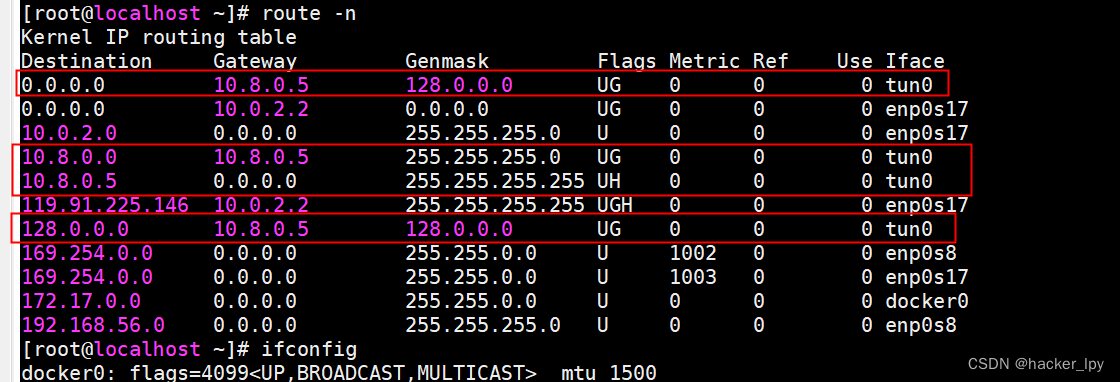
openvpn客户端认证成功后,路由表的信息类似以下的截图:
tun0网卡的信息如下:
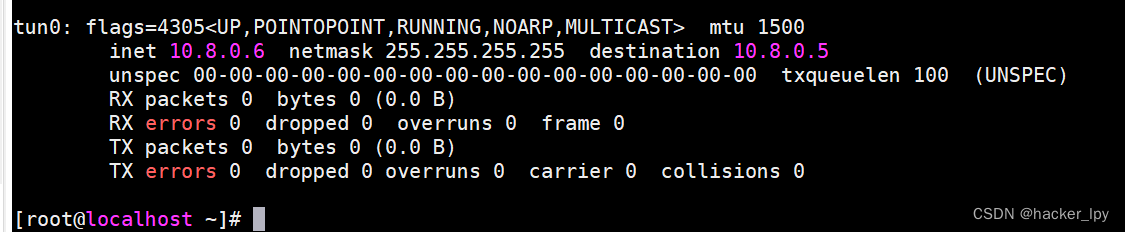
即openvpn客户端认证接入openvpn服务器后,分配到的局域网ip是10.8.0.6,服务器本身的局域网ip是10.8.0.5,这是一个点对点的网络。红线圈住的那几条就是openvpn新增的路由规则,其中第一条就是把openvpn服务端作为网关的路由规则。
四、openvpn安装配置过程
1、服务器端(centos)
我的服务端是部署在centos操作系统上的,安装openvpn就很简单了,直接用yum命令安装:
yum install -y openvpn
linux下安装的openvpn,客户端和服务端是一起的,运行的是服务端还是客户端,主要取决于配置文件。这个跟stunnel类似。
安装完成后,会有同时安装一些配置样例文件,用下面的命令进行查找:
find / -name "*openvpn*"
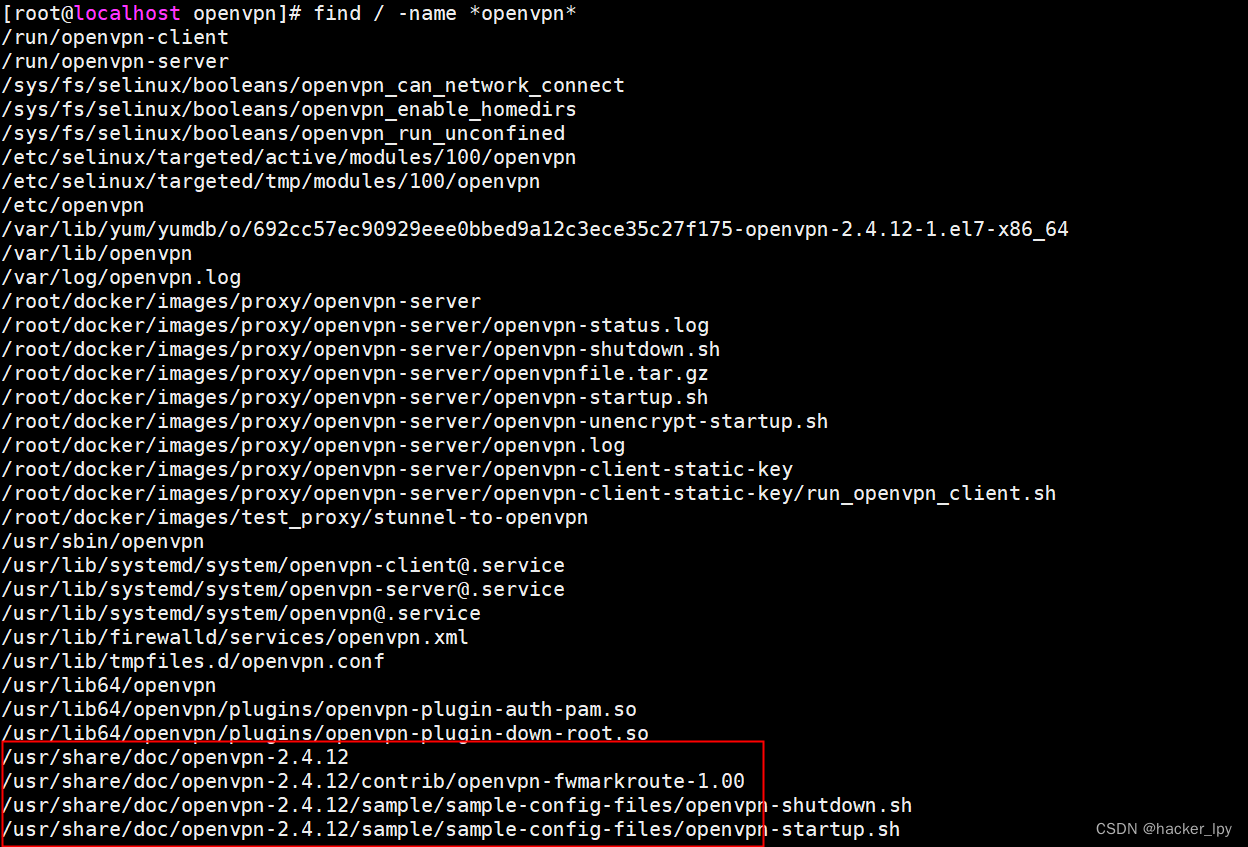
一般是/usr/share/doc/openvpn-xxx目录下,xxx是版本号。其中我们需要的几个文件就在sample/sample-config-files目录下,如下图:
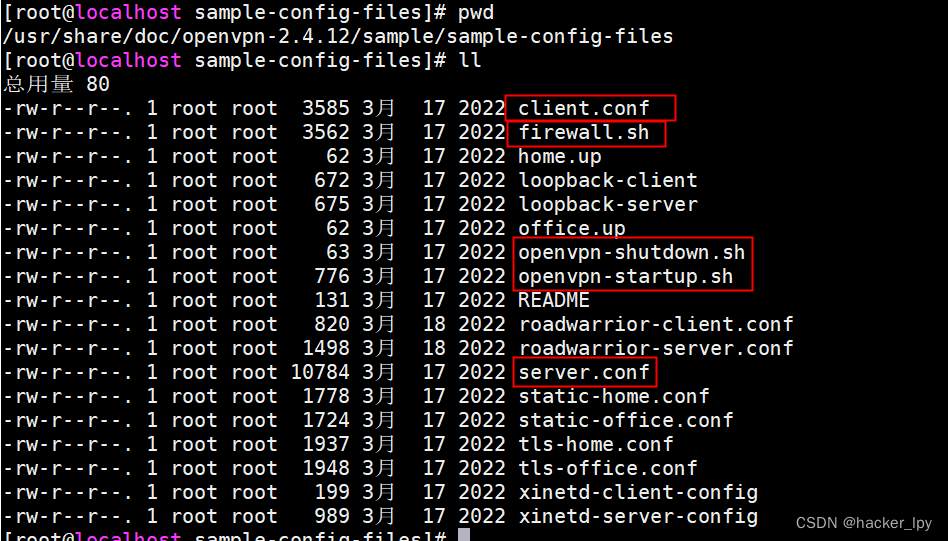
安装服务端的时候,我们复制firewall.sh、openvpn-shutdown.sh、openvpn-startup.sh、server.conf这几个文件到一个单独的目录下,比如/root/openvpn-server,如果你能看懂这几个配置文件里面的信息,就可以对应着修改一下,以符合你的部署要求。
下面是我修改以后的配置:
openvpn-startup.sh文件:
#!/bin/sh

# A sample OpenVPN startup script
# for Linux.

# openvpn config file directory
# 此处获取当前目录路径
dir=`pwd`

# load the firewall
# 调用firewall.sh脚本配置防火墙
$dir/firewall.sh
#iptables -t nat -A POSTROUTING -o eth0 -j MASQUERADE

# load TUN/TAP kernel module
modprobe tun

# enable IP forwarding 打开ipv4的转发功能
echo 1 > /proc/sys/net/ipv4/ip_forward

# Invoke openvpn for each VPN tunnel
# in daemon mode.  Alternatively,
# you could remove "--daemon" from
# the command line and add "daemon"
# to the config file.
#
# Each tunnel should run on a separate
# UDP port.  Use the "port" option
# to control this.  Like all of
# OpenVPN's options, you can
# specify "--port 8000" on the command
# line or "port 8000" in the config
# file.

# 启动openvpn服务端
openvpn --cd $dir --daemon --config server.conf
firewall.sh文件:
#!/bin/sh

# A Sample OpenVPN-aware firewall.

# eth0 is connected to the internet.
# eth1 is connected to a private subnet.

# Change this subnet to correspond to your private
# ethernet subnet.  Home will use HOME_NET/24 and
# Office will use OFFICE_NET/24.
PRIVATE=10.8.0.0/24

# Loopback address
LOOP=127.0.0.1

# Delete old iptables rules
# and temporarily block all traffic.
iptables -P OUTPUT DROP
iptables -P INPUT DROP
iptables -P FORWARD DROP
# 这条是删除原有的防火墙规则,删除的是filter表的规则,filter表的规则部分是作用在INPUT链上的
iptables -F

# Set default policies 重新设置链的默认策略
iptables -P OUTPUT ACCEPT
iptables -P INPUT DROP
iptables -P FORWARD DROP

# Prevent external packets from using loopback addr 这里是避免外部发来的数据包的源地址和目的
# 地址是回环地址,从而错误的递交给本地的进程。这应该是避免攻击的一些手段
iptables -A INPUT -i eth0 -s $LOOP -j DROP
iptables -A FORWARD -i eth0 -s $LOOP -j DROP
iptables -A INPUT -i eth0 -d $LOOP -j DROP
iptables -A FORWARD -i eth0 -d $LOOP -j DROP

# Anything coming from the Internet should have a real Internet address
# 这里是对一些有可能是错误发送的包进行丢弃
iptables -A FORWARD -i eth0 -s 192.168.0.0/16 -j DROP
iptables -A FORWARD -i eth0 -s 172.16.0.0/12 -j DROP
iptables -A FORWARD -i eth0 -s 10.0.0.0/8 -j DROP
iptables -A INPUT -i eth0 -s 192.168.0.0/16 -j DROP
iptables -A INPUT -i eth0 -s 172.16.0.0/12 -j DROP
iptables -A INPUT -i eth0 -s 10.0.0.0/8 -j DROP

# Block outgoing NetBios (if you have windows machines running
# on the private subnet).  This will not affect any NetBios
# traffic that flows over the VPN tunnel, but it will stop
# local windows machines from broadcasting themselves to
# the internet.
# 这里是对windows的一些服务端口进行屏蔽,我们是linux不用管
iptables -A FORWARD -p tcp --sport 137:139 -o eth0 -j DROP
iptables -A FORWARD -p udp --sport 137:139 -o eth0 -j DROP
iptables -A OUTPUT -p tcp --sport 137:139 -o eth0 -j DROP
iptables -A OUTPUT -p udp --sport 137:139 -o eth0 -j DROP

# Check source address validity on packets going out to internet
#iptables -A FORWARD -s ! $PRIVATE -i eth1 -j DROP
#iptables -A FORWARD -m iprange ! --src-range 10.0.0.0-10.0.0.255 -i eth1 -j DROP

# Allow local loopback 这里是对回环地址放行
iptables -A INPUT -s $LOOP -j ACCEPT
iptables -A INPUT -d $LOOP -j ACCEPT

# Allow incoming pings (can be disabled) 这里是对icmp协议放行,也就是能响应ping命令
iptables -A INPUT -p icmp --icmp-type echo-request -j ACCEPT

# Allow services such as www and ssh (can be disabled) 这里是对常用的服务端口入栈放行
iptables -A INPUT -p tcp --dport http -j ACCEPT
iptables -A INPUT -p tcp --dport ssh -j ACCEPT
iptables -A INPUT -p tcp --dport 6679 -j ACCEPT

# Allow incoming OpenVPN packets
# Duplicate the line below for each
# OpenVPN tunnel, changing --dport n
# to match the OpenVPN UDP port.
#
# In OpenVPN, the port number is
# controlled by the --port n option.
# If you put this option in the config
# file, you can remove the leading '--'
#
# If you taking the stateful firewall
# approach (see the OpenVPN HOWTO),
# then comment out the line below.

# 这里是自己想要放行的端口和协议数据,有其他端口可以自行添加
iptables -A INPUT -p udp --dport 1194 -j ACCEPT
iptables -A INPUT -p udp --dport 9981 -j ACCEPT
iptables -A INPUT -p tcp --dport 9981 -j ACCEPT
iptables -A INPUT -p tcp --dport 6379 -j ACCEPT
iptables -A INPUT -p udp --dport 6379 -j ACCEPT
iptables -A INPUT -p udp --dport 6680 -j ACCEPT
iptables -A INPUT -p tcp --dport 6680 -j ACCEPT
iptables -A INPUT -p tcp --dport 1723 -j ACCEPT

# Allow packets from TUN/TAP devices.
# When OpenVPN is run in a secure mode,
# it will authenticate packets prior
# to their arriving on a tun or tap
# interface.  Therefore, it is not
# necessary to add any filters here,
# unless you want to restrict the
# type of packets which can flow over
# the tunnel.

# 这里主要是对tun+网卡和tap+网卡的入栈和转发数据包放行,+号应该表示的是一个通配符
iptables -A INPUT -i tun+ -j ACCEPT
iptables -A FORWARD -i tun+ -j ACCEPT
iptables -A INPUT -i tap+ -j ACCEPT
iptables -A FORWARD -i tap+ -j ACCEPT

# Allow packets from private subnets 这里是对eth1网卡的入栈和转发数据包放行
iptables -A INPUT -i eth1 -j ACCEPT
iptables -A FORWARD -i eth1 -j ACCEPT

# Keep state of connections from local machine and private subnets
# 这里是放行状态为NEW的出栈数据包
iptables -A OUTPUT -m state --state NEW -o eth0 -j ACCEPT
# 这里放行已经建立连接和关联的入栈数据包
iptables -A INPUT -m state --state ESTABLISHED,RELATED -j ACCEPT
# 这里放行需要转发的包,有这两条,本机才能作为NAT代理客户端访问互联网
iptables -A FORWARD -m state --state NEW -o eth0 -j ACCEPT
iptables -A FORWARD -m state --state ESTABLISHED,RELATED -j ACCEPT

# Masquerade local subnet
# 对于需要通过openvpn服务端访问外网的客户端节点,这个防火墙配置是必需的,也是最重要的配置
# 这个防火墙的配置是将路由后的源IP地址是10.8.0.0/24,输出网卡是eth0的数据包的源ip地址进行修改,改成本机的ip地址,这样响应数据包才能正确的给我们转发回来
iptables -t nat -A POSTROUTING -s $PRIVATE -o eth0 -j MASQUERADE
这个防火墙配置,比较考验技术,新手一般看不懂,除非对防火墙的原理很熟悉,如果要介绍完全这些防火墙配置,需要另一篇长篇大论 。这个配置是根据样例文件修改后的,大体还是不变,只做了小部分的修改。这个官方给的样例,是对防火墙规则做了严密的设计。如果你对安全性要求不高,可以将防火墙的INPUT、FORWARD、OUTPUT链的策略都改成ACCEPT,那么就只需要少许的防火墙配置就能达到目的,比如如下的配置(没有实际调试过,不保证正确性):
PRIVATE=10.8.0.0/24

# 清空原有INPUT链的防火墙规则
iptables -F
# 放行所有输出包
iptables -P OUTPUT ACCEPT
# 放行所有输入包
iptables -P INPUT ACCEPT
# 放行所有需要转发的包
iptables -P FORWARD ACCEPT

# 对于需要通过openvpn服务端访问外网的客户端节点,这个防火墙配置是必需的,也是最重要的配置
# 这个防火墙的配置是将路由后的源IP地址是10.8.0.0/24,输出网卡是eth0的数据包的源ip地址进行修改,改成本机的ip地址,这样响应数据包才能正确的给我们转发回来
iptables -t nat -A POSTROUTING -s $PRIVATE -o eth0 -j MASQUERADE
server.conf文件:
#################################################
# Sample OpenVPN 2.0 config file for            #
# multi-client server.                          #
#                                               #
# This file is for the server side              #
# of a many-clients <-> one-server              #
# OpenVPN configuration.                        #
#                                               #
# OpenVPN also supports                         #
# single-machine <-> single-machine             #
# configurations (See the Examples page         #
# on the web site for more info).               #
#                                               #
# This config should work on Windows            #
# or Linux/BSD systems.  Remember on            #
# Windows to quote pathnames and use            #
# double backslashes, e.g.:                     #
# "C:\\Program Files\\OpenVPN\\config\\foo.key" #
#                                               #
# Comments are preceded with '#' or ';'         #
#################################################

# Which local IP address should OpenVPN
# listen on? (optional)
;local a.b.c.d

# Which TCP/UDP port should OpenVPN listen on?
# If you want to run multiple OpenVPN instances
# on the same machine, use a different port
# number for each one.  You will need to
# open up this port on your firewall.
# 这个是监听端口
port 6379

# TCP or UDP server?
# 使用的协议,推荐使用udp协议,速度会快两三倍
proto tcp
;proto udp

# "dev tun" will create a routed IP tunnel,
# "dev tap" will create an ethernet tunnel.
# Use "dev tap0" if you are ethernet bridging
# and have precreated a tap0 virtual interface
# and bridged it with your ethernet interface.
# If you want to control access policies
# over the VPN, you must create firewall
# rules for the the TUN/TAP interface.
# On non-Windows systems, you can give
# an explicit unit number, such as tun0.
# On Windows, use "dev-node" for this.
# On most systems, the VPN will not function
# unless you partially or fully disable
# the firewall for the TUN/TAP interface.
# 这里我们就使用tun,tap是以太网桥接方式,没有深究
;dev tap
dev tun

# Windows needs the TAP-Win32 adapter name
# from the Network Connections panel if you
# have more than one.  On XP SP2 or higher,
# you may need to selectively disable the
# Windows firewall for the TAP adapter.
# Non-Windows systems usually don't need this.
;dev-node MyTap

# SSL/TLS root certificate (ca), certificate
# (cert), and private key (key).  Each client
# and the server must have their own cert and
# key file.  The server and all clients will
# use the same ca file.
#
# See the "easy-rsa" directory for a series
# of scripts for generating RSA certificates
# and private keys.  Remember to use
# a unique Common Name for the server
# and each of the client certificates.
#
# Any X509 key management system can be used.
# OpenVPN can also use a PKCS #12 formatted key file
# (see "pkcs12" directive in man page).
# 这里配置ca证书,服务端证书,服务端密钥
ca ./crt/ca.crt
cert ./crt/server.crt
key ./crt/server.key  # This file should be kept secret

# Diffie hellman parameters.
# Generate your own with:
#   openssl dhparam -out dh2048.pem 2048
# 都告诉你了,直接使用命令openssl dhparam -out dh2048.pem 2048生成,具体作用可以自行谷歌
dh ./crt/dh2048.pem

# Network topology
# Should be subnet (addressing via IP)
# unless Windows clients v2.0.9 and lower have to
# be supported (then net30, i.e. a /30 per client)
# Defaults to net30 (not recommended)
;topology subnet

# Configure server mode and supply a VPN subnet
# for OpenVPN to draw client addresses from.
# The server will take 10.8.0.1 for itself,
# the rest will be made available to clients.
# Each client will be able to reach the server
# on 10.8.0.1. Comment this line out if you are
# ethernet bridging. See the man page for more info.
# 这里配置openvpn网络,包括ip和子网掩码,我们就用默认的
server 10.8.0.0 255.255.255.0

# Maintain a record of client <-> virtual IP address
# associations in this file.  If OpenVPN goes down or
# is restarted, reconnecting clients can be assigned
# the same virtual IP address from the pool that was
# previously assigned.
# 这里是为了保证同一个客户端多次连接后分配给相同的局域网ip地址
ifconfig-pool-persist ipp.txt

# Configure server mode for ethernet bridging.
# You must first use your OS's bridging capability
# to bridge the TAP interface with the ethernet
# NIC interface.  Then you must manually set the
# IP/netmask on the bridge interface, here we
# assume 10.8.0.4/255.255.255.0.  Finally we
# must set aside an IP range in this subnet
# (start=10.8.0.50 end=10.8.0.100) to allocate
# to connecting clients.  Leave this line commented
# out unless you are ethernet bridging.
;server-bridge 10.8.0.4 255.255.255.0 10.8.0.50 10.8.0.100

# Configure server mode for ethernet bridging
# using a DHCP-proxy, where clients talk
# to the OpenVPN server-side DHCP server
# to receive their IP address allocation
# and DNS server addresses.  You must first use
# your OS's bridging capability to bridge the TAP
# interface with the ethernet NIC interface.
# Note: this mode only works on clients (such as
# Windows), where the client-side TAP adapter is
# bound to a DHCP client.
;server-bridge

# Push routes to the client to allow it
# to reach other private subnets behind
# the server.  Remember that these
# private subnets will also need
# to know to route the OpenVPN client
# address pool (10.8.0.0/255.255.255.0)
# back to the OpenVPN server.
;push "route 192.168.10.0 255.255.255.0"
;push "route 192.168.20.0 255.255.255.0"

# To assign specific IP addresses to specific
# clients or if a connecting client has a private
# subnet behind it that should also have VPN access,
# use the subdirectory "ccd" for client-specific
# configuration files (see man page for more info).

# EXAMPLE: Suppose the client
# having the certificate common name "Thelonious"
# also has a small subnet behind his connecting
# machine, such as 192.168.40.128/255.255.255.248.
# First, uncomment out these lines:
;client-config-dir ccd
;route 192.168.40.128 255.255.255.248
# Then create a file ccd/Thelonious with this line:
#   iroute 192.168.40.128 255.255.255.248
# This will allow Thelonious' private subnet to
# access the VPN.  This example will only work
# if you are routing, not bridging, i.e. you are
# using "dev tun" and "server" directives.

# EXAMPLE: Suppose you want to give
# Thelonious a fixed VPN IP address of 10.9.0.1.
# First uncomment out these lines:
;client-config-dir ccd
;route 10.9.0.0 255.255.255.252
# Then add this line to ccd/Thelonious:
#   ifconfig-push 10.9.0.1 10.9.0.2

# Suppose that you want to enable different
# firewall access policies for different groups
# of clients.  There are two methods:
# (1) Run multiple OpenVPN daemons, one for each
#     group, and firewall the TUN/TAP interface
#     for each group/daemon appropriately.
# (2) (Advanced) Create a script to dynamically
#     modify the firewall in response to access
#     from different clients.  See man
#     page for more info on learn-address script.
;learn-address ./script

# If enabled, this directive will configure
# all clients to redirect their default
# network gateway through the VPN, causing
# all IP traffic such as web browsing and
# and DNS lookups to go through the VPN
# (The OpenVPN server machine may need to NAT
# or bridge the TUN/TAP interface to the internet
# in order for this to work properly).
# 这里是将客户端的所有流量定向到服务器端,也就是让客户端修改自己的路由表
# 把服务器端的局域网ip地址作为网关,在上面的《三、路由表在openvpn组网中的作用》中有提到
push "redirect-gateway def1 bypass-dhcp"

# Certain Windows-specific network settings
# can be pushed to clients, such as DNS
# or WINS server addresses.  CAVEAT:
# http://openvpn.net/faq.html#dhcpcaveats
# The addresses below refer to the public
# DNS servers provided by opendns.com.
# 这里是给客户端推送DNS服务器地址,如果没有这个推送,客户端还是会用本地默认的DNS地址,有可能导致
# DNS解析失败,这个我是使用命令查看服务器本地的DNS服务器:cat /etc/resolv.conf
# 你也可以使用其他的DNS服务器,只要客户端能正确解析出域名
push "dhcp-option DNS 100.100.2.136"
push "dhcp-option DNS 100.100.2.138"

# Uncomment this directive to allow different
# clients to be able to "see" each other.
# By default, clients will only see the server.
# To force clients to only see the server, you
# will also need to appropriately firewall the
# server's TUN/TAP interface.
# 这里是配置让接入到服务器的多个客户端彼此能看到对方,即能正常通信
client-to-client

# Uncomment this directive if multiple clients
# might connect with the same certificate/key
# files or common names.  This is recommended
# only for testing purposes.  For production use,
# each client should have its own certificate/key
# pair.
#
# IF YOU HAVE NOT GENERATED INDIVIDUAL
# CERTIFICATE/KEY PAIRS FOR EACH CLIENT,
# EACH HAVING ITS OWN UNIQUE "COMMON NAME",
# UNCOMMENT THIS LINE OUT.
# 这里允许使用同一个证书的多个客户端登录
duplicate-cn

# The keepalive directive causes ping-like
# messages to be sent back and forth over
# the link so that each side knows when
# the other side has gone down.
# Ping every 10 seconds, assume that remote
# peer is down if no ping received during
# a 120 second time period.
keepalive 10 120

# For extra security beyond that provided
# by SSL/TLS, create an "HMAC firewall"
# to help block DoS attacks and UDP port flooding.
#
# Generate with:
#   openvpn --genkey --secret ta.key
#
# The server and each client must have
# a copy of this key.
# The second parameter should be '0'
# on the server and '1' on the clients.
# 这里的ta.key文件也是根据命令openvpn --genkey --secret ta.key直接生成
tls-auth ./crt/ta.key 0 # This file is secret

# Select a cryptographic cipher.
# This config item must be copied to
# the client config file as well.
# Note that v2.4 client/server will automatically
# negotiate AES-256-GCM in TLS mode.
# See also the ncp-cipher option in the manpage
# 这里是指定对称加密算法,服务端和客户的配置要一样
cipher AES-256-GCM

# Enable compression on the VPN link and push the
# option to the client (v2.4+ only, for earlier
# versions see below)
# 这里是允许压缩,并且把这个压缩配置推送给了客户端,客户端可以不用配置
compress lz4-v2
push "compress lz4-v2"

# For compression compatible with older clients use comp-lzo
# If you enable it here, you must also
# enable it in the client config file.
;comp-lzo

# The maximum number of concurrently connected
# clients we want to allow.
;max-clients 100

# It's a good idea to reduce the OpenVPN
# daemon's privileges after initialization.
#
# You can uncomment this out on
# non-Windows systems.
# 这里设置openvpn允许使用的角色和用户组
user root
group root

# The persist options will try to avoid
# accessing certain resources on restart
# that may no longer be accessible because
# of the privilege downgrade.
# 这里不是很懂,直接保持原样,没有这个有时候会报错
persist-key
persist-tun

# Output a short status file showing
# current connections, truncated
# and rewritten every minute.
# 这里是每分钟记录客户端的状态
status openvpn-status.log

# By default, log messages will go to the syslog (or
# on Windows, if running as a service, they will go to
# the "\Program Files\OpenVPN\log" directory).
# Use log or log-append to override this default.
# "log" will truncate the log file on OpenVPN startup,
# while "log-append" will append to it.  Use one
# or the other (but not both).
# 这里是日志输出文件,log是每次启动覆盖之前的日志,log-append会往后追加,不要同时配置两个
log         ./openvpn.log
;log-append  ./openvpn.log

# Set the appropriate level of log
# file verbosity.
#
# 0 is silent, except for fatal errors
# 4 is reasonable for general usage
# 5 and 6 can help to debug connection problems
# 9 is extremely verbose
# 这里是日志输出等级,数字越高,日志越详细
verb 3

# Silence repeating messages.  At most 20
# sequential messages of the same message
# category will be output to the log.
;mute 20

# Notify the client that when the server restarts so it
# can automatically reconnect.
;explicit-exit-notify 1这个server.conf服务端配置文件也是根据样例文件做的一些修改。一些比较重要的配置我已经标注出来了。证书的话需要自己制作,使用openssl命令就可以生成。参考:OPenSSL-生成证书-CSDN博客
openvpn-shutdown.sh文件就不用改了,所有配置都配好就就可以启动openvpn服务器:
./openvpn-startup.sh
如果有报错就看当前目录下的openvpn.log文件查看错误
检查是否启动成功:
netstat -nlap | grep openvpn

看到6379端口在监听就说明启动成功
2、客户端(centos)
服务端启动成功后,可以使用linux的客户端连接一下,看能不能正常工作,一般都不会一次成功,都会有各种各样的问题。
centos系统上的openvpn客户端和服务端是不区分的,前面讲服务的部署的时候提到有一个client.conf的样例配置文件,我也是拿这个来改了一下。
client.conf文件如下:
##############################################
# Sample client-side OpenVPN 2.0 config file #
# for connecting to multi-client server.     #
#                                            #
# This configuration can be used by multiple #
# clients, however each client should have   #
# its own cert and key files.                #
#                                            #
# On Windows, you might want to rename this  #
# file so it has a .ovpn extension           #
##############################################

# Specify that we are a client and that we
# will be pulling certain config file directives
# from the server.
# 这里需要指明是客户端才行
client

# Use the same setting as you are using on
# the server.
# On most systems, the VPN will not function
# unless you partially or fully disable
# the firewall for the TUN/TAP interface.
# 这里跟服务端的配置一样
;dev tap
dev tun

# Windows needs the TAP-Win32 adapter name
# from the Network Connections panel
# if you have more than one.  On XP SP2,
# you may need to disable the firewall
# for the TAP adapter.
;dev-node MyTap

# Are we connecting to a TCP or
# UDP server?  Use the same setting as
# on the server.
# 这里是使用协议,必须跟服务端一致
proto tcp
;proto udp

# The hostname/IP and port of the server.
# You can have multiple remote entries
# to load balance between the servers.
# 这里填服务器端的IP端口
remote 1.1.1.1 6679
#remote my-server-2 1194

# Choose a random host from the remote
# list for load-balancing.  Otherwise
# try hosts in the order specified.
;remote-random

# Keep trying indefinitely to resolve the
# host name of the OpenVPN server.  Very useful
# on machines which are not permanently connected
# to the internet such as laptops.
# 这里就用默认的配置
resolv-retry infinite

# Most clients don't need to bind to
# a specific local port number.
# 这里指明通信绑定的端口,一般都不指定,系统随机分配
nobind

# Downgrade privileges after initialization (non-Windows only)
;user nobody
;group nobody

# Try to preserve some state across restarts.
# 这里不是很懂用来干嘛的,看注释是重启的时候维持一些状态,我们就使用默认配置
persist-key
persist-tun

# If you are connecting through an
# HTTP proxy to reach the actual OpenVPN
# server, put the proxy server/IP and
# port number here.  See the man page
# if your proxy server requires
# authentication.
;http-proxy-retry # retry on connection failures
;http-proxy [proxy server] [proxy port #]

# Wireless networks often produce a lot
# of duplicate packets.  Set this flag
# to silence duplicate packet warnings.
;mute-replay-warnings

# SSL/TLS parms.
# See the server config file for more
# description.  It's best to use
# a separate .crt/.key file pair
# for each client.  A single ca
# file can be used for all clients.
# 这里就配置ssl通信用的ca证书,客户端证书,客户端私钥,可以指定路径,默认是当前目录
ca ca.crt
cert client.crt
key client.key

# Verify server certificate by checking that the
# certicate has the correct key usage set.
# This is an important precaution to protect against
# a potential attack discussed here:
#  http://openvpn.net/howto.html#mitm
#
# To use this feature, you will need to generate
# your server certificates with the keyUsage set to
#   digitalSignature, keyEncipherment
# and the extendedKeyUsage to
#   serverAuth
# EasyRSA can do this for you.
# 这里需要注更改默认的配置,默认是打开的,因为我制作的服务端证书没有它指定的几个信息,我就不做校验了,当然你也可以按他的指示重新制作服务端证书,这个是为了避免潜在的攻击的
#remote-cert-tls server

# If a tls-auth key is used on the server
# then every client must also have the key.
# 这里配置tls认证key,这个就是服务器使用的ta.key,两端是同一个文件
tls-auth ta.key 1

# Select a cryptographic cipher.
# If the cipher option is used on the server
# then you must also specify it here.
# Note that v2.4 client/server will automatically
# negotiate AES-256-GCM in TLS mode.
# See also the ncp-cipher option in the manpage
# 加密算法,跟服务端要一致,但是我发现服务端配置的是AES-256-GCM,这里配置的是AES-256-CBC,也一样能正常加解密,比较奇怪,可能最终协商一致就可以
cipher AES-256-CBC

# Enable compression on the VPN link.
# Don't enable this unless it is also
# enabled in the server config file.
#comp-lzo

# Set log file verbosity.
# 日志等级
verb 3

# Silence repeating messages
;mute 20
# 服务端已经配置,这里不需要重新配置
;redirect-gateway autolocal
配置完成后开始启动客户端:openvpn --config client.conf
如果打印如下的日志,就是连接成功了

连接成功后我们查看一下网卡配置:
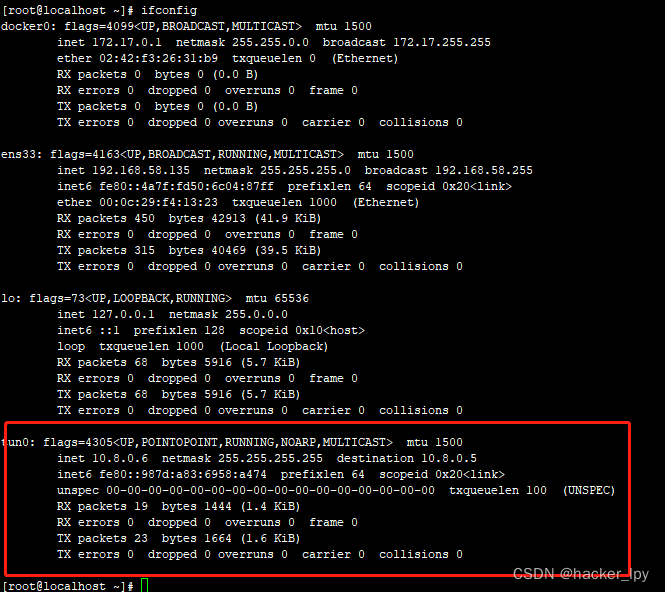
看到tun0网卡已经被创建好,服务端分配给我们客户端的ip是10.8.0.6,因为是点对点的网络,对端显示的ip是10.8.0.5,但是我们试着ping一下这个ip,发现ping不通,似乎这个ip是不存在的。但是我们此时去服务端查看一下服务端的tun0网卡的ip发现是10.8.0.1,于是尝试ping这个ip证明我们已经和服务端建立了通信:
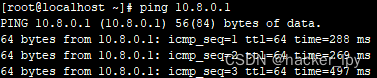
看到能ping通,说明已经能和服务端通信,vpn网络已经组网完成。
在测试过程中我发现客户端和服务器端是能进行通信,但是客户端主机解析不了域名,用命令:cat /etc/resolv.conf 查看了一下域名服务器地址,发现域名服务器地址还是本地的ip,没有自动改成服务器端给我们推送的DNS地址。我手动把这个文件的DNS地址改成服务端推送的DNS地址就可以正常进行域名解析了。此时就可以通过openvpn访问外网,客户端所有流量都会通过服务器端转发。
3、客户端(Android)
对于openvpn的安卓客户端,有两款,一款叫OpenVPN Connect,一款叫OpenVPN For Android,两款都可以用,可能需要一点技术才能下载到。
openvpn的安卓客户,在制作配置文件的时候会有点麻烦,但是如果掌握了方法也很简单。刚开始我认为配置文件在各个平台都通用,我已经在linux上配置好配置文件,直接拷贝到安卓上就行,但是发现导入配置文件的时候只能导入一个文件,那还有ca证书,客户端证书,客户端私钥,还有ta.key文件怎么导入?没法办只能求助谷歌,找了很久才在openvpn的社区中找到安卓配置文件的制作方法。
原来openvpn的配置文件支持把这些证书文件内联到配置文件中。就拿以上centos客户端的配置文件来举例,需要以下四个配置项
ca ca.crt
cert client.crt
key client.key
tls-auth ta.key 1
即需要内联四个证书,内联的时候只需要将证书文件内容包含在<configItemName></configItemName>中就可以,例如ca证书内联后就为
<ca>
...
</ca>
于是就可以拿上面的centos客户端配置来制作,先把client.conf改成文件名client.ovpn,安卓只支持这个后缀名文件。然后执行下面的命令将证书内联进配置文件:
echo "<ca>" >> client.ovpn
cat ca.crt >> client.ovpn
echo "</ca>" >> client.ovpn
echo "<cert>" >> client.ovpn
cat client.crt >> client.ovpn
echo "</cert>" >> client.ovpn
echo "<key>" >> client.ovpn
cat client.key >> client.ovpn
echo "</key>" >> client.ovpn
echo "key-direction 1" >> client.ovpn
echo "<tls-auth>" >> client.ovpn
cat ta.key >> client.ovpn
echo "</tls-auth>" >> client.ovpn
因为tls-auth ta.key 1这个配置除了配置ta.key证书文件,还有一个配置参数,所以内联了ta.key文件后,还需要添加key-direction 1这个配置参数。
OpenVPN Connect导入配置文件,就是点右下角的加号->Upload File->BROWSE,选择配置文件后导入。OpenVPN For Android导入配置,就是点击右上角的加号->IMPORT导入。这两款App的配置文件都通用
导入配置文件后,就可以点连接,如果没连上可以点右上角的按钮查看日志,然后再排查文件。如果显示连接成功,那么恭喜你,可以使用自己的openvpn了。


 1608
1608


 被折叠的 条评论
为什么被折叠?
被折叠的 条评论
为什么被折叠?
 到【灌水乐园】发言


