


springmvc
MVC
概念:
MVC 的概念最早由 Trygve Reenskaug 提出,当时他在施乐PARC中心工作((就是那个发明图形用户界面和鼠标的实验室)),当时为了解决Smalltalk 在GUI上编程问题,他提出MVC.
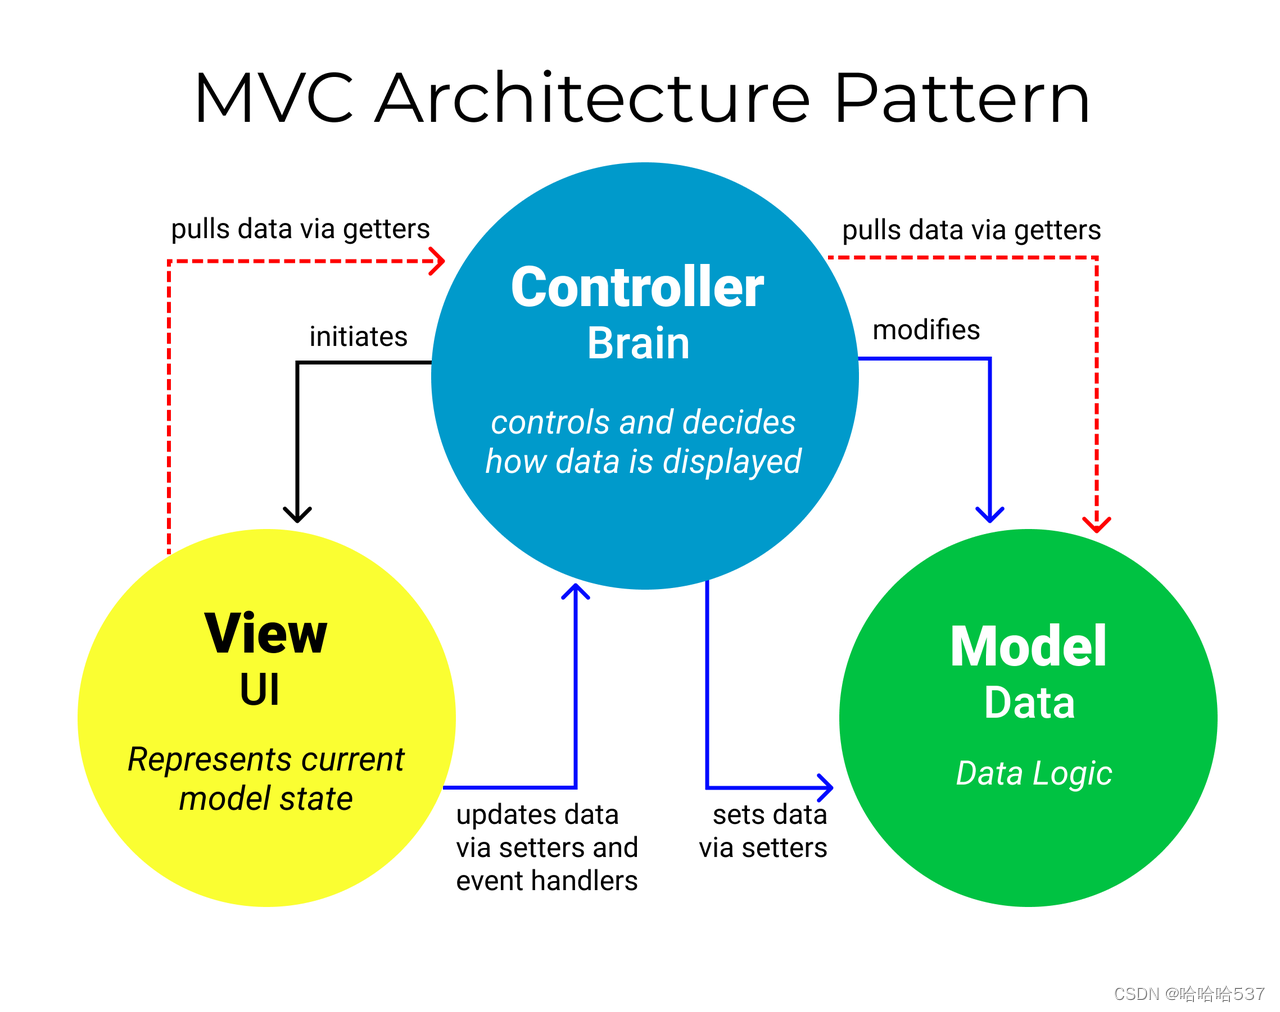
M是指模型,V是视图,C则是控制器,使用MVC的目的是将M和V的实现代码分离,从而使同一个程序可以使用不同的表现形式。
为什么使用:
MVC 模式有助于将前端和后端代码拆分为独立的组件,这样更便于管理,而且能够更方便地改动其中的某一部分而不会互相影响。
结构:平行结构
(以前的mvc是三角形结构的现在的平行结构跟http协议的特性有关)[外链图片转存失败,源站可能有防盗
使用spring mvc
第一步: 导入依赖
<!--spring mvc-->
<dependency>
    <groupId>org.springframework</groupId>
    <artifactId>spring-webmvc</artifactId>
    <version>5.0.5.RELEASE</version>
</dependency>
第二步:配置spring-mvc配置文件
<beans xmlns="http://www.springframework.org/schema/beans"
    xmlns:mvc="http://www.springframework.org/schema/mvc"
    xmlns:context="http://www.springframework.org/schema/context"
    xmlns:xsi="http://www.w3.org/2001/XMLSchema-instance"
    xsi:schemaLocation="http://www.springframework.org/schema/beans
    http://www.springframework.org/schema/beans/spring-beans.xsd
    http://www.springframework.org/schema/mvc
    http://www.springframework.org/schema/mvc/spring-mvc.xsd
    http://www.springframework.org/schema/context
    http://www.springframework.org/schema/context/spring-context.xsd">

    <!--配置注解扫描-->
    <context:component-scan base-package="com.zn"/>

    <!--配置内部资源视图解析器-->
<bean class="org.springframework.web.servlet.view.InternalResourceViewResolver">
    <property name="suffix" value=".jsp"></property>
</bean>
</beans>
第三步:web.xml 里配置SpringMVC核心控制器DispathcerServlet
<?xml version="1.0" encoding="UTF-8"?>
<web-app xmlns="http://xmlns.jcp.org/xml/ns/javaee"
         xmlns:xsi="http://www.w3.org/2001/XMLSchema-instance"
         xsi:schemaLocation="http://xmlns.jcp.org/xml/ns/javaee http://xmlns.jcp.org/xml/ns/javaee/web-app_4_0.xsd"
         version="4.0">

    <!--全局参数-->
    <context-param>
        <param-name>contextConfigLocation</param-name>
        <param-value>classpath:applicationContext.xml</param-value>
    </context-param>
    <!--Spring的监听器-->
    <listener>
        <listener-class>
            org.springframework.web.context.ContextLoaderListener
        </listener-class>
    </listener>
    <!--配置DispatcherServlet-->
    <servlet>
        <servlet-name>DispatcherServlet</servlet-name>
        <servlet-class>org.springframework.web.servlet.DispatcherServlet</servlet-class>
        <init-param>
            <param-name>contextConfigLocation</param-name>
            <param-value>classpath:spring-mvc.xml</param-value>
        </init-param>
        <load-on-startup>1</load-on-startup>
    </servlet>
    <servlet-mapping>
        <servlet-name>DispatcherServlet</servlet-name>
        <url-pattern>/</url-pattern>
    </servlet-mapping>

</web-app>
第四步:创建Controller
@Controller
public class UserController {
    @Autowired
    UserService userService;

    @RequestMapping("/show")
    public String index() {
        userService.show();
        return "index";//返回到index.jsp页面
    }
}
做完这四步之后我们就可以访问了。


 57万+
57万+


 被折叠的 条评论
为什么被折叠?
被折叠的 条评论
为什么被折叠?
 到【灌水乐园】发言


