


 本文深入探讨了C#中的特性(Attribute),包括系统提供的Obsolete、AttributeUsage和Conditional等,并展示了如何自定义特性及进行校验。通过特性,我们可以为代码添加元数据,增强代码的可读性和可维护性。此外,还介绍了如何通过反射获取和使用自定义特性,以及特性在类继承中的表现。
Attribute,这种叫做特征的类,给我们的代码提供了很多辅助的功能,名字叫做特性,但实际起到的是注释的作用,只不过这个注释是可以通过程序访问的注释,这种注释在有的场合是非常有价值的。我们一起来看看。。
一、特性Attribute
1、attribute类的定义
首先,我们来看看这个类的定义:
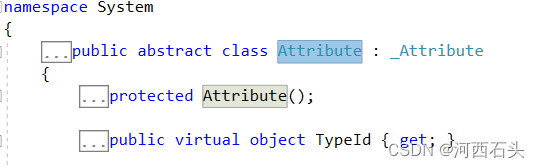
很显然,这是一个抽象类,必须要通过子类的继承才可以实例化,使用起来。
2、常用的系统提供的特性
有关C# .net内置的特性,微软有一个表我们可以参考一下,这里提供一个连接给大家(注意这个只能用于.net):
https://learn.microsoft.com/zh-cn/dotnet/api/system.componentmodel.dataannotations.validator?view=net-6.0
那么,我们常用的系统提供的特性,这里也列举一些在下面。
(1).obsolete
这个特性是对过期的属性或者函数来进行标记的,我们查看以下可以发现他的定义:
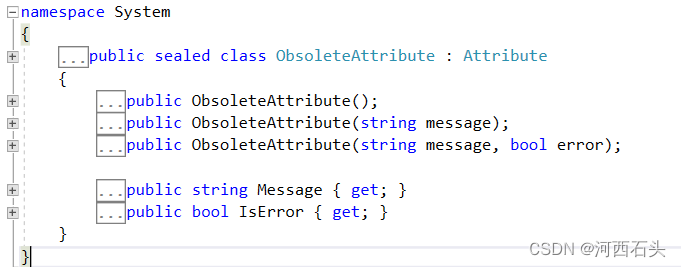
ObsoleteAttribute() 表示该程序体是被弃用的。
ObsoleteAttribute(string? message) 可以输入提示内容,在鼠标移动到程序体名称上时显示。
ObsoleteAttribute(string? message, bool error) bool参数用来表示该方法是否弃用,若为true,则该程序体不能被使用。默认为false
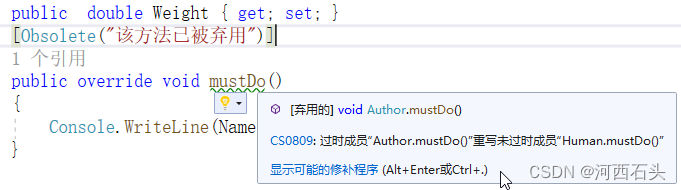
 [Obsolete("该方法已被弃用")]
        public override void mustDo()
        {
            Console.WriteLine(Name + ": must do!");
        }
在VS中,标注了该属性的方法或者属性下面就会有波浪线提示:
(2).AttributeUsage
这个内置特性一般使用在自定义属性类前面来约束其使用场合,这个在自定义特性部分详细说。
(3).Conditional
Conditional位于System.Diagnostics命名空间下,我们来看看它的定义
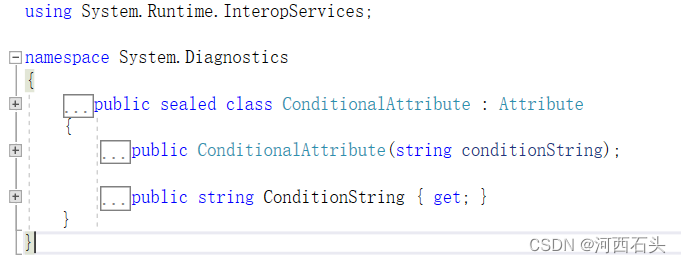
这个特性通过条件判断决定是否运行下面对应的方法或代码段。比如下面这样,我传了一个字符串Notdo,但是并没有定义这个字符串,那么这个方法就不会执行。
 [Conditional("NotDo")]
        public void Vocalize()
        {
           // return "hoo~~~";
        }
注意,这里的Conditional属性对有override的方法是不能施加这个特征的,对有返回值的方法也是不能施加这个特征的。
二、自定义特性
假如,我们自定义了一个特性类,继承自Attribute
 class UserDescription : Attribute
    {
       private string  description;
       public string Description
        {

            get { return description; }

        }
       public UserDescription(string des)
        {
            this.description = des;
        }
		 /// <summary>
        /// 这个方法可有可无,也是帮助获取description的
        /// </summary>
        /// <returns></returns>
        public string  getDes()
        {
            return this.description;
        }
    }
然后给Author类的父类Human加上特性:
[UserDescription("这是给Human的特性注释")]
    public abstract class Human
    {
        private  string name;
        public int age;

        public abstract string Name { get; set; }
        public Human(string name)
        {
            this.name = name;
            this.age = 0;
        }
        public void showBaseInfo() { }

        public void showFullInfo() { }

        public void doSomething()
        {

            Console.WriteLine(this.name + ": let me do something!");

        }

        public abstract void mustDo();
        public virtual void OtherFun()
        { }

    }
    //[UserDescription("这是给Author的特性注释")]
    public class Author : Human, Mammal
    {
        private string name;
        public Author(string name) : base(name) {
            this.name = name;
        }
        public void BirthBaby() { }
        public void Eat(){  }
        public void Walk(int distanc){   }
        public string Vocalize()
        {
            return "hoo~~~";
        }
        public override string Name
        {
            get { return this.name; }
            set { this.name = Name; }
        }

        public  int CId { get; set; }
        public int Birthday { get; set; }
        public  double Weight { get; set; }

        public override void mustDo()
        {
            Console.WriteLine(Name + ": must do!");
        }
    }
之后,我们就可以用反射Gettype获取Author的实例ar的类信息,然后再通过特性的获取自定义特性方法GetCustomAttributes获取到这个类的所有特性。
 Author ar = new Author("Tom");
 Attribute[] atrs= Attribute.GetCustomAttributes(ar.GetType(),true);
接下来,我们可以将特性输出
 foreach (Attribute atr in atrs)
     if (atr is UserDescription)
        Console.WriteLine(((UserDescription)atr).Description);
当然,我们也可以用linq查询加类型转换来实现:
string  des= ((from atr in atrs where atr is UserDescription select atr).ToList()[0] as UserDescription).Description.ToString();
            Console.WriteLine(des);
以上两段代码输出的效果一样,如下:

1、子类特性会隐藏父类特性
[UserDescription("这是给Author的特性注释")]
    public class Author : Human, Mammal
    {
        private string name;
        public Author(string name) : base(name) {
            this.name = name;
        }
        public void BirthBaby() { }
        public void Eat(){  }
        public void Walk(int distanc){   }
        public string Vocalize()
        {
            return "hoo~~~";
        }
    }
这个时候,我们输出的特性就只有子类Author的特征了。运行结果如下:

2、校验输入
关于校验特性,其实C#中早已经有了,而且功能比较齐全,我们这里实现的校验类特性只是为我们深刻理解特性而设计。
(1).设计校验特性类与字段名称特征
我们首先来设计一个校验类RequireAttribute
using System;
using System.Collections.Generic;
using System.Linq;
using System.Text;

namespace ConsoleApp2
{
    /// <summary>
    /// 必填特性,为字段或属性增加必填属性,便于校验
    /// </summary>
    public sealed class RequireAttribute : Attribute
    {
        private bool isRequire;
        public bool IsRequire
        {
            get { return isRequire; }
        }

        /// <summary>
        /// 构造函数
        /// </summary>
        /// <param name="isRequire"></param>
        public RequireAttribute(bool isRequire)
        {
            this.isRequire = isRequire;
        }
    }
}
public sealed class NarrationAttribute : Attribute
    {

        private string narration;
        public string Narration
        {
            get { return narration; }
        }

        /// <summary>
        /// 构造函数
        /// </summary>
        /// <param name="DescriptionAttribute"></param>
        public NarrationAttribute(string description)
        {
            this.narration = description;
        }


    }
(2).给Author类加上特性
然后给我们的Author的字段加上校验的特性,这里用了两个特性类(Require, Narration),原理和上面的特性一样设计
 public class Author : Human, Mammal
    {
        private string name;
        public Author(string name) : base(name) {
            this.name = name;
        }
        public void BirthBaby() { }
        public void Eat(){  }
        public void Walk(int distanc){   }
        public string Vocalize()
        {
            return "hoo~~~";
        }
        [Require(true),Narration("姓名")]
        public override string Name
        {
            get { return this.name; }
            set { this.name = Name; }
        }
        [Require(true), Narration("ID号")]
        public  int CId { get; set; }
        [Require(true), Narration("生日")]
        public int Birthday { get; set; }


        public  double Weight { get; set; }

        public override void mustDo()
        {
            Console.WriteLine(Name + ": must do!");
        }
    }
(3).设计一个校验类CheckRequire
    public static class CheckRequire
    {
        /// <summary>
        /// 检查方法,支持泛型
        /// </summary>
        /// <typeparam name="T"></typeparam>
        /// <param name="instance"></param>
        /// <returns></returns>
        public static string Require<T>(T instance)
        {
            var vtipstr = new StringBuilder();


            //获取T类的属性
            Type t = typeof(T);
            var propertyInfos = t.GetProperties();

            //遍历属性
            foreach (var propertyInfo in propertyInfos)
            {
               Attribute[] attributes = Attribute.GetCustomAttributes(propertyInfo, typeof(Attribute));
                //没标记,直接跳过
                if (attributes.Length<1)
                {
                    continue;
                }


                //获取属性的数据类型
                string type = propertyInfo.PropertyType.ToString().ToLower();

                //获取该属性的值
                var value = propertyInfo.GetValue(instance,null);

                switch(type)
                {
                    case "system.string":
                        if (string.IsNullOrEmpty((string)value) && ((RequireAttribute)attributes[0]).IsRequire)
                        {
                            vtipstr.Append(((NarrationAttribute)attributes[1]).Narration);
                            if (((RequireAttribute)attributes[0]).RStyle == RequireAttribute.requireStyle.isCode)
                                vtipstr.Append("号码不能少于11位");
                            else
                                vtipstr.Append("不能为空");
                            vtipstr.Append("\n");
                        }
                        break;

                    case "system.int32":
                        if ((int)value == 0 && ((RequireAttribute)attributes[0]).IsRequire)
                            vtipstr.Append(((NarrationAttribute)attributes[1]).Append("数值必须大于0").Append("\n");
                        break;
                    case "system.Boolean":
                        if ((int)value == 0 && ((RequireAttribute)attributes[0]).IsRequire)
                            vtipstr.Append(((NarrationAttribute)attributes[1]).Append("为必选项").Append("\n");
                        break;
                    case "system.Double":
                        if ((int)value == 0 && ((RequireAttribute)attributes[0]).IsRequire)
                            vtipstr.Append(((NarrationAttribute)attributes[1]).Append("数值必须大于1").Append("\n");
                        break;
                    default:
                        break;

                }
            }

            return vtipstr.ToString();
        }
    }
最后,我们就可以看到校验提示信息了:

3、特性的使用限定
如果我们在自定义特性前也加上一些C#内置的特性,那我们的特性就被约束了使用场合了,如
[AttributeUsage(AttributeTargets.Class), AllowMultiple = false, Inherited = false ]
这里我们看到了三个参数,
第一个参数:使用场合的限制,比如只能使用在类的前面,AttributeTargets.Class
第二个参数:是否准许多次重叠使用AllowMultiple = false
第三个参数:是否可以继承
使用场合限定类型的枚举如下:
   Assembly,
  Module,
  Class,
  Struct,
  Enum,
  Constructor,
  Method,
  Property,
  Field,
  Event,
  Interface,
  Parameter,
  Delegate,
  All = Assembly | Module | Class |
  Struct | Enum | Constructor |
  Method | Property | Field | Event |
  Interface | Parameter | Delegate,
  ClassMembers = Class | Struct | Enum |
   Constructor | Method | Property | Field |
   Event | Delegate | Interface )
有关特性的应用,我们在反射的博文中已经介绍了,有兴趣的童鞋可以参考一下:
《C#中的反射机制的应用type与assembly在项目中的使用》


 1053
1053

 被折叠的 条评论
为什么被折叠?
被折叠的 条评论
为什么被折叠?
 到【灌水乐园】发言


