


线程间通信
线程间通信:
其实就是多个线程在操作同一个资源,但是操作的动作不同。
等待/唤醒机制涉及的方法:
1. wait():让线程处于冻结状态,被wait的线程会被存储到线程池中。
2. notify():唤醒线程池中的一个线程(任何一个都有可能)。
3. notifyAll():唤醒线程池中的所有线程。
都使用在同步中,因为要对持有监视器(锁)的线程操作。
所以要使用在同步中,因为只有同步才具有锁。
为什么这些操作线程的方法要定义Object类中呢?
因为这些方法在操作同步中线程时,都必须要标识它们所操作线程只有的锁,只有同一个锁上的被等待线程,可以被同一个锁上notify唤醒。不可以对不同锁中的线程进行唤醒。
也就是说,等待和唤醒必须是同一个锁。
而锁可以是任意对象,所以可以被任意对象调用的方法定义Object类中。
wait和sleep区别?
1)wait可以指定时间也可以不指定。sleep必须指定时间。
2)在同步中时,对CPU的执行权和锁的处理不同。
wait:释放执行权,释放锁。
sleep:释放执行权,不释放锁。
生产者-消费者问题:
class Resource{
private String name ;
private String sex ;
private boolean flag = false;
public synchronized void set(String name,String sex){
if(flag )
try{
this.wait();
} catch(InterruptedException e){
e.printStackTrace();
}
this.name = name;
this.sex = sex;
flag = true ;
this.notify();
}
public synchronized void out(){
if(!flag )
try{
this.wait();
} catch(InterruptedException e){
e.printStackTrace();
}
System. out.println(name + "..." + sex);
flag = false ;
this.notify();
}
}
//输入
class Input implements Runnable{
Resource r;
Input(Resource r){
this.r = r;
}
public void run(){
int x = 0;
while(true ){
if(x == 0){
r.set( "mike","男" );
} else{
r.set( "lili","女" );
}
x = (x + 1)%2;
}
}
}
//输出
class Output implements Runnable{
Resource r;
Output(Resource r){
this.r = r;
}
public void run(){
while(true ){
r.out();
}
}
}
class ResourceDemo {
public static void main(String[] args){
//创建资源
Resource r = new Resource();
//创建任务
Input in = new Input(r);
Output out = new Output(r);
//创建线程,执行路径
Thread t1 = new Thread(in);
Thread t2 = new Thread(out);
//开启线程
t1.start();
t2.start();
}
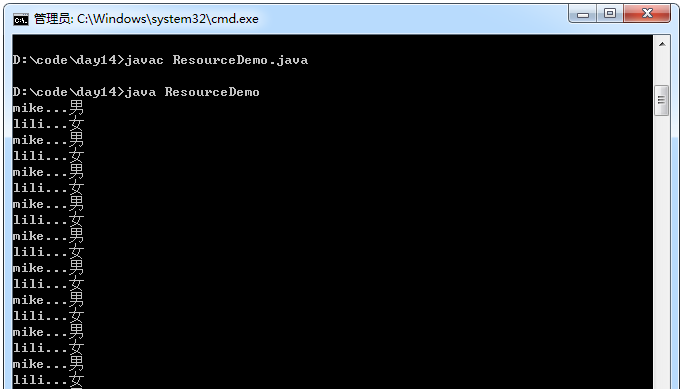
}运行结果:
多生产者-多消费者问题:
class Resource{
private String name ;
private int count = 1;
private boolean flag = false;
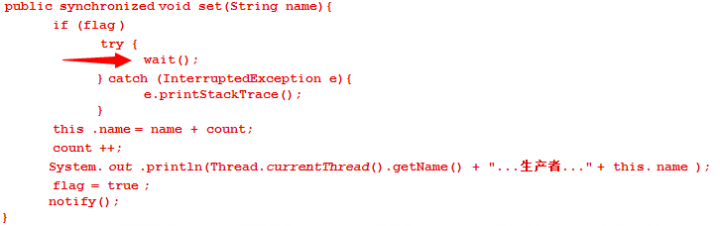
public synchronized void set(String name){
if(flag )
try{
wait();
} catch(InterruptedException e){
e.printStackTrace();
}
this.name = name + count;
count++;
System.out.println(Thread.currentThread().getName() + "...生产者..." + this. name);
flag = true ;
notify();
}
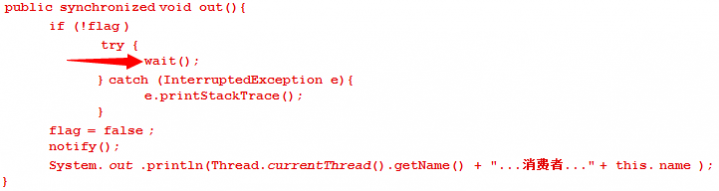
public synchronized void out(){
if(!flag )
try{
wait();
} catch(InterruptedException e){
e.printStackTrace();
}
flag = false ;
notify();
System.out.println(Thread.currentThread().getName() + "...消费者..." + this. name);
}
}
class Producer implements Runnable{
private Resource r ;
Producer(Resource r){
this.r = r;
}
public void run(){
while(true ){
r.set( "烤鸭");
}
}
}
class Consumer implements Runnable{
private Resource r ;
Consumer(Resource r){
this.r = r;
}
public void run(){
while(true ){
r.out();
}
}
}
class ProducerConsumerDemo {
public static void main(String[] args){
Resource r = new Resource();
Producer pro = new Producer(r);
Consumer con = new Consumer(r);
Thread t0 = new Thread(pro);
Thread t1 = new Thread(pro);
Thread t2 = new Thread(con);
Thread t3 = new Thread(con);
t0.start();
t1.start();
t2.start();
t3.start();
}
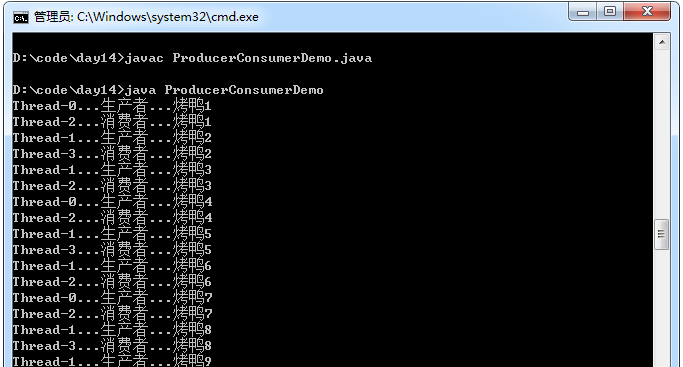
} 运行结果:以上代码存在安全问题。
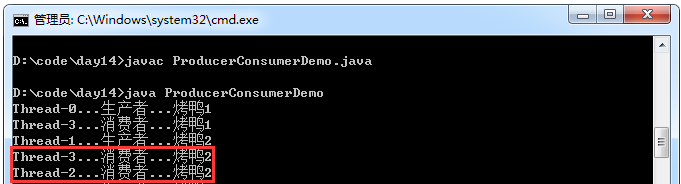
原因分析:
得到以上结果的过程分析如下:
1、线程Thread-0获取到CPU执行权及锁,生产了烤鸭3298,将flag设置为true。然后,Thread-0又重新获取到CPU执行权,由于flag为true,故执行wait方法,阻塞。Thread-1接着获取到CPU执行权,由于flag为true,故执行wait方法,也阻塞。
2、线程Thread-3获取到CPU执行权及锁,消费了烤鸭3298,将flag设置为false。然后,线程Thread-0被唤醒,但是并没有获取到锁,而是线程Thread-3接着获取到CPU执行权及锁,然而此时flag为false,所以Thread-3阻塞。下面线程Thread-2接着获取到CPU执行权及锁,然而此时flag为false,所以Thread-2也阻塞。
3、 线程Thread-0获取到CPU执行权及锁,不需要if语句判断,直接生产烤鸭3299,然后又唤醒线程Thread-1获取到CPU执行权及锁,不需要if语句判断,直接生产烤鸭3300。从而造成了烤鸭3299还没有被消费,就直接生产了烤鸭3300的情况。
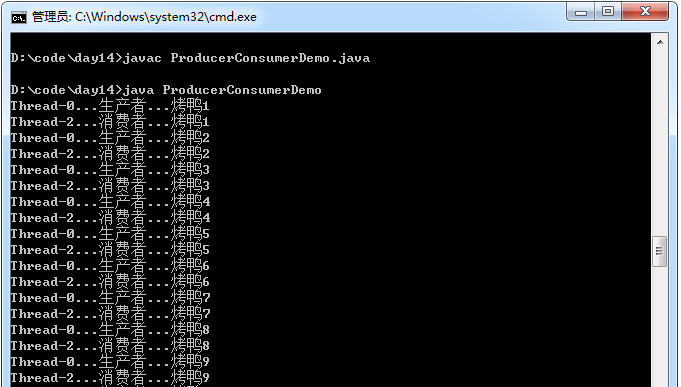
由于if判断标记,只有一次,会导致不该运行的线程运行了,出现了数据错误的情况。故修改成while判断标记,线程获取CPU执行权及锁后,将重新判断是否具备运行条件。
notify方法只能唤醒一个线程,如果本方唤醒了本方,没有意义。而且while判断标记+notify会导致死锁。notifyAll解决了本方线程一定会唤醒对方线程的问题。
P.S.
while判断标记+notify会导致死锁的示例:
如果将上面的代码中的if判断标记修改成wile判断标记,就会出现死锁的现象,前2步与原来是一致的。第3步如下:
3、 线程Thread-0获取到CPU执行权及锁,通过了while语句判断,直接生产烤鸭3299,将flag设置为true。然后又唤醒线程Thread-1获取到CPU执行权及锁,没有通过while语句判断,阻塞。线程Thread-0又获取到CPU执行权及锁,通不过while语句判断,也阻塞,此时Thread-0、1、2、3都阻塞,故死锁。
代码:
 class Resource{
        private String name ;
        private int count = 1;
        private boolean flag = false;
        public synchronized void set(String name){
             while(flag )
                    try{
                          this.wait();
                   }
                   catch(InterruptedException e)
                   {
                         e.printStackTrace();
                   }
              this.name = name + count;
              count++;
              System.out.println(Thread.currentThread().getName() + "...生产者..." + this. name);
              flag = true ;
              notifyAll();
       }
        public synchronized void out(){
              while(!flag )
                   try{
                          this.wait();
                   } catch(InterruptedException e){
                         e.printStackTrace();
                   }
             flag = false ;
             notifyAll();
             System.out.println(Thread.currentThread().getName() + "...消费者..." + this. name);
       }
 }
 class Producer implements Runnable{
        private Resource r ;
       Producer(Resource r){
              this.r = r;
       }
        public void run(){
              while(true ){
                    r.set( "烤鸭");
             }
       }
 }
 class Consumer implements Runnable{
        private Resource r ;
       Consumer(Resource r){
              this.r = r;
       }
        public void run(){
              while(true ){
                    r.out();
             }
       }
 }
 class ProducerConsumerDemo {
        public static void main(String[] args){
             Resource r = new Resource();
             Producer pro = new Producer(r);
             Consumer con = new Consumer(r);
             Thread t0 = new Thread(pro);
             Thread t1 = new Thread(pro);
             Thread t2 = new Thread(con);
             Thread t3 = new Thread(con);
             t0.start();
             t1.start();
             t2.start();
             t3.start();
       }
}
运行结果:
JDK1.5新特性
JDK1.5 中提供了多线程升级解决方案。
将同步Synchronized替换成现实Lock操作。
将Object中的wait,notify notifyAll,替换了Condition对象。
该对象可以Lock锁 进行获取。
该示例中,实现了本方只唤醒对方操作。
Lock:替代了Synchronized
lock: 获取锁。
unlock:释放锁,为了防止异常出现,导致锁无法被关闭,所以锁的关闭动作要放在finally中。
newCondition()
Condition:替代了Object wait notify notifyAll
await(); :Condition接口中的await方法对应于Object中的wait方法。
signal(); :Condition接口中的signal方法对应于Object中的notify方法。
signalAll(); :Condition接口中的signalAll方法对应于Object中的notifyAll方法。
使用一个Lock、一个Condition修改上面的多生产者-多消费者问题。
代码:
 import java.util.concurrent.locks.*;
 class Resource{
        private String name ;
        private int count = 1;
        private boolean flag = false;

       //创建一个锁对象
       Lock lock = new ReentrantLock();
        //通过已有的锁获取该锁上的监视器对象
       Condition con = lock .newCondition();
        public void set(String name){
              lock.lock();
              try{
                    while(flag )
                          try{
                               con.await();
                         }
                         catch(InterruptedException e)
                         {
                               e.printStackTrace();
                         }
                    this.name = name + count;
                    count++;
                    System.out.println(Thread.currentThread().getName() + "...生产者..." + this. name);
                    flag = true ;
                    con.signalAll();
             }finally{
                    lock.unlock();
             }
       }
        public void out(){
             lock.lock();
              try{
                    while(!flag )
                          try{
                               con.await();
                         }
                         catch(InterruptedException e)
                         {
                               e.printStackTrace();
                         }
                    flag = false ;
                    con.signalAll();
                    System.out.println(Thread.currentThread().getName() + "...消费者..." + this. name);
             }finally{
                    lock.unlock();
             }
       }
 }
 class Producer implements Runnable{
        private Resource r ;
        Producer(Resource r){
              this.r = r;
        }
        public void run(){
              while(true ){
                    r.set( "烤鸭");
             }
       }
 }
 class Consumer implements Runnable{
        private Resource r ;
        Consumer(Resource r){
              this.r = r;
        }
        public void run(){
              while(true ){
                    r.out();
             }
       }
 }
 class ProducerConsumerDemo {
        public static void main(String[] args){
             Resource r = new Resource();
             Producer pro = new Producer(r);
             Consumer con = new Consumer(r);
             Thread t0 = new Thread(pro);
             Thread t1 = new Thread(pro);
             Thread t2 = new Thread(con);
             Thread t3 = new Thread(con);
             t0.start();
             t1.start();
             t2.start();
             t3.start();
       }
 }
运行结果:
停止线程
stop方法已经过时。
如何停止线程?
只有一种,run方法结束。
开启多线程运行,运行代码通常是循环结构。
只要控制住循环,就可以让run方法结束,也就是线程结束。
特殊情况:
当线程处于了冻结状态。
就不会读取到标记。那么线程就不会结束。
当没有指定的方式让冻结的线程恢复到运行状态是,这时需要对冻结进行清除。
强制让线程恢复到运行状态中来。这样就可以操作标记让线程结束。
Thread类提供该方法 interrupt();
示例:
class StopThread implements Runnable{
private boolean flag = true;
public synchronized void run(){
while(flag){
try{
wait();
} catch(InterruptedException e){
System.out.println(Thread.currentThread().getName() + "..." + e);
flag = false;
}
System.out.println(Thread.currentThread().getName() + "......");
}
}
public void setFlag(){
flag = false;
}
}
class StopThreadDemo{
public static void main(String[] args){
StopThread st = new StopThread();
Thread t1 = new Thread(st);
Thread t2 = new Thread(st);
t1.start();
t2.start();
int num = 1;
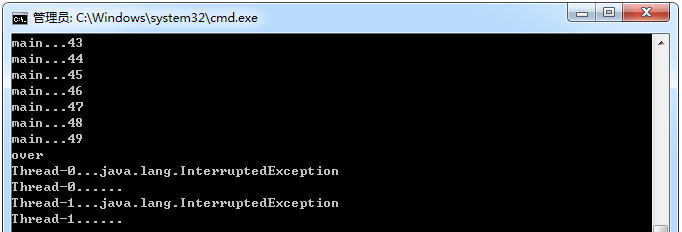
for(;;){
if(++num == 50){
t1.interrupt();
t2.interrupt();
break;
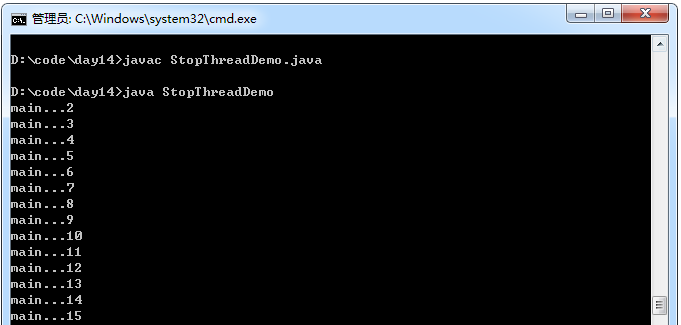
}
System.out.println( "main..." + num);
}
System.out.println( "over");
}
}
运行结果:
……
线程类的其他方法
setDaemon方法:

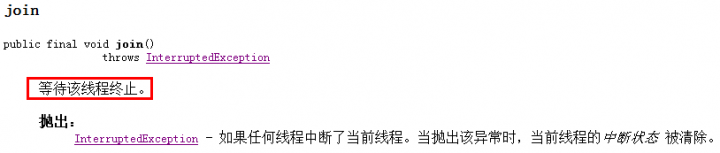
join方法:
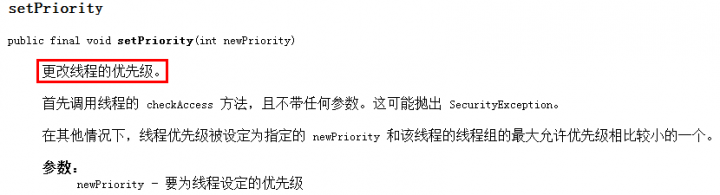
setPriority方法:
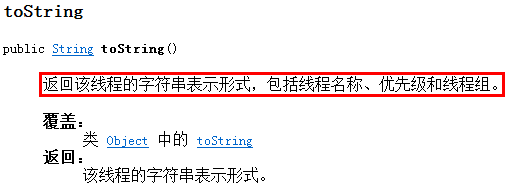
toString方法:
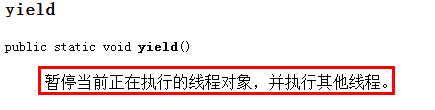
yield方法:


 16万+
16万+

 被折叠的 条评论
为什么被折叠?
被折叠的 条评论
为什么被折叠?
 到【灌水乐园】发言


