


 本文档介绍了如何在G2 3.x中实现图表滚动功能。作者通过使用DataSet控制图表视图显示区域,结合自定义滚动条组件,解决了数据较多时的视觉拥挤问题。在实现过程中,作者遇到了精度误差导致的最后一条数据无法显示的问题,并提供了修复方案。此外,还讨论了滚动的节流处理和其它实现思路,包括利用外部容器和借助第三方库实现滚动。
示例项目地址:g2-scroll-demo
观前提醒
下文实现是基于G2的^3.5.11版本,如果用不是3.x版本,可能一些api和实现是会有所区别的。
由于官方的文档有时查看起来有点问题,补充另外一个文档参考的地址,可以结合起来查看
g2 3.x官网文档参考
g2 3.x文档参考
背景
G2 是一套基于可视化编码的图形语法,以数据驱动,具有高度的易用性和扩展性,用户无需关注各种繁琐的实现细节,一条语句即可构建出各种各样的可交互的统计图表。
初次使用G2实现一个柱状图,我在想如果数据比较多的时候视图上的柱状图不是会很挤吗,影响视觉效果,因此希望在数据比较多的时候,柱状图可以水平的滚动。以下是我使用的实现方案:
思路
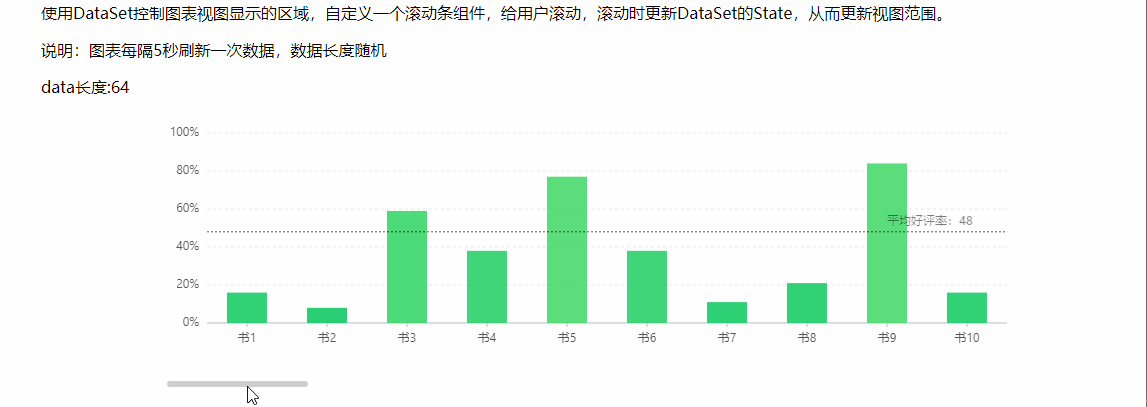
使用DataSet控制图表视图显示的区域,自定义一个滚动条组件,给用户滚动,滚动时更新DataSet的State,从而更新视图范围。
最终实现的效果如下:
具体实现
实现前需要安装依赖:
npm i -S @antv/data-set @antv/g2
定义一个自定义滚动条组件:
<template>
  <div class="scrollBar"
       ref="scrollBar"
       v-if="isShow">
    <div class="scrollBarInner"
         :style="scrollBarInnerStyle"
         ref="scrollBarInner"
         @mousedown="onmousedown"></div>
  </div>
</template>

<script>
/*
  滚动条:暂时只支持水平滚动
*/
export default {
  data () {
    return {
      isShow: false,
      scrollBarWidth: null,
      scrollBarInnerWidth: 0,
      tranX: 0,
      mousedownPosX: null
    }
  },
  computed: {
    scrollBarInnerStyle () {
      return {
        width: `${this.scrollBarInnerWidth}px`,
        transform: `translate3d(${this.tranX}px,0,0)`
      }
    }
  },
  beforeDestroy () {
    document.removeEventListener('mousemove', this.onmousemove)
    document.removeEventListener('mouseup', this.onmouseup)
  },
  methods: {
    /**
     * {Number} proportion - 滚动条占总长比例,[0,1],1时不需要显示
     * {Number} pos - 滚动条初始位置的起点坐标与总长的比值,范围:[0,(1-滚动条占总长比例)]
     */
    initScroll (proportion = 0, pos) {
      if (!proportion) {
        return
      }
      if (proportion >= 1) {
        this.isShow = false
        return
      } else {
        this.isShow = true
      }
      this.$nextTick(() => {
        const scrollBar = this.$refs.scrollBar
        const scrollBarInner = this.$refs.scrollBarInner
        if (scrollBar && scrollBarInner) {
          this.scrollBarWidth = scrollBar.offsetWidth
          const width = (this.scrollBarWidth * proportion) || 0
          this.scrollBarInnerWidth = width
        }
        if (pos >= 0) {
          this.switchPos(pos)
        }
      })
    },
    onmousedown (e) {
      this.mousedownPosX = this.getRelativePosX(e)
      this.mousedownTranX = this.tranX
      // 给全局绑定移动事件,结束时要移除事件
      document.addEventListener('mousemove', this.onmousemove.bind(this))
      document.addEventListener('mouseup', this.onmouseup.bind(this))
    },
    onmousemove (e) {
      if (this.mousedownPosX === null) {
        return
      }
      const currentMousePosX = this.getRelativePosX(e)
      // 处理边界问题
      let tranX = this.mousedownTranX + currentMousePosX - this.mousedownPosX
      tranX = this.getValidTranX(tranX)
      this.tranX = tranX
      this.$emit('updatePosRate', tranX / this.scrollBarWidth)
    },
    onmouseup (e) {
      this.mousedownPosX = null
      document.removeEventListener('mousemove', this.onmousemove)
      document.removeEventListener('mouseup', this.onmouseup)
    },
    // 获取鼠标相对于scrollBar的水平位置
    getRelativePosX (e) {
      const scrollBar = this.$refs.scrollBar
      if (!scrollBar) {
        return 0
      }
      const rect &#
最低0.47元/天 解锁文章


 5890
5890

 被折叠的 条评论
为什么被折叠?
被折叠的 条评论
为什么被折叠?
 到【灌水乐园】发言


