


文章目录
0. 首先建议使用docker搭建环境。链接在这!
1. 首先了解编译安装和yum安装的区别。
windows下安装centos虚拟机,之前写过。传送门~~
编译安装:
- 可以按需安装,想安在哪个目录下就安在哪个目录下。
- 可以设定参数
- 可安装自己想要的版本
yum安装:
- 安装的方便快捷
- 不需要考虑包的依赖
- 可以直接使用service nginx start 等命令。
2. yum安装准备工作—切换阿里云yum源
# 1.备份原有的yum源
mv /etc/yum.repos.d/CentOS-Base.repo /etc/yum.repos.d/CentOS-Base.repo.backup
# 2.下载新的CentOS-Base.repo 到/etc/yum.repos.d/
wget -O /etc/yum.repos.d/CentOS-Base.repo http://mirrors.aliyun.com/repo/Centos-7.repo
或者
curl -o /etc/yum.repos.d/CentOS-Base.repo http://mirrors.aliyun.com/repo/Centos-7.repo
# 3.清理缓存
yum clean all
# 4.生成缓存
yum makecache
如果想查看当前yum源是否切换成功,可随便使用yum安装一个东西即可看到。
yum install vim
base: mirrors.aliyun.com 这一行就代表了yum源地址
3. 编译安装lnmp 很不建议使用编译安装,麻烦且容易报错。
-
nginx
1.1 查看本地有没有安装过nginxrpm -qa | grep nginx如果安装过,则执行如下命令,卸载原有的nginx
rpm -e nginx-*1.2 安装 nginx 需要先将官网下载的源码进行编译,编译依赖 gcc 环境,如果没有 gcc 环境,则需要安装
yum install gcc-c++1.3 PCRE(Perl Compatible Regular Expressions) 是一个Perl库,包括 perl 兼容的正则表达式库。nginx 的 http 模块使用 pcre 来解析正则表达式,所以需要在 linux 上安装 pcre 库,pcre-devel 是使用 pcre 开发的一个二次开发库。nginx也需要此库。命令:
yum install -y pcre pcre-devel1.4 zlib 库提供了很多种压缩和解压缩的方式, nginx 使用 zlib 对 http 包的内容进行 gzip ,所以需要在 Centos 上安装 zlib 库。
yum install -y zlib zlib-devel1.5 OpenSSL 是一个强大的安全套接字层密码库,囊括主要的密码算法、常用的密钥和证书封装管理功能及 SSL 协议,并提供丰富的应用程序供测试或其它目的使用。
nginx 不仅支持 http 协议,还支持 https(即在ssl协议上传输http),所以需要在 Centos 安装 OpenSSL 库。yum install -y openssl openssl-devel1.6 官网下载 tar.gz安装包,地址~
Mainline version:主线版本
Stable version:稳定版本
Legacy versions:旧版本

# 我们lnmp环境全部安装在这个目录下
cd /usr/local
# 下载
wget -c https://nginx.org/download/nginx-1.20.0.tar.gz
# 解压
tar -zxvf nginx-1.20.0.tar.gz
cd nginx-1.20.0
# 编译
./configure --prefix=/usr/local/nginx
# 安装
make && make install
# make[1]: 离开目录“/usr/local/nginx-1.20.0” 最后显示这个是编译安装成功的意思!
启动、停止nginx
cd /usr/local/nginx/sbin/
./nginx
./nginx -s stop
./nginx -s quit
./nginx -s reload
# 查看ngin进程
ps aux | grep nginx
配置nginx的service服务
首先
先停掉nginx服务killall -9 nginx
或者使用 cd /usr/local/nginx/sbin/ && ./nginx -s stop然后编辑nginx.service配置文件
vim /etc/init.d/nginx
在里面写入以下配置:
#!/bin/sh
#
# nginx - this script starts and stops the nginx daemon
#
# chkconfig:   - 85 15
# description:  NGINX is an HTTP(S) server, HTTP(S) reverse \
#               proxy and IMAP/POP3 proxy server
# processname: nginx
# config:      /etc/nginx/nginx.conf
# config:      /etc/sysconfig/nginx
# pidfile:     /var/run/nginx.pid

# Source function library.
. /etc/rc.d/init.d/functions

# Source networking configuration.
. /etc/sysconfig/network

# Check that networking is up.
[ "$NETWORKING" = "no" ] && exit 0

# 配置nginx命令的位置
# 修改为你的nginx可执行命令的路径如: /usr/local/nginx/sbin/nginx
nginx="/usr/local/nginx/sbin/nginx"
prog=$(basename $nginx)

# 指向你的配置文件路径,如:/usr/local/nginx/conf/nginx.conf
NGINX_CONF_FILE="/usr/local/nginx/conf/nginx.conf"

[ -f /etc/sysconfig/nginx ] && . /etc/sysconfig/nginx

lockfile=/var/lock/subsys/nginx

make_dirs() {
   # make required directories
   user=`$nginx -V 2>&1 | grep "configure arguments:.*--user=" | sed 's/[^*]*--user=\([^ ]*\).*/\1/g' -`
   if [ -n "$user" ]; then
      if [ -z "`grep $user /etc/passwd`" ]; then
         useradd -M -s /bin/nologin $user
      fi
      options=`$nginx -V 2>&1 | grep 'configure arguments:'`
      for opt in $options; do
          if [ `echo $opt | grep '.*-temp-path'` ]; then
              value=`echo $opt | cut -d "=" -f 2`
              if [ ! -d "$value" ]; then
                  # echo "creating" $value
                  mkdir -p $value && chown -R $user $value
              fi
          fi
       done
    fi
}

start() {
    [ -x $nginx ] || exit 5
    [ -f $NGINX_CONF_FILE ] || exit 6
    make_dirs
    echo -n $"Starting $prog: "
    daemon $nginx -c $NGINX_CONF_FILE
    retval=$?
    echo
    [ $retval -eq 0 ] && touch $lockfile
    return $retval
}

stop() {
    echo -n $"Stopping $prog: "
    killproc $prog -QUIT
    retval=$?
    echo
    [ $retval -eq 0 ] && rm -f $lockfile
    return $retval
}

restart() {
    configtest || return $?
    stop
    sleep 1
    start
}

reload() {
    configtest || return $?
    echo -n $"Reloading $prog: "
    killproc $prog -HUP
    retval=$?
    echo
}

force_reload() {
    restart
}

configtest() {
  $nginx -t -c $NGINX_CONF_FILE
}

rh_status() {
    status $prog
}

rh_status_q() {
    rh_status >/dev/null 2>&1
}

case "$1" in
    start)
        rh_status_q && exit 0
        $1
        ;;
    stop)
        rh_status_q || exit 0
        $1
        ;;
    restart|configtest)
        $1
        ;;
    reload)
        rh_status_q || exit 7
        $1
        ;;
    force-reload)
        force_reload
        ;;
    status)
        rh_status
        ;;
    condrestart|try-restart)
        rh_status_q || exit 0
            ;;
    *)
        echo $"Usage: $0 {start|stop|status|restart|condrestart|try-restart|reload|force-reload|configtest}"
        exit 2
esac
然后执行
# 重新加载某个服务的配置文件
systemctl daemon-reload
然后查看nginx状态
service nginx status我这里报错了!! 提示错误信息Can’t open PID file /var/run/nginx.pid (yet?) after start:,原因是nginx主配置文件nginx.conf中 pid指令配置的pid路径 与 nginx systemd service文件中的配置PIDFile路径不一致导致的。
解决办法:- 我用此方法并没有解决!将/etc/init.d/nginx(对应你的nginx service配置文件) 的pidfile 注释去掉,修改内容为logs/nginx.pid
或者将你nginx主配置文件nginx.conf的pid注释去掉并修改内容为你的nginx service配置文件的pidfile
总之两者pid路径一直即可解决。 - 用此方法解决了使用nginx -c的参数指定nginx.conf文件的位置。执行如下命令。
1. /usr/local/nginx/sbin/nginx -c /usr/local/nginx/conf/nginx.conf
2. systemctl daemon-reload
3. service nginx status 就没错了
如果想虚拟机外访问nginx记得关闭防火墙。centos有多种防火墙。
systemctl status firewalld.service — 查看防火墙状态
systemctl stop firewalld.service — 关闭防火墙
systemctl disable firewalld.service — 设置开机禁用防火墙
iptables防火墙的关闭!!!
servcie iptables stop --临时关闭防火墙
chkconfig iptables off --永久关闭防火墙
service iptables status --查看防火墙状态最后一步:将nginx添加到环境变量
vim /etc/profile
在最后面写入如下代码
PATH=$PATH:/usr/local/nginx/sbin
export PATH
最后执行 source /etc/profile至此,编译安装nginx完成!
- 我用此方法并没有解决!将/etc/init.d/nginx(对应你的nginx service配置文件) 的pidfile 注释去掉,修改内容为logs/nginx.pid
-
mysql
1.1 首先卸载掉自带的MySQLrpm -qa | grep mariadb 查看已安装的mariadb rpm -e mariadb-*** 卸载掉相应的mariadb yum -y remove mari* 卸载yum安装的mariadb rpm -qa |grep mysql 查看已安装的mysql rpm -e mysql-*** 卸载已安装的mysql yum remove mysql** 卸载yum安装的mysql find / -name mysql rm -rf 相应的文件1.2 下载安装包
首先查看自己的linux是32位还是64位?uname -a # 如果是64位机器,会输出x86_64下载安装包 mysql下载地址。 要下载带boost的版本,Linux-Generic的版本是直接下载好解压完成,稍微配置一下就能用的。这种版本的mysql安装配置方式有待研究一下。
https://cdn.mysql.com/archives/mysql-5.7/mysql-boost-5.7.33.tar.gz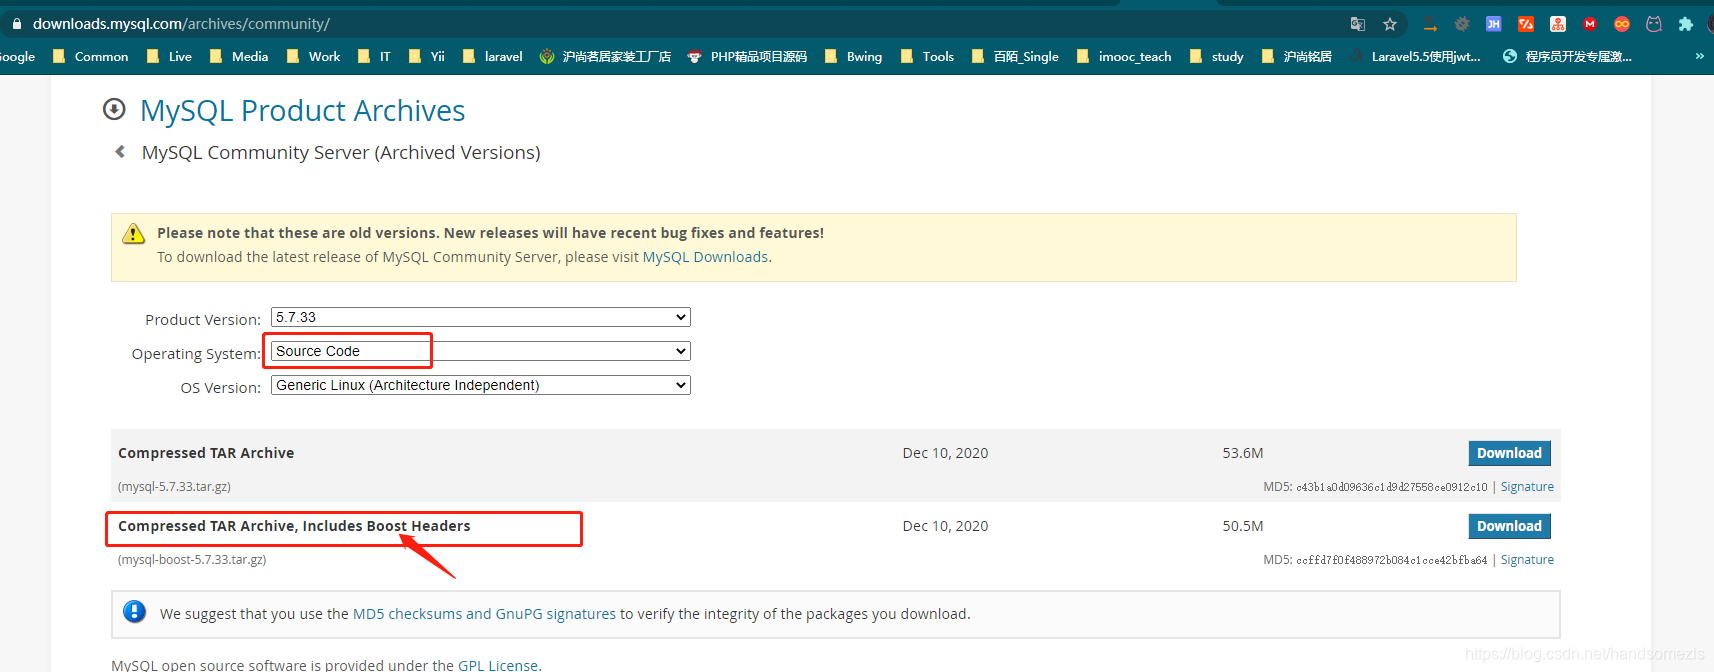
然后解压 ,这里有cmake的配置说明。MySQL CMake参数说明手册tar -zxvf mysql-boost-5.7.33.tar.gz cd ./mysql-5.7.33 cmake . -DCMAKE_INSTALL_PREFIX=/usr/local/mysql -DMYSQL_DATADIR=/usr/local/mysql/data -DSYSCONFDIR=/etc -DMYSQL_TCP_PORT=3306 -DWITH_BOOST=/usr/local/mysql-5.7.33/boost make && make install这里如果 cmake执行报错,CMake Error at cmake/boost.cmake:88 (MESSAGE): (原因是因为缺少boost) 可以尝试以下cmake命令:
cmake . -DCMAKE_INSTALL_PREFIX=/usr/local/mysql -DDEFAULT_CHARSET=utf8mb4 -DDEFAULT_COLLATION=utf8mb4_general_ci -DENABLED_LOCAL_INFILE=ON -DWITH_INNOBASE_STORAGE_ENGINE=1 -DWITH_FEDERATED_STORAGE_ENGINE=1 -DWITH_BLACKHOLE_STORAGE_ENGINE=1 -DWITHOUT_EXAMPLE_STORAGE_ENGINE=1 -DWITH_PARTITION_STORAGE_ENGINE=1 -DWITH_PERFSCHEMA_STORAGE_ENGINE=1 -DCOMPILATION_COMMENT='Mysqlma' -DWITH_READLINE=ON -DMYSQL_TCP_PORT=3306 -DDOWNLOAD_BOOST=1 -DWITH_BOOST=/usr/local/boost_1_59 -DMYSQL_DATADIR=/usr/local/mysql/data -DSYSCONFDIR=/etc -DMYSQL_UNIX_ADDR=/data/mysqldata/3306/mysql.sock1.3 安装完成后,执行命令
cd /usr/local/mysql
1.4 编辑/etc/my.cnf ( 如果没有则创建)
[client]
port        = 3306
socket      = /tmp/mysql.sock

[mysqld]
port        = 3306
socket      = /tmp/mysql.sock
user = mysql

base dir = /usr/local/mysql
datadir = /data/mysql/data
pid-file = /data/mysql/mysql.pid

log_error = /data/mysql/mysql-error.log
slow_query_log = 1
long_query_time = 1
slow_query_log_file = /data/mysql/mysql-slow.log

skip-external-locking
key_buffer_size = 32M
max_allowed_packet = 1024M
table_open_cache = 128
sort_buffer_size = 768K
net_buffer_length = 8K
read_buffer_size = 768K
read_rnd_buffer_size = 512K
myisam_sort_buffer_size = 8M
thread_cache_size = 16
query_cache_size = 16M
tmp_table_size = 32M
performance_schema_max_table_instances = 1000

explicit_defaults_for_timestamp = true
#skip-networking
max_connections = 500
max_connect_errors = 100
open_files_limit = 65535

log_bin=mysql-bin
binlog_format=mixed
server_id   = 232
expire_logs_days = 10
early-plugin-load = ""

default_storage_engine = InnoDB
innodb_file_per_table = 1
innodb_buffer_pool_size = 128M
innodb_log_file_size = 32M
innodb_log_buffer_size = 8M
innodb_flush_log_at_trx_commit = 1
innodb_lock_wait_timeout = 50

[mysqldump]
quick
max_allowed_packet = 16M

[mysql]
no-auto-rehash

[myisamchk]
key_buffer_size = 32M
sort_buffer_size = 768K
read_buffer = 2M
write_buffer = 2M
把当前用户和组改成mysql
cd /usr/local
chown -R mysql:mysql mysql
初始化mysql
./mysqld --initialize-insecure --user=mysql --basedir=/usr/local/mysql --datadir=/data/mysql/data如果没有创建data目录,记着创建一下,再次执行初始化即可。
mkdir /data/mysql/data
#赋予权限
chmod -R 777 /data/mysql
拷贝可执行配置文件
cd /usr/local/mysql/support-files
cp mysql.server /etc/init.d/mysqld
至此基本上安装成功了。启动mysql
service mysqld start测试连接
cd /usr/local/mysql/bin
./mysql -hlocalhost -uroot -p
无需密码即可连接成功
1.5 修改环境变量vim /etc/profile # 新增 PATH=/usr/local/mysql/bin:$PATH # 保存退出后执行 source /etc/profile设置开机自启动
systemctl enable mysqld查看是否开机自启动
chkconfig --list几个简单的命令
service mysqld start
service mysqld restart
service mysqld stop
service mysqld status
用Navicate连接虚拟机中的mysql。
#首先查看虚拟机的ip
ifconfig
#直接连接的时候会报错--->Host is not allowed to connect to this MySQL server
#此时需要进入mysql,执行如下命令即可连接。
mysql -u root -p
use mysql;
update user set host = '%' where user = 'root';
FLUSH PRIVILEGES;
修改MySQL密码
mysql -u root -p #进入MySQL后,直接执行。 set password for root@localhost = password('root'); ##这会报错 #执行以下命令会发现 use mysql; select Host,User from user; #host已经不是localhost了。因为刚才为了用Navicate连接,已经将host改成了%,所以此时要执行如下命令 set password for root@'%' = password('root'); flush privileges; #此时mysql的密码修改为root了。 -
安装php7.4
3.1 首先下载php安装包,https://www.php.net/downloads.php
3.2 解压、编译安装。我这里下载的是php-7.4.16.tar.gz.
#首先将压缩包移动到/usr/local目录
mv php-7.4.16.tar.gz /usr/local
cd /usr/local
tar -zxvf php-7.4.16.tar.gz
cd php-7.4.16
开始编译安装。
./configure --prefix=/usr/local/php74 --with-config-file-path=/etc/php74 --with-fpm-user=nginx --with-fpm-group=nginx --enable-fpm --enable-opcache --enable-inline-optimization --disable-debug --disable-rpath --enable-shared -enable-mysqlnd --with-mysqli=mysqlnd --with-pdo-mysql=mysqlnd --enable-mysqlnd-compression-support --with-iconv-dir --with-zlib --enable-xml --disable-rpath --enable-bcmath --enable-shmop --enable-sysvsem --enable-inline-optimization --with-curl --enable-mbregex --enable-mbstring --enable-intl --enable-ftp --enable-gd --enable-gd-jis-conv --with-jpeg --with-freetype --with-openssl --with-mhash --enable-pcntl --enable-sockets --with-xmlrpc --with-zip --enable-soap --with-gettext --enable-fileinfo --with-pear --enable-maintainer-zts --with-ldap=shared --without-gdbm --with-zip然后执行
make && make install添加环境变量
vim /etc/profile PATH=$PATH:/usr/local/php74/bin #我这里的目录是php74注意别写错 source /etc/profile # 此时执行 php -v #即可看到php信息修改php配置文件,在之前编译的源码包中,找到php.ini-production,复制到/usr/local/php74,并改名为php.ini (因为编译安装的时候,指定了php.ini文件所在目录位置。有些编译安装可能把php.ini放在php74/etc下,有些放在php74/lib下。主要看编译安装的命令)
cp /usr/local/php-7.4.16/php.ini-production /usr/local/php74/php.ini修改php.ini,设置错误信息级别
vim /usr/local/php74/php.ini
display_errors = On   //原来是off
修改php-fpm配置文件
cd /usr/local/php74/etc
cp php-fpm.conf.default php-fpm.conf
vim php.fpm.conf
去掉pid=run/php-fpm.pid前面的分号
然后复制配置文件
cd ./php-fpm.d
cp www.conf.default www.conf  (这个配置文件可能在当前目录下php-fpm.d文件夹下,根据php不同版本决定。在它所在文件夹内执行此命令即可!)
启动php
/usr/local/php74/sbin/php-fpm
# 如果报错nginx的问题  就去修改www.conf文件  将user=nginx和group=nginx两行改成user=nobody和group=nobody
# 查看进程
ps -aux | grep php
将php-fpm添加至service服务
#进入到编译目录
cd /usr/local/php-7.4.16/sapi/fpm
cp init.d.php-fpm /etc/init.d/php-fpm
#赋予脚本可执行命令,添加开机自启动
chmod +x /etc/init.d/php-fpm
chkconfig --add php-fpm
chkconfig php-fpm on
#相关命令
service php-fpm start
service php-fpm stop
service php-fpm restart
chkconfig --list   --查看开机自启项目
4.yum安装lnmp 可以先执行一下 yum update
- nginx
# 先安装nginx库 rpm -Uvh http://nginx.org/packages/centos/7/noarch/RPMS/nginx-release-centos-7-0.el7.ngx.noarch.rpm #使用yum安装nginx yum -y install nginx #启动nginx service nginx start 或者 systemctl start nginx service nginx stop service nginx status #关闭防火墙以后,即可在宿主机通过虚拟机ip直接访问虚拟机nginx systemctl status firewalld.service --- 查看防火墙状态 systemctl stop firewalld.service --- 关闭防火墙 systemctl disable firewalld.service --- 设置开机禁用防火墙 #设置开机自启动 systemctl enable nginx #取消自启动就用disable #查看开机启动项 systemctl list-unit-files systemctl list-unit-files | grep enable - mysql
首先卸载centos自带的MySQL
下载mysql的repo源 mysql的repo源#卸载mariadb rpm -qa | grep mariadb yum -y remove mari* rm -rf /var/lib/mysql/ * rpm -qa | grep mariadb # 卸载mysql数据库 yum remove mysql-community-serve rpm -qa |grep mysql yum remove mysql-* find / -name mysql rm -rf /var/lib/mysql
漫长的安装完以后#我这里下载的是5.7版本 cd /usr/local wget http://repo.mysql.com/mysql57-community-release-el7-8.noarch.rpm rpm -ivh mysql57-community-release-el7-8.noarch.rpm yum -y install mysql-server
如果想用navicate连接的话,要再进入数据库修改一下配置#首先启动mysql service mysqld start #然后查看MySQL密码 grep "password" /var/log/mysqld.log #然后进入mysql mysql -u root -p #想修改mysql密码为简单点的密码 #首先改一个复杂的密码,不然没办法修改MySQL密码策略 ALTER USER 'root'@'localhost' IDENTIFIED BY 'lol_LOL123'; #查看当前MySQL策略 SHOW VARIABLES LIKE 'validate_password%'; #修改策略 set global validate_password_policy=0; set global validate_password_length=1; #再次查看 SHOW VARIABLES LIKE 'validate_password%'; #现在即可修改成简单的密码 ALTER USER 'root'@'localhost' IDENTIFIED BY 'root';
几个简单的命令#执行完如下代码 外面的navicate即可连接了 use mysql; update user set host = '%' where user = 'root'; FLUSH PRIVILEGES;service mysqld start service mysqld stop service mysqld restart service mysqld status #设置mysql开机自启动 systemctl enable mysqld #取消自启动就用disable #查看开机启动项 systemctl list-unit-files systemctl list-unit-files | grep enable - php7.4 (安装php还是采用编译安装比较好。。编译可以配置安装路径、yum的话 还得找在哪。找半天找不到)
安装源
安装YUM管理工具yum install epel-release yum install http://rpms.remirepo.net/enterprise/remi-release-7.rpm
安装phpyum install yum-utils
一些命令yum install php74-php-gd php74-php-pdo php74-php-mbstring php74-php-cli php74-php-fpm php74-php-mysqlnd
最后附上nginx配置文件,在/etc/nginx/conf.d目录下#启动fpm、停止fpm、重启、查看状态 service php74-php-fpm start service php74-php-fpm stop service php74-php-fpm restart service php74-php-fpm status #设置开机自启动 systemctl enable php74-php-fpm #取消自启动就用disable #查看开机启动项 systemctl list-unit-files systemctl list-unit-files | grep enableserver { listen 80 default_server; server_name localhost; root /usr/share/nginx/html; # Load configuration files for the default server block. location / { # 这里改动了 定义首页索引文件的名称 index index.php index.html index.htm; } error_page 404 /404.html; location = /40x.html { } error_page 500 502 503 504 /50x.html; location = /50x.html { } # 这里新加的 # PHP 脚本请求全部转发到 FastCGI处理. 使用FastCGI协议默认配置. # Fastcgi服务器和程序(PHP,Python)沟通的协议. location ~ \.php$ { # 设置监听端口 fastcgi_pass 127.0.0.1:9000; # 设置nginx的默认首页文件(上面已经设置过了,可以删除) fastcgi_index index.php; # 设置脚本文件请求的路径 fastcgi_param SCRIPT_FILENAME $document_root$fastcgi_script_name; # 引入fastcgi的配置文件 include fastcgi_params; } }
5. lnmp一键安装 参考网站 不喜欢这种方式,所以没测试过,可以看这篇文章
Centos8(Liunx) 中安装PHP7.4 的三种方法和删除它的三种方法
6. 一些报错
- Starting nginx (via systemctl):长时间没反应并提示信息Can‘t open PID file /var/run/nginx.pid (yet?) after start
- nginx 报异常"/usr/local/nginx/logs/nginx.pid" failed (2: No such file or directory)处理方法
- configure: error: Cannot find ldap.h
- configure: error: Package requirements (libzip >= 0.11 libzip ≠ 1.3.1 libzip ≠ 1.7.0) were not met
- 解决编译时内存不足c++: internal compiler error: Killed (program cc1plus)
7. 笔记
8. 参考文章
- 源码安装与yum安装的区别
- Centos8(Liunx) 中安装PHP7.4 的三种方法和删除它的三种方法
- Linuxyum源切换阿里云软件源
- CentOS7安装Nginx 这篇文章比较老,适当借鉴即可。
- 将nginx设置为系统service==》service nginx start 命令可用
- Centos 7 systemctl和防火墙firewalld命令
- centos中iptables防火墙的停止开启与永久关闭
- firewalld和iptables区别
- 卸载centos7自带mysql_mysql(1)-centos7如何彻底卸载自带mysql
- MySQL CMake参数说明手册
- centos7 源码编译安装 mysql5.7
- 将php-fpm添加至service服务
- Linux 设置程序开机自启动 (命令systemctl 和 chkconfig用法区别比较)
- 卸载centos7自带mysql_mysql(1)-centos7如何彻底卸载自带mysql
- 使用yum安装MySQL5.7
- rpm -ivh 这个ivh是干什么的
- CentOS 7 下使用yum安装MySQL5.7.20 最简单 图文详解
- Centos8(Liunx) 中安装PHP7.4 的三种方法和删除它的三种方法


 473
473

 被折叠的 条评论
为什么被折叠?
被折叠的 条评论
为什么被折叠?
 到【灌水乐园】发言


