


SIFT: Theory and Practice
Keypoint orientations
Series: SIFT: Theory and Practice:
- Introduction
- The scale space
- LoG approximations
- Finding keypoints
- Getting rid of low contrast keypoints
- Keypoint orientations
- Generating a feature
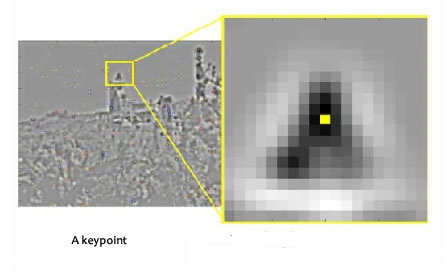
After step 4, we have legitimate key points. They've been tested to be stable. We already know the scale at which the keypoint was detected (it's the same as the scale of the blurred image). So we have scale invariance. The next thing is to assign an orientation to each keypoint. This orientation provides rotation invariance. The more invariance you have the better it is. :P
The idea
The idea is to collect gradient directions and magnitudes around each keypoint. Then we figure out the most prominent orientation(s) in that region. And we assign this orientation(s) to the keypoint.
Any later calculations are done relative to this orientation. This ensures rotation invariance.
The size of the "orientation collection region" around the keypoint depends on it's scale. The bigger the scale, the bigger the collection region.
The details
Now for the little details about collecting orientations.
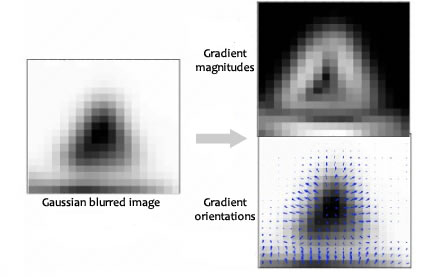
Gradient magnitudes and orientations are calculated using these formulae:

The magnitude and orientation is calculated for all pixels around the keypoint. Then, A histogram is created for this.
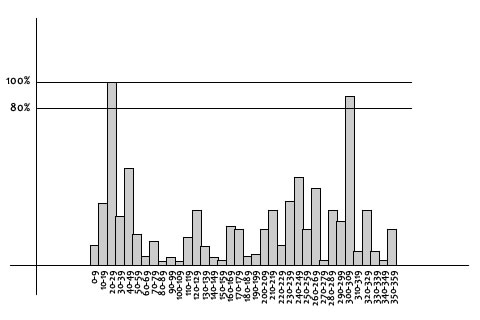
In this histogram, the 360 degrees of orientation are broken into 36 bins (each 10 degrees). Lets say the gradient direction at a certain point (in the "orientation collection region") is 18.759 degrees, then it will go into the 10-19 degree bin. And the "amount" that is added to the bin is proportional to the magnitude of gradient at that point.
Once you've done this for all pixels around the keypoint, the histogram will have a peak at some point.
Above, you see the histogram peaks at 20-29 degrees. So, the keypoint is assigned orientation 3 (the third bin)
Also, any peaks above 80% of the highest peak are converted into a new keypoint. This new keypoint has the same location and scale as the original. But it's orientation is equal to the other peak.
So, orientation can split up one keypoint into multiple keypoints.
The Technical Details
Magnitudes
Saw the gradient magnitude image above? In SIFT, you need to blur it by an amount of 1.5*sigma.
Size of the window
The window size, or the "orientation collection region", is equal to the size of the kernel for Gaussian Blur of amount 1.5*sigma.
Summary
To assign an orientation we use a histogram and a small region around it. Using the histogram, the most prominent gradient orientation(s) are identified. If there is only one peak, it is assigned to the keypoint. If there are multiple peaks above the 80% mark, they are all converted into a new keypoint (with their respective orientations).
Next, we generate a highly distinctive "fingerprint" for each keypoint. Here's a little teaser. This fingerprint, or "feature vector", has 128 different numbers.
More in the series
This tutorial is part of a series called SIFT: Theory and Practice:


 230
230


 被折叠的 条评论
为什么被折叠?
被折叠的 条评论
为什么被折叠?
 到【灌水乐园】发言


