


 本文是关于前端盒子模型的学习笔记,详细介绍了盒子模型的概念、边框的设置(颜色、宽度、样式)、margin的使用,包括内外边距的调整以及如何实现元素居中,同时还提供了多个练习案例,如京东快报、导航栏的实现,加深了对盒子模型的理解。
4. 盒子模型
4.0 代码地址
- https://gitee.com/qiangge95243611/java118/tree/master/web/day04
4.1 什么是盒子模型(Box Model)
-
所有HTML元素可以看作盒子,在CSS中,"box model"这一术语是用来设计和布局时使用。
-
CSS盒模型本质上是一个盒子,封装周围的HTML元素,它包括:外边距,边框,内填充和实际内容。
-
盒模型允许我们在其它元素和周围元素边框之间的空间放置元素。
-
下面的图片说明了盒子模型(Box Model):

-
盒子模型各部分的说明:
- Margin(外边距) - 边框以外的区域,外边距是透明的。
- Border(边框) - 围绕在内边距和内容外的边框。
- Padding(内边距) - 内容与边框之间的区域,内边距是透明的。
- Content(内容) - 盒子的内容,显示文本和图像。
-
元素的宽度和高度
-
当您设置一个元素的宽度和高度属性时,你只是设置内容区域的宽度和高度。
-
要知道元素占据页面范围完整大小,还应该包括 内边距、边框、外边距。
-
-
下面的例子中的元素的总宽度为 450px:
div {

    width: 300px;
    border: 25px solid green;
    padding: 25px;
    margin: 25px;
}
div占据页面的总宽度 = 内容宽度 + 2*内边距 + 2*外边距 + 2*边框宽度,所以计算结果如下:
300px (宽)
+ 50px (左 + 右填充)
+ 50px (左 + 右边框)
+ 50px (左 + 右边距)
= 450px -
如果页面的宽度只有250px,那么如何设置div的样式呢?
div {

    width: 220px;
    padding: 10px;
    border: 5px solid gray;
    margin: 0px;
}
220px (宽)
+ 20px (左 + 右填充)
+ 10px (左 + 右边框)
+ 0px (左 + 右边距)
= 250px
4.2 边框
边框一般包括3个方面:border-color边框颜色, border-width边框宽度, border-style边框样式。
4.2.1 边框颜色
- broder-color 样式的设置如下表所示:

-
可以使用top、right、bottom、left等属性可以设置指定方向的颜色值,如:border-top-color:#369;
div{ border-top-color:#369; border-right-color:#409eff; border-bottom-color:#f00; border-left-color:#000; } -
如果使用border-color设置边框颜色,不同的数量值,表示不同的含义:
div{

	border-color:#000; 						/*四个边框都相同值是#000*/
	border-color:red blue;					/*前面是上下red,后面是左右blue*/
	border-color:red green blue;			/*上red,左右green,下blue*/
	border-color:red green blue yellow;		/*上red,右green,下blue,左yellow*/
}
4.2.2 边框粗细
-
border-width 设置元素边框粗细。
-
为边框指定宽度有两种方法:
- 可以指定数字值,比如 2px 或 0.1em(单位为px, pt, cm, em 等)
- 使用 3 个关键字之一,它们分别是 thick 、medium(默认值) 和 thin。
-
可以使用top、right、bottom、left等属性可以设置指定方向的边框宽度,如:border-top-width: 5px;
div{ border-top-width:1px; border-right-width:2px; border-bottom-width:3px; border-left-width:4px; } -
如果使用border-width设置边框的宽度,不同的数量值,表示不同的含义:
div{

	border-width:1px; 				/*四个边框都是相同的值都是1px*/
	border-width:1px 2px;			/*前面一个是上下1px,后面的是左右2px*/
	border-width:1px 2px 3px;		/*前面一个是上1px,中间是左右2px,后面一个是下3px*/
	border-width:1px 2px 3px 4px;	/*顺序是上1px,右2px,下3px,左4px*/
}
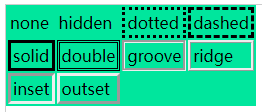
4.2.3 边框样式
-
border-style 设置元素边框样式,其常用的值如下所示:
- none:不显示边框
- hidden:和关键字 none 类似,不显示边框
- dotted:显示为一系列圆点
- dashed:显示为一系列短的方形虚线
- solid:显示为一条实线
- double :显示为一条双实线
-
border-style 默认值是 none,这意味着如果你只修改 border-width 和 border-color 是不会出现边框的。
-
可以使用top、right、bottom、left等属性可以设置指定方向的边框样式,如:border-top-style: solid;
div{ border-top-style:none; /*没有边框*/ border-right-style:solid; /*实线*/ border-bottom-style:dotted; /*点虚线*/ border-left-style:dashed; /*横虚线*/ } -
如果使用border-style设置边框样式,不同的数量值,表示不同的含义:
div{ border-style:none; /*四个边框都相同值是none*/ border-style:none solid; /*前面是上下none,后面是左右solid*/ border-style:none solid dotted; /*上none,左右solid,下dotted*/ border-style:none solid dotted dashed; /*上none,右solid,下dotted,左dashed*/ } -
代码
<table> <tr> <td class="b1">none</td> <td class="b2">hidden</td> <td class="b3">dotted</td> <td class="b4">dashed</td> </tr> <tr> <td class="b5">solid</td> <td class="b6">double</td> <td class="b7">groove</td> <td class="b8">ridge</td> </tr> <tr> <td class="b9">inset</td> <td class="b10">outset</td> </tr> </table> -
css样式表
/* 定义表格外观 */ table { border-width: 3px; background-color: #52e396; } tr, td { padding: 2px; } /* border-style 示例 */ .b1 { border-style: none; } .b2 { border-style: hidden; } .b3 { border-style: dotted; } .b4 { border-style: dashed; } .b5 { border-style: solid; } .b6 { border-style: double; } .b7 { border-style: groove; } .b8 { border-style: ridge; } .b9 { border-style: inset; } .b10 { border-style: outset; } -
效果图
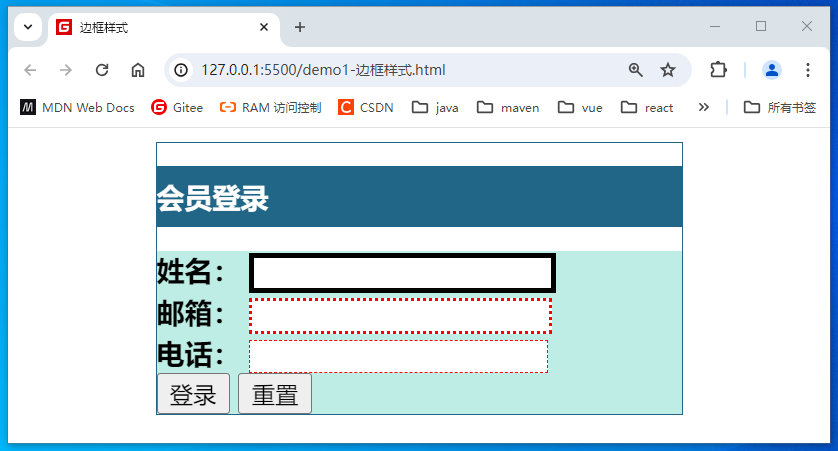
4.2.4 border简写
-
border可以同时设置边框的颜色、粗细和样式,没有顺序要求。
div{ border: 1px solid #3a6587; /*宽度1px, 样式solid, 颜色#3a6587*/ border: 2px red dashed; /*宽度2px, 样式dashed, 颜色red*/ } -
代码
<!DOCTYPE html> <html lang="en"> <head> <meta charset="UTF-8" /> <meta http-equiv="X-UA-Compatible" content="IE=edge" /> <meta name="viewport" content="width=device-width, initial-scale=1, maximum-scale=1,minimum-scale=1,user-scalable=no" /> <title>边框样式</title> <link rel="shortcut icon" href="favicon.ico" type="image/x-icon" /> <style> .box { width: 300px; border: 1px solid #3a6587; margin: 0 auto; } h2 { font-size: 16px; background-color: #3a6587; height: 35px; line-height: 35px; color: #fff; } form { background: #c8ece3; } .username { border: 3px solid black; } .email { border: 2px dotted red; } .tel { border: 1px dashed red; } </style> </head> <body> <div class="box"> <h2>会员登录</h2> <form action="#" method="post"> <div> <strong class="name">姓名:</strong> <input type="text" name="username" class="username" /> </div> <div> <strong class="name">邮箱:</strong> <input type="text" name="email" class="email" /> </div> <div> <strong class="name">电话:</strong> <input type="text" name="tel" class="tel" /> </div> <div> <input type="submit" value="登录" /> <input type="reset" value="重置" /> </div> </form> </div> </body> </html> -
效果图
4.3 margin外边距
-
margin 属性为给定元素设置所有四个(上右下左)方向的外边距属性。也就是 margin-top、margin-right、margin-bottom 和 margin-left 四个外边距属性设置的简写。
-
示例
div{ margin-top: 1px margin-right : 2px margin-bottom : 2px margin-left : 1px margin :3px 5px 7px 4px; /*上右下左*/ margin :3px 5px; /*上下, 左右*/ margin :3px 5px 7px; /*上, 左右,下*/ margin :8px; /*四个方向相同*/ } -
代码
<!DOCTYPE html>
<html lang="en">
  <head>
    <meta charset="UTF-8" />
    <meta http-equiv
 最低0.47元/天 解锁文章


 534
534

 被折叠的 条评论
为什么被折叠?
被折叠的 条评论
为什么被折叠?
 到【灌水乐园】发言


