


 本文详细介绍了在CentOS7系统上,利用Apache服务器快速部署WordPress,并实现伪静态配置的过程。从Apache、MySQL、PHP的安装,到WordPress的配置及伪静态规则设置,全程亲测可用。
【昊鼎王五】如何三分钟在centos7上基于Apache搭建WordPress服务器并支持伪静态?-亲测可用
一.安装过程大致说一下:
1.安装Apache
yum install httpd
systemctl start httpd
2.安装mysql并配置MYSQL数据库
略(具体请见https://blog.csdn.net/haoding205/article/details/102072479有写过)
3.安装PHP
yum install php php-mysql php-gd php-imap php-ldap php-odbc php-pear php-xml php-xmlrpc
测试PHP是否安装成功,
在/var/www/html下建立一个test.php文件:
vi /var/www/html/test.php
文件内输入
<?php
phpinfo();
?>
现在你在浏览器输入
http://x.x.x.x/test.php
就可以看到PHP的信息了(图略)
4.安装wordpress
cp wordpress-4.8.1-zh_CN.tar.gz /var/www/html/
cd /var/www/html/
tar xf wordpress-4.8.1-zh_CN.tar.gz
cd wordpress/
cp wp-config-sample.php wp-config.php
vim wp-config.php     #配置正确数据库连接
再次打开浏览器,输入http://IP/wordpress,即可看到Wordpress配置安装界面,然后安装成功,可以正常使用了。
(图略(具体请见https://blog.csdn.net/haoding205/article/details/100173208 有写过))
本文重点是讲如何实现让Apache支持wordpress伪静态,如下:
二.wordpress配置伪静态的方法:
1.确保apache加载了rewrite模块
运行httpd -M查看这个模块是否加载,
一般情况下是默认加载了的,至少本博主的机器上该模块是默认加载了。
此处若没有加载,网上的解决方法是添加或取消注释这段代码
LoadModule rewrite_module modules/mod_rewrite.so
更多方法请搜索Apache如何重新编译rewrite模块
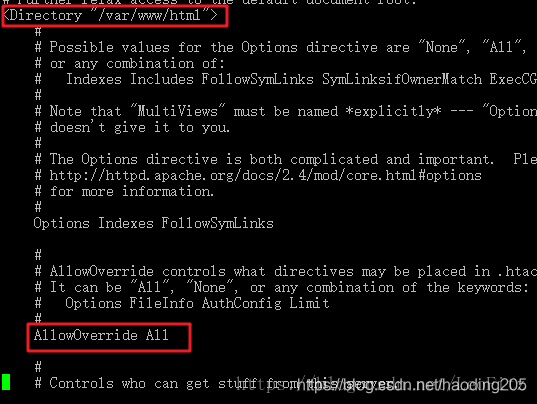
2.修改apache配置文件,使其支持特定目录下的rewrite
/etc/httpd/conf/httpd.conf
第二个红框处将None改成All
注意外部标签是/var/www/html/(修改其他地方没用,此处是坑)
3.确保对目录拥有正确的读写权限
chown -R apache:apache /var/www/html/wordpress
此处非常重要
4.重启apache及其他
service httpd restart     #重启apache

#安装ftp服务器,以后有用
yum install vsftpd
system start vsftpd
5.在wordpress配置
5.1在仪表盘中“设置–>固定链接”设置,选择“自定义结构”
/%category%/%post_id%.html
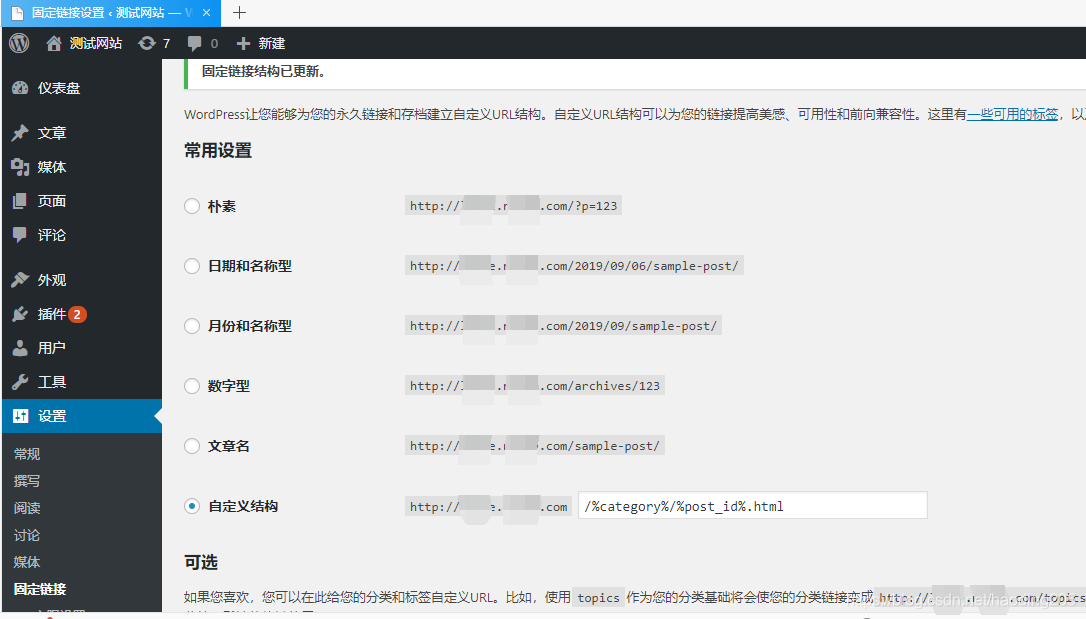
点击保存后退出,此时会在/www/html/wordpress/目录下自动生成一个.htaccess文件。
5.2检查生成的.htaccess文件是否正确。
检查上述自动生成的.htaccess
内容应该是:
[root@localhost wordpress]# cat .htaccess

# BEGIN WordPress
<IfModule mod_rewrite.c>
RewriteEngine On
RewriteBase /wordpress/
RewriteRule ^index\.php$ - [L]
RewriteCond %{REQUEST_FILENAME} !-f
RewriteCond %{REQUEST_FILENAME} !-d
RewriteRule . /wordpress/index.php [L]
</IfModule>

# END WordPress[root@localhost wordpress]#
6.浏览器访问检查效果:

大功告成。
至此,让Apache支持wordpress伪静态-亲测可用。
下面大致讲一下固定链接设置参数:
- %year% 基于文章发布年份,比如2007;
- %monthnum% 基于文章发布月份,比如05;
- %day% 基于文章发布当日,比如28;
- %hour% 基于文章发布小时数,比如15;
- %minute% 基于文章发布分钟数,比如43
- %second% 基于文章发布秒数,比如33
- %postname% 基于文章的postname,其值为撰写时指定的缩略名,不指定缩略名时是文章标题;
- %post_id% 基于文章post_id,比如423;
- %category% 基于文章分类,子分类会处理成“分类/子分类”这种形式;
- %author% 基于文章作者名。
将上述参数进行组合,即可得到wordpress的固定链接形式。网上常见的几种设置方法:
/%year%/%monthnum%/%day%/%postname%/
/%year%/%monthnum%/%postname%/
/%year%/%monthnum%/%day%/%postname%.html
/%year%/%monthnum%/%postname%.html
/%category%/%postname%.html
/%category%/%post_id%.html
/%postname%.html
/%post_id%.html 我们一般使用这个方式比较好。


 被折叠的 条评论
为什么被折叠?
被折叠的 条评论
为什么被折叠?
 到【灌水乐园】发言


