


优化的点??
- zabbix 宏定义???
- 查看历史区间数据,自动加监控???
- 批量添加主机???
- 安装客户端自动化???
- 网络程序交付,变更发布系统???
- 网络排查链路公告割接故障诊断系统?预警系统?
- 方便批量配置监控项?? 实时获取监控项值????
教程 zabbix6 入门到精通b站 语雀
snmp 统一监控???
oid值变化的情
通过批量添加监控项??
告警和事件的关系??
主机原型-图表原型??
服务对象?
method:
params:{}
接口
码表 配置
key value msg parent
获取监控项
依赖主机id
item.get
{
 "hostids":"10559"
}
获取历史数据
监控项id
history.get
{
"itemids": "44641",
"limit":10
}
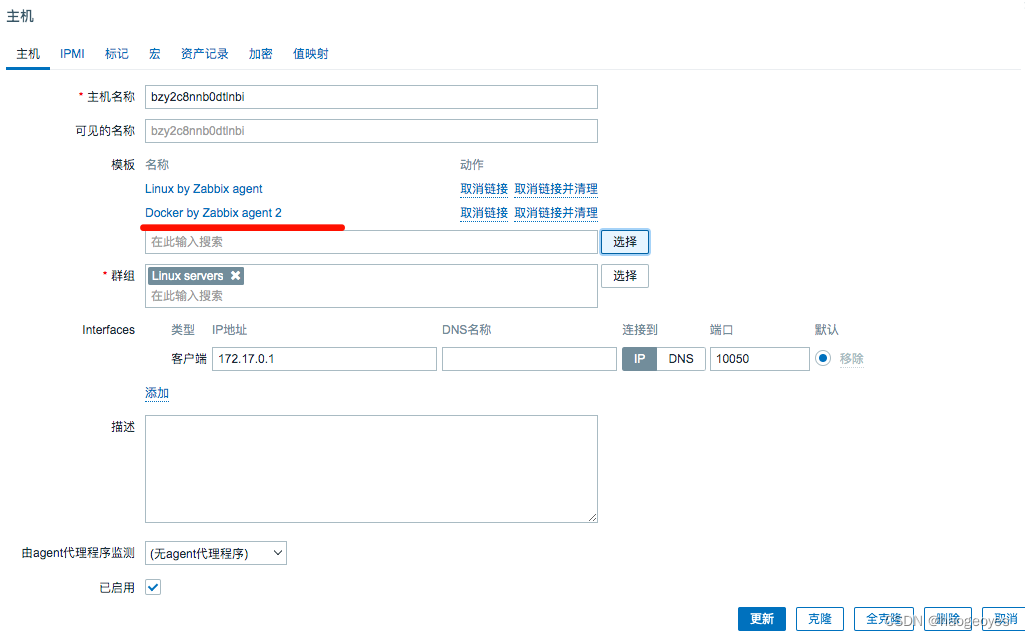
创建主机
https://www.zabbix.com/documentation/6.0/zh/manual/api/reference/host/create
method:host.create
params:{}
- 获取主机接口
https://www.zabbix.com/documentation/6.0/zh/manual/api/reference/hostinterface/object
type:
1 - agent;
2 - SNMP;
3 - IPMI;
4 - JMX
main:是否是默认的接口
0 - 不是默认;
1 - 默认
useip:是否通过ip进行连接
0 - 使用主机DNS进行连接;
1 - 使用主机接口的主机IP进行连接
params:
{
    "host": "172.17.0.1",
   "interfaces": [
            {
                "type": 1,
                "main": 1,
                "useip": 1,
                "ip": "172.17.0.1",
                "dns": "",
                "port": "10050"
            }
        ],
    "groups": [
            {
                "groupid": "2"
            }
        ]
}
返回:

{
    "jsonrpc": "2.0",
    "error": {
        "code": 0,
        "message": "",
        "data": ""
    },
    "result": {
        "hostids": [
            "10561"
        ]
    },
    "id": 1
}
- 更新主机模版
host.update
{
"hostid": "10561",
"templates":[{"templateid":"10001"}]
}
返回:
{
    "jsonrpc": "2.0",
    "error": {
        "code": 0,
        "message": "",
        "data": ""
    },
    "result": {
        "hostids": [
            "10561"
        ]
    },
    "id": 1
}
- 获取模版id
https://www.zabbix.com/documentation/6.0/zh/manual/api/reference/template/get
method:template.get
params:
获取 templateid
参数
{
 "limit":10
}

返回
{
            "auto_compress": "1",
            "custom_interfaces": "0",
            "description": "Official Linux template. Requires agent of Zabbix 3.0.14, 3.4.5 and 4.0.0 or newer.\r\n\r\nKnown Issues:\r\n\r\n  Description: Network discovery. Zabbix agent as of 4.2 doesn't support items such as net.if.status, net.if.speed.\r\n\r\nYou can discuss this template or leave feedback on our forum https://www.zabbix.com/forum/zabbix-suggestions-and-feedback/387225-discussion-thread-for-official-zabbix-template-for-linux\r\n\r\nTemplate tooling version used: 0.41",
            "flags": "0",
            "host": "Linux by Zabbix agent",
            "ipmi_authtype": "-1",
            "ipmi_password": "",
            "ipmi_privilege": "2",
            "ipmi_username": "",
            "lastaccess": "0",
            "maintenance_from": "0",
            "maintenance_status": "0",
            "maintenance_type": "0",
            "maintenanceid": "0",
            "name": "Linux by Zabbix agent",
            "proxy_address": "",
            "proxy_hostid": "0",
            "status": "3",
            "templateid": "10001",
            "tls_accept": "1",
            "tls_connect": "1",
            "tls_issuer": "",
            "tls_psk": "",
            "tls_psk_identity": "",
            "tls_subject": "",
            "uuid": "f8f7908280354f2abeed07dc788c3747"
        }
- 获取主机组
https://www.zabbix.com/documentation/6.0/zh/manual/api/reference/hostgroup/get
method:hostgroup.get
params:
{
  "filter":{
    "name":"Linux servers"
  }
}
{
    "jsonrpc": "2.0",
    "error": {
        "code": 0,
        "message": "",
        "data": ""
    },
    "result": [
        {
            "flags": "0",
            "groupid": "2",
            "internal": "0",
            "name": "Linux servers",
            "uuid": "dc579cd7a1a34222933f24f52a68bcd8"
        }
    ],
    "id": 1
}
lld
接口文档
https://www.zabbix.com/documentation/6.0/zh/manual/api/reference/discoveryrule/get
- 自动发现规则
method:discoveryrule.get
params:{}
{
            "allow_traps": "0",
            "authtype": "0",
            "delay": "1h",
            "description": "描述:自动发现监控主机端口",
            "discover": "0",
            "error": "",
            "flags": "1",
            "follow_redirects": "1",
            "headers": [],
            "history": "90d",
            "hostid": "10559",
            "http_proxy": "",
            "interfaceid": "15",
            "inventory_link": "0",
            "ipmi_sensor": "",
            "itemid": "44942",
            "jmx_endpoint": "",
            "key_": "net.port.discovery",
            "lifetime": "30d",
            "logtimefmt": "",
            "master_itemid": "0",
            "name": "自动发现服务端口",
            "parameters": [],
            "params": "",
            "password": "",
            "post_type": "0",
            "posts": "",
            "privatekey": "",
            "publickey": "",
            "query_fields": [],
            "request_method": "0",
            "retrieve_mode": "0",
            "snmp_oid": "",
            "ssl_cert_file": "",
            "ssl_key_file": "",
            "ssl_key_password": "",
            "state": "0",
            "status": "0",
            "status_codes": "200",
            "templateid": "0",
            "timeout": "3s",
            "trapper_hosts": "",
            "trends": "0",
            "type": "0",
            "units": "",
            "url": "",
            "username": "",
            "uuid": "",
            "value_type": "4",
            "valuemapid": "0",
            "verify_host": "0",
            "verify_peer": "0"
        }
接口文档
https://www.zabbix.com/documentation/6.0/zh/manual/api/reference/itemprototype/get
- 监控项原型
method:itemprototype.get
params:{“discoveryids”: “44942”}
此处的discoveryids,就是如上的"itemid": “44942”
{
            "allow_traps": "0",
            "authtype": "0",
            "delay": "1h",
            "description": "",
            "discover": "0",
            "evaltype": "0",
            "flags": "2",
            "follow_redirects": "1",
            "formula": "",
            "headers": [],
            "history": "90d",
            "hostid": "10559",
            "http_proxy": "",
            "interfaceid": "15",
            "inventory_link": "0",
            "ipmi_sensor": "",
            "itemid": "44943",
            "jmx_endpoint": "",
            "key_": "net.tcp.port[,\"{#PORTNAME}\"]",
            "lifetime": "30d",
            "logtimefmt": "",
            "master_itemid": "0",
            "name": "监控端口\"{#PORTNAME}\"状态是否可以访问",
            "output_format": "0",
            "parameters": [],
            "params": "",
            "password": "",
            "post_type": "0",
            "posts": "",
            "privatekey": "",
            "publickey": "",
            "query_fields": [],
            "request_method": "0",
            "retrieve_mode": "0",
            "snmp_oid": "",
            "ssl_cert_file": "",
            "ssl_key_file": "",
            "ssl_key_password": "",
            "status": "0",
            "status_codes": "200",
            "templateid": "0",
            "timeout": "3s",
            "trapper_hosts": "",
            "trends": "365d",
            "type": "0",
            "units": "",
            "url": "",
            "username": "",
            "uuid": "",
            "value_type": "3",
            "valuemapid": "0",
            "verify_host": "0",
            "verify_peer": "0"
        }
网络发现
https://www.zabbix.com/documentation/6.0/zh/manual/discovery/network_discovery
宏
支持的宏列表
https://www.zabbix.com/documentation/6.0/zh/manual/appendix/macros/supported_by_location
snmp监控
https://www.zabbix.com/documentation/6.0/zh/manual/config/items/itemtypes/snmp#configuring-snmp-monitoring
说明
端口
TCP/UDP 端口。默认端口: Zabbix agent 是 10050, SNMP agent 是 161, JMX 是 12345,IPMI 是 623
zabbix_server.conf配置文件参数说明
https://www.zabbix.com/documentation/6.0/zh/manual/appendix/config/zabbix_server
监控项
队列
管理-》队列
待刷新数据的监控项
内部监控项zabbix[queue,,]可以用于监控ZABBIX中队列的健康状态。他会返回指定时间区间的监控项数目
批量更新
多选监控项-》底部批量更新
自定义插件脚本监控
https//www.zabbix.com/documentation/6.0/zh/manual/discovery/low_level_discovery/examples/prometheus
本机测试监控项
zabbix_agent2 -t net.port.discovery
重新健在配置文件
sudo zabbix_agent2 -R userparameter_reload
prometheus
prometheus 自动发现预处理 https://www.zabbix.com/documentation/6.0/zh/manual/discovery/low_level_discovery/examples/prometheus
问题确认
https://www.zabbix.com/documentation/6.0/zh/manual/acknowledges
正则
sdfjiodfji:(.*) \1 https://www.zabbix.com/documentation/6.0/zh/manual/regular_expressions#example监控项预处理
JSONPATH官方文档: https://www.zabbix.com/documentation/6.0/zh/manual/config/items/preprocessing/jsonpath_functionality
python读取json解析监控案例: https://blog.csdn.net/weixin_39027047/article/details/124905806
监控日志:
- zabbix agent 主动模式
- log[/var/log/syslog,err]
ssh agent
- 键值:ssh.run[,1314,]
- 已执行的脚本 w
telnet 客户端
https://www.zabbix.com/documentation/6.0/zh/manual/config/items/itemtypes/telnet_checks
插件
常见监控插件
https://www.zabbix.com/documentation/6.0/zh/manual/config/items/plugins
开发插件过程
https://www.zabbix.com/documentation/6.0/zh/manual/config/items/plugins/build
net.tcp.port go语言监控源码
https://git.zabbix.com/projects/ZBX/repos/zabbix/browse/src/go/plugins/net/tcp/tcp.go
从 Zabbix 6.0.0 开始,插件不必直接集成到agent2 中,并且可以作为单独的外部插件添加,从而使得创建额外的插件来收集新的监控指标更加容易。
https://www.zabbix.com/documentation/6.0/zh/manual/config/items/itemtypes/external
插件基于go实现开发指南
https://www.zabbix.com/documentation/guidelines/en/plugins
各应用软件插件
https://www.zabbix.com/documentation/6.0/zh/manual/appendix/config/zabbix_agent2_plugins
zabbix_agent2 -t docker.containers.discovery
docker.containers.discovery                   [s|[{"{#ID}":"63924a2cfc2784cf4a07e57902ac57b71241a7e53c1502b7ef6ce70d041913c9","{#NAME}":"/nginx"},{"{#ID}":"b87815deda95768c563dbda6d1d81b13d32798e534adf91b485990901d973f8b","{#NAME}":"/zabbix1"},{"{#ID}":"206d7509833317b1fd2fd02b0beefb841eb9640103a60db883737e4e8ea11033","{#NAME}":"/sad_yonath"},{"{#ID}":"ec5011dc13b8281ce21d82449be7f320e73bc77fe8984043cb413f466d490cd3","{#NAME}":"/mysql"}]]
外部检查 插件
不要过度使用外部检查,创建进程会降低zabbix性能
script[,,…]
键值ls.sh[-a]
键值 check.sh
测试
问题
/usr/lib/zabbix/externalscripts/ls: [2] No such file or directory
vi /usr/lib/zabbix/externalscripts/check.sh
ls&&w
chown zabbix:zabbix check.sh
chmod 777 check.sh
zabbix采集器
文档:https://www.zabbix.com/documentation/6.0/zh/manual/config/items/itemtypes/trapper
类型:Zabbix采集器
键值:trap
失败
zabbix_sender -z 127.0.0.1 -p 10051 -s "bzy2c8nnb0dtlnbi" -k trap -o "test value"
Response from "127.0.0.1:10051": "processed: 0; failed: 1; total: 1; seconds spent: 0.000043"
sent: 1; skipped: 0; total: 1
成功
[root@b87815deda95 externalscripts]# zabbix_sender -z 127.0.0.1 -p 10051 -s "bzy2c8nnb0dtlnbi" -k trap -o "test value"
Response from "127.0.0.1:10051": "processed: 1; failed: 0; total: 1; seconds spent: 0.000078"
sent: 1; skipped: 0; total: 1
相关项目-监控子集
名称:zabbix采集器-trap-从属监控项
类型:相关项目
键值:test 自定义
主要项:选择 xx:zabbix trap 自动接收采集器
- 进程
预定义步骤
javascript
参数
var out = JSON.parse(value)
return out.a
智能监控预测磁盘空间
- vfs.fs.size[/,free]
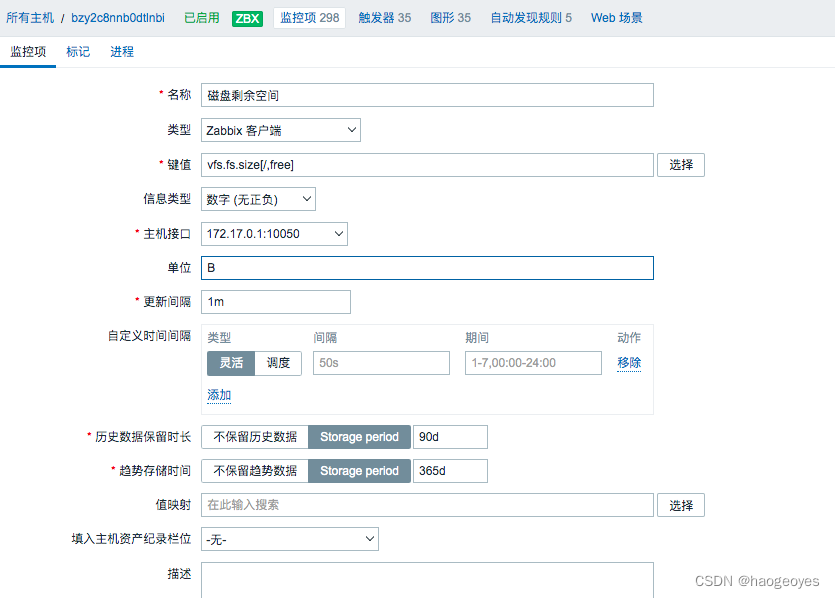
触发器
磁盘剩余空间-机器学习预测磁盘空间剩余使用时间小于1小时为0
timeleft(/bzy2c8nnb0dtlnbi/vfs.fs.size[/,free],1h,0)<1h and timeleft(/bzy2c8nnb0dtlnbi/vfs.fs.size[/,free],1h,0)<>-1

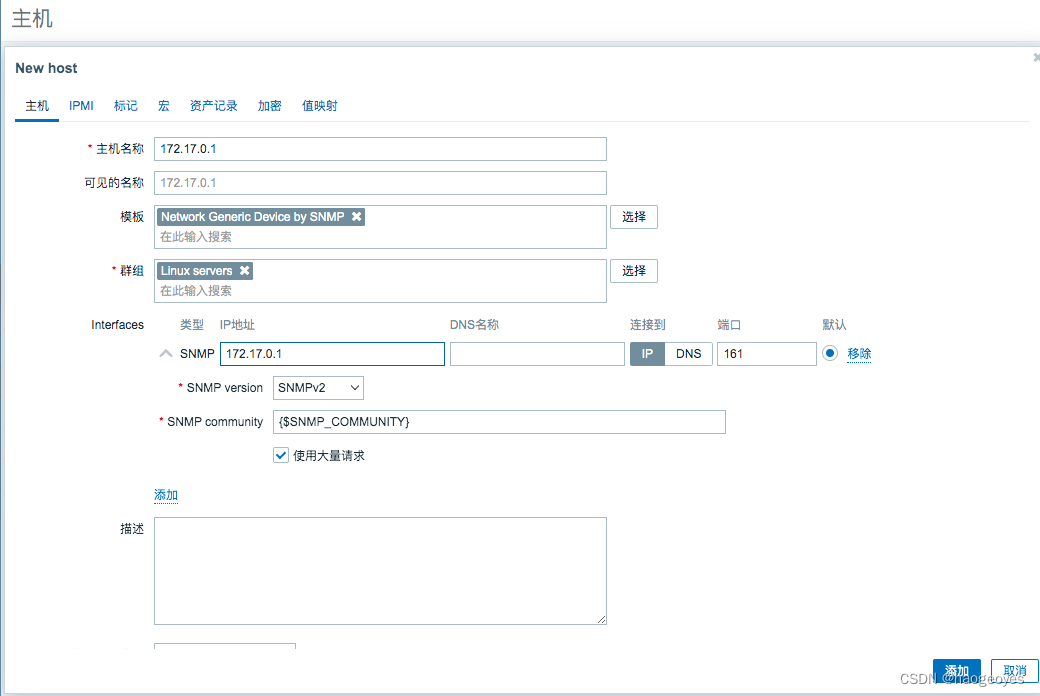
snmp
- linux安装snmp工具 yum -y install net-snmp-utils
- snmp agent安装 yum -y install net-snmp
- snmpwalk -v 2c -c public 127.0.0.1 | more
- 端口 161 162
配置
 vi /etc/snmp/snmpd.conf
 [root@bzy2c8nnb0dtlnbi ~]# vi /etc/snmp/snmpd.conf
[root@bzy2c8nnb0dtlnbi ~]# systemctl status snmpd
● snmpd.service - Simple Network Management Protocol (SNMP) Daemon.
   Loaded: loaded (/usr/lib/systemd/system/snmpd.service; disabled; vendor preset: disabled)
   Active: inactive (dead)
[root@bzy2c8nnb0dtlnbi ~]# systemctl start snmpd
[root@bzy2c8nnb0dtlnbi ~]# systemctl status snmpd
● snmpd.service - Simple Network Management Protocol (SNMP) Daemon.
   Loaded: loaded (/usr/lib/systemd/system/snmpd.service; disabled; vendor preset: disabled)
   Active: active (running) since 三 2023-03-22 13:45:08 CST; 2s ago
检查端口netstat -tulnp | grep 161
snmpwalk -v 2c -c public 127.0.0.1 | more
SNMPv2-MIB::sysDescr.0 = STRING: Linux bzy2c8nnb0dtlnbi 3.10.0-957.el7.x86_64 #1 SMP Thu Nov 8 23:39:32 UTC 2018 x86_64
SNMPv2-MIB::sysObjectID.0 = OID: NET-SNMP-MIB::netSnmpAgentOIDs.10
DISMAN-EVENT-MIB::sysUpTimeInstance = Timeticks: (23131) 0:03:51.31
SNMPv2-MIB::sysContact.0 = STRING: Root <root@localhost> (configure /etc/snmp/snmp.local.conf)
SNMPv2-MIB::sysName.0 = STRING: bzy2c8nnb0dtlnbi
SNMPv2-MIB::sysLocation.0 = STRING: Unknown (edit /etc/snmp/snmpd.conf)
SNMPv2-MIB::sysORLastChange.0 = Timeticks: (4) 0:00:00.04
SNMPv2-MIB::sysORID.1 = OID: SNMP-MPD-MIB::snmpMPDCompliance
SNMPv2-MIB::sysORID.2 = OID: SNMP-USER-BASED-SM-MIB::usmMIBCompliance
SNMPv2-MIB::sysORID.3 = OID: SNMP-FRAMEWORK-MIB::snmpFrameworkMIBCompliance
SNMPv2-MIB::sysORID.4 = OID: SNMPv2-MIB::snmpMIB
SNMPv2-MIB::sysORID.5 = OID: TCP-MIB::tcpMIB
SNMPv2-MIB::sysORID.6 = OID: IP-MIB::ip
SNMPv2-MIB::sysORID.7 = OID: UDP-MIB::udpMIB
SNMPv2-MIB::sysORID.8 = OID: SNMP-VIEW-BASED-ACM-MIB::vacmBasicGroup
SNMPv2-MIB::sysORID.9 = OID: SNMP-NOTIFICATION-MIB::snmpNotifyFullCompliance
SNMPv2-MIB::sysORID.10 = OID: NOTIFICATION-LOG-MIB::notificationLogMIB
SNMPv2-MIB::sysORDescr.1 = STRING: The MIB for Message Processing and Dispatching.
SNMPv2-MIB::sysORDescr.2 = STRING: The management information definitions for the SNMP User-based Security Model.
SNMPv2-MIB::sysORDescr.3 = STRING: The SNMP Management Architecture MIB.
SNMPv2-MIB::sysORDescr.4 = STRING: The MIB module for SNMPv2 entities
SNMPv2-MIB::sysORDescr.5 = STRING: The MIB module for managing TCP implementations
SNMPv2-MIB::sysORDescr.6 = STRING: The MIB module for managing IP and ICMP implementations
SNMPv2-MIB::sysORDescr.7 = STRING: The MIB module for managing UDP implementations
SNMPv2-MIB::sysORDescr.8 = STRING: View-based Access Control Model for SNMP.
SNMPv2-MIB::sysORDescr.9 = STRING: The MIB modules for managing SNMP Notification, plus filtering.
SNMPv2-MIB::sysORDescr.10 = STRING: The MIB module for logging SNMP Notifications.
SNMPv2-MIB::sysORUpTime.1 = Timeticks: (4) 0:00:00.04
SNMPv2-MIB::sysORUpTime.2 = Timeticks: (4) 0:00:00.04
SNMPv2-MIB::sysORUpTime.3 = Timeticks: (4) 0:00:00.04
SNMPv2-MIB::sysORUpTime.4 = Timeticks: (4) 0:00:00.04
SNMPv2-MIB::sysORUpTime.5 = Timeticks: (4) 0:00:00.04
SNMPv2-MIB::sysORUpTime.6 = Timeticks: (4) 0:00:00.04
SNMPv2-MIB::sysORUpTime.7 = Timeticks: (4) 0:00:00.04
SNMPv2-MIB::sysORUpTime.8 = Timeticks: (4) 0:00:00.04
SNMPv2-MIB::sysORUpTime.9 = Timeticks: (4) 0:00:00.04
SNMPv2-MIB::sysORUpTime.10 = Timeticks: (4) 0:00:00.04
HOST-RESOURCES-MIB::hrSystemUptime.0 = Timeticks: (1536894080) 177 days, 21:09:00.80
HOST-RESOURCES-MIB::hrSystemUptime.0 = No more variables left in this MIB View (It is past the end of the MIB tree)
获取oid
snmpget -v 2c -c public -On 127.0.0.1 SNMPv2-MIB::sysORID.4
返回:
.1.3.6.1.2.1.1.9.1.2.4 = OID: .1.3.6.1.6.3.1
宏定义
lld 低级别自动发现
net.if.discovery
vfs.dev.discovery
概念
一般用户宏 {$MAX}
LLD宏 {#FSNAME}
6 新增 表达式宏 {?avg(/zabbix001/system.cpu.util[,idle],1m)}
全局宏 :管理-》一般-》宏
模版宏:配置-》模版-》选择模版-》宏
主机宏:配置-》主机-》宏
监控项
宿主机监控docker
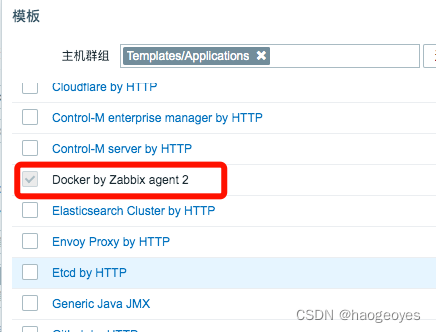
添加后docker 访问没有权限修改
修改为root 启动
/usr/lib/systemd/system/zabbix-agent2.service
监控日志
自定义插件方式
grep `date +%Y-%m-%d` ~/src/python/dabai/django/app/static/log/token.log | grep job | wc -l

vi /etc/zabbix/zabbix_agent2.d/web.conf
UserParameter=check.djangolog,grep `date +%Y-%m-%d` /root/src/python/dabai/django/app/static/log/token.log | grep job | wc -l
systemctl restart zabbix-agent2
无权限的问题修改为root
[root@bzy2c8nnb0dtlnbi ~]# vi /usr/lib/systemd/system/zabbix-agent2.service
user root
group root
[root@bzy2c8nnb0dtlnbi ~]# systemctl restart zabbix-agent2
Warning: zabbix-agent2.service changed on disk. Run 'systemctl daemon-reload' to reload units.
[root@bzy2c8nnb0dtlnbi ~]# systemctl daemon-reload
[root@bzy2c8nnb0dtlnbi ~]# systemctl restart zabbix-agent2

测试:
页面添加 测试
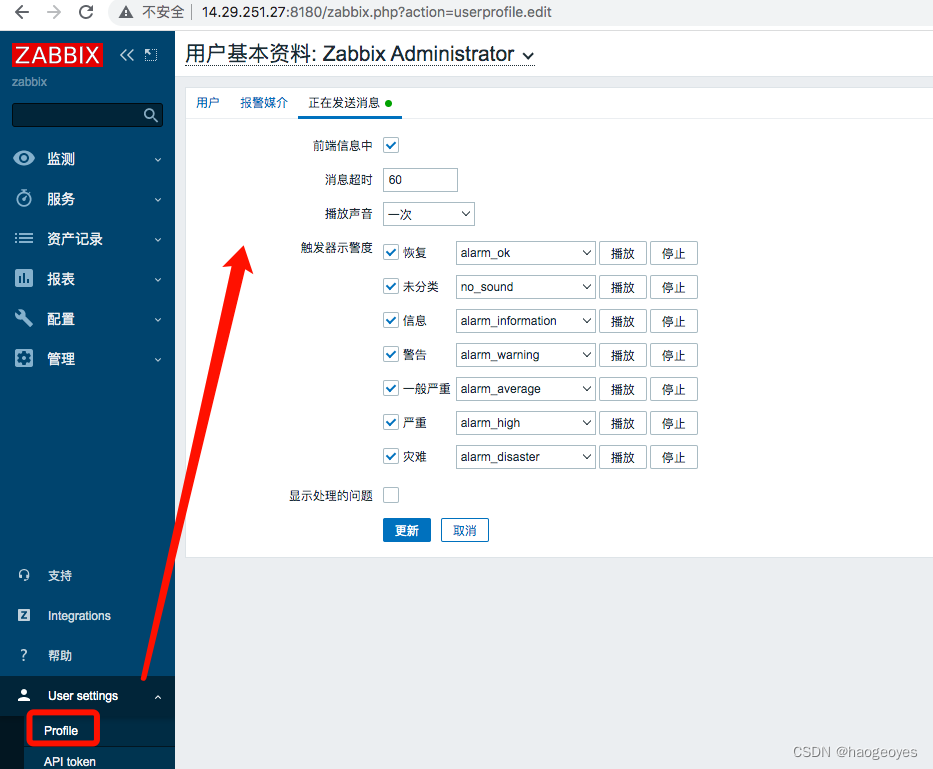
配置告警声音
⭐️ 自定义监控
1️⃣脚本获取值
2️⃣ zbx格式,配置文件、创建键值: 键值key获取客户端数据
3️⃣ 重启客户端,服务端测试键值可用
4️⃣ web键值关联
监控脚本插件
[root@bzy2c8nnb0dtlnbi plugins.d]# grep -i include= /etc/zabbix/zabbix_agent2.conf
# Include=
Include=/etc/zabbix/zabbix_agent2.d/*.conf
# Include=/usr/local/etc/zabbix_agent2.userparams.conf
# Include=/usr/local/etc/zabbix_agent2.conf.d/
# Include=/usr/local/etc/zabbix_agent2.conf.d/*.conf
Include=./zabbix_agent2.d/plugins.d/*.conf
编写:
vi /etc/zabbix/zabbix_agent2.d/web.conf
#UserParameter=key,cmd
#UserParameter=check.django,ps -ef | grep /usr/local/bin/python3 | grep 80 | wc -l
UserParameter=check.django,ss -lntup| grep -w *:80  | wc -l
重启客户端
systemctl restart zabbix-agent2
客户端本地测试
[root@bzy2c8nnb0dtlnbi zabbix_agent2.d]# zabbix_agent2 -t check.django
check.django                                  [s|3]
agent 监控项

Server=192.168.3.101 #被动模式,指定zabbix-server服务端的ip地址,多个ip的话使用逗号分隔
ServerActive=192.168.3.101 #主动模式,指定zabbix-server的ip地址,使用逗号分隔多IP,如果注释这个选项,那么当前服务器的主动监控就被禁用了
Hostname=itops-server #当使用主动模式时,这个名称的设置必须与zabbix-web监控页面创建的主机名称保持一致
修改完后重启zabbix agent使服务生效
service zabbix_agent restart
配置
zbx 不绿,客户端配置server 是否配置,本地10050端口是否启动

制作镜像
docker commit -m 'zabbix6.0登录' -a="haogeoyes" zabbix1 zabbix:v1
问题
登录语言
参考文档
Locale for language “en_US” is not found on the web server. Tried to set: en_US, en_US.utf8,
语言选择:
You are not able to choose some of the languages, because locales for them are not installed on the web server.
配置中文:
dnf install langpacks-zh_CN.noarch
dnf install glibc-common
locale -a | grep zh_CN
字体设置

scp /Library/Fonts/Songti.ttc   root@xx:/tmp
cp /tmp/Songti.ttc /root/zabbix/
cd /usr/share/zabbix/assets/fonts/
mv graphfont.ttf  graphfontbak.ttf
cp /root/zabbix/Songti.ttc
mv Songti.ttc  graphfont.ttf
zabbix 启动未就绪
查看日志 /var/log/zabbix/zabbix_server.log
"vm.memory.size[total]" on host "Zabbix server" failed: first network
centos8 安装zabbix6.0
docker pull centos:centos8
6.0 centos8 官方安装文档
docker run --name zabbix1 -t -d -p 8100-8199:8100-8199 -v /root/zabbix:/root/zabbix --privileged=true centos:centos8 /usr/sbin/init
7000-8000:7000-8000
yum 安装
rpm -Uvh https://repo.zabbix.com/zabbix/6.0/rhel/8/x86_64/zabbix-release-6.0-4.el8.noarch.rpm

curl -o /etc/yum.repos.d/CentOS-Base.repo https://mirrors.aliyun.com/repo/Centos-8.repo

mv *repo /bak/

dnf install zabbix-server-mysql zabbix-web-mysql zabbix-nginx-conf zabbix-sql-scripts zabbix-selinux-policy zabbix-agent

不行,需要使用官方源
vi /etc/yum.repos.d/mariadb.repo
[mariadb]
name = MariaDB
baseurl = http://mirrors.aliyun.com/mariadb/yum/10.5/centos8-amd64/
gpgkey = http://mirrors.aliyun.com/mariadb/yum/RPM-GPG-KEY-MariaDb
gpgcheck = 1
enabled = 1

官方源
[mariadb]
name = MariaDB
baseurl = http://yum.mariadb.org/10.5/centos8-amd64
module_hotfixes=1
gpgkey=https://yum.mariadb.org/RPM-GPG-KEY-MariaDB
gpgcheck=1

[root@b87815deda95 yum.repos.d]# systemctl start mariadb
[root@b87815deda95 yum.repos.d]# systemctl enable mariadb
Created symlink /etc/systemd/system/multi-user.target.wants/mariadb.service → /usr/lib/systemd/system/mariadb.service.
[root@b87815deda95 yum.repos.d]# mysql -u root -p
Enter password:
Welcome to the MariaDB monitor.  Commands end with ; or \g.
Your MariaDB connection id is 3
Server version: 10.5.19-MariaDB MariaDB Server

Copyright (c) 2000, 2018, Oracle, MariaDB Corporation Ab and others.

Type 'help;' or '\h' for help. Type '\c' to clear the current input statement.

MariaDB [(none)]> create database zabbix character set utf8mb4 collate utf8mb4_bin;
Query OK, 1 row affected (0.000 sec)

MariaDB [(none)]> create user zabbix@localhost identified by 'zabbix';
Query OK, 0 rows affected (0.000 sec)

MariaDB [(none)]> grant all privileges on zabbix.* to zabbix@localhost;
Query OK, 0 rows affected (0.000 sec)

MariaDB [(none)]> set global log_bin_trust_function_creators = 1;
Query OK, 0 rows affected (0.000 sec)

MariaDB [(none)]> quit;
Bye
[root@b87815deda95 yum.repos.d]# ls /usr/share/zabbix-sql-scripts/mysql/server.sql.gz
/usr/share/zabbix-sql-scripts/mysql/server.sql.gz
[root@b87815deda95 yum.repos.d]# zcat /usr/share/zabbix-sql-scripts/mysql/server.sql.gz | mysql --default-character-set=utf8mb4 -uzabbix -p zabbix
Enter password:


[root@b87815deda95 yum.repos.d]# mysql -uroot -p
MariaDB [(none)]> set global log_bin_trust_function_creators = 0;
Query OK, 0 rows affected (0.000 sec)

MariaDB [(none)]> quit;
修改 /etc/zabbix/zabbix_server.conf
vi /etc/zabbix/zabbix_server.conf
DBPassword=zabbix
修改 /etc/nginx/conf.d/zabbix.conf
listen 8180;
server_name zabbix;
启动
systemctl restart zabbix-server zabbix-agent nginx php-fpm
systemctl enable zabbix-server zabbix-agent nginx php-fpm
页面初始化 http://14.29.251.xx:8180/
web登录默认用户名 Admin 密码 zabbix
清理缓存参考
更新缓存
dnf clean all
dnf makecache
dnf repolist

dnf search mariadb
查看版本
dnf search mariadb-server --showduplicates  --disablerepo=AppStream
dnf -y install MariaDB-server-debuginfo-10.5.17-1.el8.x86_64


rpm -qa | grep -i mariadb
systemctl enable mariadb
systemctl start mariadb
从新部署
http://mirrors.aliyun.com/
阿里yum源检索
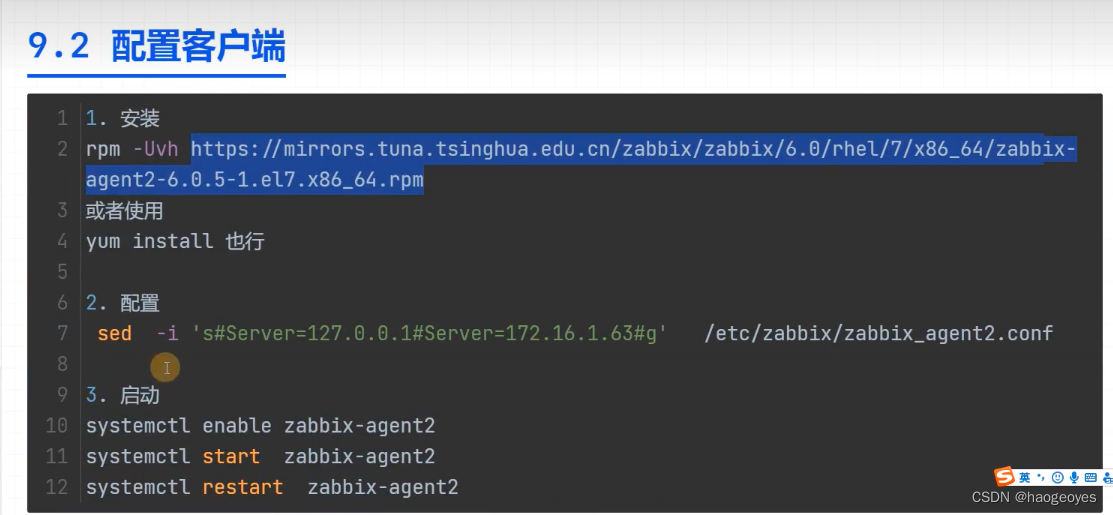
zabbix 6.0在centos7里只能按客户端
nginx.repo
[nginx-stable]
name=nginx stable repo
baseurl=http://nginx.org/packages/centos/
r
e
l
e
a
s
e
v
e
r
/
releasever/
releasever/basearch/
gpgcheck=1
enabled=1
gpgkey=https://nginx.org/keys/nginx_signing.key
module_hotfixes=true
curl -o /etc/yum.repos.d/CentOS-Base.repo http://mirrors.aliyun.com/repo/Centos-7.repo
yum install epel-release.noarch -y
curl -o /etc/yum.repos.d/epel.repo http://mirrors.aliyun.com/repo/epel-7.repo
rpm -Uvh https://mirror.webtatic.com/yum/el7/webtatic-release.rpm
yum install php72w-cli php72w-fpm php72w-gd php72w-mbstring php72w-bcmath php72w-xml php72w-ldap php72w-mysqlnd
yum install -y nginx
rpm -qa | egrep ‘nginx|php’
rpm -qa | egrep ‘nginx|php’ | wc -l
11
配置
vi /etc/nginx/conf.d/nginx.conf
server {
listen 80;
server_name nginx;
root /root/zabbix;
location / {
index index.php;
}
location ~ .php$ {
fastcgi_pass 127.0.0.1:9000;
fastcgi_index index.php;
#fastcgi_param SCRIPT_FILENAME /app/code/zbx$fastcgi_script_name;
fastcgi_param SCRIPT_FILENAME
d
o
c
u
m
e
n
t
r
o
o
t
document_root
documentrootfastcgi_script_name;
include fastcgi_params;
}
}
修改php配置
匹配 user/group开头的apache替换为nginx
sed -ri ‘/^(user|group)/s#apache#nginx#g’ /etc/php-fpm.d/www.conf
egrep ‘^(user|group)’ /etc/php-fpm.d/www.conf
/root/zabbix/info.php
<?php phpinfo(); ?>systemctl start nginx php-fpm
systemctl enable nginx php-fpm
访问测试
http://xx/info.php
curl http://127.0.0.1/info.php
工具测试
yum provides */netstat
报错nginx 403
检查日志
检查日志
/var/log/nginx/error.log
023/03/18 00:02:04 [error] 1413#1413: *1 open() “/root/zabbix/favicon.ico” failed (13: Permission denied), client: 125.121.41.124, server: nginx, request: “GET /faviconn
.ico HTTP/1.1”, host: “14.29.251.27:8051”, referrer: “http://14.29.251.27:8051/info.php”
增加权限xxx
注意:修改权限为root
vi /etc/nginx/nginx.conf
user root
报错
File not found.
部署数据库
zabbix 6.0 不支持mariadb 5.5 默认源10.5以上
马瑞亚db
配置源
vi /etc/yum.repos.d/mariadb.repo
[mariadb]
name = MariaDB
baseurl = http://mirrors.aliyun.com/mariadb/yum/10.5/centos7-amd64/
gpgkey = http://mirrors.aliyun.com/mariadb/yum/RPM-GPG-KEY-MariaDb
gpgcheck = 1
enabled = 1
yum install mariadb-server -y
rpm -qa | grep -i mariadb
systemctl enable mariadb
systemctl start mariadb
配置
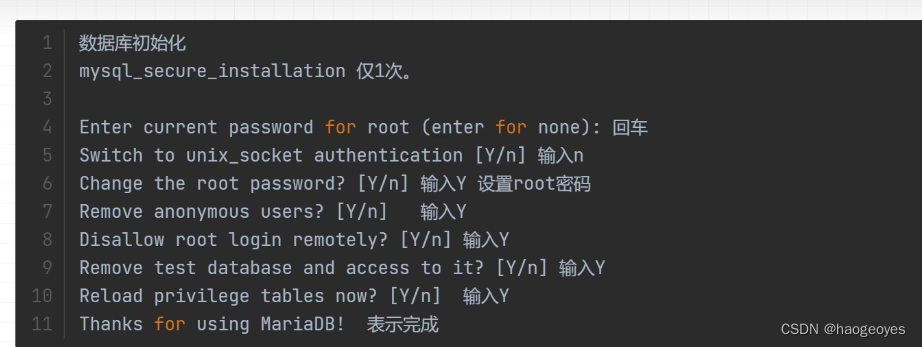
数据库初始化
mysql_secure_installation
回车
n
其他全y
修改密码 root
创建用户
- 指定字符集中文乱码
create database zabbix charset utf8 collate utf8_bin; - 创建用户密码zabbix
grant all on zabbix.* to ‘zabbix’@‘localhost’ identified by ‘zabbix’;
授权其他地址
grant all on zabbix.* to ‘zabbix’@‘xx.xx.xx.%’ identified by ‘zabbix’;
向数据库导入数据
⚠️ 导入顺序
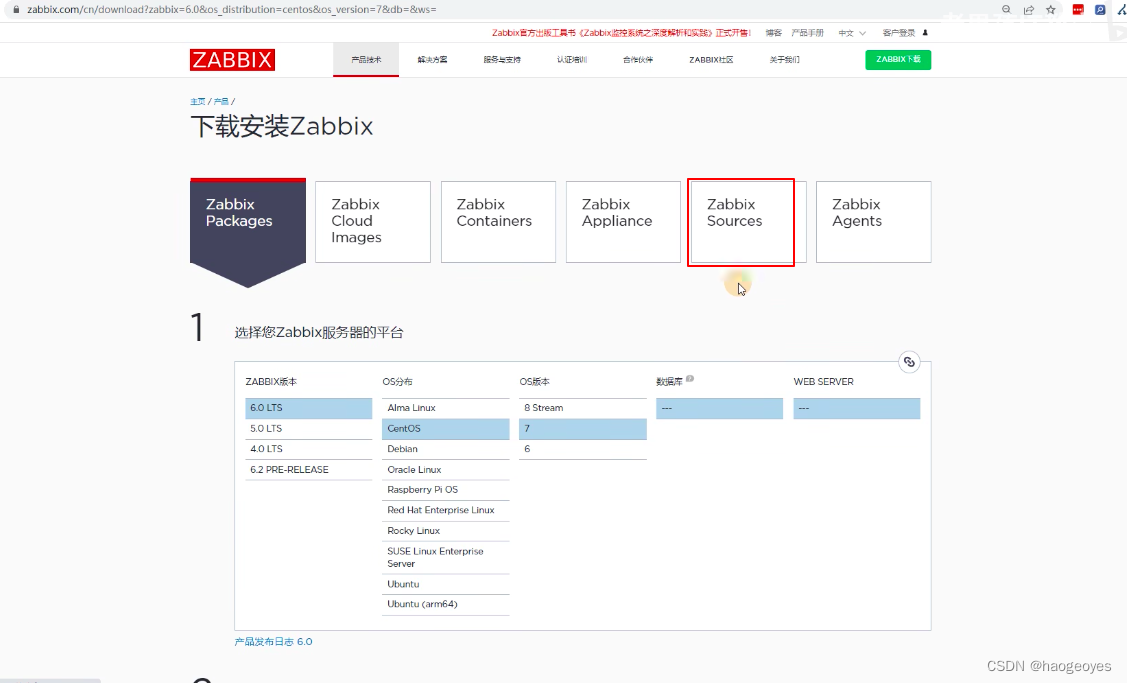

下载源码
https://www.zabbix.com/download_sources#60LTS
curl -O https://cdn.zabbix.com/zabbix/sources/stable/6.0/zabbix-6.0.14.tar.gz zabbix-6.0.14.tar.gz
tar zxvf  zabbix-6.0.14.tar.gz
cd zabbix-6.0.14/database/mysql/
[root@857cd8bba2b3 mysql]# ls
Makefile.am  Makefile.in  data.sql  double.sql  history_pk_prepare.sql  images.sql  schema.sql
[root@857cd8bba2b3 mysql]# mysql -uroot -proot zabbix < schema.sql
[root@857cd8bba2b3 mysql]# mysql -uroot -proot zabbix < images.sql
[root@857cd8bba2b3 mysql]# mysql -uroot -proot zabbix < data.sql
[root@857cd8bba2b3 mysql]# mysql -uroot -proot zabbix < double.sql
[root@857cd8bba2b3 mysql]# mysql -uroot -proot zabbix < history_pk_prepare.sql
编译安装
cd zabbix*
yum install -y mysql-devel pcre-devel openssl-devel zlib-devel libxml2-devel net-snmp-devel net-snmp libssh2-devel OpenIPMI-devel libevent-devel openldap-devel libcurl-devel

./configure
make install


./configure  --sysconfdir=/etc/zabbix/ --enable-server --with-mysql --with-net-snmp --with-libxml2 --with-libxml2 --with-ssh2 --with-openipmi --with-zlib --with-libpthread --with-libevent --with-openssl --with-ldap --with-libcurl --with-libpcre

make install
echo $?
- 报错 configure: error: no acceptable C compiler found in $PATH
yum -y install gcc.x86_64
./configure  默认/usr/local下
--sysconfdir=/etc/zabbix/  指定配置文件目录
--enable-server  安装服务端 -client
--with-mysql  开启对mysql的支持
依赖功能
--with-net-snmp --with-libxml2 --with-libxml2 --with-ssh2 --with-openimpi --with-zlib --with-libpthread --with-libevent --with-openssl --with-ldap --with-libcurl --with-libpcre
Configuration:

  Detected OS:           linux-gnu
  Install path:          /usr/local
  Compilation arch:      linux

  Compiler:              cc
  Compiler flags:         -g -O2

  Library-specific flags:
    database:              -I/usr/include/mysql -I/usr/include/mysql/mysql
    libpcre:
    libXML2:               -I/usr/include/libxml2
    Net-SNMP:               -I/usr/local/include -I/usr/lib64/perl5/CORE -I. -I/usr/include
    OpenIPMI:              -I/usr/include
    libssh2:               -I/usr/include
    TLS:                   -I/usr/include
    LDAP:                  -I/usr/include
    libevent:              -I/usr/include

  Enable server:         yes
  Server details:
    With database:         MySQL
    WEB Monitoring:        cURL
      SSL certificates:      /usr/local/share/zabbix/ssl/certs
      SSL keys:              /usr/local/share/zabbix/ssl/keys
    SNMP:                  yes
    IPMI:                  yes
    SSH:                   yes (libssh2)
    TLS:                   OpenSSL
    ODBC:                  no
    Linker flags:           -L/usr/lib64   -L/usr/lib64/      -L/usr/lib  -L/usr/lib -L/usr/lib -L/usr/lib -L/usr/lib -L/usr/lib -L/usr/lib  -rdynamic
    Libraries:              -lmariadb     -lxml2    -lnetsnmp -lssh2  -lOpenIPMI -lOpenIPMIposix -lz -lpthread -levent -lssl -lcrypto -lldap -llber   -lcurl -lm -ldl  -lresolv -lpcre
    Configuration file:    /etc/zabbix/zabbix_server.conf
    External scripts:      /usr/local/share/zabbix/externalscripts
    Alert scripts:         /usr/local/share/zabbix/alertscripts
    Modules:               /usr/local/lib/modules

  Enable proxy:          no

  Enable agent:          no

  Enable agent 2:        no

  Enable web service:    no

  Enable Java gateway:   no

  LDAP support:          yes
  IPv6 support:          no

***********************************************************
*            Now run 'make install'                       *
*                                                         *
*            Thank you for using Zabbix!                  *
*              <http://www.zabbix.com>                    *
***********************************************************
依赖不通过
[root@857cd8bba2b3 zabbix-6.0.14]# ./configure
checking for a BSD-compatible install... /usr/bin/install -c
checking whether build environment is sane... yes
checking for a thread-safe mkdir -p... /usr/bin/mkdir -p
checking for gawk... gawk
checking whether make sets $(MAKE)... yes
checking whether make supports nested variables... yes
checking how to create a pax tar archive... gnutar
configure: Configuring Zabbix 6.0.14
checking whether make sets $(MAKE)... (cached) yes
checking build system type... x86_64-pc-linux-gnu
checking host system type... x86_64-pc-linux-gnu
checking for cc... no
checking for c99... no
checking for gcc... no
checking for clang... no
configure: error: in `/zabbix/zabbix-6.0.14':
configure: error: no acceptable C compiler found in $PATH
See `config.log' for more details
部署测试
docker 构建
docker-compose.yml
docker-compose up -d
安装zabbix测试
docker run --name zabbix -t -d -p 8051:10051 -p 8001:80   -v /root/zabbix:/root/zabbix --privileged=true centos:7 /usr/sbin/init

docker exec -it zabbix /bin/bash

yum 源
rpm -ivh  https://dl.fedoraproject.org/pub/epel/7/x86_64/Packages/e/epel-release-7-14.noarch.rpm


yum install -y zabbix-server-mysql zabbix-web-mysql zabbix-get zabbix-agent

rpm -ivh http://repo.zabbix.com/zabbix/6.0/rhel/7/x86_64/zabbix-release-6.0-1.el7.noarch.rpm
生成缓存
yum makecache
更新
yum -y update


rpm -ivh http://repo.zabbix.com/zabbix/6.2/rhel/7/x86_64/zabbix-release-6.2-1.el7.noarch.rpm
rpm --import /etc/pki/rpm-gpg/RPM-GPG-KEY-ZABBIX

删除所有zabbix依赖
rpm -e --nodeps `rpm -qa | grep zabbix`

create database zabbix character set utf8mb4 collate utf8mb4_bin;
create user zabbix@'%' identified by 'zabbix';
grant all privileges on zabbix.* to zabbix@'%';
set global log_bin_trust_function_creators = 1;

报错
No package zabbix-server-mysql available
解决
yum install epel-release

报错:
Error downloading packages:
  fping-3.16-1.el7.x86_64: [Errno 256] No more mirrors to try.
解决
安装6.2版本zabbix
mysql 文件挂载?
本机安装
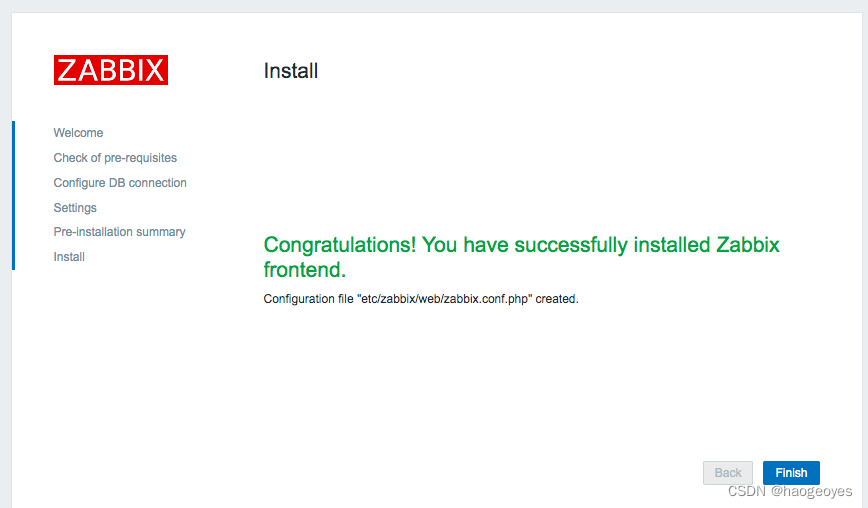
http://14.29.251.27:8889/zabbix/setup.php
报错
Transaction check error:
file /usr/bin/zabbix_get from install of zabbix-get-6.0.14-release1.el7.x86_64 conflicts with file from package zabbix6.0-6.0.13-1.el7.x86_64
rpm -qa | grep zabbix
强制卸载
rpm -e zabbix6.0-6.0.13-1.el7.x86_64 --nodeps
http://:8889/
Minimum required PHP version is 7.2.5.
升级php
]# php -v
PHP 5.4.16 (cli) (built: Apr 1 2020 04:07:17)
删除 yum remove php*
[root@bzy2c8nnb0dtlnbi zabbix]# yum search php7
已加载插件:fastestmirror
Repository base is listed more than once in the configuration
Repository updates is listed more than once in the configuration
Repository extras is listed more than once in the configuration
Repository centosplus is listed more than once in the configuration
Loading mirror speeds from cached hostfile
- base: mirrors.ustc.edu.cn
- epel: mirrors.bfsu.edu.cn
- extras: mirrors.ustc.edu.cn
- updates: ftp.sjtu.edu.cn
警告:没有匹配 php7 的软件包
No matches found
错误:
yum-config-manager
-bash: yum-config-manager: 未找到命令
解决:
[root@bzy2c8nnb0dtlnbi zabbix]# yum -y install yum-utils
加载插件
yum-config-manager --enable remi-php72
不行重整:
yum install epel-release
rpm -Uvh https://mirror.webtatic.com/yum/el7/webtatic-release.rpm
yum search php72w
yum -y install php72w php72w-mysql
没有php命令
sudo yum install epel-release
sudo yum install http://rpms.remirepo.net/enterprise/remi-release-7.rpm
sudo yum install yum-utils
sudo yum-config-manager --enable remi-php72
sudo yum update
sudo yum install php72 php72-php-mysqlnd
php72-mysql
yum install php php-mysql php-mysqlnd --skip-broken
错误:
The requested URL /zabbix/setup.php was not found on this server


 1142
1142


 被折叠的 条评论
为什么被折叠?
被折叠的 条评论
为什么被折叠?
 到【灌水乐园】发言


