


Flume Agent
    Flume Agent的配置被存储在一个本地配置文件,这是一个根据java属性文件格式的文本文件,在这个配置文件中,包括了对source、channel、sink的属性配置,和其相关联形成数据流的配置。
    Flume Agent实时监控端口,收集数据,将其以日志的形式打印在控制台。
    一个source可以分发到多个channel,一个sink取一个channel的数据。
    Flume的开发就是编写配置文件,说白了就是Agent中Source、Channel和Sink的类型及属性。
企业中常用的flume type
source(获取数据源):
    ->exec (文件)
    ->spoolingdir (文件夹)
    ->taildir(文件夹及文件的变动)
    ->kafka
    ->syslog
    ->http
channel(管道):
    ->mem
    ->file
    ->kafka
sink(将channel中的 数据发送到目标地址):
    ->hdfs
    ->hive
    ->hbase
        ->同步
        ->异步
Agent的编写(初级)
案例1:source:hive.log,channel: mem,sink:log
前期工作
拷贝一份conf目录下的文件:cp flume-conf.properties.template hive-men-log.properties
动态查看hive的log:tail -F /opt/cdh-5.3.6/hive-0.13.1-cdh5.3.6/logs/hive.log
-Dflume.root.logger=INFO,console : 日志级别
运行指令
bin/flume-ng agent --conf conf/ --name a1 --conf-file conf/hive-mem-log.properties -Dflume.root.logger=INFO,console- 具体内容
#define a agent

a1.sources = s1
a1.channels = c1
a1.sinks = k1


# define source

a1.sources.s1.type = exec
a1.sources.s1.command = tail -F /opt/cdh-5.3.6/hive-0.13.1-cdh5.3.6/logs/hive.log
a1.sources.s1.shell = /bin/sh -c


# define channel

a1.channels.c1.type = memory
a1.channels.c1.capacity = 100
a1.channels.c1.transactionCapacity = 100


# define sink

a1.sinks.k1.type = logger


#zuhe source sink channel

a1.sources.s1.channels = c1
a1.sinks.k1.channel = c1
案例2:channel:file
前期工作
需要先创建目录在/opt/datas下:mkdir -p flume/datas,mkdir flume/check
    以下两个参数是必须的
a1.channels.c1.dataDirs = /opt/datas/flume/datas
a1.channels.c1.checkpointDir = /opt/datas/flume/check
运行指令
bin/flume-ng agent --conf conf/ --name a1 --conf-file conf/hive-file-log.properties -Dflume.root.logger=INFO,console具体内容
#define a agent

a1.sources = s1
a1.channels = c1
a1.sinks = k1


# define source

a1.sources.s1.type = exec
a1.sources.s1.command = tail -F /opt/cdh-5.3.6/hive-0.13.1-cdh5.3.6/logs/hive.log
a1.sources.s1.shell = /bin/sh -c


# define channel

a1.channels.c1.type = file
a1.channels.c1.dataDirs = /opt/datas/flume/datas
a1.channels.c1.checkpointDir = /opt/datas/flume/check


# define sink

a1.sinks.k1.type = logger


#zuhe source sink channel

a1.sources.s1.channels = c1
a1.sinks.k1.channel = c1
案例3:sink:hdfs
前期工作
案例分析:实时收集数据至HDFS
    此案例实时监控Hive日志文件,放到HDFS目录中。
    实时监控某个日志文件,将数据收集存储到HDFS上。此案例使用EXEC Source,实时监控文件数据,使用Memory Channel缓存数据,使用HDFS Sink写入数据。

a1.sinks.k1.hdfs.path = /flume/event/size
三种配置方式:1.配置全局变量 2.考入配置文件 3.写出HDFS绝对路径

HDFS目录:a1.sinks.k1.hdfs.path = /flume/event
运行指令
bin/flume-ng agent --conf conf/ --name a1 --conf-file conf/hive-mem-hdfs.properties -Dflume.root.logger=INFO,console具体内容
#define a agent

a1.sources = s1
a1.channels = c1
a1.sinks = k1


# define source

a1.sources.s1.type = exec
a1.sources.s1.command = tail -F /opt/cdh-5.3.6/hive-0.13.1-cdh5.3.6/logs/hive.log
a1.sources.s1.shell = /bin/sh -c


# define channel

a1.channels.c1.type = memory
a1.channels.c1.capacity = 100
a1.channels.c1.transactionCapacity = 100


# define sink

a1.sinks.k1.type = hdfs
a1.sinks.k1.hdfs.path = /flume/event
a1.sinks.k1.hdfs.fileType = DataStream


#zuhe source sink channel

a1.sources.s1.channels = c1
a1.sinks.k1.channel = c1
Agent当前存在问题(中级)
关于文件大小,案例4:size
前期工作
# define sink  基于大小,就把基于时间的关闭,设置为0即可

a1.sinks.k1.type = hdfs
a1.sinks.k1.hdfs.path = /flume/event/size
a1.sinks.k1.hdfs.fileType = DataStream
a1.sinks.k1.hdfs.rollSize = 10240
a1.sinks.k1.hdfs.rollInterval = 0
a1.sinks.k1.hdfs.rollCount = 0
运行指令
bin/flume-ng agent --conf conf/ --name a1 --conf-file conf/hive-mem-size.properties -Dflume.root.logger=INFO,console具体内容
#define a agent

a1.sources = s1
a1.channels = c1
a1.sinks = k1


# define source

a1.sources.s1.type = exec
a1.sources.s1.command = tail -F /opt/cdh-5.3.6/hive-0.13.1-cdh5.3.6/logs/hive.log
a1.sources.s1.shell = /bin/sh -c


# define channel

a1.channels.c1.type = memory
a1.channels.c1.capacity = 100
a1.channels.c1.transactionCapacity = 100


# define sink

a1.sinks.k1.type = hdfs
a1.sinks.k1.hdfs.path = /flume/event/size
a1.sinks.k1.hdfs.fileType = DataStream
a1.sinks.k1.hdfs.rollSize = 10240
a1.sinks.k1.hdfs.rollInterval = 0
a1.sinks.k1.hdfs.rollCount = 0


#zuhe source sink channel

a1.sources.s1.channels = c1
a1.sinks.k1.channel = c1
hive分区表与修改文件头部,案例5
hive分区
a1.sinks.k1.hdfs.path = /flume/event/date/date=%Y%m%d/hour=%H%M修改文件头部
a1.sinks.k1.hdfs.filePrefix = hive-log运行指令
bin/flume-ng agent --conf conf/ --name a1 --conf-file conf/hive-mem-part.properties -Dflume.root.logger=INFO,console具体内容
#define a agent

a1.sources = s1
a1.channels = c1
a1.sinks = k1


# define source

a1.sources.s1.type = exec
a1.sources.s1.command = tail -F /opt/cdh-5.3.6/hive-0.13.1-cdh5.3.6/logs/hive.log
a1.sources.s1.shell = /bin/sh -c


# define channel

a1.channels.c1.type = memory
a1.channels.c1.capacity = 100
a1.channels.c1.transactionCapacity = 100


# define sink

a1.sinks.k1.type = hdfs
a1.sinks.k1.hdfs.path = /flume/event/date/date=%Y%m%d/hour=%H%M
a1.sinks.k1.hdfs.fileType = DataStream
a1.sinks.k1.hdfs.rollSize = 10240
a1.sinks.k1.hdfs.rollInterval = 0
a1.sinks.k1.hdfs.rollCount = 0
a1.sinks.k1.hdfs.useLocalTimeStamp = true
a1.sinks.k1.hdfs.filePrefix = hive-log


#zuhe source sink channel

a1.sources.s1.channels = c1
a1.sinks.k1.channel = c1
企业中的日志存储一(高级一)
案例6:source:spoolingdir
前期工作
企业中日志文件的产生如下:
web_log/20161127.log.tmp  ->  20161127.log
            20161128.log.tmp

如何进行数据的采集?exec:监控是一个文件
需求:动态监控文件夹内新文件的生成,并且采集
source:spoolingdir   监控目录

创建目录:/opt/datas/flume/spoodir
运行指令
bin/flume-ng agent --conf conf/ --name a1 --conf-file conf/dir-mem-hdfs.properties -Dflume.root.logger=INFO,console具体内容
#define a agent

a1.sources = s1
a1.channels = c1
a1.sinks = k1


# define source

a1.sources.s1.type = spooldir
a1.sources.s1.spoolDir = /opt/datas/flume/spooldir


# define channel

a1.channels.c1.type = memory
a1.channels.c1.capacity = 100
a1.channels.c1.transactionCapacity = 100


# define sink

a1.sinks.k1.type = hdfs
a1.sinks.k1.hdfs.path = /flume/dir
a1.sinks.k1.hdfs.fileType = DataStream


#zuhe source sink channel

a1.sources.s1.channels = c1
a1.sinks.k1.channel = c1
测试
拷贝一个文件到目录下,运行结束后文件名变为20161202.log.COMPLETED 表示上传完成。
- 优化:忽略以.tmp结尾的文件
#define a agent

a1.sources = s1
a1.channels = c1
a1.sinks = k1


# define source

a1.sources.s1.type = spooldir
a1.sources.s1.spoolDir = /opt/datas/flume/spooldir
a1.sources.s1.ignorePattern = ([^ ]*\.tmp$)


# define channel

a1.channels.c1.type = memory
a1.channels.c1.capacity = 100
a1.channels.c1.transactionCapacity = 100


# define sink

a1.sinks.k1.type = hdfs
a1.sinks.k1.hdfs.path = /flume/dir-ig
a1.sinks.k1.hdfs.fileType = DataStream


#zuhe source sink channel

a1.sources.s1.channels = c1
a1.sinks.k1.channel = c1

企业架构(高级二)
多sink的配置:一个sink对应一个channel
- 具体内容
#define a agent

a1.sources = s1
a1.channels = hdfsc1 hdfsc2
a1.sinks = hdfs1 hdfs2


# define source

a1.sources.s1.type = exec
a1.sources.s1.command = tail -F /opt/cdh-5.3.6/hive-0.13.1-cdh5.3.6/logs/hive.log
a1.sources.s1.shell = /bin/sh -c


# define channel1

a1.channels.hdfsc1.type = file
a1.channels.hdfsc1.dataDirs = /opt/datas/flume/data1
a1.channels.hdfsc1.checkpointDir = /opt/datas/flume/check1


# define channel2

a1.channels.hdfsc2.type = file
a1.channels.hdfsc2.dataDirs = /opt/datas/flume/data2
a1.channels.hdfsc2.checkpointDir = /opt/datas/flume/check2


# define sink1

a1.sinks.hdfs1.type = hdfs
a1.sinks.hdfs1.hdfs.path = /flume/dir1
a1.sinks.hdfs1.hdfs.fileType = DataStream


# define sink2

a1.sinks.hdfs2.type = hdfs
a1.sinks.hdfs2.hdfs.path = /flume/dir2
a1.sinks.hdfs2.hdfs.fileType = DataStream


#zuhe source sink channel

a1.sources.s1.channels = hdfsc1 hdfsc2
a1.sinks.hdfs1.channel = hdfsc1
a1.sinks.hdfs2.channel = hdfsc2
- 具体内容
flume collect
前期工作
avro sink  &  avro source
    agent端配置:收集日志传输给avro source
    collect端配置:收集agent的数据,传递给HDFS sink
配置好avro-collect.properties发送到集群中其他机器
运行指令
主机运行collect:bin/flume-ng agent --conf conf/  --name a1 --conf-file conf/avro-collect.properties -Dflume.root.logger=INFO,console
slave1机器运行agent1: bin/flume-ng agent --conf conf/ --name a1 --conf-file conf/avro-agent.properties -Dflume.root.logger=INFO,console
slave2机器运行agent2: bin/flume-ng agent --conf conf/ --name a1 --conf-file conf/avro-agent.properties -Dflume.root.logger=INFO,console
具体内容:avro-collect.properties
#define a agent

a1.sources = s1
a1.channels = c1
a1.sinks = k1


# define source

a1.sources.s1.type = avro
a1.sources.s1.bind = 192.168.134.191
a1.sources.s1.port = 50505


# define channel

a1.channels.c1.type = memory
a1.channels.c1.capacity = 100
a1.channels.c1.transactionCapacity = 100


# define sink

a1.sinks.k1.type = hdfs
a1.sinks.k1.hdfs.path = /flume/avro
a1.sinks.k1.hdfs.fileType = DataStream


#zuhe source sink channel

a1.sources.s1.channels = c1
a1.sinks.k1.channel = c1
具体内容:avro-agent.properties
#define a agent

a1.sources = s1
a1.channels = c1
a1.sinks = k1


# define source

a1.sources.s1.type = exec
a1.sources.s1.command = tail -F /opt/cdh-5.3.6/hive-0.13.1-cdh5.3.6/logs/hive.log
a1.sources.s1.shell = /bin/sh -c


# define channel

a1.channels.c1.type = memory
a1.channels.c1.capacity = 100
a1.channels.c1.transactionCapacity = 100


# define sink

a1.sinks.k1.type = avro
a1.sinks.k1.hostname = 192.168.134.191
a1.sinks.k1.port = 50505


#zuhe source sink channel

a1.sources.s1.channels = c1
a1.sinks.k1.channel = c1
使用taildir(高级三)
- 关于taildir
- 需求
监控文件的同时要监控文件夹,但是exec,spoolingdir满足不了需求,因此选择使用taildir,这是1.7以后才有的功能,需要手动编译源码。
- 需求
编译完成taildir,GitHub
- 新建一个目录,尽量不包含中文
进入目录,执行
git clone https://github.com/apache/flume.git下载完成,进入flume目录
查看所有版本:git branch -r
查看当前版本:git branch -a
切换版本:git checkout origin/flume-1.7
导入eclipse
jar包替换
-》1.5.0
    1.5.0-cdh5.3.6
-》cdh版本
    添加cdh的maven源
-》建议直接拷贝提供的pom
报错
- 删除overwrite
- 拷贝flume-1.7/core/source/PollableSourceConstants.class到项目中
- 删除overwrite
- 编译Maven
- 将jar包放入flume的lib:flume-taildir-source-1.5.0-cdh5.3.6.jar
实现taildir
前期工作
创建文件:[beifeng@hadoop-senior01 flume]$ echo " " >hadoop10.log
创建目录:[beifeng@hadoop-senior01 flume]$ mkdir hadoop10
运行指令
bin/flume-ng agent --conf conf/ --name a1 --conf-file conf/taildir-mem-log.properties -Dflume.root.logger=INFO,console具体内容
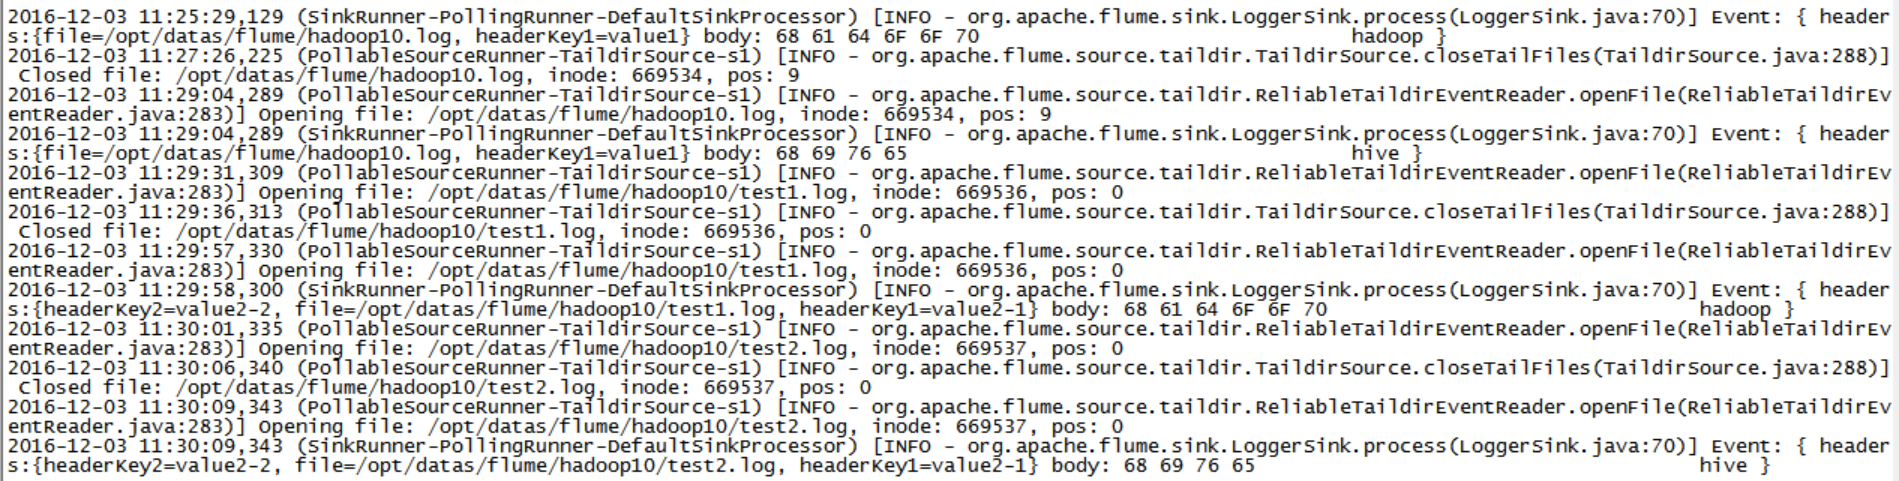
#define a agent

a1.sources = s1
a1.channels = c1
a1.sinks = k1


# define source

a1.sources.s1.type = org.apache.flume.source.taildir.TaildirSource
a1.sources.s1.positionFile = /opt/cdh-5.3.6/flume-1.5.0-cdh5.3.6-bin/position/taildir_position.json
a1.sources.s1.filegroups = f1 f2
a1.sources.s1.filegroups.f1 = /opt/datas/flume/hadoop10.log
a1.sources.s1.headers.f1.headerKey1 = value1
a1.sources.s1.filegroups.f2 = /opt/datas/flume/hadoop10/.*
a1.sources.s1.headers.f2.headerKey1 = value2-1
a1.sources.s1.headers.f2.headerKey2 = value2-2
a1.sources.s1.fileHeader = true


# define channel

a1.channels.c1.type = memory
a1.channels.c1.capacity = 100
a1.channels.c1.transactionCapacity = 100


# define sink

a1.sinks.k1.type = logger


#zuhe source sink channel

a1.sources.s1.channels = c1
a1.sinks.k1.channel = c1
实现效果
测试
控制台显示
taildir_position.json内容


 1472
1472

 被折叠的 条评论
为什么被折叠?
被折叠的 条评论
为什么被折叠?
 到【灌水乐园】发言


