


一.制作环境
PC环境: Red Hat Enterprise Linux 4
嵌入设备CPU体系:s3c2410
交叉工具:arm-linux-
需要的源代码:
BusyBox 1.1.3.tar.bz2 bash-3.2.tar.bz2 sysvinit-2.86.tar.bz2
文件夹路径:
/home/codes/ 存放要编译的代码
/home/rootfs/ 要制作的rootfs
二.移植步骤
1. 移植busybox
(1)解压 BusyBox 1.1.3.tar.bz2 到/home下
(2)修改Makefile文件 设置好交叉编译工具
ARCH ?=arm
CROSS_COMPILE ?=arm-linux-
(3)行make menuconfig,然后进行设置(只是列举关键选项,其他自己选择)
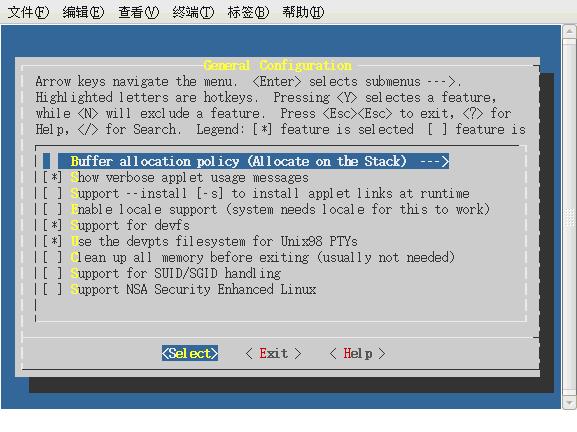
图1
如图1在General Configuration中,一定要选择“Support for devfs”选项,现在的Busybox新版本去掉了这个选项,不过应该可以通过修改配置文件加入。
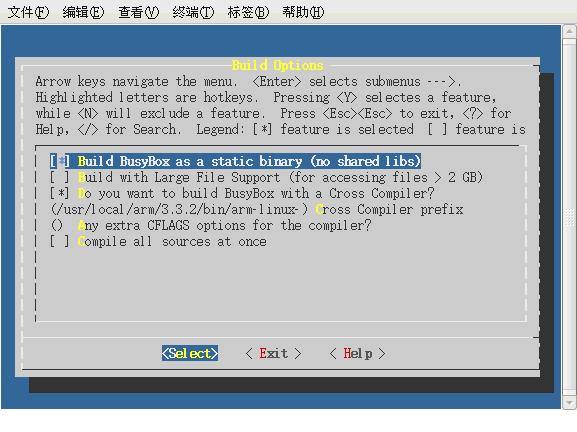
图2
如图2在Build Options选项中,选择使用“静态库”以及设置交叉编译工具的PREFIX。
(实际中可以采用动态库,我后来采用的动态库,使得busy box的更小)
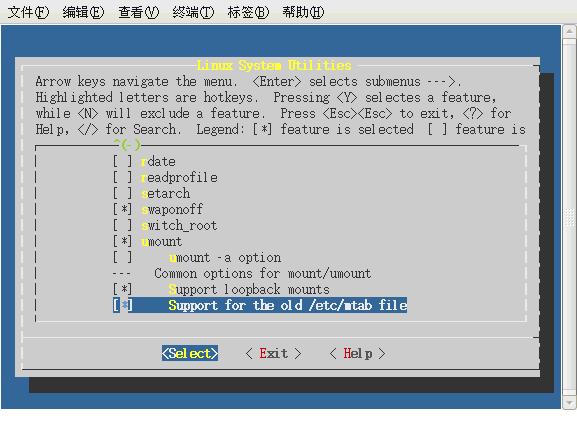
图3
如图3 在Linux System Utilities选项中,“Support loopback mounts”和“Support for the old /etc/mtab file”2个选项应该选中。
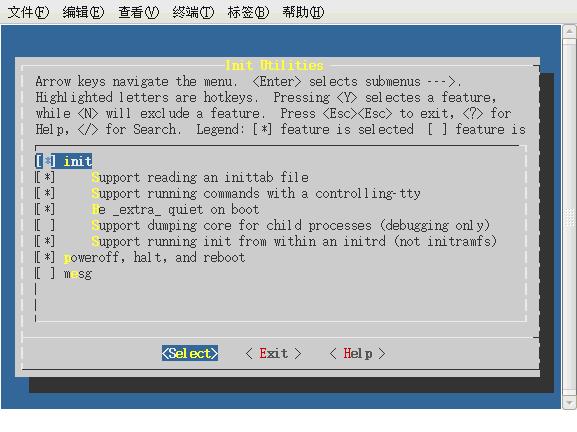
图4
如图4:在Init Utilities选项中,“Support reading an inittab file”应该选中,这样可以根据自己编写的inittab文件初始化;“Support running commands with a controlling-tty”应该选中,否则会提示非常困扰的“/bin/sh: can't access tty; job control turned off”的提示,尽管可以进入控制台命令行。
(其实如果采用自己的 system v init 完全可以不选这个)
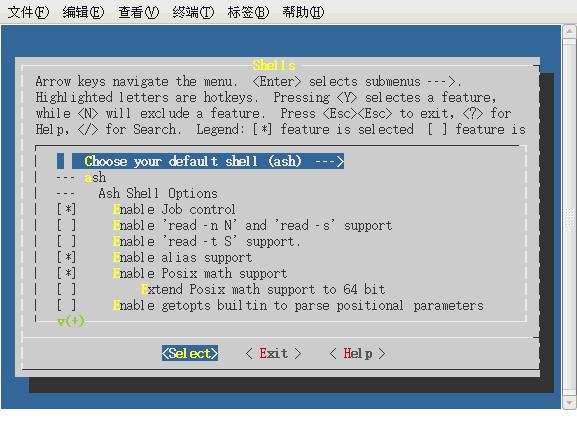
图 5
如图5:在Shell选项中,应该选中默认shell:ash,否则不会生成sh,导致不能解释脚本文件。
(ASH Shell 选项 都可以空,因为我们要移植 上 bash 更好用)
(4)配置完成后,退出保存(最好备份.config文件以供后用)编译,安装
[root@localhost busybox-1.10.1]#
make PREFIX=/home/rootfs all install;
(5)这样就可以生成相应的 bin sbin 和 usr 目录 和 linuxrc;
mkdir dev etc home lib mnt proc sys tmp var,建立相应的文件夹,再建立etc下的init.d文件夹。
如果使用linux 2.6.xx内核,应该实现创建节点console、null。转到rootfs/dev/目录来创建:
sudo mknod console c 5 1
sudo mknod null c 1 3
因为 后面 init 启动时候 inittab配置 需要 设置console(串口输出设备,linux 2.6.x 默认为ttySAC0)否则会出现 错误:
串口无输出,提示getty 无法打开 tty设备
提示“Warning: unable to open an initial console.
Kernel panic - not syncing: Attempted to kill init!”的类似错误。
删除 linuxrc;
2.移植sysvinit-2.86
(1)修改Makefile文件
# Version: @(#)Makefile 2.85-13 23-Mar-2004 miquels@cistron.nl
#
CC = arm-linux-cc
(2)编译 make
(3)copy 可执行程序 init
rm /home/rootfs/sbin/init -fr
cp init runlevel sulogin /home/rootfs/sbin/ -fr
3.移植bash-3.2
(1)配置 CC=arm-linux-gcc ./configure
(2)编译
(3)copy 可执行程序 bash
cp bash /home/rootfs/bin/ -fr
4.移植库 去相应编译工具那里去取库 (这些都是必须的)
-rwxr-xr-x 1 root root 97456 Feb 4 19:50 ld-2.3.2.so
lrwxrwxrwx 1 root root 11 Feb 4 19:50 ld-linux.so.2 -> ld-2.3.2.so
-rwxr-xr-x 1 root root 1289704 Feb 4 19:50 libc-2.3.2.so
-rwxr-xr-x 1 root root 22584 Feb 4 19:50 libcrypt-2.3.2.so
lrwxrwxrwx 1 root root 18 Feb 4 19:50 libcrypto.so -> libcrypto.so.0.9.6
lrwxrwxrwx 1 root root 18 Feb 4 19:50 libcrypto.so.0 -> libcrypto.so.0.9.6
-rwxr-xr-x 1 root root 751580 Feb 4 19:50 libcrypto.so.0.9.6
lrwxrwxrwx 1 root root 17 Feb 4 19:50 libcrypt.so.1 -> libcrypt-2.3.2.so
lrwxrwxrwx 1 root root 13 Feb 4 19:50 libc.so.6 -> libc-2.3.2.so
-rwxr-xr-x 1 root root 704856 Feb 4 19:50 libm-2.3.2.so
lrwxrwxrwx 1 root root 13 Feb 4 19:50 libm.so.6 -> libm-2.3.2.so
-rwxr-xr-x 1 root root 10348 Feb 4 19:50 libpamc.so.0
-rwxr-xr-x 1 root root 10348 Feb 4 19:50 libpamc.so.0.72
-rwxr-xr-x 1 root root 8472 Feb 4 19:50 libpam_misc.so.0
-rwxr-xr-x 1 root root 8472 Feb 4 19:50 libpam_misc.so.0.72
lrwxrwxrwx 1 root root 14 Feb 4 19:50 libpam.so.0 -> libpam.so.0.72
-rwxr-xr-x 1 root root 36400 Feb 4 19:50 libpam.so.0.72
-rwxr-xr-x 1 root root 11824 Feb 4 19:50 libdl-2.3.2.so
lrwxrwxrwx 1 root root 14 Feb 4 19:50 libdl.so.2 -> libdl-2.3.2.so
drwxr-xr-x 2 root root 4096 Feb 4 19:50 security
5.移植启动脚本文件
System v init 最重要的 inittab 配置文件
如例:
# /etc/inittab: init(8) configuration.
# $Id: inittab,v 1.8 1998/05/10 10:37:50 miquels Exp $
# The default runlevel.
id:3:initdefault:
# Boot-time system configuration/initialization script.
# This is run first except when booting in emergency (-b) mode.
si::sysinit:/etc/init.d/rcS
#wi::sysinit:/usr/init/setenv.sh
# What to do in single-user mode.
~~:S:wait:/sbin/sulogin
# /etc/init.d executes the S and K scripts upon change
# of runlevel.
#
# Runlevel 0 is halt.
# Runlevel 1 is single-user.
# Runlevels 2-5 are multi-user.
# Runlevel 6 is reboot.
l0:0:wait:/etc/rc.d/rc 0
l1:1:wait:/etc/rc.d/rc 1
l2:2:wait:/etc/rc.d/rc 2
l3:3:wait:/etc/rc.d/rc 3
l4:4:wait:/etc/rc.d/rc 4
l5:5:wait:/etc/rc.d/rc 5
l6:6:wait:/etc/rc.d/rc 6
# Normally not reached, but fallthrough in case of emergency.
z6:6:respawn:/sbin/sulogin
# What to do when CTRL-ALT-DEL is pressed.
ca:12345:ctrlaltdel:/sbin/shutdown -t1 -a -r now
# Action on special keypress (ALT-UpArrow).
kb::kbrequest:/bin/echo "Keyboard Request--edit /etc/inittab to let this work."
# What to do when the power fails/returns.
pf::powerwait:/etc/init.d/powerfail start
pn::powerfailnow:/etc/init.d/powerfail now
po::powerokwait:/etc/init.d/powerfail stop
# This line provides a nice out-of-box experience. For regular use, you
# should replace it with the proper getty lines below.
con:2345:respawn:/sbin/getty console 115200 vt100
#如果 设置出错导致串口无输出,/sbin/getty 报无法找到设备的错误,
#(确定 创建了/dev/console )
# con:2345:respawn:/sbin/getty -l /bin/fakelogin3 -n console
#con:12345:respawn:/sbin/getty ttyS2 115200 vt100
# -l /sbin/sulogin
# /sbin/getty invocations for the runlevels.
#
# MontaVista linux comes with devfs turned on by default.
#
# The "id" field MUST be the same as the last
# characters of the device (after "tty").
#
# Format:
# <id>:<runlevels>:<action>:<process>
#
# Uncomment these for a devfs system
#
#1:2345:respawn:/sbin/getty 38400 vc/1
#2:23:respawn:/sbin/getty 38400 vc/2
#3:23:respawn:/sbin/getty 38400 vc/3
#4:23:respawn:/sbin/getty 38400 vc/4
#5:23:respawn:/sbin/getty 38400 vc/5
#6:23:respawn:/sbin/getty 38400 vc/6
#
# Uncomment these only for non-devfs systems
#
#1:2345:respawn:/sbin/getty 38400 tty1
#2:23:respawn:/sbin/getty 38400 tty2
#3:23:respawn:/sbin/getty 38400 tty3
#4:23:respawn:/sbin/getty 38400 tty4
#5:23:respawn:/sbin/getty 38400 tty5
#6:23:respawn:/sbin/getty 38400 tty6
# Example how to put a getty on a serial line (for a terminal)
#
# Uncomment these for a devfs system
#
#T0:23:respawn:/sbin/getty -L tts/0 9600 vt100
#T1:23:respawn:/sbin/getty -L tts/1 9600 vt100
#
# Uncomment these only for non-devfs systems
#
#T0:12345:respawn:/sbin/getty -L ttygs0 9600 vt100
#Le:345:respawn:/sbin/powercheck
#pe:12345:wait:/sbin/neod
#T0:23:wait:/sbin/getty -L ttygs0 9600 vt100
#T1:23:respawn:/sbin/getty -L ttyS1 9600 vt100
# Example how to put a getty on a modem line.
#
# Uncomment this for a devfs system
#
#T3:23:respawn:/sbin/mgetty -x0 -s 57600 tts/3
#
# Uncomment these only for non-devfs systems
#
#T3:23:respawn:/sbin/mgetty -x0 -s 57600 ttyS3
fstab 如例:
# /etc/fstab: static file system information.
#
# <file system> <mount point> <type> <options> <dump> <pass>
/dev/mtdblock2 /root jffs2 defaults 0 0
/dev/tffsa /truefs ext3 noatime 0 0
proc /proc proc defaults 0 0
ramfs /tmp ramfs defaults 0 0
sysfs /sys sysfs defaults 0 0
rc 和rcS 可以采用PC的
6.移植agetty和login
getty命令的源代码可以为agetty.c,login命令的源代码为login.c。
getty 就是一个程序,他让你能从各种设备上登陆,比如虚拟终端,文字终端或是一个modem。他显示一个登陆提示符,一旦你键入用户名,getty把它传送到login,login会向你要密码,认证成功后给你一个shell。有很多getty,有的发行版,包括red hat使用很小的,只能在虚拟终端上用的mingetty。login(登陆)程序是linux功能包的一部分,包含了一个名为agetty的getty。
下载: util-linux-2.12r.tar.bz2
看到Makefile文件中有include ../make_include(设置编译变量)和include ./MCONFIG (配置信息)
打开MCONFIG文件,在文件上部添加一行,如下
DESTDIR=/home/rootfs #你要安装的路径
修改: CPU=arm
ARCH=arm
打开make_include文件,
修改: CC=arm-linux-gcc
重新安装后,在目标系统的sbin目录下为agetty建立一个符号连接到 getty。
MCONFIG中还有一个地方要改的:HAVE_SHADOW=no
因为自己用手建的passwd文件根本不可能有shadow,如果没改,也是无法登陆到系统中去的。
passwd文件可以这样定义登录的shell:
root::0:0:root:/root:/bin/bash
这样基本就可以进入登录终端界面了,其它配置,由自己根据需求完善。该方法采用 system v init启动方式,bash作为启动的shell,简单,功能强大,可以作为项目实用。
Linux的账号验证程序login的处理流程:
1.Login首先检查登录者是否为超级用户,如果不是超级用户,并且存在/etc/nologin文件,则输出该文件内容,并中止登录过程;主要由checknologin()实现;
2.如果登录用户是超级用户,那么login必须在/etc/securetty/中指定的tty列表中实现登录,否则将导致登录失败。同样可以不指定/etc/securetty文件,此时,超级用户可以在任何tty上登录。
3.经过前两步测试后,login接下来将提示输入登录密码(由getpass()调用完成,有兴趣的读者可参考其手册页面),并进行验证,如果密码不对,则提示重新登录。
4.顺利经过密码验证后,login还将检查是否存在.hushlogin文件,如果该文件存在,则执行一次"quiet"登录(所谓的quiet登录指的是,登录时不再提示邮件mail,不再显示最后一次登录时间,不输出任何消息。启动级别为3时,正常情况下输出这些信息)
5.login接下来设置登录tty的用户ID和组ID,并设置相应的环境变量,包括HOME、PATH、SHELL、TERM、LOGNAME等。对于普通用户来说,PATH缺省被设置成/usr/local/bin: /bin/usr/bin:;对于超级用户来说,PATH被设置成/sbin: /bin: /usr/sbin: /usr/bin:
6.login的最后一步是为用户启动shell。如果在/etc/passwd中没有为用户指定shell,那么将使用/bin/sh,如果在/etc/passwd中没有给出当前工作目录,则使用"/"。
至此,一个完整的登录过程就结束了。


 7556
7556

 被折叠的 条评论
为什么被折叠?
被折叠的 条评论
为什么被折叠?
 到【灌水乐园】发言


