


之前首先需要准备好两个文件 ipa 和plist 两个文件
具体操作步骤如下:
1、将ipa和plist两个文件 架在服务器的根目录下 可以下通过网站直接访问并且下载这两个文件
2、在根目录下写一个链接文件,主要用于文件下载只用
Install App
完成以上两步操作之后,如果你的服务器是架在linux上的,那么你已经成功了。
但是如果你不是linux服务器还需要第三 步
3、修改mimes type
设定服务器 MIME 类型
您可能需要配置您的 Web 服务器以便正确地传输清单文件和应用程序文件。
对于 OS X Server,将以下 MIME 类型添加到 Web 服务的“MIME Types”(MIME 类型)设置中:
application/octet-stream ipa
text/xml plist
对于 IIS,使用 IIS Manager 在服务器的“属性”页面中添加 MIME 类型:
.ipa application/octet-stream
.plist text/xml
这样就很完美了
注释:1、对于plist的格式示例如下
2、注意其中的url一定要写对。
3、注意手机端访问和网页访问效果是不一样的
转载:http://blog.sina.com.cn/s/blog_c22173770101awic.html
iOS 通过Safari浏览器安装 App
以往,如果要安装App到非越狱设备上,那么有俩个办法
1.App制作的时候使用企业级开发者帐号申请证书(开发证书/发布证书),那么只做好App后,无需提交AppStore,放置在自己的Server上 http下载就可以自动安装。
2.如果是个人开发者帐号,需要使用hoc证书,并且需要把 需要安装App的设备的UDID添加到证书里,打包后,需要将证书以及安装包一起发送给对方,他才能安装。
针对2,还有另外一个方式,不用发送给对方,只需要让对方用Safari浏览器打开一个网页就可以自动安装,其实是借鉴了企业级App的方式,下面看我处理部署流程。
a.将设备UDID添加到帐户设备表中。
b.更新hoc证书,重新编译打包,制作安装包 app.ipa。
c.接下来就是与以往不同的了,制作一个dev.html和一个dev.plist俩文件,然后将app.ipa与dev.html,dev.plist 放到同一个目录中,将整个目放置到httpServer的一个目录下。参考下图


为了便于CV程序员尝试,我贴点代码,百度不能放文件,很不爽。
dev.html,如下
|
1
2
3
4
5
6
7
8
9
10
11
12
13
14
15
16
17
18
19
20
21
22
|
<!DOCTYPE html PUBLIC "-//W3C//DTD XHTML 1.0 Transitional//EN" "http://www.w3.org/TR/xhtml1/DTD/xhtml1-transitional.dtd">
<
head
>
<
meta
http-equiv
=
"Content-Type"
content
=
"text/html; charset=UTF-8"
/>
<
meta
name
=
"viewport"
content="
width
=
320
,
height
=
460
,
user-scalable
=
no
,
initial-scale
=
1
.0" />
<
title
>Install Dev App</
title
>
</
head
>
<
br
/><
br
/><
br
/>
<
body
>
<
div
align
=
"center"
>
<
a
href
=
"itms-services://?action=download-manifest&url=http://192.168.16.74/dev.plist"
style
=
"color:orange; font-size:24px"
>
Install the App</
a
>
</
div
>
<
p
/>
</
body
>
<
br
/>
<
br
/>
</
html
>
|
dev.plist如下
|
1
2
3
4
5
6
7
8
9
10
11
12
13
14
15
16
17
18
19
20
21
22
23
24
25
26
27
28
29
30
31
|
<?
xml
version
=
"1.0"
encoding
=
"UTF-8"
?>
<!DOCTYPE plist PUBLIC "-//Apple//DTD PLIST 1.0//EN" "http://www.apple.com/DTDs/PropertyList-1.0.dtd">
<
plist
version
=
"1.0"
>
<
dict
>
<
key
>items</
key
>
<
array
>
<
dict
>
<
key
>assets</
key
>
<
array
>
<
dict
>
<
key
>kind</
key
>
<
string
>software-package</
string
>
<
key
>url</
key
>
</
dict
>
</
array
>
<
key
>metadata</
key
>
<
dict
>
<
key
>bundle-identifier</
key
>
<
string
>com.mycompany</
string
>
<
key
>bundle-version</
key
>
<
string
>1.0</
string
>
<
key
>kind</
key
>
<
string
>software</
string
>
<
key
>title</
key
>
<
string
>myApp</
string
>
</
dict
>
</
dict
>
</
array
>
</
dict
>
</
plist
>
|
接下来在对方的safari中输入 http://myserver.com/ios/dev.html 后续就一直默认操作就可以了。
我在实验的时候,遇到了点问题,dev.html是可以正常访问的,但是就是不能自动安装,经过查证,找到了问题
猜测是server配置问题,查了查,果然,服务器不知道客户端请求的俩文件 app.ipa和dev.plist以什么方式(文本还是流之类)传递给客户端,需要增加这两种扩展名的文件处理模式<纯个人理解>,因为很多常见的后缀名都已经有默认声明
参考
http://help.apple.com/iosdeployment-apps/mac/1.1/#app43ad871e
设定服务器 MIME 类型
您可能需要配置您的 Web 服务器以便正确地传输清单文件和应用程序文件。
对于 OS X Server,将以下 MIME 类型添加到 Web 服务的“MIME Types”(MIME 类型)设置中:
application/octet-stream ipa
text/xml plist
对于 IIS,使用 IIS Manager 在服务器的“属性”页面中添加 MIME 类型:
.ipa application/octet-stream
.plist text/xml
通过网页进行 iOS 应用内部分发
介绍如何通过网页内部分发 iOS 应用, 包括 In-House 企业应用和 ad-hoc 测试应用。
原生 XCode 应用
1. 归档编译
用 XCode 打开要分发的项目, 依次选择 "Product" -> "Build for" -> "Archiving", 如下图:

编译完成之后,就会生成 XCode 的项目归档, 接下来使用 Organizer 设置分发信息。
2. 使用 Organizer 设置分发信息
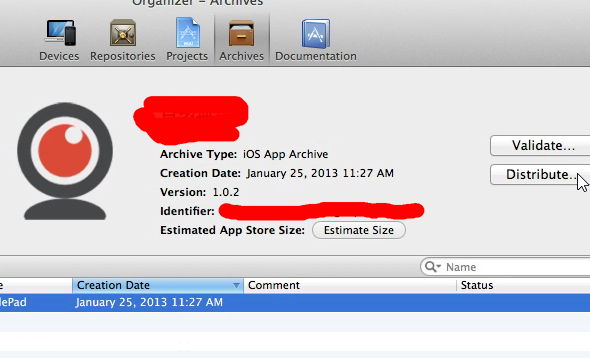
打开 Orangizer , 选择 Archives 标签, 可以看到现有的 XCode 项目归档, 选择要分发的项目, 然后点击右边的 Distribute... 按钮, 如下图所示:
接下来回弹出分发向导, 第一步分发方式, 选择 Save for Enterprise or Ad-Hoc Development, 如下图所示:

点击 Next 按钮, 第二步选择代码签名, 选择 Enterprise 或者 Ad-Hoc 签名, 如下图所示:

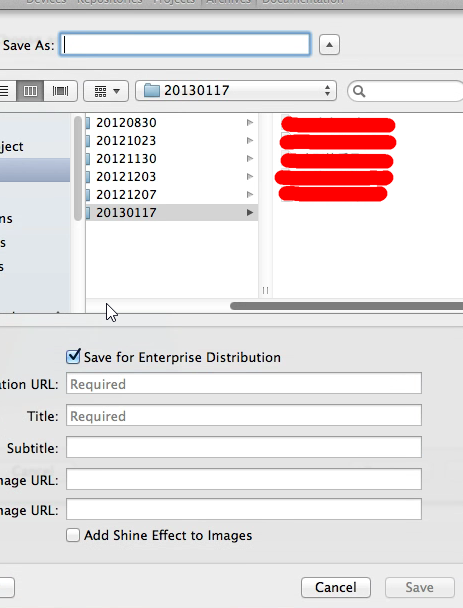
点击 Next 按钮, 第三步填写分发信息, 选择应用保存位置以及名称, 同时要勾选 Save for Enterprise Distribution, 输入分发信息, 然后保存, 这样将会生成两个文件, 一个是后缀为 ipa 文件, 就是 iOS 程序本身了, 另一个是后缀为 plist 文件, 包含 ipa 文件的描述信息。
3. 部署到内部 Web 服务器
将上一部最终生成的 ipa 以及 plist 文件复制到内部的 Web 服务器, 在网页上添加类似这样的链接:
<a href="itms-services://?action=download-manifest&url=http://url-to-your-app.plist">安装移动办公iOS版</a>Web 服务器上可能需要添加 .plist 和 .ipa 的 Mime 类型, 它们的 Mime 类型分别为:
.plist : text/xml;.ipa : application/octet-stream
4. iOS 设备下载安装
用 iOS 设备访问网页, 点击链接就可以直接安装了。 如果是未越狱的设备, 需要确认签名许可包含了设备的 UDID , 否则无法安装。
MonoTouch 应用
对于 MonoTouch 编写的应用, 需要将 MonoDevelop 升级到最新版的 3.1.1 , 在 Build 菜单下也添加了 Achive 选项, 选择Arcive 菜单进行编译, 就会在 XCode 的 Organizer 的 Archives 标签下能看到对应的项目, 接下来就和上面的步骤一致了。
以无线方式安装应用程序
构建网站
将这些项目上传到您网站上已鉴定的用户可以访问的区域:
-
应用程序 (.ipa) 文件
-
清单 (.plist) 文件
您的网站设计可以像用来链接到清单文件的单个页面那么简单。当用户轻按 Web 链接时,清单文件会被下载,并触发它所描述的应用程序的下载和安装。
以下是一个示例链接:
请勿添加归档的应用程序 (.ipa) 的 Web 链接。载入清单文件时,设备会下载该 .ipa。虽然 URL 的协议部分是 itms-services,但 iTunes Store 并不参与此过程。
设定服务器 MIME 类型
您可能需要配置您的 Web 服务器以便正确地传输清单文件和应用程序文件。
对于 OS X Server,将以下 MIME 类型添加到 Web 服务的“MIME Types”(MIME 类型)设置中:
对于 IIS,使用 IIS Manager 在服务器的“属性”页面中添加 MIME 类型:
转载:http://help.apple.com/iosdeployment-apps/mac/1.1/#app43ad871e
IOS通过OTA部署App
通过ota安装app是个很酷的功能,尤其是发给朋友测试的时候。一直想整理一下这方面的文件,发现很多人都整理了。
转一篇儿中文的:iOS: install App via OTA用的是xcode4.3.
这还有一篇儿英文的:Distributing an iPhone App (.ipa) Over the air with Xcode 4.虽然说是xcode4.但应该是4.2及以下的版本。因为4.3以后打包方式变了。
前提: 能安装app的device需要被包含在你的provisioning profile里
Environment: iOS 5.0 + xcode 4.3
ref link: https://help.apple.com/iosdeployment-apps/?lang=en-us#app43ad871e
Step 1 在你的project里,选择”iOS Device” in the active scheme (如果选择的是iPad simulator or iPhone simulator,那么menu “Product > Archive”是灰化的)

Step 2 select menu “Product > Archive”来为你的project创建一个archive (it is recommended that build your project again before this action)
Step 3 这时应该会自动弹出organizer window (之后你可以通过menu “Window > Organizer”来打开它),并显示你刚创建的archive item in the archive list。Highlight the archive item, and then click “Distribute…” button
Step 4 select option “Save for enterprise or Ad-Hoc deployment”, click “Next”
Step 5 set “Code Signing Identity” as default value, my default value is “Tomson Xu” (这应该是你在apple developer site创建的certificate name), click “Next”
Step 6 设置”Save as”为你的project name,设置存放生成文件的位置”Where”,勾上”Save for Enterprise Distribution”。
Step 7 设置”Application URL”为即将生成的ipa将放到web site里的URL (e.g.http://xxx.xxx.xxx.xxx/CityUCAP.ipa),设置”Title”为任意text(注意它并不是安装后的app display name), click “Save” button. 这时它将创建一个ipa file和一个与ipa file同名的plist file (假设为 CityUCAP.ipa and CityUCAP.plist)
Step 8 把step 7生成的ipa and plist file复制到你的web site里 (注意:其url要和step 7设置的”Application URL“一样),然后创建一个html file as follow.
Step 9 你需要添加2个MIME类型到你的web server,否则安装过程中就有可能出错。下面以IIS为例添加MIME type
1. 打开IIS Manager,左边panel选定root node,然后在右边的panel double click “MIME Types”
2. right click 任意位置, select “Add…”,分别添加下列2个MIME Type
MIME Type: application/octet-stream
File name extension: .plist
MIME Type: text/xml
3. restart your web server
Step 10. 在你的iPhone web browser里访问Step 8创建的html file,然后click link to install app!
关于第九步,因为我一直用的nginx所以也没配置过这步,不过一直好使。
转载:http://www.cnblogs.com/yingkong1987/archive/2012/10/28/2743774.html
对xampp配置,mime.types增加
application/vnd.android.package-archive apk
application/octet-stream ipa
text/xml plist
application/iphone pxl ipa


 172
172

 被折叠的 条评论
为什么被折叠?
被折叠的 条评论
为什么被折叠?
 到【灌水乐园】发言


