最近比较迷恋canvas,加之做了一个个人网站,有用到环形进度条,记录下来。
canvas中没有直接绘制圆的方法,但有一个绘制弧线的context.arc方法,
下面讲下用该方法如何绘制出图片效果。
arc()方法介绍
context.arc(x,y,r,sAngle,eAngle,counterclockwise);
参数说明:
- x: 圆的中心的 x 坐标
- y: 圆的中心的 y 坐标
- r: 圆的半径
- sAngle: 起始角,以弧度计。(弧的圆形的三点钟位置是 0 度)
- eAngle: 结束角,以弧度计
- counterclockwise: 可选。规定应该逆时针还是顺时针绘图。False = 顺时针,true = 逆时针。默认false
看到这里,大家就会明白怎么画圆了把,只要让起始角和结束角度为一个圆周就可以了。
下面开始画图咯!
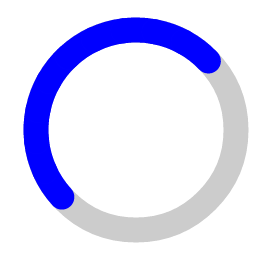
环形进度条
环形进度条主要两部分组成,一是灰色圆,另一是蓝色弧度。也就是说灰色圆圈和蓝色弧同圆心同半径。知道了原理大家是不是觉得瞬间简单好多。。。
第一步:画灰色圆
function Circle() {
this.radius = 100;
this.lineWidth = 25;
this.strokeStyle = '#ccc';
this.fillStyle = 'blue';
this.lineCap = 'round';
}
Circle.prototype.draw = function(ctx) {
ctx.beginPath();
ctx.arc(250, 250, this.radius, 0, Math.PI*2, true);
ctx.lineWidth = this.lineWidth;
ctx.strokeStyle = this.strokeStyle;
ctx.stroke();
};
当然这样是画不出来的,我们继续往下看。
第二步:画进度条(蓝色部分)
这部分说白了就是和灰色圆圈同圆心同半径的一条蓝弧。
function Ring(startAngle, percent) {
Circle.call(this);
this.startAngle = startAngle || 3*Math.PI/2;
this.percent = percent;
}
Ring.prototype = Object.create(Circle.prototype);
Ring.prototype.drawRing = function(ctx) {
this.draw(ctx);
ctx.beginPath();
var anglePerSec = 2 * Math.PI / (100 / this.percent);
ctx.arc(250, 250, this.radius, this.startAngle, this.startAngle + , false);
ctx.strokeStyle = that.fillStyle;
ctx.lineCap = that.lineCap;
ctx.stroke();
ctx.closePath();
}
- 1
- 2
- 3
- 4
- 5
- 6
- 7
- 8
- 9
- 10
- 11
- 12
- 13
- 14
- 15
- 16
- 17
- 18
- 19
- 20
- 1
- 2
- 3
- 4
- 5
- 6
- 7
- 8
- 9
- 10
- 11
- 12
- 13
- 14
- 15
- 16
- 17
- 18
- 19
- 20
canvas是不是还没定义呐?别急,咱慢慢来~
<canvas id="canvas" width="400" height="400"></canvas>
获取canvas的上下文context:
var canvas = document.getElementById('canvas');
var ctx =  canvas.getContext('2d');
接下来就调用下我们的drawRing吧
var ring = new Ring(2*Math.PI/3, 50);
ring.drawRing(ctx);
到这里,一个上图所示的进度环就ok了~
先别鼓掌太早,既然是进度条,是不是要动起来的更美呢!
动之前,我们先搞明白一个概念,我们知道,坐标分为四个象限,如果圆心是原点,那么arc方法的弧度是怎么开始的呢?先看图!
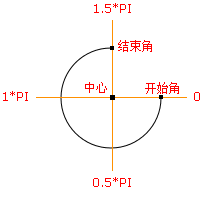 (偶从w3school挖的图)
怎么样,明白了吗?是不是觉得哪里不对劲呢~上学时学的第一象限0~π/2(右上角),怎么看起来是反的呢,这就是差异啊!!细心的童鞋可能会注意到arc方法不是还有最后一个参数嘛,还是可选的,当counterclockwise参数为true时,你们猜这逆天的坐标轴会变成我们熟悉的吗?哎~摸摸头。。。人家这参数只是让弧度逆时针转了而已,坐标轴弧度还是不变滴~
好了,说了这么多,是不是该动起来了呢,直接上代码。
Ring.prototype.drawRing = function(ctx) {
var count = 0,
that = this,
times = 10,
startAngle = this.startAngle,
endAngle = startAngle;
this.draw(ctx);
var handle = setInterval(function() {
if (count == times) {
clearInterval(handle);
}
ctx.beginPath();
var anglePerSec = 2 * Math.PI * (that.percent / 100) / times;
ctx.arc(250, 250, that.radius, startAngle, endAngle, false);
ctx.strokeStyle = that.fillStyle;
ctx.lineCap = that.lineCap;
ctx.stroke();
ctx.closePath();
startAngle += anglePerSec - 0.0028;
endAngle = startAngle + anglePerSec;
count++;
}, 60);
}
- 1
- 2
- 3
- 4
- 5
- 6
- 7
- 8
- 9
- 10
- 11
- 12
- 13
- 14
- 15
- 16
- 17
- 18
- 19
- 20
- 21
- 22
- 23
- 24
- 25
- 26
- 27
- 28
- 29
- 30
- 1
- 2
- 3
- 4
- 5
- 6
- 7
- 8
- 9
- 10
- 11
- 12
- 13
- 14
- 15
- 16
- 17
- 18
- 19
- 20
- 21
- 22
- 23
- 24
- 25
- 26
- 27
- 28
- 29
- 30
是的,只要把Ring.prototype.drawRing方法替换为上面的就行。
小伙伴们自己动手画个吧~
转载:http://blog.csdn.net/chuan2009he/article/details/45065299
<!DOCTYPE html>
<head>
<meta http-equiv="Content-Type" content="text/html;charset=UTF-8">
<title>Canvas绘图</title>
</head>
<body>
<canvas class="process" width="48px" height="48px">0%</canvas>
</body>
<script>
$(document).ready(function() {
//drawProcess();
i = 0;
var t = setInterval("addNum()",20);
});
function addNum() {
if(i<100){
i++;
$('canvas.process').text(i+"%");
drawProcess();
}else{
clearInterval(t);
}
}
function drawProcess() {
$('canvas.process').each(function() {
var text = $(this).text();
var process = text.substring(0, text.length-1);
var canvas = this;
var context = canvas.getContext('2d');
context.clearRect(0, 0, 48, 48);
context.beginPath();
context.moveTo(24, 24);
context.arc(24, 24, 24, 0, Math.PI * 2, false);
context.closePath();
context.fillStyle = '#ddd';
context.fill();
context.beginPath();
context.moveTo(24, 24);
context.arc(24, 24, 24, 0, Math.PI * 2 * process / 100, false);
context.closePath();
context.fillStyle = '#2a2';
context.fill();
context.beginPath();
context.moveTo(24, 24);
context.arc(24, 24, 21, 0, Math.PI * 2, true);
context.closePath();
context.fillStyle = 'rgba(255,255,255,1)';
context.fill();
context.beginPath();
context.arc(24, 24, 18.5, 0, Math.PI * 2, true);
context.closePath();
context.strokeStyle = '#ddd';
context.stroke();
context.font = "bold 9pt Arial";
context.fillStyle = '#2a2';
context.textAlign = 'center';
context.textBaseline = 'middle';
context.moveTo(24, 24);
context.fillText(text, 24, 24);
});
}
</script>
</html>
转载:http://www.oschina.net/question/591528_116343?sort=time


 1087
1087


 被折叠的 条评论
为什么被折叠?
被折叠的 条评论
为什么被折叠?
 到【灌水乐园】发言


