


mybatis
基本使用
整合springboot
1.添加依赖
2.添加配置
spring:
  # 数据源相关配置
  datasource:
    username: root
    password: 123456
    driver-class-name: com.mysql.cj.jdbc.Driver
    #时区必须配置否则报错,注意数据库名切换为自己的数据库名称
    url:  jdbc:mysql://127.0.0.1/itheima?useUnicode=true&characterEncoding=UTF-8&serverTimezone=UTC
#mybatis 相关配置
mybatis:
  # 指定接口映射文件的位置
  mapper-locations: classpath:mapper/*.xml
  # 为POJO类指定别名 指定后使用时不再需要指定包名
  type-aliases-package: com.itheima.integration.pojo
# 开启debug日志
logging:
  level:
    com.itheima.springbootinit4: debug
3.指定DAO接口所在的包
@SpringBootApplication
@MapperScan("com.winter.dao")
public class SpringbootMybatisDemoApplication {

    public static void main(String[] args) {
        SpringApplication.run(SpringbootMybatisDemoApplication.class, args);
    }
}
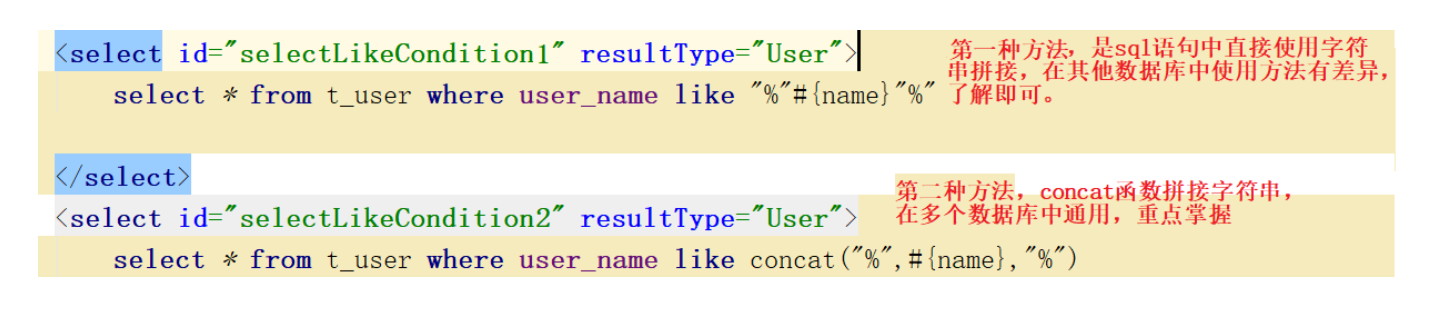
模糊查询
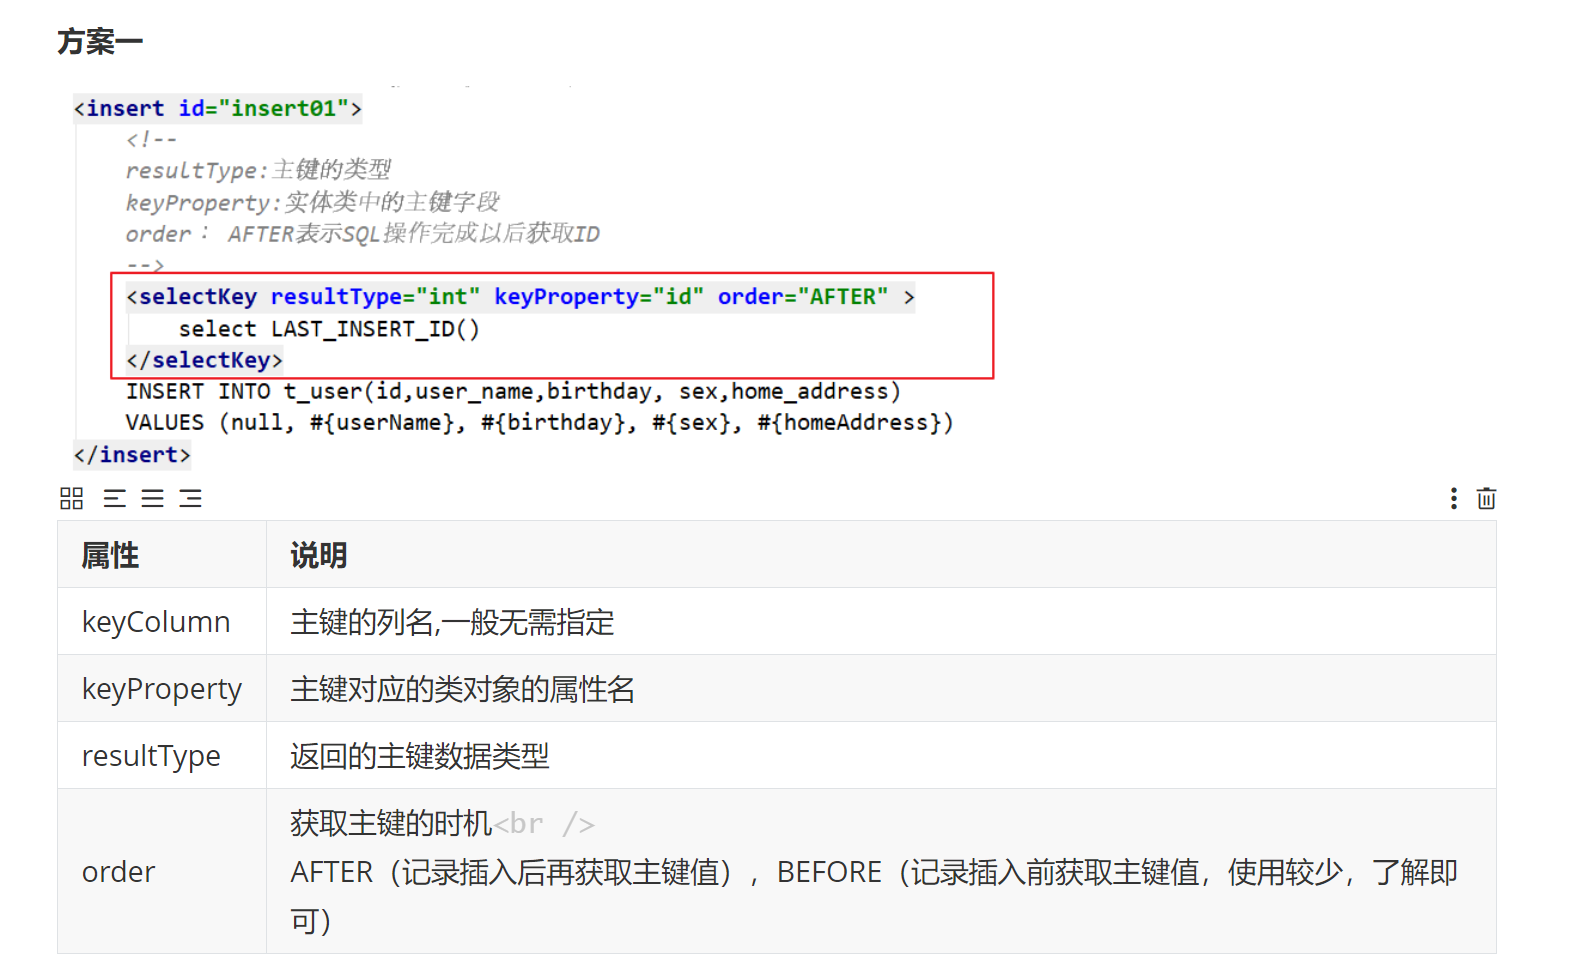
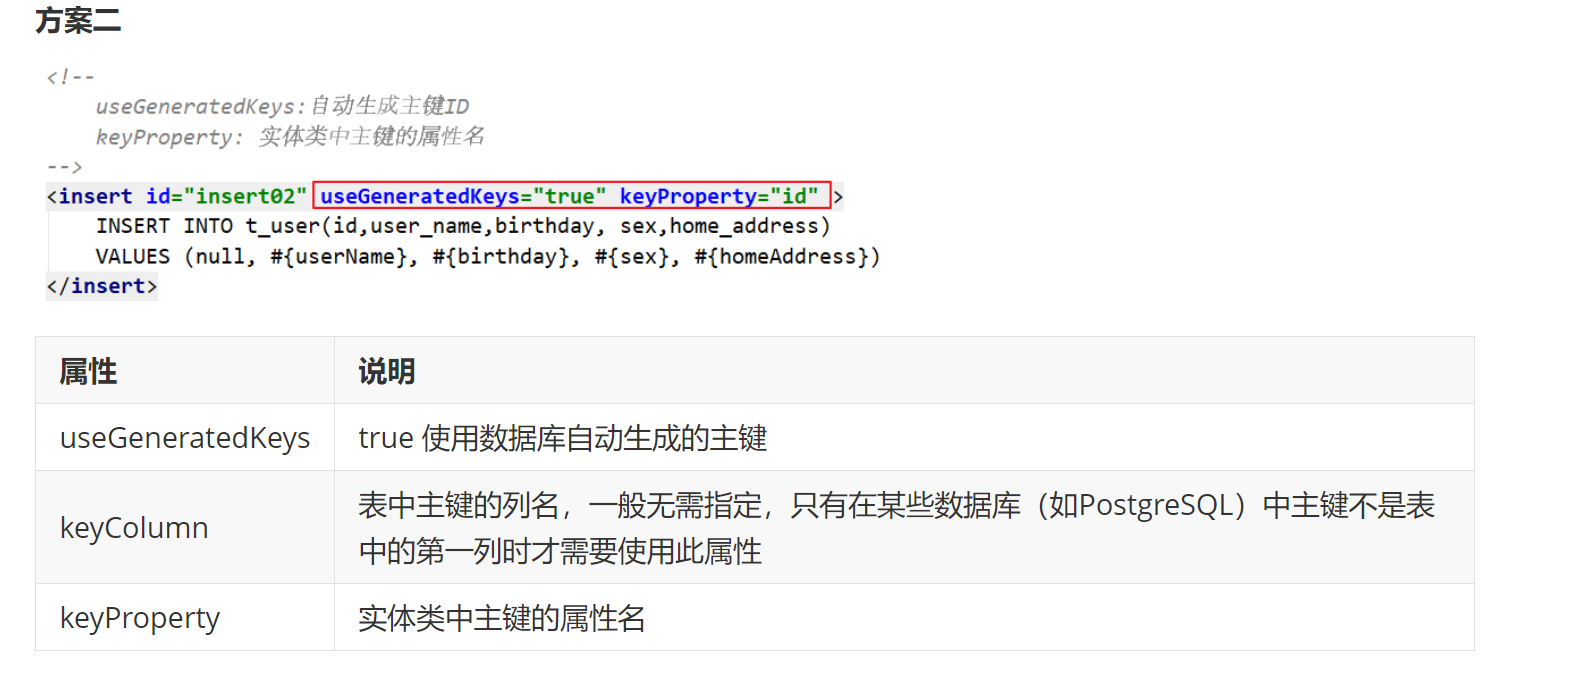
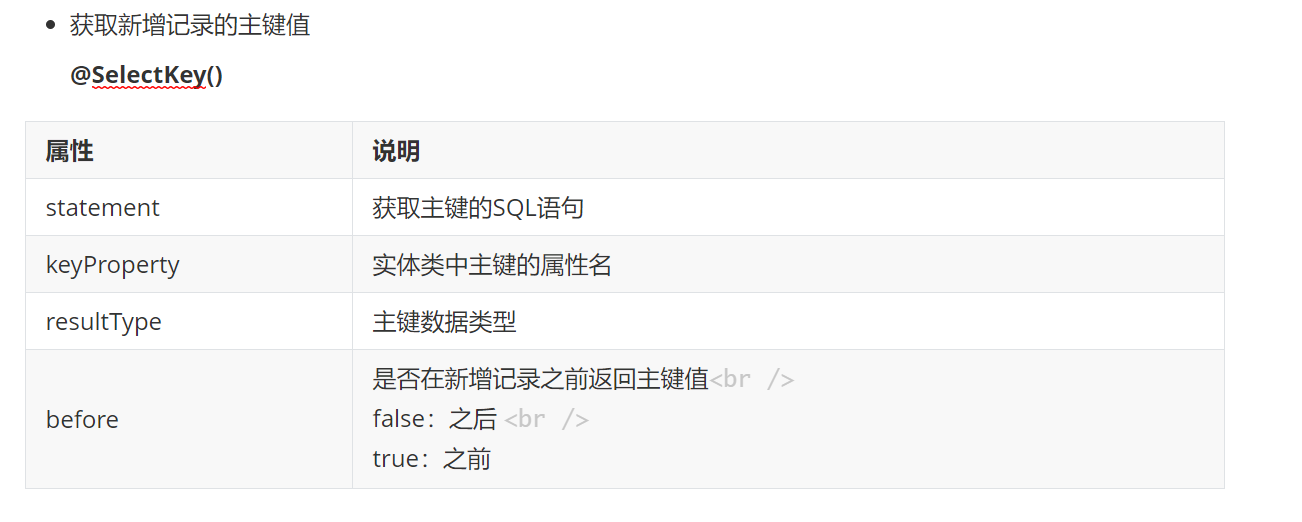
获取自增主键
插入数据后获取自增主键的方案有两种,分别是使用<selectKey>和useGeneratedKeys属性
扩展 如果id为字符串类型,主键由uuid生成

ognl 表达式
#{} 【推荐】: 占位符, 相当于PreparedStatement对象, 会自动转换类型
	pojo对象 		 #{对象中的属性名} -- 获取pojo中的属性
	基本数据类型 	  #{参数名}	-- 获取基本类型数据,参数名通过@Param("xxxx")指定
${}	: 拼接符, 相当于字符串直接拼接, 不会自动转换类型,需要手动拼接类型
	pojo对象 		${对象中的属性名}	-- 获取pojo中的属性
	基本数据类型   ${参数名}  -- 获取基本类型数据,参数名通过@Param("xxxx")指定
User selectById( @Param("id") Integer id);
<!--
    属性
    id              对应方法名,唯一
    parameterType   参数的类型,可以省略
    resultType      返回值类型
-->
<select id="selectById" parameterType="java.lang.Integer" resultType="com.itheima.entity.User">
  select * from t_user where id = #{id}
</select>
<!--
获取mapper传入参数
1.简单类型:四类八种, String  获取:使用`#{}`直接获取参数,名称可以任意写(有注解时与注解保一致)
2.实体对象参数(POJO类)
获取:使用`#{}`直接获取对象的属性(有注解时,注解内容 点 属性)
-->
标签
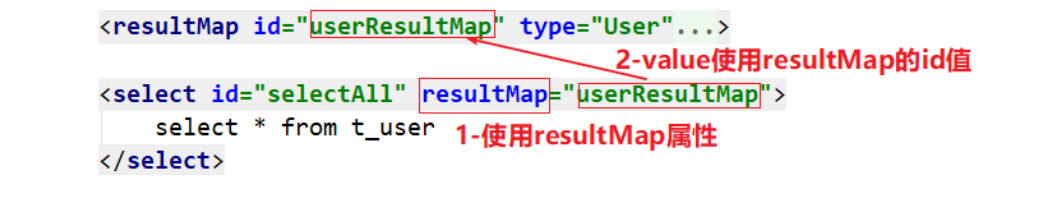
resultMap 标签
    <!--
    定义映射
        id:映射的名字
        type:实体类
    -->
    <resultMap id="userResultMap" type="User">
        <!--
        定义字段映射,id和result标签分别表示主键字段映射和非主键字段映射
            property    实体类中的属性名
            column      SQL返回结果的列名
            如果property和cloumn的值相同,可以省略
        -->
        <id property="id" column="id"/>
        <result property="userName" column="user_name"/>
        <result property="birthday" column="birthday"/>
        <result property="sex" column="sex"/>
        <result property="homeAddress" column="home_address"/>
    </resultMap>
where 与 if 标签
    <!--
    where:
        1. where标签就相当于SQL语句中where关键字
        2. 去掉多余的and、or关键字
    if:
        判断条件是否为真,如果为真则将if中字符串拼接到SQL语句中
    -->
	<select id="selectByUserNameAndSex" resultMap="userResultMap">
        select * from t_user
        <where>
            <if test="userName!=null and userName!=''">
                user_name=#{userName}
            </if>
            <if test="sex!=null and sex!=''">
              and  sex=#{sex}
            </if>
        </where>
    </select>
set 标签
    <!--
    set
        1.一般与if标签配合使用
        2.set用在update语句中,相当于set关键字
        3.会自动去掉能多余的逗号
    -->
    <update id="updateByIdSelective">
        update t_user
        <set>
            <if test="userName!=null">
                user_name = #{userName},
            </if>
            <if test="birthday!=null">
                birthday = #{birthday},
            </if>
            <if test="sex!=null">
                sex = #{sex},
            </if>
            <if test="homeAddress!=null">
                home_address = #{homeAddress},
            </if>
        </set>
        where id=#{id}
    </update>
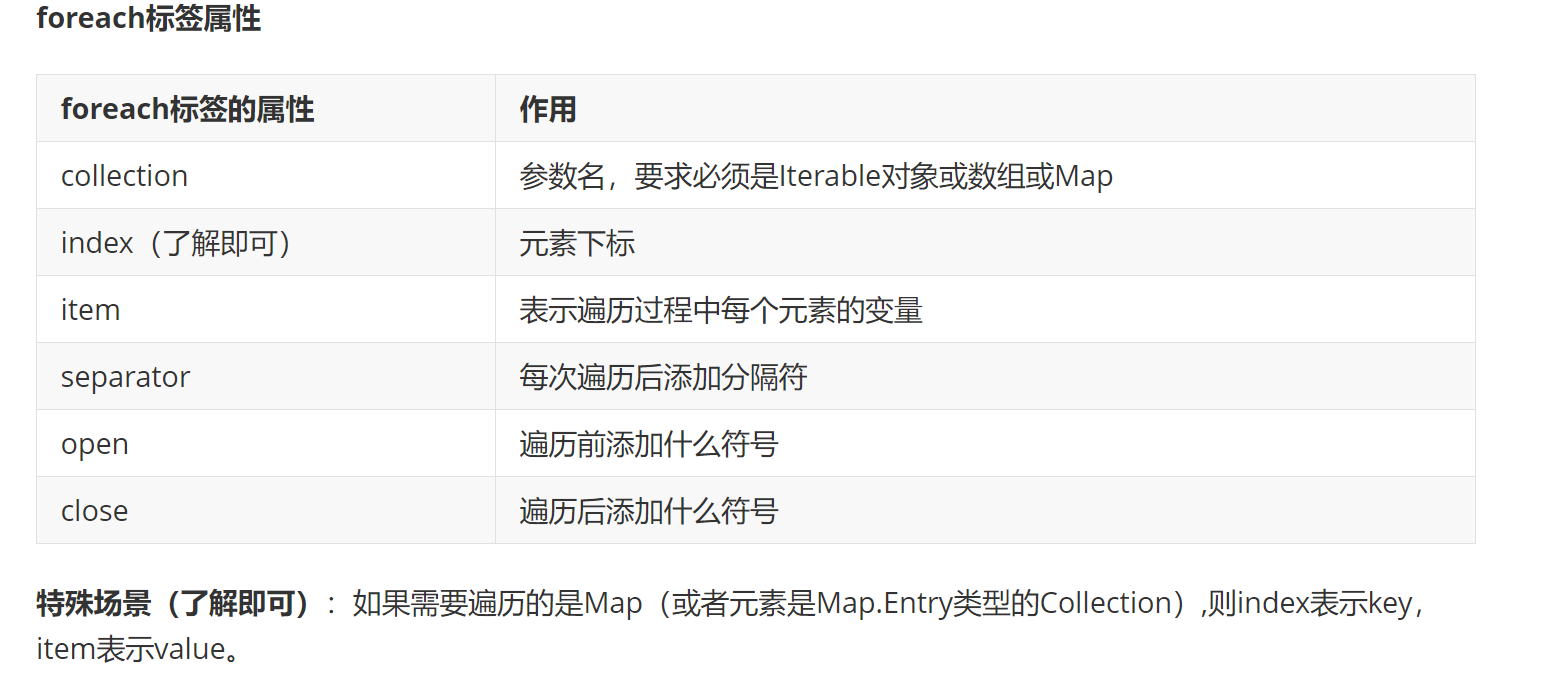
foreach 标签
    <insert id="insertRecords">
        insert into t_user values
        <foreach collection="users" item="user"  separator=",">
            (#{user.id}, #{user.userName}, #{user.birthday}, #{user.sex}, #{user.homeAddress})
        </foreach>
    </insert>
    <delete id="deleteByIdS">
        delete from t_user where id in
        <!--
           open     遍历开始前添加的符号
           close    遍历完成后添加的符号
        -->
        <foreach collection="ids" item="id" separator="," open="(" close=")">
            #{id}
        </foreach>
    </delete>
sql/include标签
- sql标签:定义一段可以重用的SQL语句
- include标签:refid 关联sql标签的id
    <!--定义可重用的代码块-->
    <sql id="conditionSql">
        <if test="condition!=null and condition!=''">
            where user_name like concat('%',#{condition},'%')
            or home_address like concat('%',#{condition},'%')
        </if>
    </sql>
    <!--根据条件查询-->
    <select id="selectByConditon" resultMap="userResultMap">
        select * from t_user
        <!--引用代码块-->
        <include refid="conditionSql"/>
    </select>
    <!--根据条件统计-->
    <select id="countByConditon" resultType="int">
        select count(1) from t_user
        <!--引用代码块-->
        <include refid="conditionSql"/>
    </select>
结果集复杂映射
当SQL查询的结果集复杂,不能(或不方便)使用一个类结构来接收这些数据,我们就称这种映射是复杂映射。复杂映射一般分为两种:一对一、一对多。
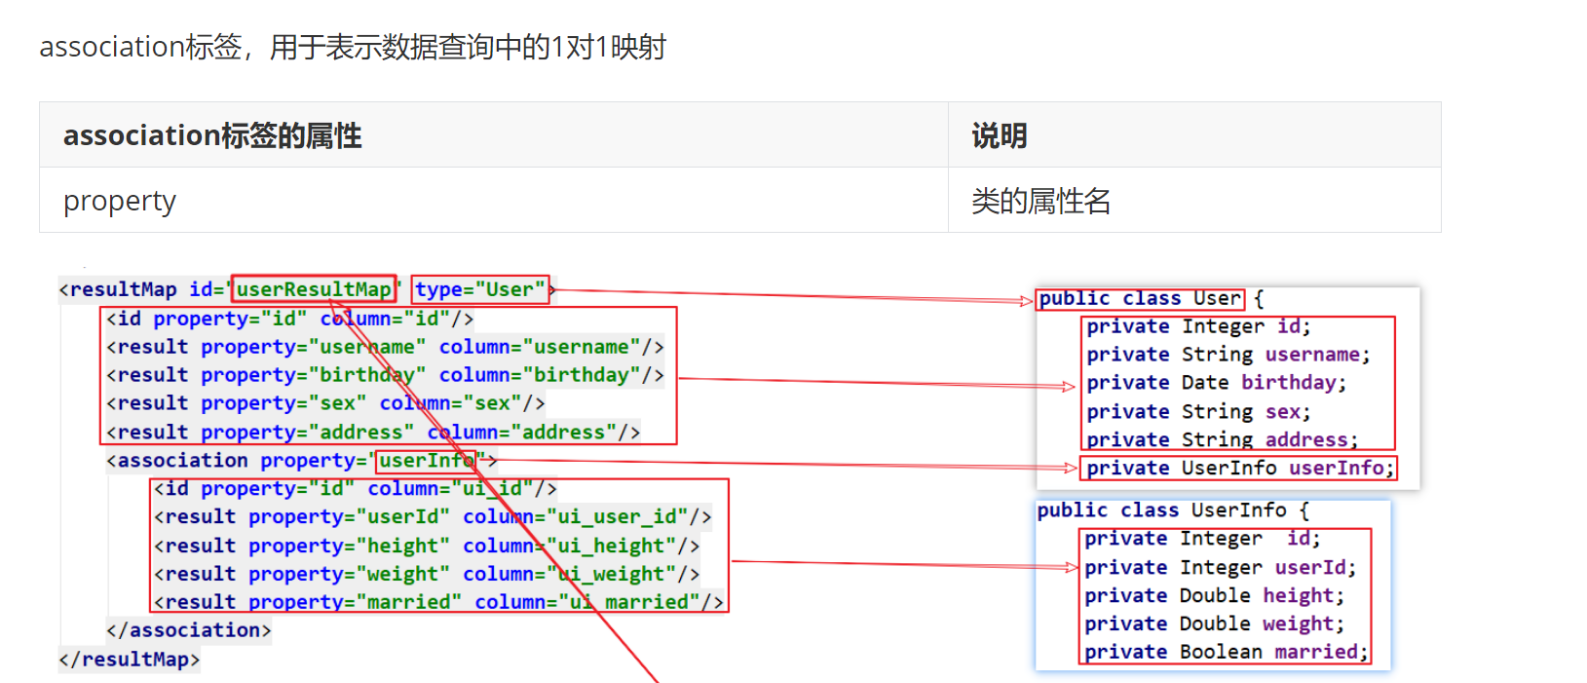
一对一映射通过<assosication>标签实现;一对多映射通过<collection>标签实现。
一对一映射
一对多
<!--
一对多映射
1. collection标签,用于表示数据查询中的1对多映射
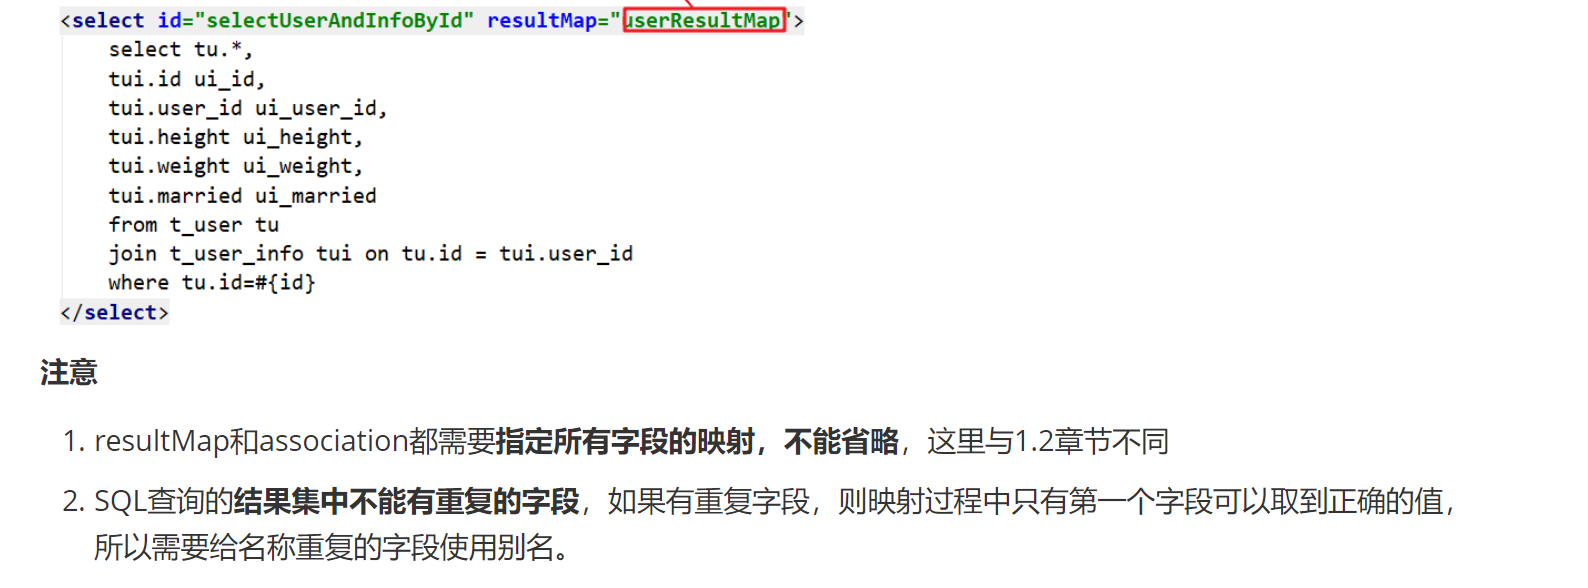
2. 此时,resultMap和collection都需要指定所有字段的映射,不能省略(同association)
3. SQL查询的结果集中不能有重复的字段,如果有重复字段,则映射过程中只有第一个字段可以取到正确的值,所以需要给名称重复的字段使用别名。(同association)
-->
<resultMap id="userAndOrderResultMap" type="User">
<id property="id" column="id"/>
<result property="username" column="username"/>
<result property="birthday" column="birthday"/>
<result property="sex" column="sex"/>
<result property="address" column="address"/>
<!--
collection 映射成一个集合
porperty 类属的属性名
ofType 集合内元素的类型
-->
<collection property="orders" ofType="Order" >
<id property="id" column="o_id"/>
<result property="userId" column="o_user_id"/>
<result property="goods" column="o_goods"/>
<result property="createTime" column="o_create_time"/>
<result property="note" column="o_note"/>
</collection>
</resultMap>
<select id="selectUserAndOrderById" resultMap="userAndOrderResultMap">
SELECT tu.*,
tor.id o_id,
tor.user_id o_user_id,
tor.goods o_goods,
tor.create_time o_create_time,
tor.note o_note
FROM t_user tu join t_order tor on tu.id=tor.user_id
where tu.id=#{id}
</select>

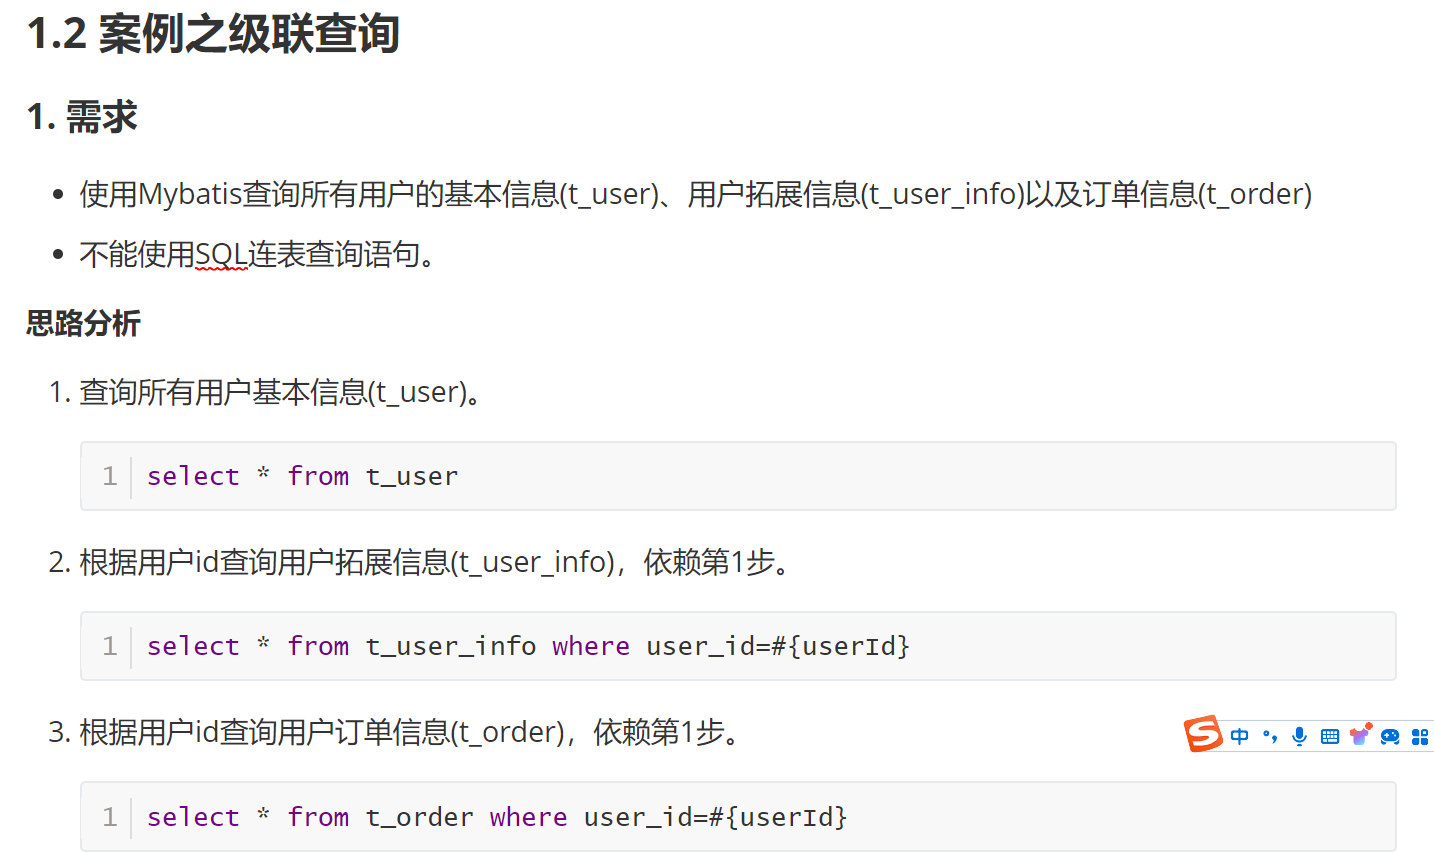
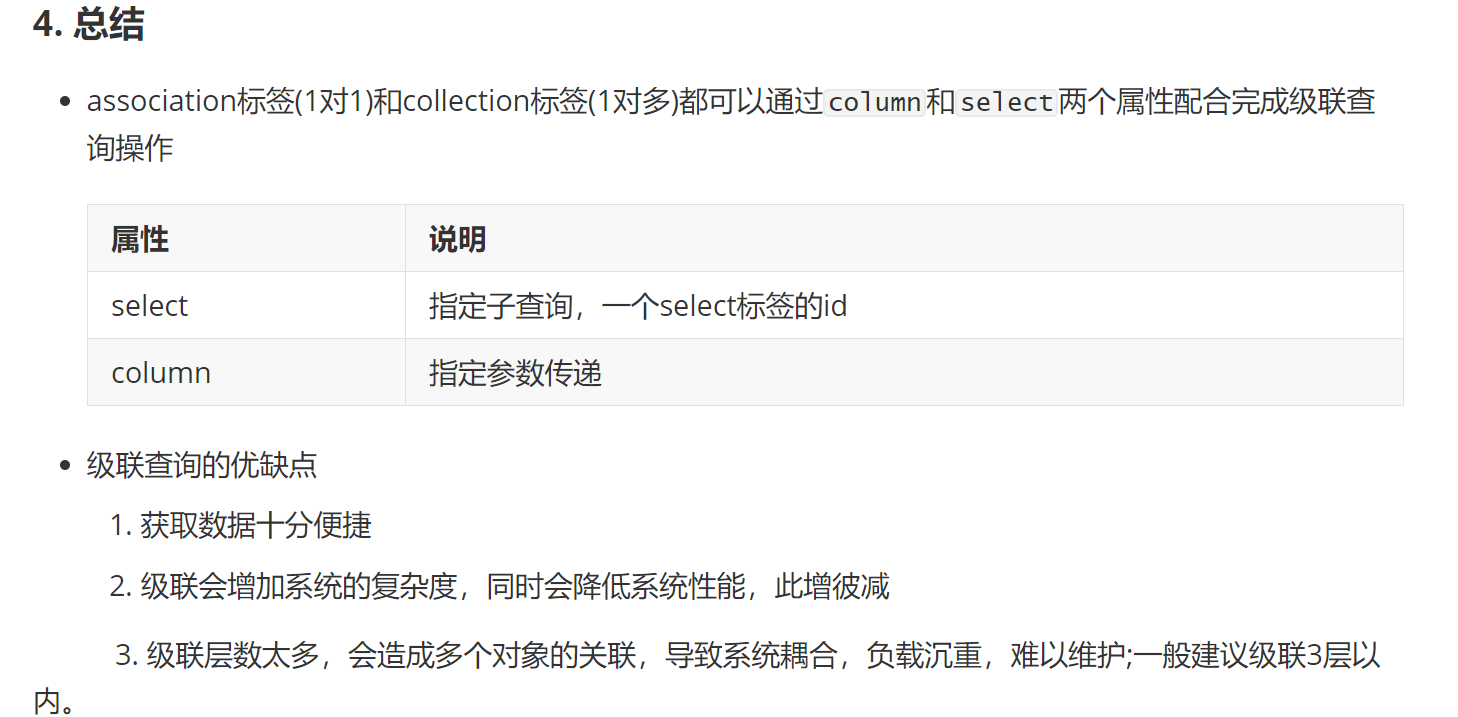
级联(嵌套)查询
public interface UserMapper{
	 /**
     * 查询所有用户基本信息、拓展细信、订单
     *
     * @return
     */
    List<User> selectAllUserAndInfoAndOrder();
}
    <!--用户详细信映射-->
    <resultMap id="userDetailResultMap" type="User">
        <id property="id" column="id"/>
        <result property="username" column="username"/>
        <result property="birthday" column="birthday"/>
        <result property="sex" column="sex"/>
        <result property="address" column="address"/>
        <!--
        association和collection都可以通过column属性和select属性配合完成级联查询操作
            select  子查询,一个select标签的id
            column  指定参数传递
        -->
        <association property="userInfo" column="id" select="selectUserInfoByUserId"/>
        <collection property="orders"   column="id"  select="selectOrderByUserId"/>
    </resultMap>
    <!--用户拓展信息映射-->
    <resultMap id="userInfoResultMap" type="UserInfo">
        <result property="userId" column="user_id"/>
    </resultMap>
    <!--订单信息映射-->
    <resultMap id="orderResultMap" type="Order">
        <result property="userId" column="user_id"/>
        <result property="createTime" column="create_time"/>
    </resultMap>

    <!--查询用户信息-->
    <select id="selectAllUserAndInfoAndOrder" resultMap="userDetailResultMap">
        select * from t_user
    </select>
    <!--查询用户拓展信-->
    <select id="selectUserInfoByUserId" resultMap="userInfoResultMap">
        select * from t_user_info where user_id=#{userId}
    </select>
    <!--查询订单信-->
    <select id="selectOrderByUserId" resultMap="orderResultMap">
        select * from t_order where user_id=#{userId}
    </select>
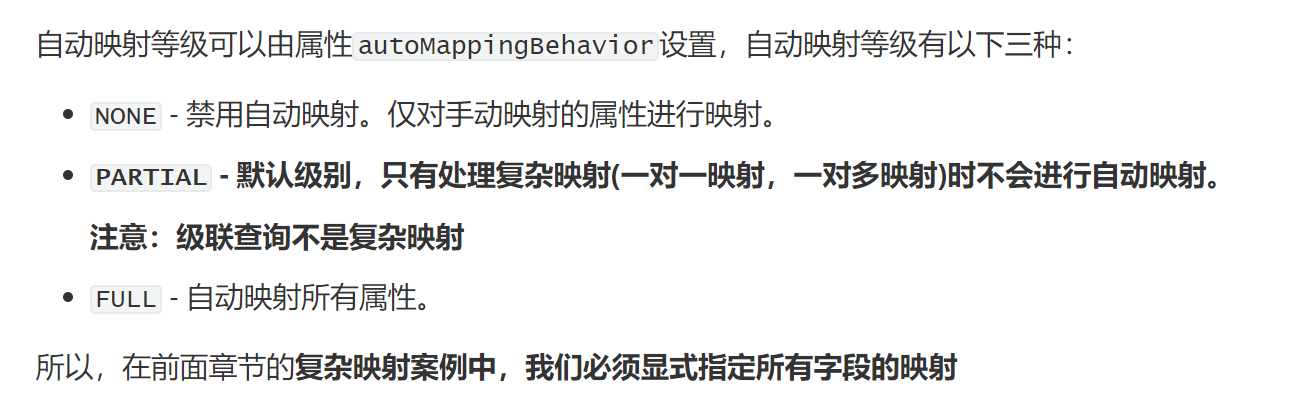
自动映射
当自动映射查询结果时,MyBatis 会获取结果(sql查询结果集)中返回的列名并在 Java 类中查找相同名字的属性(忽略大小写)。 这意味着如果发现了 ID 列和 id 属性,MyBatis 会将列 ID 的值赋给 id 属性。
通常数据库列使用大写字母组成的单词命名,单词间用下划线分隔;而 Java 属性一般遵循驼峰命名法约定。
注解开发
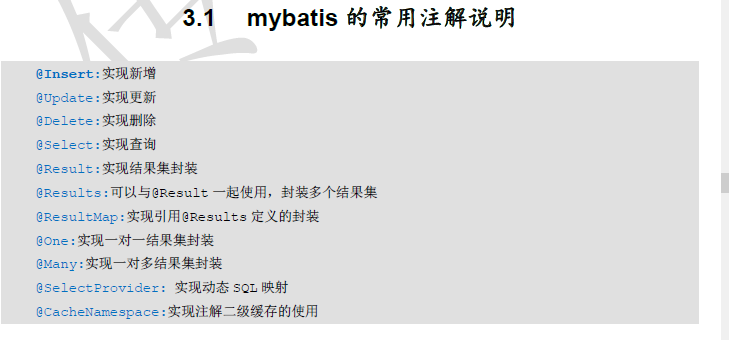
增删改查注解
@Select(“查询语句”)查询;
@Update(“更新语句”)更新;
@Delete(“删除语句”)删除;
@Insert(“插入语句”)插入;
@SelectKey()
public interface UserMapper {

    @Select(value = "select * from t_user where username like concat('%',#{username},'%')")
    List<User> selectByLike(String username);

    /**
     * 分页查询
     * @param startIndex
     * @param pageSize
     * @return
     */
    @Select(value = "select * from t_user limit #{param1}, #{param2}")
    List<User> selectByPage1(Integer startIndex, Integer pageSize);

    /**
     * 分页查询
     * @param startIndex
     * @param pageSize
     * @return
     */
    @Select(value = "select * from t_user limit #{startIndex}, #{pageSize}")
    List<User> selectByPage2(@Param("startIndex") Integer startIndex, @Param("pageSize") Integer pageSize);

    /**
     * 查询所有
     * @return
     */
    @Select(value = "select * from t_user")
    List<User> selectAll();
    /**
     * 通过id查询用户基础信息
     */
    @Select(value="select * from t_user where id = #{id}")
    User selectById(@Param("id") Integer id);

    /**
     * 更新用户信息基础信息
     * @param user
     * @return
     */
    @Update(value=" update t_user set username=#{username}, birthday=#{birthday}, sex=#{sex}, address=#{address} where id=#{id}")
    int update(User user);
    /**
     * 更新用户信息基础信息
     * @param id
     * @return
     */
    @Delete(value=" delete from  t_user where id=#{id}")
    int deleteById(@Param("id") Integer id);

    /**
     * 插入
     * @param user
     * @return
     */
    @Insert("insert into t_user(username,birthday,sex,address) values (#{username},#{birthday},#{sex},#{address})")
    @SelectKey(resultType = Integer.class,keyProperty ="id",before = false,statement = "select LAST_INSERT_ID()")
    int insert(User user);
}
结果映射
@Results:
@Result
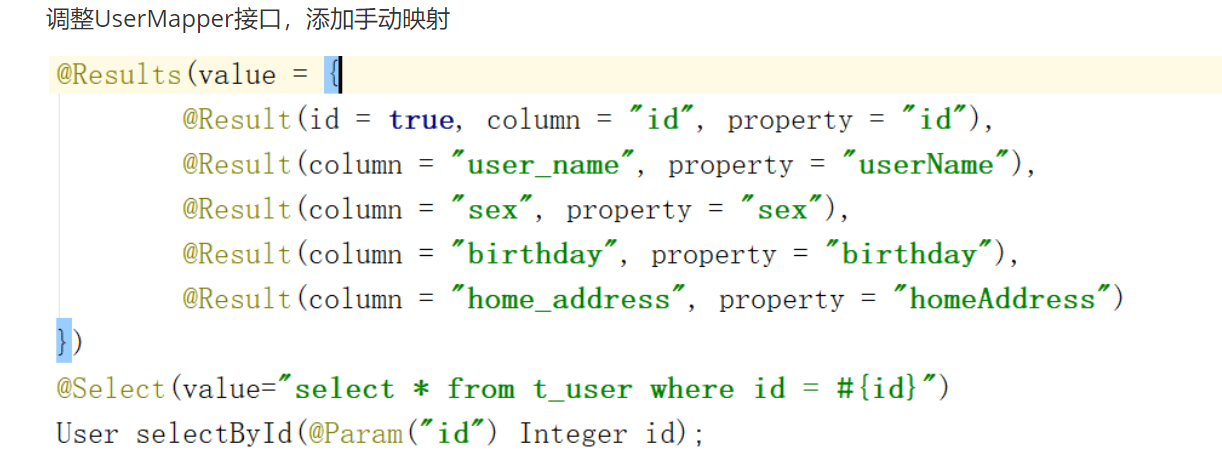
@Results:
含义:封装映射关系的父注解。
属性
value: 定义了Result 数组
@Result
含义:封装映射关系的子注解。
属性
id: 是否是主键
column:查询出的表中字段名称
property 属性:实体对象中的属性名称
javaType属性:被包含对象的数据类型
一对一级联查询
@One
@Results(value = {
        @Result(id = true, column = "id", property = "id"),
        @Result(column = "user_name", property = "userName"),
        @Result(column = "sex", property = "sex"),
        @Result(column = "birthday", property = "birthday"),
        @Result(column = "home_address", property = "homeAddress"),
        @Result(
                property = "userInfo",
                column = "id",
                one = @One(select = "com.itheima.dao.UserInfoMapper.selectUserInfoByUserId"))
})
@Select(value="select * from t_user where id = #{id}")
User selectById(@Param("id") Integer id);
public interface UserInfoMapper {

    @Select("select * from t_user_info where user_id = #{user_id}")
    UserInfo selectUserInfoByUserId(Integer userId);
}
@Results : 映射结果集
@Result: 映射某一列
@One: 一对一映射
一对多级联查询
@Many: 一对多映射
@Results(value = {
        @Result(id = true, column = "id", property = "id"),
        @Result(column = "user_name", property = "userName"),
        @Result(column = "sex", property = "sex"),
        @Result(column = "birthday", property = "birthday"),
        @Result(column = "home_address", property = "homeAddress"),
        @Result(
                property = "userInfo",
                column = "id",
                one = @One(select = "com.itheima.dao.UserInfoMapper.selectUserInfoByUserId")),
        @Result(
                property = "orders",
                column = "id",
                many = @Many(select = "com.itheima.dao.OrderMapper.selectOrderListByUserId"))
})
@Select(value="select * from t_user where id = #{id}")
User selectById(@Param("id") Integer id);
public interface UserInfoMapper {

    @Select("select * from t_user_info where user_id = #{user_id}")
    UserInfo selectUserInfoByUserId(Integer userId);
}
@Results : 映射结果集
@Result: 映射某一列
@Many: 一对多映射
原理
一级,二级缓存
MyBatis的缓存
@Transactional注解和Mybatis缓存问题
mybatis springboot 开启缓存
mybatis缓存分为 一级缓存和二级缓存
注:
缓存只针对于DQL语句,也就是说缓存机制只对应select语句。
在springboot中,使用了数据库连接池,默认每次查询后自动提交(commite),导致两次查询 不是一个sqlSession,根据一级缓存原理,它不会生效
缓存优先级: 二级>一级>数据库
1. ⼀级缓存:一级缓存的范围是SqlSession!
①⼀级缓存默认是开启的,不需要做任何配置。
②原理:只要使⽤同⼀个SqlSession对象执⾏同⼀条SQL语句,就会⾛缓存。
2. ⼆级缓存: ⼆级缓存的范围是SqlSessionFactory对象!
使⽤⼆级缓存需要具备以下⼏个条件:
① 全局性地开启或关闭所有映射器配置⽂件中已配置的任何缓存。默认就是true,⽆需设置(默认>二级缓存就是开启的)!
②在需要使⽤⼆级缓存的SqlMapper.xml⽂件中添加一个标签:
③使⽤⼆级缓存的实体类对象必须是可序列化的,也就是必须实现java.io.Serializable接⼝
④SqlSession对象关闭或提交之后,⼀级缓存中的数据才会被写⼊到⼆级缓存当中;此时⼆级缓存才可⽤。
3.MyBatis集成第三方缓存EhCache(了解)
集成EhCache是为了代替MyBatis⾃带的⼆级缓存,⼀级缓存是⽆法替代的!
懒加载
mybatisPlus
国内研发,在 MyBatis 的基础上只做增强不做改变
官网
依赖
    <!--SpringBoot-->
    <dependency>
        <groupId>com.baomidou</groupId>
        <!--下面坐标根据自己使用的SpringBoot版本二选一-->
        <!--SpringBoot2使用此版本-->
        <artifactId>mybatis-plus-boot-starter</artifactId>
        <!--3.5.4开始,支持SpringBoot3使用此版本-->
        <artifactId>mybatis-plus-spring-boot3-starter</artifactId>
        <version>最新版本</version>
    </dependency>
配置
mybatis-plus:

  mapper-locations: classpath:net/cnki/editor/expense/dao/impl/*.xml
  #类型:String[]
  #默认值:["classpath*:/mapper/**/*.xml"]
  #MyBatis Mapper 所对应的 XML 文件位置,如果您在 Mapper 中有自定义方法(XML 中有自定义实现),需要进行该配置,告诉 Mapper 所对应的 XML 文件位置,Maven 多模块项目的扫描路径需以 classpath*: 开头 (即加载多个 jar 包下的 XML 文件)

  type-aliases-package: net.cnki.editor.expense.dos
  #类型:String
  #默认值:null
  #MyBaits 别名包扫描路径,通过该属性可以给包中的类注册别名,注册后在 Mapper 对应的 XML 文件中可以直接使用类名,而不用使用全限定的类名(即 XML 中调用的时候不用包含包名)

  configuration.map-underscore-to-camel-case: true
   #类型:boolean
   #默认值:true
   #是否开启自动驼峰命名规则(camel case)映射,即从经典数据库列名 A_COLUMN(下划线命名) 到经典 Java 属性名 aColumn(驼峰命名) 的类似映射。

  global-config.db-config.id-type: assign_id
    # 类型:com.baomidou.mybatisplus.annotation.IdType
    #默认值:ASSIGN_ID
    #全局默认主键类型
注解
@MapperScan
在 Spring Boot 启动类中添加 @MapperScan 注解,扫描 Mapper 文件夹:
每天一个注解之@MapperScan
@SpringBootApplication
@MapperScan("com.baomidou.mybatisplus.samples.quickstart.mapper")
public class Application {

    public static void main(String[] args) {
        SpringApplication.run(Application.class, args);
    }

}
@TableName
描述:表名注解,标识实体类对应的表
使用位置:实体类
@TableId
描述:主键注解
使用位置:实体类主键字段
@TableField(opens new window)
描述:字段注解(非主键)
使用
springboot整合
1.添加依赖
2.添加配置文件
3.添加启动类扫描
@SpringBootApplication
@MapperScan("com.winter.dao")
public class SpringbootMybatisDemoApplication {

    public static void main(String[] args) {
        SpringApplication.run(SpringbootMybatisDemoApplication.class, args);
    }
}
4.添加实体类
@TableName("tb_user")
@Data
public class User {
    //设置id生成策略:AUTO 数据库自增
    @TableId(type = IdType.AUTO)
    private Long id;
    //@TableField("user_name")
    private String userName;

    private String password;
    private String name;
    private Integer age;
    private String email;
    //不希望该值存入数据库
   // @TableField(exist = false)
   // private String info;

}
5.创建mapper(可通过插件生成)
/**
 * 使用mp定义Mapper,需要让Mapper接口继承 BaseMapper接口。
 */

public interface UserMapper extends BaseMapper<User> {
}
6.创建service
public interface _UserService extends IService<User> {
}
@Service
public class _UserServiceImpl extends ServiceImpl<UserMapper, User> implements _UserService {}
7.分页查询,添加分页拦截器
@Configuration
public class PageConfig {

    /**
     * 3.4.0之前的版本用这个
     * @return
     */
   /* @Bean
    public PaginationInterceptor paginationInterceptor(){
        return  new PaginationInterceptor();
    }*/

    /**
     * 3.4.0之后提供的拦截器的配置方式
     * @return
     */
   @Bean
   public MybatisPlusInterceptor mybatisPlusInterceptor(){
       MybatisPlusInterceptor mybatisPlusInterceptor = new MybatisPlusInterceptor();
       mybatisPlusInterceptor.addInnerInterceptor(new PaginationInnerInterceptor());
       return mybatisPlusInterceptor;
   }
}
/**
     * 分页查询:
     *  1. 当前页码:currentPage
     *  2. 每页显示条数:size
     *
     *  注意:使用mp的分页要设置一个拦截器!!!
            */
    @Test
    public void testSelectPage() {
        int current = 1;//当前页码
        int size = 2;//每页显示条数
        IPage<User> page = new Page(current,size);
        userMapper.selectPage(page,null);

        List<User> records = page.getRecords();//当前页的数据
        long pages = page.getPages();//总页数 2
        long total = page.getTotal();//总记录数 4
        System.out.println(records);
        System.out.println(pages);
        System.out.println(total);
    }
8.条件构造器
基础比较查询
Wrapper()包装器://条件构建器
 1.QueryWrapper
     LambdaQueryWrapper
 2.UpdateWrapper
     LambdaUpdateWrapper

方法:
eq( ) :  等于 =
ne( ) :  不等于 <>
gt( ) :  大于 >
ge( ) :  大于等于  >=
lt( ) :  小于 <
le( ) :  小于等于 <=
between ( ) :  BETWEEN 值1 AND 值2
notBetween ( ) :  NOT BETWEEN 值1 AND 值2
in( ) :  in
notIn( ) :not in

逻辑查询
or( ) :让紧接着下一个方法用or连接

模糊查询
like 查询关键字前后都加%
notLike
likeLeft
likeRight

排序查询
orderBy
orderByAsc通过某个条件正排
orderByDesc反排

select:指定需要查询的字段
@Test
    public void testWrapper2(){
        //1.创建查询条件构建器
        QueryWrapper<User> wrapper = new QueryWrapper<>();
        //2.设置条件
        wrapper.eq("user_name","lisi")
                .or()
                .lt("age",23)
                .in("name","李四","王五");
        /*
            select * from tb_user where user_name = ? or age < ? and name in (?,?)
         */
        List<User> users = userMapper.selectList(wrapper);
        System.out.println(users);
    }
LambdaQueryWrapper:消除代码中的硬编码
@Test
    public void testWrapper7(){
        LambdaQueryWrapper<User> wrapper = new LambdaQueryWrapper<>();
        wrapper.eq(User::getUserName,"zhangsan");
        userMapper.selectOne(wrapper);
    }
LambdaQueryWrapper原理
代码生成工具,IDE插件


 1008
1008

 被折叠的 条评论
为什么被折叠?
被折叠的 条评论
为什么被折叠?
 到【灌水乐园】发言


