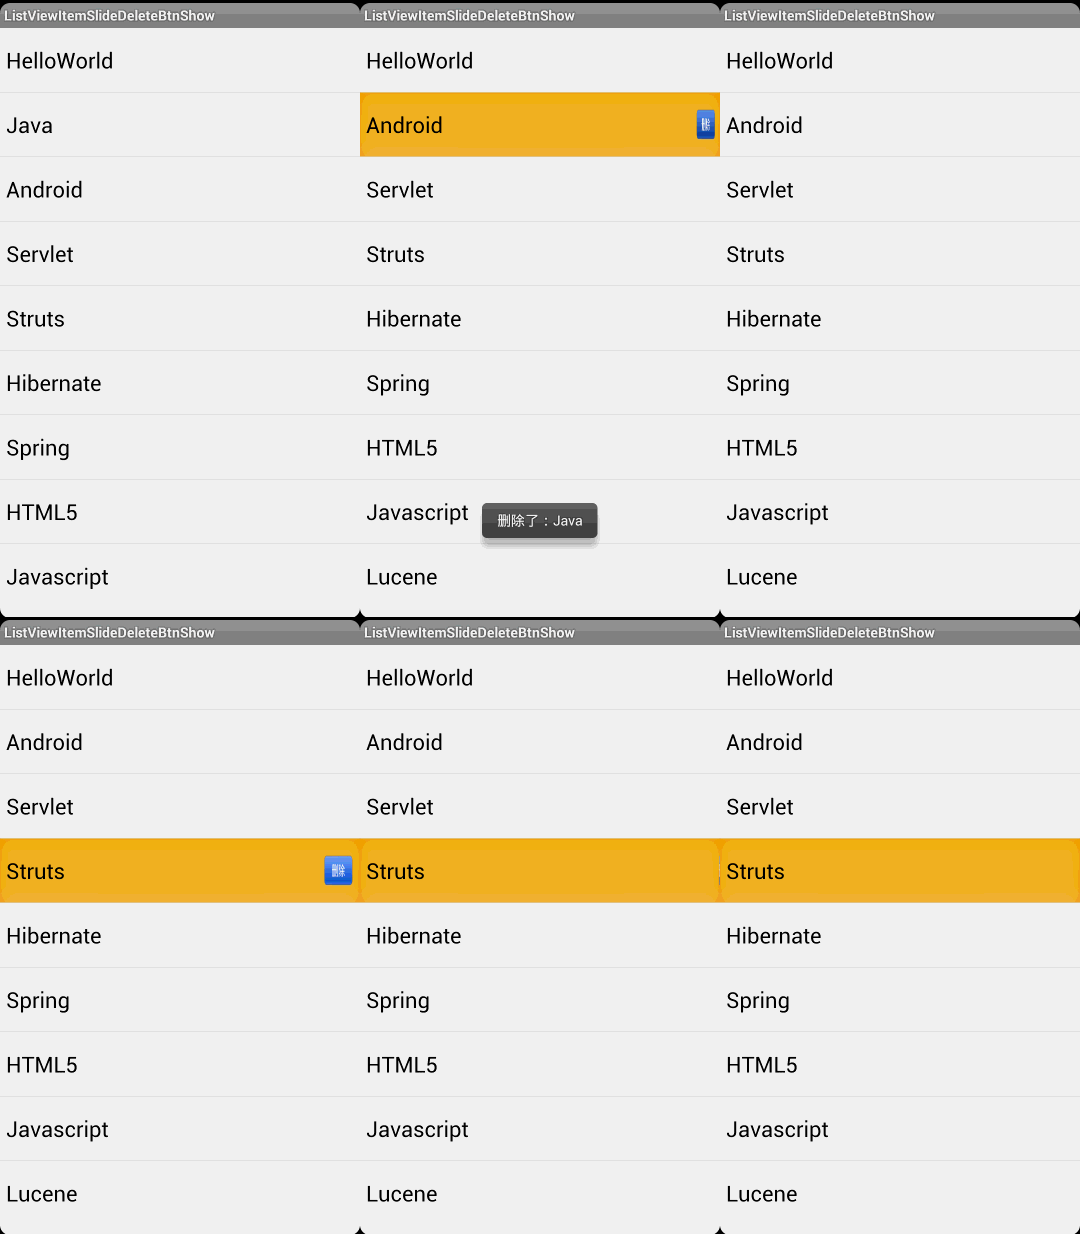
本来准备在ListView的每个Item的布局上设置一个隐藏的Button,当滑动的时候显示。但是因为每次只要存在一个Button,发现每个Item上的Button相互间不好控制。所以决定继承ListView然后结合PopupWindow。
首先是布局文件:
delete_btn.xml:这里只需要一个Button
<?
xml
version
=
"1.0"
encoding
=
"utf-8"
?>
- <LinearLayout xmlns:android="http://schemas.android.com/apk/res/android"
- android:layout_width="wrap_content"
- android:layout_height="wrap_content"
- android:orientation="vertical" >
- <Button
- android:id="@+id/id_item_btn"
- android:layout_width="60dp"
- android:singleLine="true"
- android:layout_height="wrap_content"
- android:text="删除"
- android:background="@drawable/d_delete_btn"
- android:textColor="#ffffff"
- android:paddingLeft="15dp"
- android:paddingRight="15dp"
- android:layout_alignParentRight="true"
- android:layout_centerVertical="true"
- android:layout_marginRight="15dp"
- />
- </LinearLayout>
- <RelativeLayout xmlns:android="http://schemas.android.com/apk/res/android"
- xmlns:tools="http://schemas.android.com/tools"
- android:layout_width="match_parent"
- android:layout_height="match_parent" >
- <com.example.listviewitemslidedeletebtnshow.QQListView
- android:id="@+id/id_listview"
- android:layout_width="fill_parent"
- android:layout_height="wrap_content" >
- </com.example.listviewitemslidedeletebtnshow.QQListView>
- </RelativeLayout>
- package com.example.listviewitemslidedeletebtnshow;
- import android.content.Context;
- import android.util.AttributeSet;
- import android.view.Gravity;
- import android.view.LayoutInflater;
- import android.view.MotionEvent;
- import android.view.View;
- import android.view.ViewConfiguration;
- import android.widget.Button;
- import android.widget.LinearLayout;
- import android.widget.ListView;
- import android.widget.PopupWindow;
-
public class QQListView extends ListView
{

   private static final String TAG = "QQlistView";

   // private static final int VELOCITY_SANP = 200;
   // private VelocityTracker mVelocityTracker;
   /**
    * 用户滑动的最小距离
    */
   private int touchSlop;

   /**
    * 是否响应滑动
    */
   private boolean isSliding;

   /**
    * 手指按下时的x坐标
    */
   private int xDown;
   /**
    * 手指按下时的y坐标
    */
   private int yDown;
   /**
    * 手指移动时的x坐标
    */
   private int xMove;
   /**
    * 手指移动时的y坐标
    */
   private int yMove;

   private LayoutInflater mInflater;

   private PopupWindow mPopupWindow;
   private int mPopupWindowHeight;
   private int mPopupWindowWidth;

   private Button mDelBtn;
   /**
    * 为删除按钮提供一个回调接口
    */
   private DelButtonClickListener mListener;

   /**
    * 当前手指触摸的View
    */
   private View mCurrentView;

   /**
    * 当前手指触摸的位置
    */
   private int mCurrentViewPos;

   /**
    * 必要的一些初始化
    *
    * @param context
    * @param attrs
    */
   public QQListView(Context context, AttributeSet attrs)
   {
      super(context, attrs);

      mInflater = LayoutInflater.from(context);
      touchSlop = ViewConfiguration.get(context).getScaledTouchSlop();

      View view = mInflater.inflate(R.layout.delete_btn, null);
      mDelBtn = (Button) view.findViewById(R.id.id_item_btn);
      mPopupWindow = new PopupWindow(view, LinearLayout.LayoutParams.WRAP_CONTENT,
            LinearLayout.LayoutParams.WRAP_CONTENT);
      /**
       * 先调用下measure,否则拿不到宽和高
       */
      mPopupWindow.getContentView().measure(0, 0);
      mPopupWindowHeight = mPopupWindow.getContentView().getMeasuredHeight();
      mPopupWindowWidth = mPopupWindow.getContentView().getMeasuredWidth();
   }

   @Override
   public boolean dispatchTouchEvent(MotionEvent ev)
   {
      int action = ev.getAction();
      int x = (int) ev.getX();
      int y = (int) ev.getY();
      switch (action)
      {

      case MotionEvent.ACTION_DOWN:
         xDown = x;
         yDown = y;
         /**
          * 如果当前popupWindow显示,则直接隐藏,然后屏蔽ListView的touch事件的下传
          */
         if (mPopupWindow.isShowing())
         {
            dismissPopWindow();
            return false;
         }
         // 获得当前手指按下时的item对应的数据在数据源模型中的索引
         mCurrentViewPos = pointToPosition(xDown, yDown);
         // 获得当前手指按下时的item      getFirstVisiblePosition() 返回当前屏幕上第一个可见的item的数据在数据源模型中的索引
         View view = getChildAt(mCurrentViewPos - getFirstVisiblePosition());
         mCurrentView = view;
         break;
      case MotionEvent.ACTION_MOVE:
         xMove = x;
         yMove = y;
         int dx = xMove - xDown;
         int dy = yMove - yDown;
         /**
          * 判断是否是从右到左的滑动
          */
         if (xMove < xDown && Math.abs(dx) > touchSlop && Math.abs(dy) < touchSlop)
         {
            // Log.e(TAG, "touchslop = " + touchSlop + " , dx = " + dx +
            // " , dy = " + dy);
            isSliding = true;
         }
         break;
      }

      boolean state = super.dispatchTouchEvent(ev);

      Log.i(TAG, "dispatchTouchEvent = " + ev.getAction() + ", return = " +state);
      /**
       *     通过查看源码super.dispatchTouchEvent(ev)直接调用的是ViewGroup#dispatchTouchEvent(ev)
       *     ViewGroup#onFilterTouchEventForSecurity() 过滤触摸事件到应用的安全策略
       *     如果是ACTION_DOWN事件就取消状态并清除触摸响应对象 重置触摸状态
       *     如果是ACTION_DOWN事件或者触控目标链表中第一次触控的目标不为空,调用onInterceptTouchEvent(ev)进行拦截处理
       *     如果没有拦截且没有取消,中途会调用dispatchTransformedTouchEvent()它的返回值会作为QQListView#dispatchTouchEvent()的返回值
       *
       *     在dispatchTransformedTouchEvent()中如果已经拦截或者复位取消接下来标志就调用当前View对象的super.dispatchTouchEvent(event)
       *否则就调用当前View对象的dispatchTouchEvent(event) 后面的情况和刚才的处理逻辑类似;View#dispatchTouchEvent()中,会先处理onTouch()事件
       *如果处理了onTouch()事件就返回true,那么就不会执行到onTouchEvent(event),所以我们一般设置了OnTouchListener事件监听就把返回值设置为false,
       *这样才能执行到onTouchEvent(event),执行onTouchEvent(event)后如果执行了单击等事件返回true,否则返回false
       *
       */

      return state;
   }

   @Override
   public boolean onTouchEvent(MotionEvent ev)
   {
      int action = ev.getAction();
      /**
       * 如果是从右到左的滑动才相应
       */
      if (isSliding)
      {
         switch (action)
         {
         case MotionEvent.ACTION_MOVE:

            int[] location = new int[2];
            // 获得当前item的位置x与y
            mCurrentView.getLocationOnScreen(location);
            // 设置popupWindow的动画
            mPopupWindow.setAnimationStyle(R.style.popwindow_delete_btn_anim_style);
            mPopupWindow.update();
            mPopupWindow.showAtLocation(mCurrentView, Gravity.LEFT | Gravity.TOP,
                  location[0] + mCurrentView.getWidth(), location[1] + mCurrentView.getHeight() / 2
                        - mPopupWindowHeight / 2);

            Log.i(TAG, "location[0]=" + location[0] + " ,location[1] = " + location[1] + ", mCurrentView.getWidth() = " + mCurrentView.getWidth() + " , mCurrentView.getHeight() = " + mCurrentView.getHeight() + " , mPopupWindowHeight = " + mPopupWindowHeight);

            // 设置删除按钮的回调
            mDelBtn.setOnClickListener(new OnClickListener()
            {
               @Override
               public void onClick(View v)
               {
                  if (mListener != null)
                  {
                     mListener.clickHappend(mCurrentViewPos);
                     mPopupWindow.dismiss();
                  }
               }
            });
            // Log.e(TAG, "mPopupWindow.getHeight()=" + mPopupWindowHeight);

            break;
         case MotionEvent.ACTION_UP:
            isSliding = false;

         }
         // 相应滑动期间屏幕itemClick事件,避免发生冲突
         return true;
      }

      /**
       * super.onTouchEvent(ev)这里调用的是AbsListView重写的onTouchEvent(ev)是返回true的
       */
      boolean state = super.onTouchEvent(ev);
      Log.i(TAG, "state = " + state + ", action = " + ev.getAction());

      return state;
   }

   /**
    * 隐藏popupWindow
    */
   private void dismissPopWindow()
   {
      if (mPopupWindow != null && mPopupWindow.isShowing())
      {
         mPopupWindow.dismiss();
      }
   }

   public void setDelButtonClickListener(DelButtonClickListener listener)
   {
      mListener = listener;
   }

   interface DelButtonClickListener
   {
      public void clickHappend(int position);
   }

}
接下来是MainActivity.java,这里代码很简单不做介绍了。
- package com.example.listviewitemslidedeletebtnshow;
- import java.util.ArrayList;
- import java.util.Arrays;
- import java.util.List;
- import android.app.Activity;
- import android.os.Bundle;
- import android.view.View;
- import android.widget.AdapterView;
- import android.widget.AdapterView.OnItemClickListener;
- import android.widget.ArrayAdapter;
- import android.widget.Toast;
- import com.example.listviewitemslidedeletebtnshow.QQListView.DelButtonClickListener;
- public class MainActivity extends Activity
- {
- private QQListView mListView;
- private ArrayAdapter<String> mAdapter;
- private List<String> mDatas;
- @Override
- protected void onCreate(Bundle savedInstanceState)
- {
- super.onCreate(savedInstanceState);
- setContentView(R.layout.activity_main);
- mListView = (QQListView) findViewById(R.id.id_listview);
- // 不要直接Arrays.asList
- mDatas = new ArrayList<String>(Arrays.asList("HelloWorld", "Welcome", "Java", "Android", "Servlet", "Struts",
- "Hibernate", "Spring", "HTML5", "Javascript", "Lucene"));
- mAdapter = new ArrayAdapter<String>(this, android.R.layout.simple_list_item_1, mDatas);
- mListView.setAdapter(mAdapter);
- mListView.setDelButtonClickListener(new DelButtonClickListener()
- {
- @Override
- public void clickHappend(final int position)
- {
- Toast.makeText(MainActivity.this, position + " : " + mAdapter.getItem(position), 1).show();
- mAdapter.remove(mAdapter.getItem(position));
- }
- });
- mListView.setOnItemClickListener(new OnItemClickListener()
- {
- @Override
- public void onItemClick(AdapterView<?> parent, View view, int position, long id)
- {
- Toast.makeText(MainActivity.this, position + " : " + mAdapter.getItem(position), 1).show();
- }
- });
- }
- }


 335
335

 被折叠的 条评论
为什么被折叠?


