springboot集成cxf调用webservice踩坑Unable to create schema compiler

1. springboot集成cxf

		#只使用第一个应该可以,具体没测试
		<dependency>
			<groupId>org.apache.cxf</groupId>
			<artifactId>cxf-spring-boot-starter-jaxws</artifactId>
			<version>3.4.3</version>
		</dependency>
		
	
		<dependency>
			<groupId>org.apache.cxf</groupId>
			<artifactId>cxf-rt-frontend-jaxws</artifactId>
			<version>3.4.3</version>
		</dependency>

		<dependency>
			<groupId>org.apache.cxf</groupId>
			<artifactId>cxf-rt-transports-http</artifactId>
			<version>3.4.3</version>
		</dependency>

2. 创建cxf工具类

import org.apache.cxf.endpoint.Endpoint;
import org.apache.cxf.jaxws.endpoint.dynamic.JaxWsDynamicClientFactory;
import org.apache.cxf.service.model.BindingInfo;
import org.apache.cxf.service.model.BindingOperationInfo;
import org.springframework.stereotype.Service;

import javax.xml.namespace.QName;

@Service
public class CXFUtils {
	
	/**
     * 
     * @param url webservice接口地址
     * @param operation 方法名
     * @param parameters 参数
     * @return 接口返回值
     */
    public static Object[] invokeRemoteMethod(String url, String operation, Object[] parameters) {
        Object[] res = null;
        try {
            JaxWsDynamicClientFactory dcf = JaxWsDynamicClientFactory.newInstance();
            if (!url.endsWith("wsdl")) {
                url += "?wsdl";
            }
            org.apache.cxf.endpoint.Client client = dcf.createClient(url);
            //处理webService接口和实现类namespace不同的情况,CXF动态客户端在处理此问题时,会报No operation was found with the name的异常
            Endpoint endpoint = client.getEndpoint();
            QName opName = new QName(endpoint.getService().getName().getNamespaceURI(), operation);
            BindingInfo bindingInfo = endpoint.getEndpointInfo().getBinding();
            if (bindingInfo.getOperation(opName) == null) {
                for (BindingOperationInfo operationInfo : bindingInfo.getOperations()) {
                    if (operation.equals(operationInfo.getName().getLocalPart())) {
                        opName = operationInfo.getName();
                        break;
                    }
                }
            }
            res = client.invoke(opName, parameters);
        } catch (Exception e) {
            e.printStackTrace();
        }
        return res;
    }
}

3. 踩坑记录

1、 idea编辑器中测试正常,jar包运行时调用webservice提示 Unable to create schema compiler

解决办法:

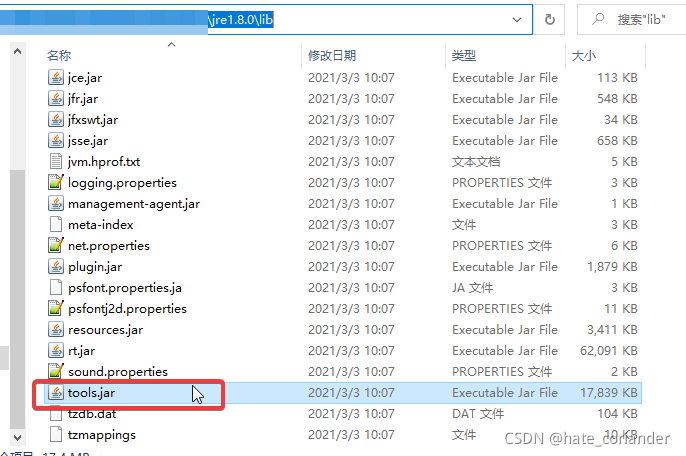
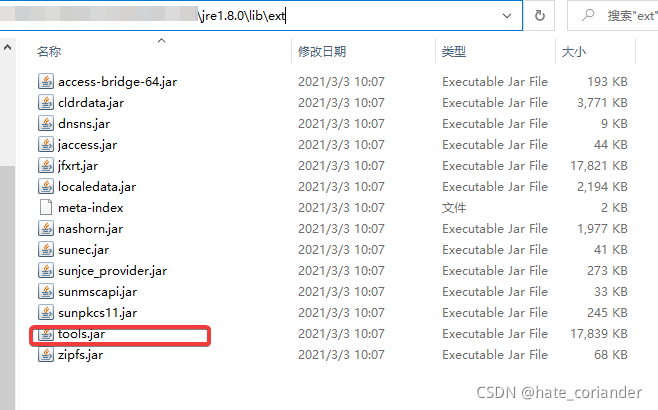
指定jre启动,为避免引起其他项目出错,复制jdk目录下jre包到jar包目录中。
在这里插入图片描述

复制jdk下lib中tools.jar到jre的lib和lib\ext文件内(网上有人说只复制到lib包下即可,实测不行)
在这里插入图片描述
在这里插入图片描述

指定jre启动jar包

start jre1.8.0/bin/java -jar -Dspring.config.location=application.yml -Dfile.encoding=utf-8 xxx.jar

  • 1
    点赞
  • 2
    收藏
    觉得还不错? 一键收藏
  • 0
    评论
### 回答1: Spring Boot集成CXF框架可以方便地调用Web服务。以下是使用Spring Boot和CXF调用Web服务的步骤: 1. 在pom.xml文件中添加CXF依赖: ``` <dependency> <groupId>org.apache.cxf</groupId> <artifactId>cxf-spring-boot-starter-jaxws</artifactId> <version>3.3.6</version> </dependency> ``` 2. 创建一个接口来定义Web服务的操作: ``` @WebService public interface MyWebService { @WebMethod String sayHello(String name); } ``` 3. 创建一个实现类来实现接口中定义的操作: ``` @Service @WebService(endpointInterface = "com.example.MyWebService") public class MyWebServiceImpl implements MyWebService { @Override public String sayHello(String name) { return "Hello " + name + "!"; } } ``` 4. 在应用程序的配置文件中添加CXF配置: ``` cxf: servlet: path: /services/* jaxws: properties: javax.xml.ws.soap.http.soapaction.use: "false" ``` 5. 在控制器中注入Web服务并调用它: ``` @RestController public class MyController { @Autowired private MyWebService myWebService; @GetMapping("/hello/{name}") public String sayHello(@PathVariable String name) { return myWebService.sayHello(name); } } ``` 6. 启动应用程序并访问Web服务: ``` http://localhost:8080/services/MyWebServiceImpl?wsdl ``` 以上就是使用Spring Boot和CXF调用Web服务的步骤。 ### 回答2: Spring Boot是一个使用习惯优秀的Web应用开发框架,它可以帮助我们快速构建应用,提高开发效率。而CXF是一个开源的WebService框架,它提供了一系列的API和工具来帮助开发人员可以很轻易地实现一个基于SOAP的Web服务。 在Spring Boot中调用CXF框架中的WebService,需要进行以下步骤: 1. 添加依赖 在pom.xml中添加CXF和Spring Boot Web依赖: ``` <dependencies> <dependency> <groupId>org.springframework.boot</groupId> <artifactId>spring-boot-starter-web</artifactId> </dependency> <dependency> <groupId>org.apache.cxf</groupId> <artifactId>cxf-spring-boot-starter-jaxws</artifactId> <version>3.3.1</version> </dependency> </dependencies> ``` 2. 编写WebService客户端类 编写一个类来调用CXF产生的webservice服务,其中包括Endpoint指向和需要调用的方法等信息。 ``` @Service public class WebServiceClient { @Autowired private JaxWsProxyFactoryBean jaxWsProxyFactoryBean; private HelloPortType helloPortType; public String sayHello(final String name) { initPortType(); return helloPortType.sayHello(name); } private void initPortType() { if (helloPortType == null) { jaxWsProxyFactoryBean.setServiceClass(HelloPortType.class); jaxWsProxyFactoryBean.setAddress("http://localhost:8080/hello"); helloPortType = (HelloPortType) jaxWsProxyFactoryBean.create(); } } } ``` 3. 编写WebService 通过CXF创建web服务,并实现接口提供服务,返回接口需要的数据。 ``` @javax.jws.WebService(serviceName = "HelloService", portName = "HelloPort", targetNamespace = "http://www.example.org/HelloService/", endpointInterface = "org.example.service.HelloPortType") public class HelloPortTypeImpl implements HelloPortType { private final static Logger LOGGER = LoggerFactory.getLogger(HelloPortTypeImpl.class); @Resource private WebServiceContext webServiceContext; @Override public String sayHello(final String name) { final MessageContext mc = webServiceContext.getMessageContext(); final HttpServletRequest req = (HttpServletRequest) mc.get(MessageContext.SERVLET_REQUEST); LOGGER.info("服务SayHello calling, name: {}, IP addr:{}, sessionId: {}", name, req.getRemoteAddr(), req.getSession().getId()); return String.format("Hello, %s!", name); } } ``` 4. 进行测试 在控制器中注入WebService客户端类,并进行测试。 ``` @RestController @RequestMapping("/test") public class TestController { @Autowired private WebServiceClient webServiceClient; @GetMapping("/sayHello") public String sayHello(@RequestParam(value = "name") final String name) { return webServiceClient.sayHello(name); } } ``` 总的来说,Spring Boot和CXF框架结合起来使用,可以很方便地调用WebService,提供服务的代码也可以很容易地进行编写。 ### 回答3: SpringBoot是一个非常受欢迎的Java框架,其有很多优秀的特性让使用者更方便地进行应用的开发。其中,SpringBootCXF框架结合使用来调用Webservice可以非常简单地完成。本文将介绍SpringBootCXF框架结合使用来调用Webservice。 首先,我们需要在pom.xml文件中加入CXF及相关依赖。 ```xml <dependency> <groupId>org.apache.cxf</groupId> <artifactId>cxf-rt-frontend-jaxws</artifactId> <version>3.2.14</version> </dependency> <dependency> <groupId>org.apache.cxf</groupId> <artifactId>cxf-rt-transport-http</artifactId> <version>3.2.14</version> </dependency> ``` 然后,我们需要在配置文件中设置一些参数,具体如下: ```yaml cxf: client: simple.frontend: true logging.enabled: true timeout: connect: 2000 receive: 5000 path: /ws servlet: url-pattern: /soap/* ``` 在上述配置中,我们开启了日志记录,设置了连接超时和读取超时时间,以及指明了Webservice的路径。 接下来就可以创建一个接口来调用我们的Webservice。例如,我们想要调用一个返回学生列表的Webservice: ```java @WebService public interface StudentWebService { @WebMethod List<Student> getStudents(); } ``` 我们使用CXF的JAX-WS Frontend创建了一个接口,同时使用@WebService注解来标记该接口。然后我们就可以创建一个实现类来实现该接口: ```java @Service public class StudentWebServiceImpl implements StudentWebService { @Override public List<Student> getStudents() { // 调用Webservice,返回学生列表 return new ArrayList<>(); } } ``` 在上述实现类中,我们使用@Service注解来标记该类为SpringBoot的一个服务,同时实现了我们在接口中声明的getStudents()方法,去调用Webservice并返回学生列表。在该方法中,我们可以使用Spring提供的RestTemplate或者使用CXF的Client接口来进行调用。 然后我们同样使用CXF开放一个服务端口,供客户端调用: ```java @Configuration public class CxfConfig { @Bean(name = Bus.DEFAULT_BUS_ID) public SpringBus springBus() { return new SpringBus(); } @Bean public ServletRegistrationBean<CXFServlet> cxfServlet() { return new ServletRegistrationBean<CXFServlet>(new CXFServlet(), "/soap/*"); } @Bean public StudentWebService studentWebService() { return new StudentWebServiceImpl(); } @Bean public Endpoint endpoint() { EndpointImpl endpoint = new EndpointImpl(springBus(), studentWebService()); endpoint.publish("/StudentWebService"); return endpoint; } } ``` 在上述代码中,我们创建了一个CXFServlet,并将其映射到/soap/*路径下,同时创建了一个WebService的实现类,在SpringBoot启动时通过Endpoint暴露出来。这样我们就可以在客户端中通过CXF框架来访问Webservice了。 总结一下,SpringBootCXF框架结合使用调用Webservice可以非常方便地完成。我们只需要提供一个接口,实现其方法并使用CXF暴露出去,就可以在客户端通过CXF框架来访问了。同时,我们还可以使用CXF的一些特性来定制化我们的调用过程,包括定制连接超时、读取超时、日志记录等。

“相关推荐”对你有帮助么?

  • 非常没帮助
  • 没帮助
  • 一般
  • 有帮助
  • 非常有帮助
提交
评论
添加红包

请填写红包祝福语或标题

红包个数最小为10个

红包金额最低5元

当前余额3.43前往充值 >
需支付:10.00
成就一亿技术人!
领取后你会自动成为博主和红包主的粉丝 规则
hope_wisdom
发出的红包
实付
使用余额支付
点击重新获取
扫码支付
钱包余额 0

抵扣说明:

1.余额是钱包充值的虚拟货币,按照1:1的比例进行支付金额的抵扣。
2.余额无法直接购买下载,可以购买VIP、付费专栏及课程。

余额充值