


导语:
刚学springboot几天,做了个小例子,感觉springboot很好用。相比ssm,springboot除去了很多的繁杂的配置,使用起来非常方便。而且springboot内置了tomcat、jetty这两个web服务器,也不需要你再去配置web服务器,方便刚学springboot或者想学springboot的朋友,下面就带你一步一步做成一个小例子
工具:
开发工具:IDEA 2019.2
框架:springboot、mybatis、bootstrap
模板引擎:thymeleaf
数据库:MySQL
构建工具:Maven
项目搭建

一、数据库设计
创建好数据库之后随便插入几条数据就可以了
CREATE TABLE `stus` (
  `id` int(11) NOT NULL AUTO_INCREMENT,
  `username` varchar(50) DEFAULT NULL,
  `password` varchar(50) CHARACTER SET utf8mb4 COLLATE utf8mb4_0900_ai_ci DEFAULT NULL,
  PRIMARY KEY (`id`)
) ENGINE=InnoDB AUTO_INCREMENT=42 DEFAULT CHARSET=utf8mb4 COLLATE=utf8mb4_0900_ai_ci;
在resource中创建application.yml配置文件,有两种文件,一种是properties的一种是yml的,这里使用的是yml的,yml的编写格式很重要,就是冒号后面一定要给一个空格,而且不能按tab键缩进,必须手动缩进,下面是对数据库连接的配置
spring:
  #数据库配置
  datasource:
    url: jdbc:mysql://localhost:3306/数据库名?useSSL=false
    driver-class-name: com.mysql.jdbc.Driver
    username: 用户名
    password: 密码
    initial-size: 10
    max-active: 20
    max-idle: 8
    min-idle: 8
pro.xml文件(导入依赖)
注意
- 在pom.xml文件这里有几点需要注意的,就是导入springboot和mybatis的整合包的时候不需要再导入mybatis包,会冲突
- 添加junit测试包的时候不用添加scope,不然无法在controller中使用测试
<?xml version="1.0" encoding="UTF-8"?>
<project xmlns="http://maven.apache.org/POM/4.0.0" xmlns:xsi="http://www.w3.org/2001/XMLSchema-instance"
         xsi:schemaLocation="http://maven.apache.org/POM/4.0.0 https://maven.apache.org/xsd/maven-4.0.0.xsd">
    <modelVersion>4.0.0</modelVersion>
    <parent>
        <groupId>org.springframework.boot</groupId>
        <artifactId>spring-boot-starter-parent</artifactId>
        <version>2.7.1</version>
        <relativePath/> <!-- lookup parent from repository -->
    </parent>
    <groupId>com.ketai</groupId>
    <artifactId>springboot-mybatis-demo-02</artifactId>
    <version>0.0.1-SNAPSHOT</version>
    <name>springboot-mybatis-demo-02</name>
    <description>Demo project for Spring Boot</description>
    <properties>
        <java.version>1.8</java.version>
    </properties>
    <dependencies>
        <!--web启动器  spring-boot-starter-xx springboot官方的starter-->
        <dependency>
            <groupId>org.springframework.boot</groupId>
            <artifactId>spring-boot-starter-web</artifactId>
        </dependency>
        <!--mybatis启动器 xxx-spring-boot-starter 第三方的starter-->
        <dependency>
            <groupId>org.mybatis.spring.boot</groupId>
            <artifactId>mybatis-spring-boot-starter</artifactId>
            <version>2.2.2</version>
        </dependency>

        <!--mysql-->
        <dependency>
            <groupId>mysql</groupId>
            <artifactId>mysql-connector-java</artifactId>
        </dependency>

        <!--lombok-->
        <dependency>
            <groupId>org.projectlombok</groupId>
            <artifactId>lombok</artifactId>
        </dependency>

        <!--测试-->
        <dependency>
            <groupId>org.springframework.boot</groupId>
            <artifactId>spring-boot-starter-test</artifactId>
            <scope>test</scope>
        </dependency>
        <!-- thymeleaf -->
        <dependency>
            <groupId>org.springframework.boot</groupId>
            <artifactId>spring-boot-starter-thymeleaf</artifactId>
            <version>2.7.5</version>
        </dependency>
        <dependency>
            <groupId>com.github.pagehelper</groupId>
            <artifactId>pagehelper-spring-boot-starter</artifactId>
            <version>1.2.5</version>
        </dependency>
    </dependencies>

    <build>
        <plugins>
            <plugin>
                <groupId>org.springframework.boot</groupId>
                <artifactId>spring-boot-maven-plugin</artifactId>
            </plugin>
        </plugins>
    </build>

</project>
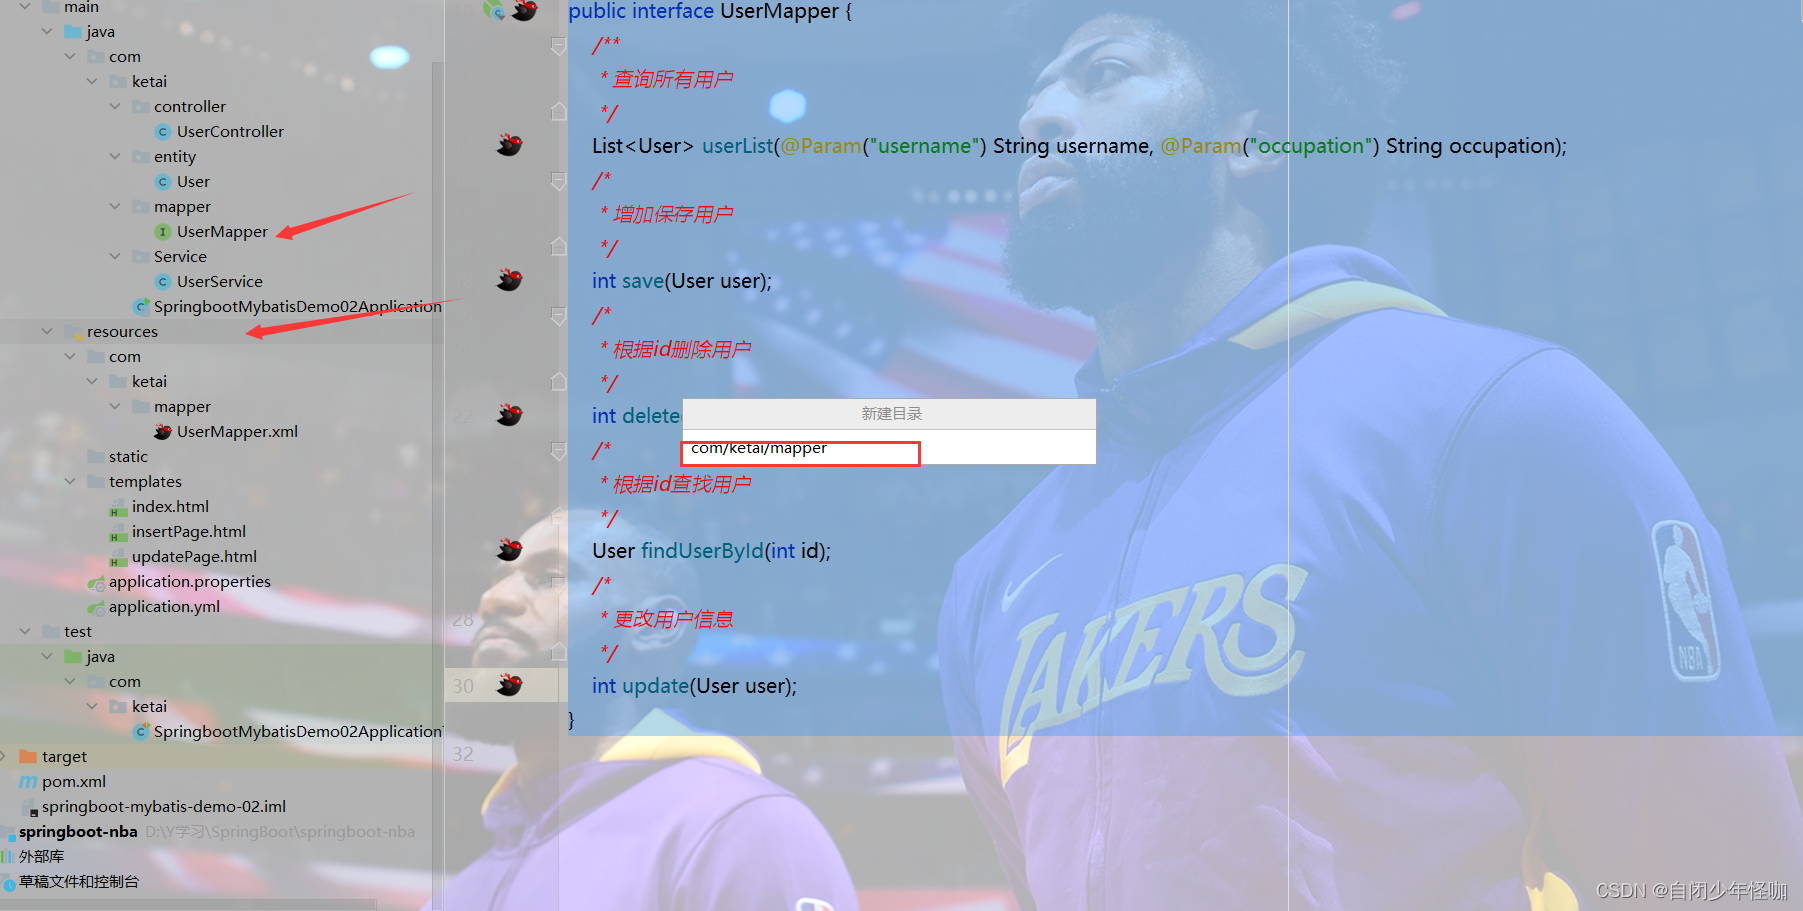
三、项目结构
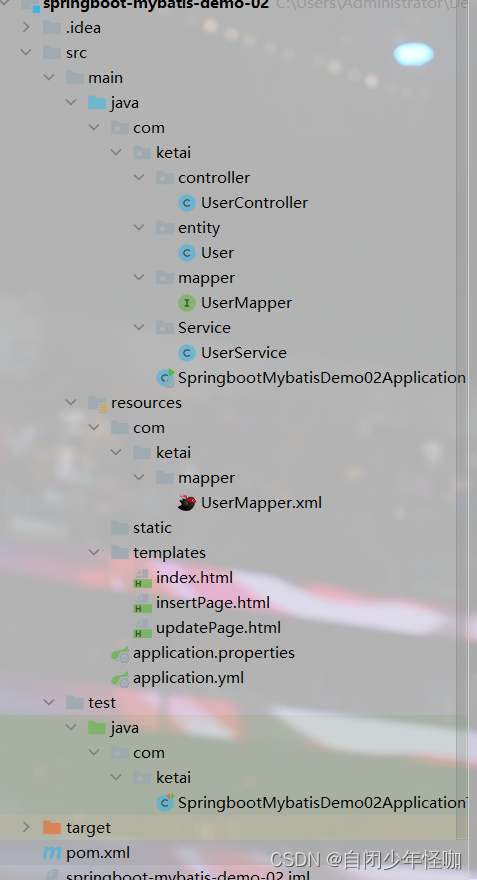
四、前端代码实现
前端代码并没有实现,只是单纯展示数据,大佬勿喷
在resource目录下新建两=个文件夹,分别是templates、static
templates用于存放html页面
static用于存放静态资源文件,如(js、img、css)
pagehelper:配置的是分页插件
#配置数据源
spring:
  datasource:
    driver-class-name: com.mysql.cj.jdbc.Driver
    url: jdbc:mysql://localhost:3306/springboot?serverTimezone=GMT%2B8
    username: root
    password: root

#mybatis的配置
mybatis:
  #别名
  type-aliases-package: com.ketai.entity
  #下划线自动映射驼峰
  configuration:
    map-underscore-to-camel-case: true
  #指定sql映射文件的位置
  mapper-locations: classpath:com/ketai/U*.xml

pagehelper:
  helperDialect: mysql
  reasonable: true
  supportMethodsArguments: false
  params: count=countSql
如果启动出现此错误的话
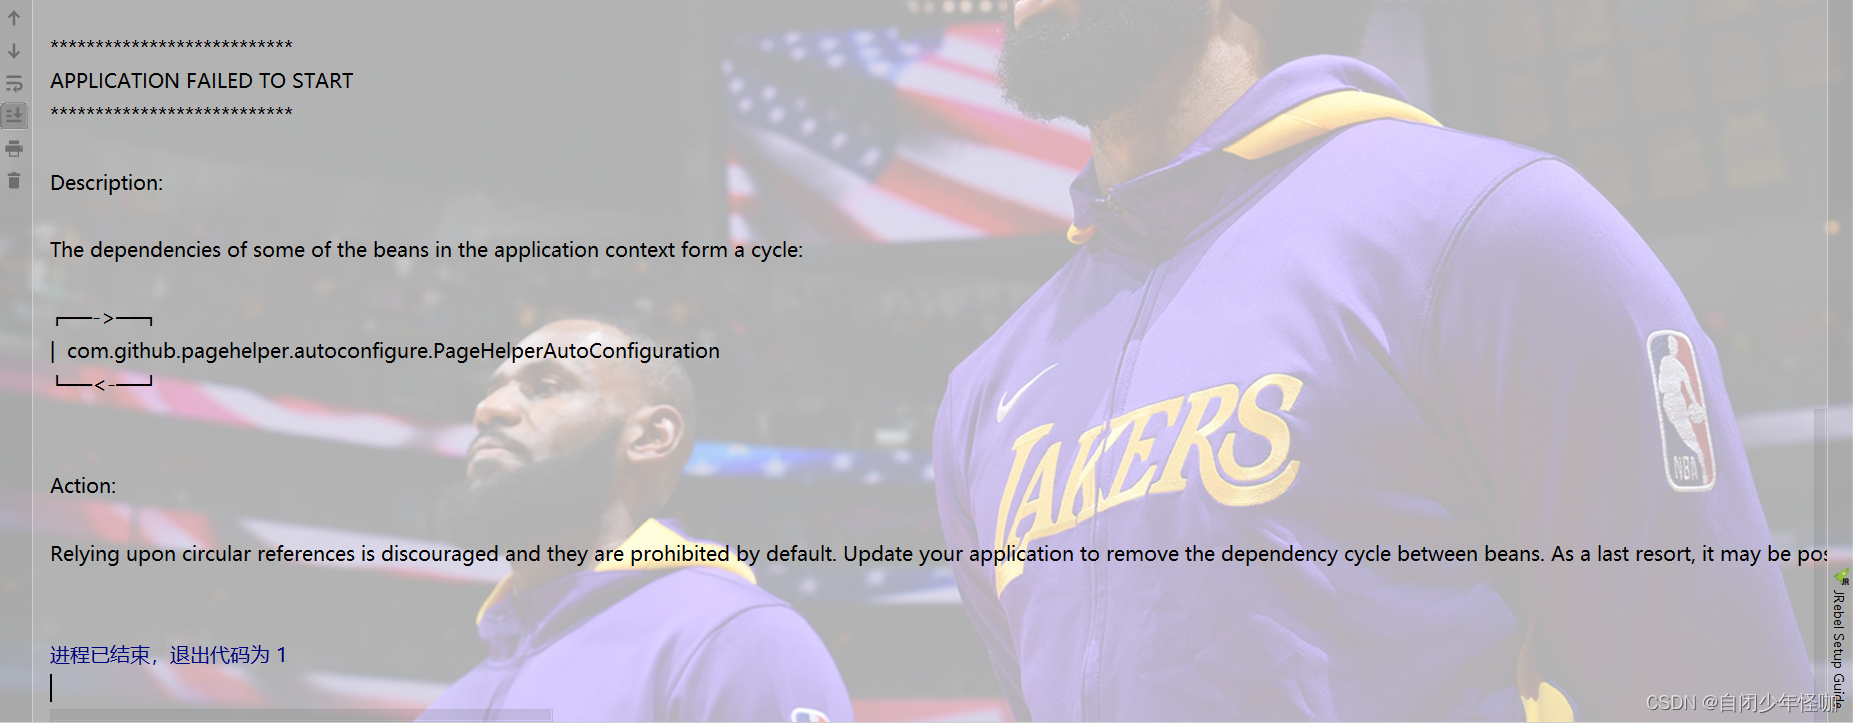
只需要在application.properties添加以下语句
spring.main.allow-circular-references=true

在templates文件夹中新建一个html页面,命名为userList.html,如果需要使用样式框架的话加在static里面的文件夹就可以了
注意
在html中导入bootstrap样式的时候路径要注意,就是如果你在application.yml配置了访问的是static目录下的资源的时候,在html导入的静态资源是不需要在前面加static了
比如这里的bootstrap.css样式是放在static/css目录下的,在html中就直接写css/bootstrap.css就可以了,如果在前面加了static就无法访问样式了,这里踩了很多坑,要注意
使用thymeleaf模板引擎的时候一定添加 xmlns:th="http://www.thymeleaf.org"在html标签中
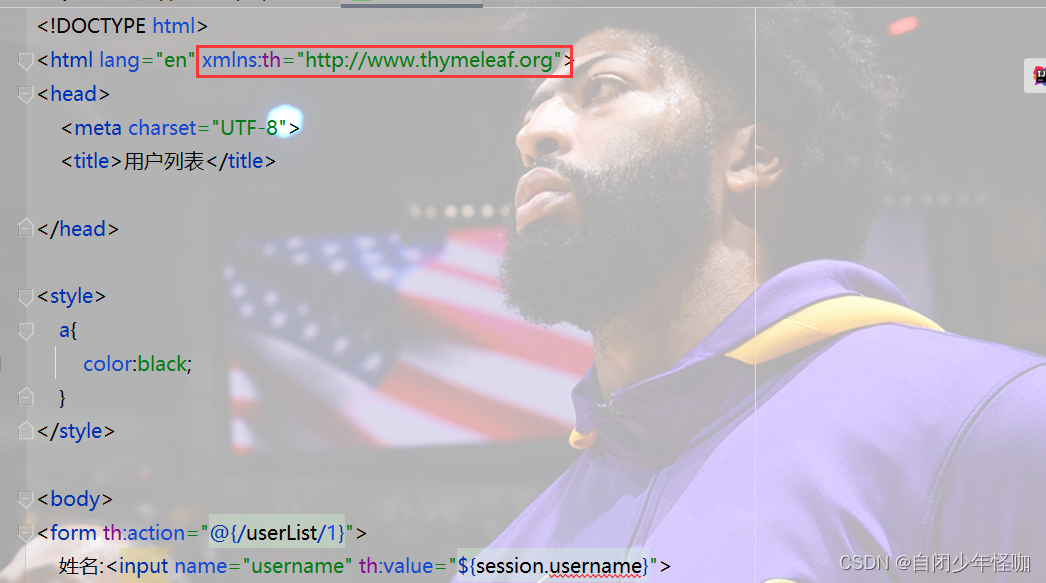
<!DOCTYPE html>
<html lang="en" xmlns:th="http://www.thymeleaf.org">
<head>
    <meta charset="UTF-8">
    <title>用户列表</title>

</head>

<style>
    a{
        color:black;
    }
</style>

<body>
<form th:action="@{/userList/1}">
    姓名:<input name="username" th:value="${session.username}">
    职位:<select name="occupation">
    <option value="">---请选择---</option>
    <option value="管理员">管理员</option>
    <option value="员工">员工</option>
</select>
    <button type="submit" value="查找">查找</button>
</form>

<button class="btn btn-primary form-control" style="height:50px">
    <a th:href="@{'/insertPage'}">添加用户</a></button>
<div style="text-align: center">
<table class="table table-striped table-bordered table-hover text-center">
    <thead>
    <tr style="text-align:center">
        <th>Id</th>
        <th>Username</th>
        <th>Password</th>
        <th>occupation</th>
        <th>操作</th>
    </tr>
    </thead>

    <tr th:each="users  : ${page.list}">
        <td th:text="${users.id}"></td>
        <td th:text="${users.username}"></td>
        <td th:text="${users.password}"></td>
        <td th:text="${users.occupation}"></td>
        <td>
            <a class="btn btn-primary" th:href="@{'/updatePage/'+${users.id}}">更改</a>
            <a class="btn btn-danger" th:href="@{'/delete/'+${users.id}}">删除</a>
        </td>
    </tr>
</table>
</div>
<div>
    <a  th:href="@{/userList/{page}(page=1,username=${session.username},occupation=${session.occupation})}">首页</a>
    <a th:if="${page.hasPreviousPage}" th:href="@{'/userList/{page}'(page=${page.prePage},username=${session.username},occupation=${session.occupation})}">上一页</a>
    <a th:if="${page.hasNextPage}" th:href="@{'/userList/{page}'(page=${page.nextPage},username=${session.username},occupation=${session.occupation})}">下一页</a>
    <a th:if="${page.hasNextPage}" th:href="@{'/userList/{page}'(page=${page.pages},username=${session.username},occupation=${session.occupation})}">末页</a>
    第<span th:text="${page.pageNum}"/>页
    共<span th:text="${page.pages}"/>页
</div>
</body>
</html>
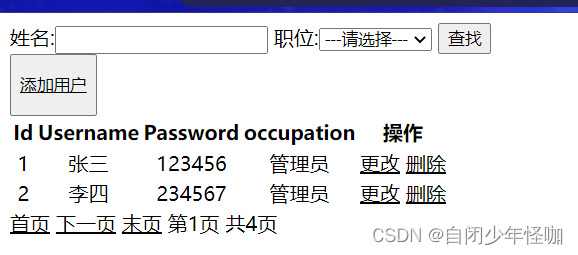
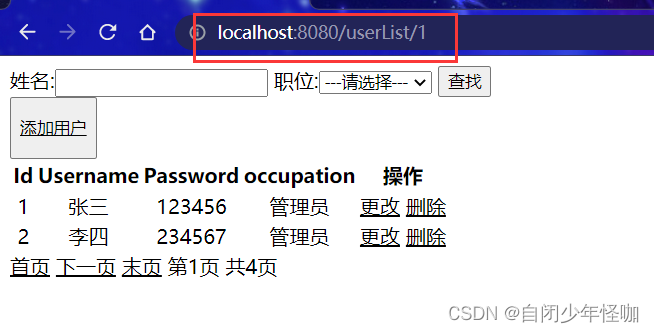
页面展示:
添加页面代码;
<!DOCTYPE html>
<html lang="en" xmlns:th="http://www.thymeleaf.org">
<head>
    <meta charset="UTF-8">
    <title>添加用户</title>
    <link href="/css/bootstrap.css" rel="stylesheet">
</head>

<body>

<div style="width:800px;height:100%;margin-left:270px;">
    <form action="/insert" method="post">
        用户名:<input class="form-control" type="text" th:value="${username}" name="username"><br>
        密    码:<input class="form-control" type="text" th:value="${password}" name="password"><br>
        职    位:<input class="form-control" type="text" th:value="${occupation}" name="occupation"><br>

        <button class="btn btn-primary btn-lg btn-block">保存</button>
    </form>
</div>

</body>
</html>
页面实现效果:

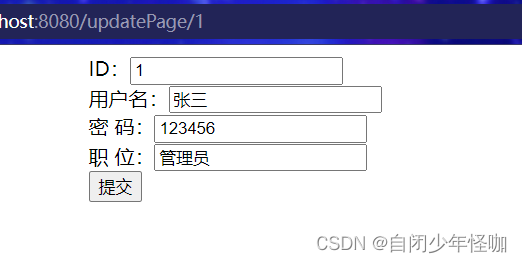
修改页面代码
<!DOCTYPE html>
<html lang="en" xmlns:th="http://www.thymeleaf.org">
<head>
    <meta charset="UTF-8">
    <title>修改用户</title>
    <link href="/css/bootstrap.css" rel="stylesheet">
</head>
<body>

<div style="width:800px;height:100%;margin-left:270px;">
    <form action="/update" method="post">
        ID:<input class="form-control" name="id" type="text" th:value="${user.id}" readonly="readonly"><br>
        用户名:<input class="form-control" type="text" th:value="${user.username}" name="username"><br>
        密 码:<input class="form-control" type="text" th:value="${user.password}" name="password"><br>
        职 位:<input class="form-control" type="text" th:value="${user.occupation}" name="occupation"><br>
        <button class="btn btn-primary btn-lg btn-block" type="submit">提交</button>
    </form>
</div>

</body>
</html>
页面实现效果
五、后台代码展示
有了前端代码之后我们就可以实现前端页面的功能了,这里主要是实现用户的增删改查,而且这里没有使用到ajax交互,纯后端
在com.ketai.entity包中新建一个类,命名为User.java(实体类)
package com.ketai.entity;

import lombok.AllArgsConstructor;
import lombok.Data;
import lombok.NoArgsConstructor;
import lombok.ToString;

@Data
@NoArgsConstructor
@AllArgsConstructor
@ToString
public class User {
    private  Integer id;
    private  String username;
    private String password;
    private String occupation;
}
在com.ketai.mapper包中新建一个类,编写mapper接口(UserMapper.java)
package com.ketai.mapper;

import com.ketai.entity.User;
import org.apache.ibatis.annotations.Mapper;
import org.apache.ibatis.annotations.Param;

import java.util.List;

@Mapper
public interface UserMapper {
    /**
     * 查询所有用户
     */
    List<User> userList(@Param("username") String username, @Param("occupation") String occupation);
    /*
     * 增加保存用户
     */
    int save(User user);
    /*
     * 根据id删除用户
     */
    int delete(Integer id);

    /*
     * 更改用户信息
     */
    int update(User user);
}
写了接口之后在resource下新建一个mapping文件夹,用于存放映射文件新建usermapper.xml文件,写入以下代码即可(注意:此映射文件需与Java下mapper文件夹下的接口同名,并且包名也要与其一致,在这里创建方式也不同)
<?xml version="1.0" encoding="UTF-8"?>
<!DOCTYPE mapper PUBLIC "-//mybatis.org//DTD Mapper 3.0//EN"
"http://mybatis.org/dtd/mybatis-3-mapper.dtd">
<mapper namespace="com.ketai.mapper.UserMapper">
	<!--查询所有用户-->
    <select id="userList" resultType="com.ketai.entity.User">
        select * from stus
        <where>
        <if test="username != null and username != ''">
        username like concat('%',#{username},'%')
         </if>
         <if test="occupation != null and occupation != ''">
         and occupation=#{occupation}
            </if>
</where>
    </select>
    <!--添加用户-->
    <insert id="save" parameterType="string">
        INSERT INTO stus VALUES(null,#{username},#{password},#{occupation})
    </insert>
	<!--删除用户-->
    <delete id="delete" parameterType="int">
        delete from stus where id = #{id}
    </delete>
	<!--根据id查询用户-->
    <select id="findUserById" resultType="com.ketai.entity.User">
        select * from stus where id = #{id}
    </select>
	<!--更改用户信息-->
    <update id="update" parameterType="user">
        update stus set username=#{username},password=#{password} where id=#{id}
    </update>
</mapper>
在com.ketai.service包中新建一个UserService类,接下来就是编写业务层了(UserService.java)
这里为了快速实现一个增删改查,就不新建UserServiceImpl类来实现UserService接口了,直接在新建UserService类来写业务了
package com.ketai.Service;
import com.github.pagehelper.PageHelper;
import com.github.pagehelper.PageInfo;
import com.ketai.entity.User;
import com.ketai.mapper.UserMapper;
import org.springframework.beans.factory.annotation.Autowired;
import org.springframework.stereotype.Service;
import java.util.List;
@Service
public  class UserService {
    @Autowired
    private UserMapper userMapper;
    public PageInfo<User> userList(Integer pageNum,String username,String occupation) {
        //开启分页功能
        PageHelper.startPage(pageNum,2);
        //获取List集合
        List<User> list=userMapper.userList(username,occupation);
        //把list集合放进分页插件
        PageInfo<User> page=new PageInfo<User>(list,5);
        return page;
    }
    public Object select(int id) {
        return  userMapper.delete(id);
    }
    public int update(User user) {
        return  userMapper.update(user);
    }
    public User findUserById(int id) {
        return userMapper.findUserById(id);
    }
    public int delete(Integer id) {
        return userMapper.delete(id);
    }
    public int save(User user) {
        return userMapper.save(user);
    }
}
编写完业务之后就是编写控制器了
在com.ketai.controller包中新建一个UserController.java
package com.ketai.controller;

import com.github.pagehelper.PageInfo;
import com.ketai.Service.UserService;
import com.ketai.entity.User;
import org.springframework.beans.factory.annotation.Autowired;
import org.springframework.stereotype.Controller;
import org.springframework.ui.Model;
import org.springframework.web.bind.annotation.*;

import javax.servlet.http.HttpSession;
import java.util.List;

@Controller
public class UserController {
    @Autowired
    private UserService userService;
@GetMapping("/userList/{pageNum}")
    public String userList(Model model, @PathVariable("pageNum")Integer pageNum, String username, String   occupation, HttpSession session){
    PageInfo<User> userList = userService.userList(pageNum,username ,occupation );
    session.setAttribute("username",username);
    session.setAttribute("occupation",occupation);
    model.addAttribute("page",userList);
    return "index";
}
@RequestMapping("/insertPage")
    public String index(){
        return "insertPage";
    }
    @RequestMapping("select/{id}")
    @ResponseBody
    public String save(@PathVariable int id){
        return userService.select(id).toString();
    }
    @RequestMapping("/insert")
    public String save(User user){
        userService.save(user);
        return "redirect:/userList/1";
    }
    @GetMapping("/delete/{id}")
    public String delete(@PathVariable Integer id){
        userService.delete(id);
        return "redirect:/userList/1";
    }
    @GetMapping("/updatePage/{id}")
    public String updatePage(Model model,@PathVariable int id){
        User user = userService.findUserById(id);
        model.addAttribute("user",user);
        return "updatePage";
    }
    @PostMapping("/update")
    public String updateUser(User user){
        userService.update(user);
        return "redirect:/userList/1";
    }
}
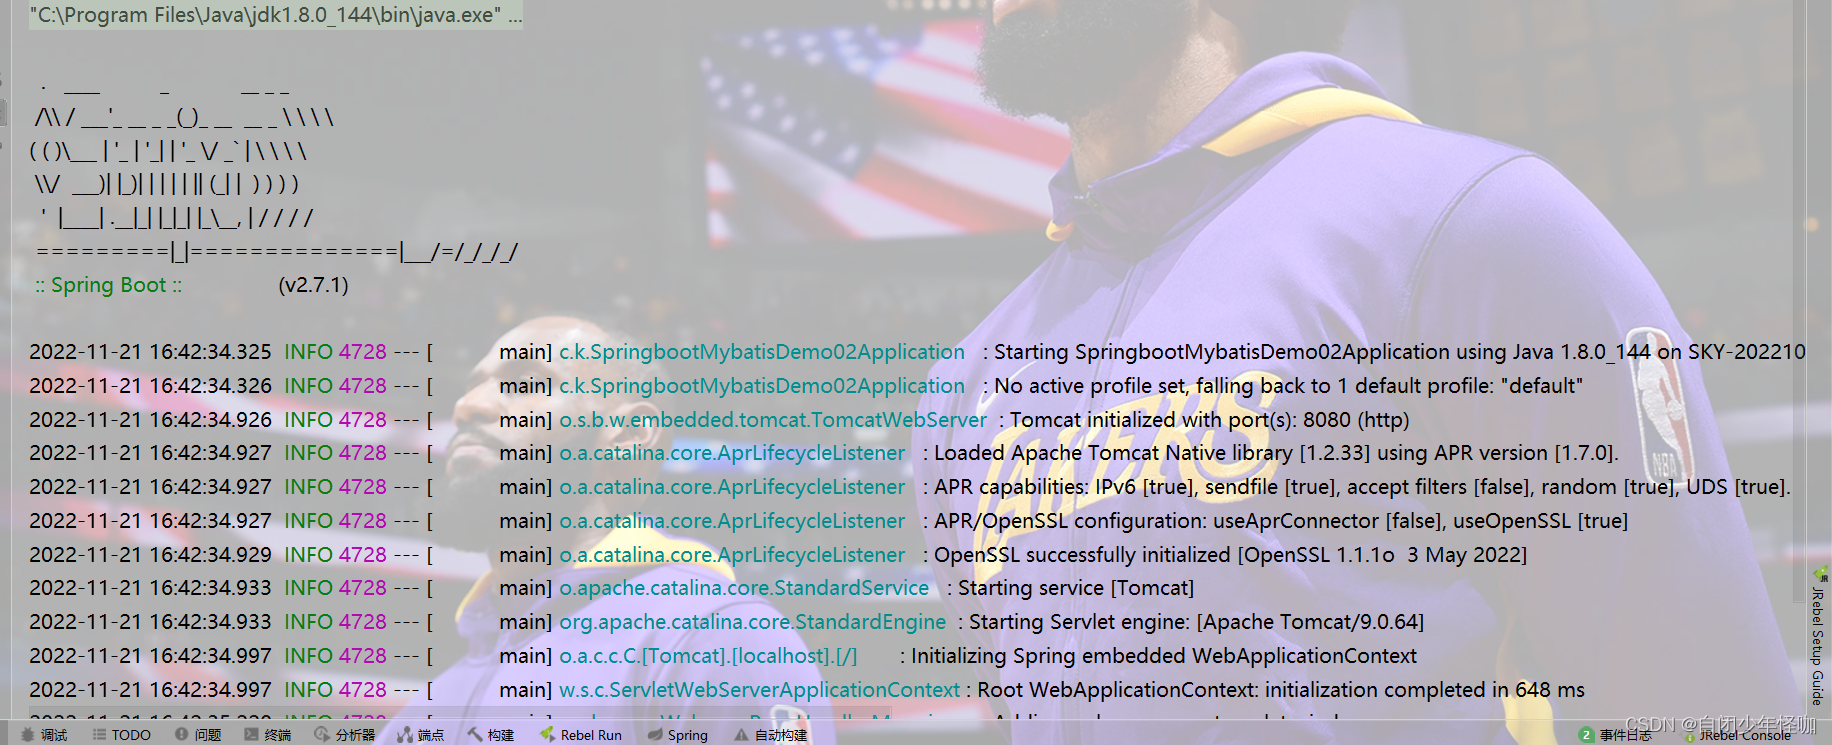
SpringBoot启动界面
访问首页分页后并展示数据(路径)
到此结束。。。。。。


 925
925


 被折叠的 条评论
为什么被折叠?
被折叠的 条评论
为什么被折叠?
 到【灌水乐园】发言


