


1.在安装MySql之前,要先卸载掉CentOS自带的MariaDB,输入:
rpm -qa | grep -i mariadb结果:

再次输入查出的文件(删除文件):
rpm -e --nodeps mariadb-libs-5.5.52-1.el7.x86_64
2.删除其他的mysql文件:
rpm -qa | grep mysql #检查系统是否已安装mysql
(如果系统已安装mysql,可以卸载:
rpm -e (mysql) #普通模式删除
rpm -e --nodeps (mysql)# 强力删除模式,如果使用上面命令删除时,提示有依赖的其它文件,则用该命令可以对其进行强力删除)
3.下载mysql8
新建目录存放mysql包
mkdir -p /data/mysql下载
#切换到/data/mysql目录下
cd /data/mysql

#wget下载二进制包
wget https://dev.mysql.com/get/Downloads/MySQL-8.0/mysql-8.0.22-linux-glibc2.12-x86_64.tar.xz
解压并将解压的目录重命名mysql8并放置到 /usr/local/mysql
#解压
tar Jxvf mysql-8.0.22-linux-glibc2.12-x86_64.tar.xz

#将解压的目录重命名放置到 /usr/local/mysql
mv /data/mysql/mysql-8.0.22-linux-glibc2.12-x86_64 /usr/local/mysql

#将文件名称改为mysql8
mv mysql-8.0.22-linux-glibc2.12-x86_64/ mysql8
用户和组
#先检查用户mysql和组mysql是否存在

#检查组是否存在
cat /etc/group | grep mysql

#如果不存在,创建组
groupadd mysql

#检查用户mysql是否存在
cat /etc/passwd | grep mysql
或者
id mysql

#如果不存在,创建用户
useradd -g mysql mysql
分配权限
#递归设置/usr/local/mysql文件夹及下面文件的属组和属主(此操作需要在mysql文件夹上一级才行)
chown -R mysql:mysql mysql
编辑配置文件my.cnf
vim /etc/my.cnf#内容如下:
[mysqld]
user=mysql
port=3306
basedir=/usr/local/mysql
datadir=/usr/local/mysql/data
socket=/usr/local/mysql/mysql.sock
pid-file=/usr/local/mysql/mysql.pid
character-set-server=utf8mb4
open_files_limit=65535
back_log=1024
max_connections=512
max_connect_errors=1000000
table_open_cache=1024
table_definition_cache=1024
table_open_cache_instances=64
thread_stack=512K
external-locking=FALSE
max_allowed_packet=32M
sort_buffer_size=4M
join_buffer_size=4M
thread_cache_size=768
interactive_timeout=600
wait_timeout=600
tmp_table_size=32M
max_heap_table_size=32M
slow_query_log=1
slow_query_log_file=/usr/local/mysql/slow.log
log-error=/usr/local/mysql/mysql-error.log
long_query_time=0.1
server-id=1
log-bin=/usr/local/mysql/binlog
sync_binlog=1
binlog_cache_size=4M
max_binlog_cache_size=1G
max_binlog_size=1G
expire_logs_days=7
master_info_repository=TABLE
relay_log_info_repository=TABLE
gtid_mode=on
enforce_gtid_consistency=1
log_slave_updates
binlog_format=row
relay_log_recovery=1
relay-log-purge=1
key_buffer_size=32M
read_buffer_size=8M
read_rnd_buffer_size=4M
bulk_insert_buffer_size=64M
lock_wait_timeout=3600
explicit_defaults_for_timestamp=1
innodb_thread_concurrency=0
innodb_sync_spin_loops=100
innodb_spin_wait_delay=30
transaction_isolation=REPEATABLE-READ
#innodb_additional_mem_pool_size=16M
innodb_buffer_pool_size=512M
innodb_buffer_pool_instances=8
innodb_buffer_pool_load_at_startup=1
innodb_buffer_pool_dump_at_shutdown=1
innodb_data_file_path=ibdata1:1G:autoextend
innodb_flush_log_at_trx_commit=1
innodb_log_buffer_size=32M
innodb_log_file_size=2G
innodb_log_files_in_group=2
innodb_max_undo_log_size=4G
innodb_io_capacity=4000
innodb_io_capacity_max=8000
innodb_flush_neighbors=0
innodb_write_io_threads=8
innodb_read_io_threads=8
innodb_purge_threads=4
innodb_page_cleaners=4
innodb_open_files=65535
innodb_max_dirty_pages_pct=50
innodb_flush_method=O_DIRECT
innodb_lru_scan_depth=4000
innodb_checksum_algorithm=crc32
innodb_lock_wait_timeout=10
innodb_rollback_on_timeout=1
innodb_print_all_deadlocks=1
innodb_file_per_table=1
innodb_online_alter_log_max_size=4G
innodb_stats_on_metadata=0
lower_case_table_names = 1
[mysqldump]
quick
max_allowed_packet=32M
初始化数据库(这个不执行)
usr/local/mysql/mysql8/bin/mysqld  --defaults-file=/etc/my.cnf --initialize --user=mysql --lower-case-table-names=1

#注意:
#1、--initialize初始化之后会给root用户生成一个随机密码(可以在/usr/local/mysql/mysql-error.log里看到,也可以使用cat /usr/local/mysql/mysql-error.log | grep password。),如果想默认无密码,可以在--initialize后面加上-insecure。
#2、--lower-case-table-names=1需要在初始化数据库的命令上加上并且my.cnf也得有这一项的配置,否则会报Different lower_case_table_names settings for server ('1') and data dictionary ('0')。
手动启动MySQL服务(执行)
/usr/local/mysql/mysql8/bin/mysqld_safe --defaults-file=/etc/my.cnf --user=mysql
MySQL服务加入systemctl管理
永久关闭SELinux
#修改配置文件
[root@dxm system]# vi /etc/selinux/config

#这里SELINUX默认值是Enforcing,这里我们设置配置项为:
SELINUX=disabled

*然后重启机器*

#修改/etc/sysconfig/selinux 这个文件也是一样的,因为它其实就是/etc/selinux/config的符号链接
[root@dxm system]# ll /etc/sysconfig/selinux
lrwxrwxrwx. 1 root root 17 12月  3 16:27 /etc/sysconfig/selinux -> ../selinux/config
创建mysql.service文件
vim /usr/lib/systemd/system/mysql.service#内容如下:
[Unit]
Description=MySQL
SourcePath=/etc/init.d/mysql
Before=shutdown.target
[Service]
User=mysql
Type=forking
TimeoutSec=0
PermissionsStartOnly=true
ExecStart=/usr/local/mysql/mysql8/bin/mysqld --defaults-file=/etc/my.cnf --user=mysql --daemonize
ExecStop=/etc/init.d/mysql stop
LimitNOFILE = 65535
Restart=on-failure
RestartSec=10
RestartPreventExitStatus=1
PrivateTmp=false
[Install]
WantedBy=multi-user.target
MySQL服务设置为开机自启动
# disabled为非开机自启动状态,enabled为开机自启动状态。执行:
[root@dxm system] systemctl list-unit-files | grep mysql
mysql.service                  disabled

# 设置为开机自启动
[root@dxm system] systemctl enable mysql.service
Synchronizing state of mysql.service with SysV service script with /usr/lib/systemd/systemd-sysv-install.
Executing: /usr/lib/systemd/systemd-sysv-install enable mysql
[root@dxm system] /usr/lib/systemd/systemd-sysv-install enable mysql

#再来查看是否为开机自启动状态
[root@dxm system] systemctl list-unit-files | grep mysql
mysql.service                  enabled

# 查看并记录当前mysql的pid,用于重启之后对比
[root@dxm system] ps aux | grep mysql

# 重启服务器(注意:谨慎使用)
[root@dxm system] reboot

# 重启完成之后再检查mysql服务是否启动完成
[root@dxm system] ps aux | grep mysql
更改密码并授予远程访问权限:
查看初始化随机生成的root密码
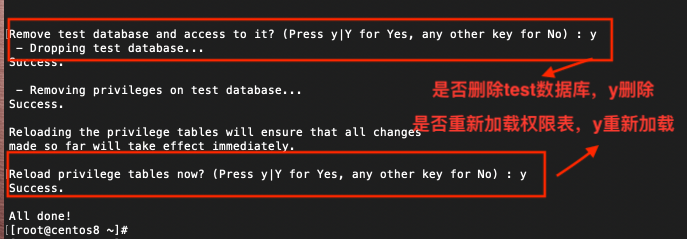
cat /usr/local/mysql/mysql-error.log | grep password安全设置 (上次没执行成功)
mysql_secure_installation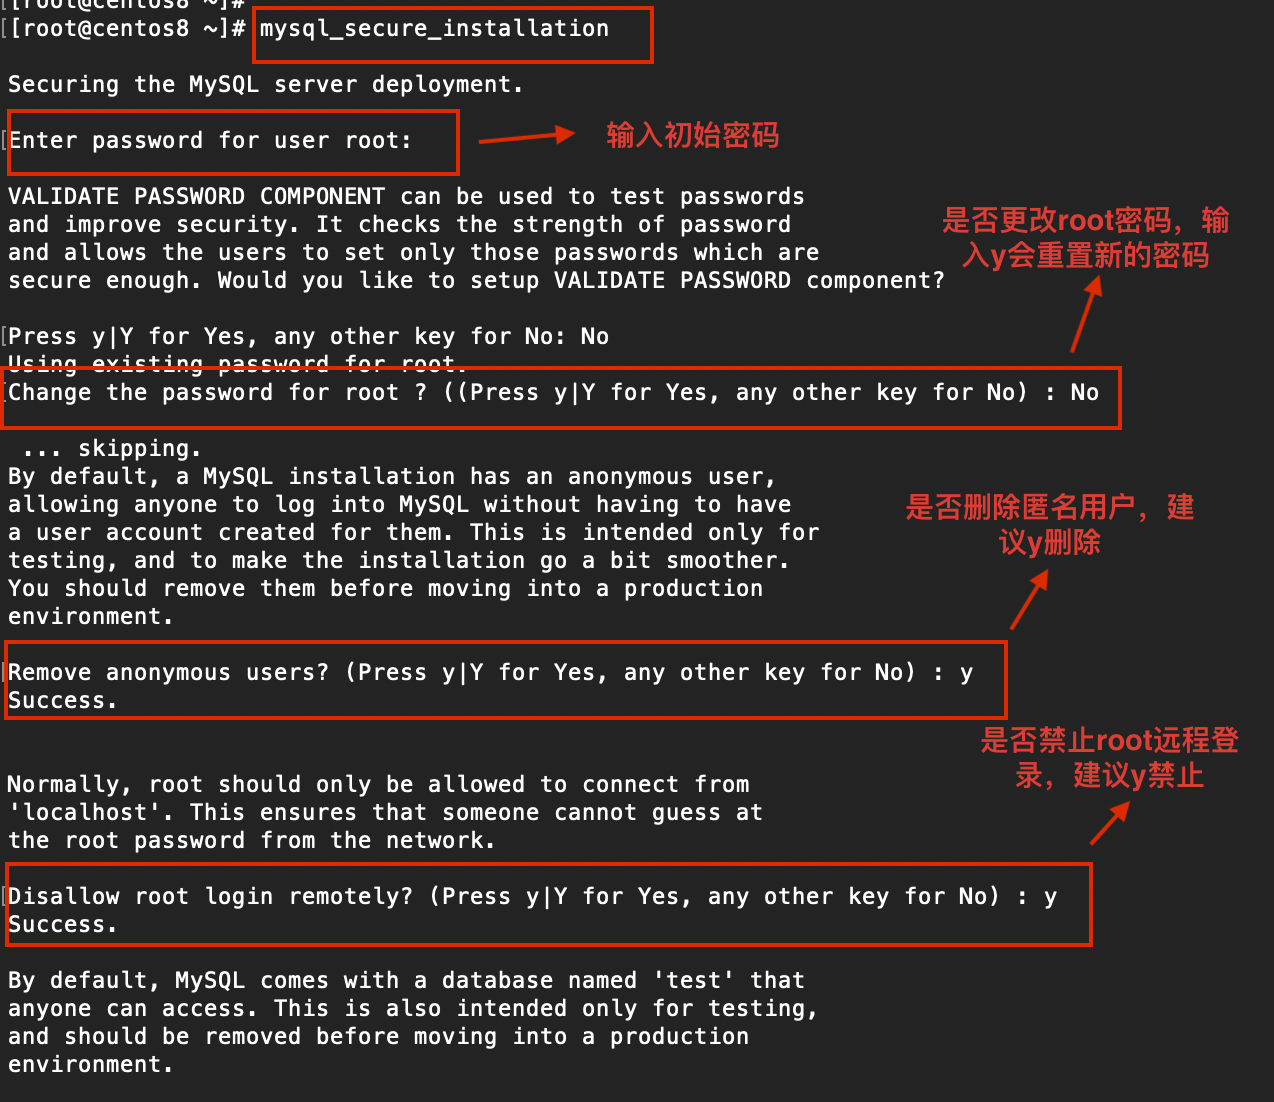
mysql登录
mysql -uroot -p //随机密码登录 问题1:提示mysql:未找到命令。
原因:这是由于系统默认会查找/usr/bin下的命令,如果这个命令不在这个目录下,当然会找不到命令,我们需要做的就是映射一个链接到/usr/bin目录下,相当于建立一个链接文件。
首先得知道mysql命令或mysqladmin命令的完整路径,比如mysql的路径是:/usr/local/mysql/mysql8/bin/mysql,我们则可以这样执行命令:
ln -s /usr/local/mysql/mysql8/bin/mysql /usr/bin问题2:此时输入密码会出现错误

解决方法
ln -s /usr/local/mysql/mysql.sock /tmp/mysql.sock
重置密码(Mysql8.0+有变化)
第一次登陆出现下面问题:代表密码太简单需要改写

解决:
#第一次输入(上述问题的解决方法)
set password='12345678';

#先把root的旧密码置空
use mysql;

#先将root密码置空
update user set authentication_string='' where user='root';

#重置成新密码
ALTER USER 'root'@'localhost' IDENTIFIED BY '12345678';
默认只允许root帐户在本地登录,如果要在其它机器上连接mysql,必须修改root允许远程连接,或者添加一个允许远程连接的帐户。
修改root用户远程访问权限:
选择 mysql 数据库:use mysql;
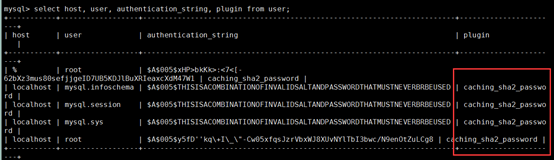
在 mysql 数据库的 user 表中查看当前 root 用户的相关信息:
select host, user, authentication_string, plugin from user;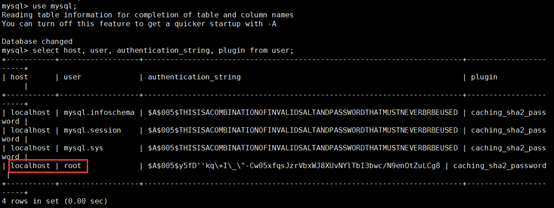
发现root的host是localhost,不是%哦,那我们就加个host是%的root账号:
CREATE USER 'root'@'%' IDENTIFIED BY '新密码';
例如
CREATE USER 'root'@'%' IDENTIFIED BY '12345678';
再查下用户
select host, user, authentication_string, plugin from user;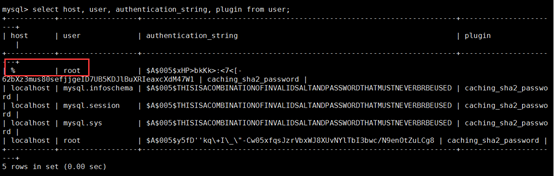
可以看到已经新增了host为%的root用户
然后再执行:
GRANT ALL ON *.* TO 'root'@'%';mysql8的加密方式规则不一样,是caching_sha2_password
把加密方式改成mysql_native_password就行了:
ALTER USER '[用户名]'@'%' IDENTIFIED WITH mysql_native_password BY '[密码]';
例子:

ALTER USER 'root'@'%' IDENTIFIED WITH mysql_native_password BY '12345678';
加密方式以及改成了mysql_native_password:

然后使用下面命令使修改生效:
flush privileges;防火墙开放端口和阿里云安全组入方向规则
查看开放端口
firewall-cmd --permanent --zone=public --list-ports
firewall-cmd --permanent --zone=public --add-port=3306/tcp
firewall-cmd --permanent --zone=public --add-port=8080/tcp
(8080开不开不知道有没有啥影响,反正这个端口都会用到先开为敬)

firewall-cmd --reload
添加阿里云安全组入方向规则

navicat访问
ip:服务器ip
端口号:3306
用户名:root
密码:自己设置的密码
所遇到的问题:·
安装启动MySQL服务过程中遇到的问题总结
1、mysql启动时报Different lower_case_table_names settings for server (‘1’) and data dictionary (‘0’)
这个MySQL官方文档,有记录:
lower_case_table_names can only be configured when initializing the
server. Changing the lower_case_table_names setting after the server
is initialized is prohibited.
原因是MySQL8.0新增data dictionary的概念,数据初始化的时候在Linux下默认使用lower-case-table-names=0参数,数据库启动的时候读取my.cnf文件中的值。若二者值不一致则在MySQL的错误日志中记录报错信息,所以我们不仅仅需要在my.cnf里设置lower_case_table_names=1,而且在初始化的时候也得加上–lower-case-table-names=1选项。
2、启动服务完成之后,输入mysql -uroot -p回车,提示mysql:未找到命令。
原因:这是由于系统默认会查找/usr/bin下的命令,如果这个命令不在这个目录下,当然会找不到命令,我们需要做的就是映射一个链接到/usr/bin目录下,相当于建立一个链接文件。
首先得知道mysql命令或mysqladmin命令的完整路径,比如mysql的路径是:/usr/local/mysql/mysql8/bin/mysql,我们则可以这样执行命令:
ln -s /usr/local/mysql/mysql8/bin/mysql /usr/bin
3、MySQL报 mysql:error while loading shared libraries: libtinfo.so.5
解决办法:
sudo ln -s /usr/lib64/libtinfo.so.6.1 /usr/lib64/libtinfo.so.54、Can 't connect to local MySQL server through socket '/tmp/mysql.sock ’ (2)
问题是:找不到mysql.sock,如果你可以运行find / -name mysql.sock找到之后做一个软链接即可。
ln -s /usr/local/mysql/mysql.sock /tmp/mysql.sock
5、Host ‘127.0.0.1’ is not allowed to connect to this MySQL server
原因: MySQL数据库的配置文件中设置了参数: skip-name-resolve
从而导致使用“localhost”不能连接到数据库。
解决方法: 注释掉: #skip-name-resolve,然后重启mysql。
6、/dev/mapper/cl-root 超过80%导致启动mysql失败
/dev/mapper/cl-root 是跟Linux系统物理空间分配有关,那既然空间不足,我们可以删除一些文件再试试。使用find / -xdev -size +100M -exec ls -l {} ;命令查找都有哪些文件,然后把没用的文件,比如日志文件,删除掉,再尝试启动服务。
几个systemctl常用的命令
# 列出所有可用单元
systemctl list-unit-files

# 从可用单元中查看是否有mysql
systemctl list-unit-files | grep mysql

# 启动mysql服务
systemctl start mysql.service

# 查看mysql服务状态active即为启动状态,inactive是非启动状态
systemctl status mysql.service


# 重启mysql服务
systemctl restart mysql.service

# 停止mysql服务
systemctl stop mysql.service


 8125
8125


 被折叠的 条评论
为什么被折叠?
被折叠的 条评论
为什么被折叠?
 到【灌水乐园】发言


