Chapter5.Building Spring web applications
State management, workflow, and validation are all
important features a java web developer needs to be addressed. None of these is made any easier given the HTTP protocol’s stateless nature.HTTP是无状态协议。
5.1Getting started with Spring MVC
Let’s take a look at how a request makes its way from the client through the components in Spring MVC, ultimately resulting in a request that goes back to the client.
5.1.1Following the life of a request
The request is a busy creature. From the time it leaves the browser until it returns with a response, it makes several stops, each time dropping off a bit of information and picking up some more.每次失去和增加一些信息。Figure 5.1 shows all the stops the request makes as it travels through Spring MVC.
下面是每部分的讲解:
When the request leaves the browser (Part 1), it carries information about what the user is asking for. At the least, the request will be carrying the requested URL. But it may also carry additional data, such as the information submitted in a form by the user.
The DispatcherServlet’s job is to send the request on to a Spring MVC controller. A controller is a Spring component that processes the request(controller是重点). But a typical application may have several controllers, and DispatcherServlet needs some help deciding which controller to send the request to. So the DispatcherServlet consults one or more **handler mappings (Part 2)**to figure out where the request’s next stop will be. The handler mapping pays particular attention to the URL carried by the request when making its decision.这一步就是DispatcherServlet给特定的request选择合适的controller。
Once an appropriate controller has been chosen, DispatcherServlet sends the request on its merry way to the chosen controller (Part 3). At the controller, the request drops off its payload (the information submitted by the user) and patiently waits while
the controller processes that information. (Actually, a well-designed controller performs little or no processing itself and instead delegates responsibility for the business logic to one or more service objects.)controller自己最好不处理logic,交给service objects进行处理。
The logic performed by a controller often results in some information that needs to be carried back to the user and displayed in the browser. This information is
referred to as the model. But sending raw information back to the user isn’t sufficient—it needs to be formatted in a user-friendly format, typically HTML. For that, the information needs to be given to a view, typically a JavaServer Page (JSP).
One of the last things a controller does is package up the model data and identify the name of a view that should render the output. 只是指定名字,这样能够实现解耦。
It then sends the request, along with the model and view name, back to the DispatcherServlet (Part 4).
So that the controller doesn’t get coupled to a particular view, the view name passed back to DispatcherServlet doesn’t directly identify a specific JSP. It doesn’t even necessarily suggest that the view is a JSP. Instead, it only carries a logical name that will be used to look up the actual view that will produce the result. The DispatcherServlet consults a view resolver (Part 5) to map the logical view name to a specific view implementation, which may or may not be a JSP.
Now that DispatcherServlet knows which view will render the result, the request’s job is almost over. Its final stop is at the view implementation (Part 6), typically a JSP, where it delivers the model data. The request’s job is finally done. The view will use the model data to render output that will be carried back to the client by the (notso-hardworking) response object (Part 7).
5.1.2Setting up Spring MVC
For now, you’ll take the simplest approach to configuring Spring MVC: you’ll do just enough configuring to be able to run the controllers you create.只需要配置能让controller跑起来的配置就行。
CONFIGURING DISPATCHERSERVLET
DispatcherServlet is the centerpiece of Spring MVC. It’s where the request first hits the framework, and it’s responsible for routing the request through all the other components.
Instead of a web.xml file, you’re going to use Java to configure DispatcherServlet in the servlet container. The following listing shows the Java class you’ll need.以前是只能在web.xml中配置。现在应该两个地方都可以。
//Configuring DispatcherServlet
package spittr.config;
import org.springframework.web.servlet.support.
AbstractAnnotationConfigDispatcherServletInitializer;
public class SpittrWebAppInitializer
extends AbstractAnnotationConfigDispatcherServletInitializer {
@Override
protected String[] getServletMappings() {//Map //DispatcherServlet to /
return new String[] { "/" };
}
@Override
protected Class<?>[] getRootConfigClasses() {
return new Class<?>[] { RootConfig.class };
}
@Override
protected Class<?>[] getServletConfigClasses() {//Specify configuration class
return new Class<?>[] { WebConfig.class };
}
}
Any class that extends AbstractAnnotationConfigDispatcherServletInitializer will automatically be used to configure DispatcherServlet and the Spring application context in the application’s servlet context.
Looking at listing 5.1, you can see that SpittrWebAppInitializer overrides three methods.
1.The first method, getServletMappings(), identifies one or more paths that DispatcherServlet will be mapped to. In this case, it’s mapped to /, indicating that it will be the application’s default servlet. It will handle all requests coming into the application.map到/就handle每个request,其他的同理。
In order to understand the other two methods, you must first understand the relationship between DispatcherServlet and a servlet listener known as ContextLoaderListener.要弄清后两个方法,先要清楚这两者之间的关系。
记住,后两种方法现在还没有总结呢,等理清关系后再来。
A TALE OF TWO APPLICATION CONTEXTS
Under the covers, AbstractAnnotationConfigDispatcherServletInitializer creates both a DispatcherServlet and a ContextLoaderListener. The @Configuration
classes returned from getServletConfigClasses() will define beans for DispatcherServlet’s application context. Meanwhile, the @Configuration class’s returned getRootConfigClasses() will be used to configure the application context created by ContextLoaderListener.
In this case, your root configuration is defined in RootConfig, whereas DispatcherServlet’s configuration is declared in WebConfig. You’ll see what those two configuration classes look like in a moment.不同的两个东西,在不同的地方定义。
If you’re not yet working with a Servlet 3.0-capable server,那么你就只能在web.xml中定义了。We’ll look at web.xml and other configuration options in chapter 7.
ENABLING SPRING MVC
The very simplest Spring MVC configuration you can create is a class annotated with @EnableWebMvc:
package spittr.config;
import org.springframework.context.annotation.Configuration;
import org.springframework.web.servlet.config.annotation.EnableWebMvc;
@Configuration
@EnableWebMvc
public class WebConfig {
}
This will work, and it will enable Spring MVC. But it leaves a lot to be desired.上面的代码虽然能enable,但是太朴素了吧,好多功能都没有配置:
1.No view resolver is configured. As such, Spring will default to using BeanNameViewResolver(默认用这个view resolver), a view resolver that resolves views by looking for beans whose ID matches the view name and whose class implements the View interface.
2.Component-scanning isn’t enabled. Consequently, the only way Spring will find any controllers is if you declare them explicitly in the configuration.除非你显式地定义它为controller。
3.As it is, DispatcherServlet is mapped as the default servlet for the application and will handle all requests, including requests for static resources, such as images and stylesheets (which is probably not what you want in most cases).默认map所有request,包括静态资源的请求,但是这样不是你想要的。
The new WebConfig in the next listing addresses these concerns.下面这个应该好很多了。
//A minimal yet useful configuration for Spring MVC
package spittr.config;
import org.springframework.context.annotation.Bean;
import org.springframework.context.annotation.ComponentScan;
import org.springframework.context.annotation.Configuration;
import org.springframework.web.servlet.ViewResolver;
import org.springframework.web.servlet.config.annotation.
DefaultServletHandlerConfigurer;
import org.springframework.web.servlet.config.annotation.EnableWebMvc;
import org.springframework.web.servlet.config.annotation.
WebMvcConfigurerAdapter;
import org.springframework.web.servlet.view.
InternalResourceViewResolver;
@Configuration
@EnableWebMvc  //Enable Spring MVC
@ComponentScan("spitter.web")//Enable
//component-scanning
public class WebConfig
extends WebMvcConfigurerAdapter {
@Bean
public ViewResolver viewResolver() {
InternalResourceViewResolver resolver =//Configure a JSP view resolver
new InternalResourceViewResolver();
resolver.setPrefix("/WEB-INF/views/");
resolver.setSuffix(".jsp");
resolver.setExposeContextBeansAsAttributes(true);
return resolver;
}
@Override
//Configure static content handling
public void configureDefaultServletHandling(
DefaultServletHandlerConfigurer configurer) {
configurer.enable();
}
}
需要注意的:
The first thing to notice in listing 5.2 is that WebConfig is now annotated with @ComponentScan so that the spitter.web package will be scanned for components. As you’ll soon see, the controllers you write will be annotated with @Controller, which will make them candidates for component-scanning. Consequently, you won’t have to
explicitly declare any controllers in the configuration class.
Next, you add a ViewResolver bean. More specifically, it’s an InternalResourceViewResolver. We’ll talk more about view resolvers in chapter 6. For now,
just know that it’s configured to look for JSP files by wrapping view names with a specific prefix and suffix (for example, a view name of home will be resolved as /WEB-INF/ views/home.jsp).
Finally, this new WebConfig class extends WebMvcConfigurerAdapter and overrides
its configureDefaultServletHandling() method. By calling enable() on the given DefaultServletHandlerConfigurer, you’re asking DispatcherServlet to forward requests for static resources to the servlet container’s default servlet and not to try to handle them itself.关于静态资源的处理。
这样正好解决了上面的三个问题。完美。
With WebConfig settled, what about RootConfig? Because this chapter is focused
on web development, and web configuration is done in the application context created by DispatcherServlet, you’ll keep RootConfig relatively simple for now:暂时简单配置RootConfig就行了。
package spittr.config;
import org.springframework.context.annotation.ComponentScan;
import org.springframework.context.annotation.ComponentScan.Filter;
import org.springframework.context.annotation.Configuration;
import org.springframework.context.annotation.FilterType;
import org.springframework.web.servlet.config.annotation.EnableWebMvc;
@Configuration
@ComponentScan(basePackages={"spitter"},
excludeFilters={
@Filter(type=FilterType.ANNOTATION, value=EnableWebMvc.class)
})
public class RootConfig {
}
5.1.3Introducing the Spittr application
开始练手。项目需求:模仿twitter,叫Spittr,The Spittr application has two essential domain concepts: spitters (the users of the application) and spittles (the brief status updates that users publish).
In this chapter, you’ll build out the web layer of the application, create controllers that display spittles, and process forms where users register as spitters.
The stage is now set. You’ve configured DispatcherServlet, enabled essential Spring MVC components, and established a target application. Let’s turn to the meat of the chapter: handling web requests with Spring MVC controllers.
5.2Writing a simple controller
In Spring MVC, controllers are just classes with methods that are annotated with @RequestMapping to declare the kind of requests they’ll handle.
一个例子:
//HomeController: an example of an extremely //simple controller
package spittr.web;
import static org.springframework.web.bind.annotation.RequestMethod.*;
import org.springframework.stereotype.Controller;
import org.springframework.web.bind.annotation.RequestMapping;
import org.springframework.web.bind.annotation.RequestMethod;
@Controller  //Declared to be a controller
public class HomeController {
@RequestMapping(value="/", method=GET)//Handle //GET requests for /
public String home() {
return "home";  //View name is home
}
}
The first thing you’ll notice about HomeController is that it’s annotated with @Controller. Although it’s clear that this annotation declares a controller, the annotation has little to do with Spring MVC.
@Controller is a stereotype annotation, based on the @Component annotation. Its purpose here is entirely for the benefit of component-scanning. Because HomeController is annotated with @Controller, the component scanner will automatically pick up HomeController and declare it as a bean in the Spring application context.
You could have annotated HomeController with @Component, and it would have had the same effect, but it would have been less expressive about what type of component HomeController is.也可以用@Component,完全能够达到作用,但是就不expressive啦。
Given the way you configured InternalResourceViewResolver, the view name “home” will be resolved as a JSP at /WEB INF/views/home.jsp. For now, you’ll keep the Spittr application’s home page rather basic, as shown next.
//Spittr home page, defined as a simple JSP
<%@ taglib uri="http://java.sun.com/jsp/jstl/core" prefix="c" %>
<%@ page session="false" %>
<html>
<head>
<title>Spittr</title>
<link rel="stylesheet"
type="text/css"
href="<c:url value="/resources/style.css" />" >
</head>
<body>
<h1>Welcome to Spittr</h1>
<a href="<c:url value="/spittles" />">Spittles</a> |
<a href="<c:url value="/spitter/register" />">Register</a>
</body>
</html>
The obvious way to test a controller may be to build and deploy the application and poke at it with a web browser, but an automated test will give you quicker feedback and more consistent hands-off results. So, let’s cover HomeController with a test.
5.2.1Testing the controller
Starting with Spring 3.2, however, you have a way to test Spring MVC controllers as controllers, not merely as POJOs. Spring now includes a mechanism for mocking all the mechanics of Spring MVC and executing HTTP requests against controllers. This
will enable you to test your controllers without firing up a web server or web browser.
测试上面的home()方法:
package spittr.web;
import static
org.springframework.test.web.servlet.request.MockMvcRequestBuilders.*;
import static
org.springframework.test.web.servlet.result.MockMvcResultMatchers.*;
import static
org.springframework.test.web.servlet.setup.MockMvcBuilders.*;
import org.junit.Test;
import org.springframework.test.web.servlet.MockMvc;
import spittr.web.HomeController;
public class HomeControllerTest {
@Test
public void testHomePage() throws Exception {
HomeController controller = new HomeController();
MockMvc mockMvc =  //Set up MockMvc
standaloneSetup(controller).build();
mockMvc.perform(get("/"))  //Perform GET /
.andExpect(view().name("home"));//Expect home //view
}
}
5.2.2 Defining class-level request handling
改为class-level request handling:
@Controller
@RequestMapping("/")
public class HomeController {
@RequestMapping(method=GET)
public String home() {
return "home";
}
HomeController’s home() method is mapped to handle GET requests for both / and /homepage requests:
@Controller
@RequestMapping({"/", "/homepage"})
public class HomeController {
...
}
5.2.3Passing model data to the view
In the Spittr application, you’ll need a page that displays a list of the most recent spittles that have been submitted.
Therefore, you’ll need a new method to serve such a page.
First you need to define a repository for data access.At the moment, you only need a repository that can fetch a list of the spittles. SpittleRepository, as defined here, is a sufficient start:
//定义一个接口
package spittr.data;
import java.util.List;
import spittr.Spittle;
public interface SpittleRepository {
List<Spittle> findSpittles(long max, int count);
}
In order to get the 20 most recent Spittle objects, you can call findSpittles() like this:
List<Spittle> recent =
spittleRepository.findSpittles(Long.MAX_VALUE, 20);
Spittle:
//Spittle class: carries a message, a timestamp, //and a location
package spittr;
import java.util.Date;
public class Spittle {
private final Long id;
private final String message;
private final Date time;
private Double latitude;
private Double longitude;
public Spittle(String message, Date time) {
this(message, time, null, null);
}
public Spittle(
String message, Date time, Double longitude, Double latitude) {
this.id = null;
this.message = message;
this.time = time;
this.longitude = longitude;
this.latitude = latitude;
}
public long getId() {
return id;
}
public String getMessage() {
return message;
}
public Date getTime() {
return time;
}
public Double getLongitude() {
return longitude;
}
public Double getLatitude() {
return latitude;
}
@Override
public boolean equals(Object that) {
return EqualsBuilder.reflectionEquals(this, that, "id", "time");
}
@Override
public int hashCode() {
return HashCodeBuilder.reflectionHashCode(this, "id", "time");
}
}
SpittleController:
package spittr.web;
import java.util.List;
import org.springframework.beans.factory.annotation.Autowired;
import org.springframework.stereotype.Controller;
import org.springframework.web.bind.annotation.RequestMapping;
import org.springframework.web.bind.annotation.RequestMethod;
import spittr.Spittle;
import spittr.data.SpittleRepository;
@Controller
@RequestMapping("/spittles")
public class SpittleController {
private SpittleRepository spittleRepository;
@Autowired
public SpittleController(//Inject
//SpittleRepository
SpittleRepository spittleRepository) {
this.spittleRepository = spittleRepository;
}
@RequestMapping(method=RequestMethod.GET)
public String spittles(Model model) {
model.addAttribute(//Add spittles to model
spittleRepository.findSpittles(
Long.MAX_VALUE, 20));
return "spittles";  //Return view name
}
}
test:
@Test
public void shouldShowRecentSpittles() throws Exception {
List<Spittle> expectedSpittles = createSpittleList(20);
SpittleRepository mockRepository =  //Mock repository
mock(SpittleRepository.class);
when(mockRepository.findSpittles(Long.MAX_VALUE, 20))
.thenReturn(expectedSpittles);
SpittleController controller =
new SpittleController(mockRepository);
SpittleController controller =
new SpittleController(mockRepository);
MockMvc mockMvc = standaloneSetup(controller)  //Mock Spring MVC
.setSingleView(
new InternalResourceView("/WEB-INF/views/spittles.jsp"))
.build();
mockMvc.perform(get("/spittles"))  //GET /spittles
.andExpect(view().name("spittles"))
.andExpect(model().attributeExists("spittleList"))
.andExpect(model().attribute("spittleList",  //Assert expectations
hasItems(expectedSpittles.toArray())));
}
...
private List<Spittle> createSpittleList(int count) {
List<Spittle> spittles = new ArrayList<Spittle>();
for (int i=0; i < count; i++) {
spittles.add(new Spittle("Spittle " + i, new Date()));
}
return spittles;
}
梳理:
通过Spittle来定义单类,定义的SpittleRepository类不实现,然后在测试中通过mock实现,注意when(mockRepository.findSpittles(Long.MAX_VALUE, 20)).thenReturn(expectedSpittles);语句,猜想应该是调用该方法时,直接代理返回expectedSpittles数据,即带Spittle单类的ArrayList。然后添加Assert来对比model中的数据和view中的数据。
Now that there’s data in the model, how does the JSP access it? As it turns out, when the view is a JSP, the model data is copied into the request as request attributes. Therefore, the spittles.jsp file can use JavaServer Pages Standard Tag Library’s (JSTL) <c:forEach> tag to render the list of spittles:
<c:forEach items="${spittleList}" var="spittle" >
<li id="spittle_<c:out value="spittle.id"/>">
<div class="spittleMessage">
<c:out value="${spittle.message}" />
</div>
<div>
<span class="spittleTime"><c:out value="${spittle.time}" /></span>
<span class="spittleLocation">
(<c:out value="${spittle.latitude}" />,
<c:out value="${spittle.longitude}" />)</span>
</div>
</li>
</c:forEach>
它的view在brower中显示如下:
One thing that neither HomeController nor SpittleController does, however, is handle any form of input. Let’s expand on SpittleController to take some input from the client.
5.3Accepting request input
Spring MVC provides several ways that a client can pass data into a controller’s handler method. These include:
1.Query parameters
2.Form parameters
3.Path variables
For a start, let’s look at handling requests with query parameters, the simplest and most straightforward way to send data from the client to the server.
5.3.1Taking query parameters
你想要在前面的基础上,实现翻页的功能,需要加入两个参数:
To implement this paging solution, you’ll need to write a handler method that accepts the following:
1.A before parameter (which indicates the ID of the Spittle that all Spittle objects in the results are before)
2.A count parameter (which indicates how many spittles to include in the result)
To achieve this, let’s replace the spittles() method you created in listing 5.10 with a new spittles() method that works with the before and count parameters. You’ll start by adding a test to reflect the functionality you want to see from the new spittles() method.
//New method to test for a paged list of spittles
@Test
public void shouldShowPagedSpittles() throws Exception {
List<Spittle> expectedSpittles = createSpittleList(50);
SpittleRepository mockRepository = mock(SpittleRepository.class);
when(mockRepository.findSpittles(238900, 50))  //Expect max and count parameters
.thenReturn(expectedSpittles);
SpittleController controller =
new SpittleController(mockRepository);
MockMvc mockMvc = standaloneSetup(controller)
.setSingleView(
new InternalResourceView("/WEB-INF/views/spittles.jsp"))
.build();
mockMvc.perform(get("/spittles?max=238900&count=50"))  //Pass max and count parameters
.andExpect(view().name("spittles"))
.andExpect(model().attributeExists("spittleList"))
.andExpect(model().attribute("spittleList",
hasItems(expectedSpittles.toArray())));
}
With both tests in place, you can be assured that no matter what changes you make to the controller, it will still be able to handle both kinds of requests:
@RequestMapping(method=RequestMethod.GET)
public List<Spittle> spittles(
@RequestParam("max") long max,
@RequestParam("count") int count) {
return spittleRepository.findSpittles(max, count);
}
If the handler method in SpittleController is going to handle requests with or without the max and count parameters, you’ll need to change it to accept those parameters but still default to Long.MAX_VALUE and 20 if those parameters are absent on the request. The defaultValue attribute of @RequestParam will do the trick:
@RequestMapping(method=RequestMethod.GET)
public List<Spittle> spittles(
@RequestParam(value="max",
defaultValue=MAX_LONG_AS_STRING) long max,
@RequestParam(value="count", defaultValue="20") int count) {
return spittleRepository.findSpittles(max, count);
}
Now, if the max parameter isn’t specified, it will default to the maximum value of Long. Because query parameters are always of type String, the defaultValue attribute requires a String value. Therefore, Long.MAX_VALUE won’t work. Instead, you can capture Long.MAX_VALUE in a String constant named MAX_LONG_AS_STRING:
private static final String MAX_LONG_AS_STRING =
Long.toString(Long.MAX_VALUE);
Even though the defaultValue is given as a String, it will be converted to a Long when bound to the method’s max parameter.The count parameter will default to 20 if the request doesn’t have a count parameter.
Query parameters are a common way to pass information to a controller in a request. Another way that’s popular, especially in a discussion of building resourceoriented controllers(面向资源的controller), is to pass parameters as part of the request path. Let’s see how to use path variables to take input as part of the request path.
5.3.2Taking input via path parameters
Let’s say your application needs to support the display of a single Spittle, given its ID. One option you have is to write a handler method that accepts the ID as a query parameter using @RequestParam:(一种做法是将ID当做param传入)
@RequestMapping(value="/show", method=RequestMethod.GET)
public String showSpittle(
@RequestParam("spittle_id") long spittleId,
Model model) {
model.addAttribute(spittleRepository.findOne(spittleId));
return "spittle";
}
This handler method would handle requests such as /spittles/show?spittle_id=12345.虽然没有问题,但是不符合面向资源的controller的套路,Ideally, the resource being identified (the Spittle) would be identified by the URL path, not by query parameters.
A GET request for /spittles/12345 is better than one for /spittles/show?spittle_id=12345. The former identifies a resource to be retrieved.The latter describes an operation with a parameter—essentially RPC over HTTP.
针对面向资源的controller的test(虽然controller现在还没写):
//Testing a request for a Spittle with ID specified in a path variable
@Test
public void testSpittle() throws Exception {
Spittle expectedSpittle = new Spittle("Hello", new Date());
SpittleRepository mockRepository = mock(SpittleRepository.class);
when(mockRepository.findOne(12345)).thenReturn(expectedSpittle);
SpittleController controller = new SpittleController(mockRepository);
MockMvc mockMvc = standaloneSetup(controller).build();
mockMvc.perform(get("/spittles/12345"))  //Request resource via path
.andExpect(view().name("spittle"))
.andExpect(model().attributeExists("spittle"))
.andExpect(model().attribute("spittle", expectedSpittle));
}
为了迎合上面的测试,必须拿到12345这个值啊。
To accommodate these path variables, Spring MVC allows for placeholders in an @RequestMapping path. The placeholders are names surrounded by curly braces ({ and }). **Although all the other parts of the path need to match exactly for the request to be handled, the placeholder can carry any value.(request的其他部分必须精确匹配,placeholder中可以存放任意值)**Here’s a handler method that uses placeholders to accept a Spittle ID as part of
the path:
@RequestMapping(value="/{spittleId}", method=RequestMethod.GET)
public String spittle(
@PathVariable("spittleId") long spittleId,
Model model) {
model.addAttribute(spittleRepository.findOne(spittleId));
return "spittle";
}
For example, it can handle requests for /spittles/12345.If the request is a GET request for /spittles/54321, then 54321 will be passed in as the value of spittleId.
严重怀疑上面代码的正确性,是否应该将value=”/{spittleId}”改为value=”/spittles/{spittleId}”?
Query parameters and path parameters are fine for passing small amounts of data on a request. But often you need to pass a lot of data (perhaps data coming from a form submission), and query parameters are too awkward and limited for that. Let’s see how you can write controller methods that handle form submissions.
5.4Processing forms
There are two sides to working with forms: 1.displaying the form and 2.processing the data the user submits from the form.
SpitterController is a new controller with a single request-handling method for displaying the registration form.
//SpitterController: displays a form for users to sign up with the app
@Controller
@RequestMapping("/spitter")
public class SpitterController {
@RequestMapping(value="/register", method=GET)//Handle GET requestsfor /spitter/register
public String showRegistrationForm() {
return "registerForm";
}
}
Given how you’ve configured InternalResourceViewResolver, that means the JSP at /WEB INF/views/registerForm.jsp will be called on to render the registration form.
测试也非常简单:
//Testing a form-displaying controller method
@Test
public void shouldShowRegistration() throws Exception {
SpitterController controller = new SpitterController();
MockMvc mockMvc = standaloneSetup(controller).build();  //Set up MockMvc
mockMvc.perform(get("/spitter/register"))
.andExpect(view().name("registerForm"));  //Assert registerForm view
}
我们的jsp也非常的simple:
//JSP to render a registration form
<%@ taglib uri="http://java.sun.com/jsp/jstl/core" prefix="c" %>
<%@ page session="false" %>
<html>
<head>
<title>Spittr</title>
<link rel="stylesheet" type="text/css"
href="<c:url value="/resources/style.css" />" >
</head>
<body>
<h1>Register</h1>
<form method="POST">
First Name: <input type="text" name="firstName" /><br/>
Last Name: <input type="text" name="lastName" /><br/>
Username: <input type="text" name="username" /><br/>
Password: <input type="password" name="password" /><br/>
<input type="submit" value="Register" />
</form>
</body>
</html>
Notice that the <form> tag doesn’t have an action parameter set. Because of that, when this form is submitted, it will be posted back to the same URL path that displayed it. That is, it will be posted back to /spitters/register.That means you’ll need something back on the server to handle the HTTP POST request. Let’s add another method to SpitterController to handle form submission.
5.4.1Writing a form-handling controller
测试:
@Test
public void shouldProcessRegistration() throws Exception {
SpitterRepository mockRepository =
mock(SpitterRepository.class);  //Set up mock repository
Spitter unsaved =
new Spitter("jbauer", "24hours", "Jack", "Bauer");
Spitter saved =
new Spitter(24L, "jbauer", "24hours", "Jack", "Bauer");
when(mockRepository.save(unsaved)).thenReturn(saved);
SpitterController controller =
new SpitterController(mockRepository);
MockMvc mockMvc = standaloneSetup(controller).build(); //Set up MockMvc
mockMvc.perform(post("/spitter/register")  //Perform request
.param("firstName", "Jack")
.param("lastName", "Bauer")
.param("username", "jbauer")
.param("password", "24hours"))
.andExpect(redirectedUrl("/spitter/jbauer"));
verify(mockRepository, atLeastOnce()).save(unsaved);  //Verify save
}
When handling a POST request, it’s usually a good idea to send a redirect after the POST has completed processing so that a browser refresh won’t accidentally submit the form a second time. This test expects that the request will end in a redirect to /spitter/jbauer, the URL path of the new user’s profile page.(处理POST请求,一般加上重定向,避免刷新后重新提交)
正经的加上功能:
//Handling form submission to register a new user
@Controller
@RequestMapping("/spitter")
public class SpitterController {
private SpitterRepository spitterRepository;
@Autowired
public SpitterController(
SpitterRepository spitterRepository) {  //Inject SpitterRepository
this.spitterRepository = spitterRepository;
}
@RequestMapping(value="/register", method=GET)
public String showRegistrationForm() {
return "registerForm";
}
@RequestMapping(value="/register", method=POST)
public String processRegistration(Spitter spitter) {
spitterRepository.save(spitter);  //Save a Spitter
return "redirect:/spitter/" +  //Redirect to profile page
spitter.getUsername();
}
}
Notice the new processRegistration() method: it’s given a Spitter object as a parameter. This object has firstName, lastName, username, and password properties that will be populated from the request parameters of the same name.
When InternalResourceViewResolver sees the redirect: prefix on the view specification, it knows to interpret it as a redirect specification instead of as a view name. In this case, it will redirect to the path for a user’s profile page. For example, if the Spitter.username property is jbauer, then the view will redirect to /spitter/jbauer.
It’s worth noting that in addition to redirect:, InternalResourceViewResolver also recognizes the forward: prefix. When it sees a view specification prefixed with forward:, the request is forwarded to the given URL path instead of redirected.
疑问:搞不懂processRegistration方法中的参数Spitter是怎么传入的。,form表单中也没有标注啊。
What will happen if the form doesn’t send a username or password parameter? Or what if the firstName or lastName value is empty or too long? Let’s look at how to add validation to the form submission to prevent inconsistencies in the data presented.
5.4.2Validating forms
除了在controller的逻辑中判断是否合法,The Java Validation API defines several annotations that you can put on properties to place constraints on the values of those properties. All of these annotations are in the javax.validation.constraints package. Table 5.1 lists these validation annotations.
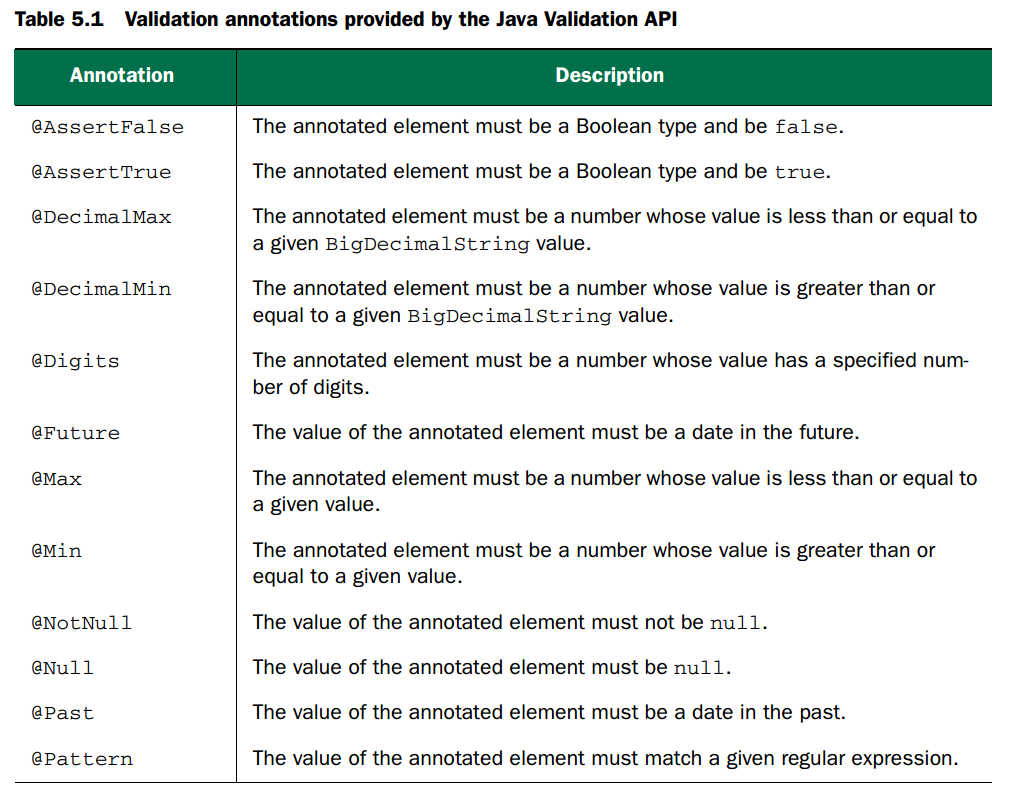
Thinking over the constraints you need to apply to the fields in Spitter, it seems you’ll probably need the @NotNull and @Size annotations. All you need to do is toss those annotations around on the properties of Spitter. The next listing shows Spitter with its properties annotated for validation.
//在单类Spitter中进行限定
public class Spitter {
private Long id;
@NotNull
@Size(min=5, max=16)
private String username;
@NotNull
@Size(min=5, max=25)
private String password;
@NotNull
@Size(min=2, max=30)
private String firstName;
@NotNull
@Size(min=2, max=30)
private String lastName;
...
}
Now that you have annotated Spitter with validation constraints, you need to change the processRegistration() method to apply validation. The new validationenabled processRegistration() is shown next.
//processRegistration(): ensures that data submitted is valid
@RequestMapping(value="/register", method=POST)
public String processRegistration(
@Valid Spitter spitter,  //Validate Spitter input,加入了@Valid
Errors errors) {
if (errors.hasErrors()) {
return "registerForm";  //Return to form on validation errors
}
spitterRepository.save(spitter);
return "redirect:/spitter/" + spitter.getUsername();
}
5.5Summary
Coming up in chapter 6, we’ll dig deeper into Spring views, expanding on how you can take advantage of Spring tag libraries in JSP. You’ll also see how to add consistent layouts to your views using Apache Tiles. And we’ll look at Thymeleaf, an exciting alternative to JSP that comes with built-in Spring support.
Chapter6.Rendering web views
Last chapter,we didn’t spend too much time discussing the views or what happens between the time a controller finishes handling a request and the time the results are displayed in the user’s web browser. That’s the topic of this chapter.
6.1Understanding view resolution
But if the controller only knows about the view by a logical view name, how does Spring determine which actual view implementation it should use to render the model? That’s a job for Spring’s view resolvers.
Spring给你实现的各种view resolver:
Spring comes with 13 view resolvers to translate logical view names into physical view implementations.
For the most part, each of the view resolvers in table 6.1 corresponds to a specific view technology available for Java web applications.
InternalResourceViewResolver is typically used for JSP, TilesViewResolver is for Apache Tiles views, and FreeMarkerViewResolver and VelocityViewResolver map to FreeMarker and Velocity template views respectively.
To wrap up this chapter, we’ll look at a view-resolver option that isn’t listed in table 6.1. Thymeleaf is a compelling alternative to JSP that offers a view resolver for working with Thymeleaf’s natural templates: templates that have more in common with the HTML they produce than with the Java code that drives them. Thymeleaf is such an exciting view option that I wouldn’t blame you if you flipped a few pages ahead to section 6.4 to see how to use it with Spring.
Thymeleaf大法好啊!
6.2Creating JSP views
Spring supports JSP views in two ways:
1.InternalResourceViewResolver can be used to resolve view names into JSP files. Moreover, if you’re using JavaServer Pages Standard Tag Library (JSTL)
tags in your JSP pages, InternalResourceViewResolver can resolve view names into JSP files fronted by JstlView to expose JSTL locale and resource bundle
variables to JSTL’s formatting and message tags.
2.Spring provides two JSP tag libraries, one for form-to-model binding and one providing general utility features.
6.2.1Configuring a JSP-ready view resolver
You can configure InternalResourceViewResolver to apply this convention when resolving views by configuring it with this @Bean-annotated method:
@Bean
public ViewResolver viewResolver() {
InternalResourceViewResolver resolver =
new InternalResourceViewResolver();
resolver.setPrefix("/WEB-INF/views/");
resolver.setSuffix(".jsp");
return resolver;
}
RESOLVING JSTL VIEWS
If those JSP files are using JSTL tags for formatting or messages, then you may want to configure InternalResourceViewResolver to resolve a JstlView instead.配置如下,与上面差不多:
@Bean
public ViewResolver viewResolver() {
InternalResourceViewResolver resolver =
new InternalResourceViewResolver();
resolver.setPrefix("/WEB-INF/views/");
resolver.setSuffix(".jsp");
resolver.setViewClass(
org.springframework.web.servlet.view.JstlView.class);
return resolver;
}
6.2.2Using Spring’s JSP libraries
Spring offers two JSP tag libraries to help define the view of your Spring MVC web views. One tag library 1.renders HTML form tags that are bound to a model attribute. The other has 2.a hodgepodge of utility tags that come in handy from time to time.
You’re likely to find the form-binding tag library to be the more useful of the two tag libraries.
BINDING FORMS TO THE MODEL
Spring’s form-binding JSP tag library includes 14 tags, most of which render HTML form tags. But what makes these different from the raw HTML tags is that they’re bound to an object in the model and can be populated with values from the model object’s properties. The tag library also includes a tag that can be used to communicate errors to the user by rendering them into the resulting HTML.跟HTML tag差不多,但它携带了model数据。
1.To use the form-binding tag library, you’ll need to declare it in the JSP pages that will use it:
<%@ taglib uri="http://www.springframework.org/tags/form" prefix="sf" %>Notice that I specified a prefix of sf, but it’s also common to use a prefix of form. 没什么别的含义。
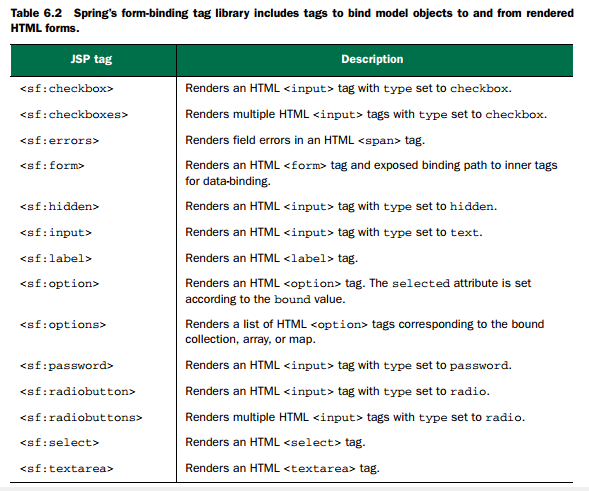
Applying those tags to the registration JSP, you get the following:
<sf:form method="POST" commandName="spitter">
First Name: <sf:input path="firstName" /><br/>
Last Name: <sf:input path="lastName" /><br/>
Email: <sf:input path="email" /><br/>
Username: <sf:input path="username" /><br/>
Password: <sf:password path="password" /><br/>
<input type="submit" value="Register" />
</sf:form>
In the preceding code, you set commandName to spitter. Therefore, there must be an object in the model whose key is spitter, or else the form won’t be able to render (and you’ll get JSP errors). That means you need to make a small change to SpitterController to ensure that a Spitter object is in the model under the spitter key:
@RequestMapping(value="/register", method=GET)
public String showRegistrationForm(Model model) {
model.addAttribute(new Spitter());
return "registerForm";
}
Using Spring’s form-binding tags gives you a slight improvement over using standard HTML tags—the form is prepopulated with the previously entered values after failed validation. But it still fails to tell the user what they did wrong. To guide the user in fixing their mistakes, you’ll need the <sf:errors> tag.
DISPLAYING ERRORS
6.3Defining a layout with Apache Tiles views
6.4Working with Thymeleaf
The most recent contender, Thymeleaf, shows
some real promise and is an exciting choice to consider. Thymeleaf templates are natural and don’t rely on tag libraries. They can be edited and rendered anywhere that raw HTML is welcome. And because they’re not coupled to the servlet specification,
Thymeleaf templates can go places JSPs dare not tread. Let’s look at how to use Thymeleaf with Spring MVC.终于要用这一大杀器了!
6.4.1Configuring a Thymeleaf view resolver
In order to use Thymeleaf with Spring, you’ll need to configure three beans that enable Thymeleaf-Spring integration:
1.A ThymeleafViewResolver that resolves Thymeleaf template views from logical view names
2.A SpringTemplateEngine to process the templates and render the results
3.A TemplateResolver that loads Thymeleaf templates
java配置:
@Bean
public ViewResolver viewResolver(//Thymeleaf //view resolver
SpringTemplateEngine templateEngine) {
ThymeleafViewResolver viewResolver = new ThymeleafViewResolver();
viewResolver.setTemplateEngine(templateEngine);
return viewResolver;
}
@Bean
public TemplateEngine templateEngine(//Template //engine
TemplateResolver templateResolver) {
SpringTemplateEngine templateEngine = new SpringTemplateEngine();
templateEngine.setTemplateResolver(templateResolver);
return templateEngine;
}
@Bean
public TemplateResolver templateResolver() {
//Template resolver
TemplateResolver templateResolver =
new ServletContextTemplateResolver();
templateResolver.setPrefix("/WEB-INF/templates/");
templateResolver.setSuffix(".html");
templateResolver.setTemplateMode("HTML5");
return templateResolver;
}
ThymeleafViewResolver is an implementation of Spring MVC’s ViewResolver. Just like any view resolver, it takes a logical view name and resolves a view. But in this case, that view is ultimately a Thymeleaf template.
6.4.2Defining Thymeleaf templates
Thymeleaf templates are primarily just HTML files.What makes Thymeleaf tick, however, is that it adds Thymeleaf attributes to the standard set of HTML tags via a custom namespace.
下面是home.html:
//home.html: home page template using the //Thymeleaf namespace
<html xmlns="http://www.w3.org/1999/xhtml"
xmlns:th="http://www.thymeleaf.org">//Declare //Thymeleaf namespace
<head>
<title>Spittr</title>
<link rel="stylesheet"
type="text/css"
th:href="@{/resources/style.css}"></link>//th:href link to stylesheet
</head>
<body>
<h1>Welcome to Spittr</h1>
//th:href link to stylesheet
<a th:href="@{/spittles}">Spittles</a> |
<a th:href="@{/spitter/register}">Register</a>
</body>
</html>
What makes th:href special is that its value can contain Thymeleaf expressions to evaluate dynamic values. It will render a standard href attribute containing a value that’s dynamically created at render time. This is how many of the attributes in the Thymeleaf namespace work: they mirror the standard HTML attribute that they share a name with, to render some computed value.
In this case, all three uses of the th:href attribute use the @{} expressions to calculate context-sensitive URL paths (much as you might use JSTL’s <c:url> tag or Spring’s <s:url> tag in a JSP page).
This means Thymeleaf templates, unlike JSPs, can be edited and even rendered naturally, without going through any sort of processor.Sure, you’ll need Thymeleaf to process the templates to fully render the desired output.
Simple templates like home.html are a nice introduction to Thymeleaf. But form binding is something that Spring’s JSP tags excel at. If you’re abandoning JSP, must you abandon form binding as well? Fear not. Thymeleaf has a little something up its
sleeve.
FORM BINDING WITH THYMELEAF
Form binding is an important feature of Spring MVC. It makes it possible for controllers to receive command objects populated with data submitted in a form and for the form to be prepopulated with values from the command object when displaying the form.
Without proper form binding, you’d have to ensure that 1.the HTML form fields were properly named to map to the backing command object’s properties. And you’d also be responsible for 2.ensuring that the fields’ values were set to the command object’s properties when redisplaying a form after validation failure.
To demonstrate Thymeleaf data binding in action, the following listing shows the complete registration form template.
//Registration page, using Thymeleaf to bind a //form to a command object
<form method="POST" th:object="${spitter}">
<div class="errors"  //Display errors
th:if="${#fields.hasErrors('*')}">
<ul>
<li th:each="err : ${#fields.errors('*')}"
th:text="${err}">Input is incorrect</li>
</ul>
</div>
<label th:class="${#fields.hasErrors('firstName')}? 'error'">
First Name</label>:
<input type="text" th:field="*{firstName}"
th:class="${#fields.hasErrors('firstName')}? 'error'" /><br/>
<label th:class="${#fields.hasErrors('lastName')}? 'error'">
Last Name</label>:
<input type="text" th:field="*{lastName}"
th:class="${#fields.hasErrors('lastName')}? 'error'" /><br/>
<label th:class="${#fields.hasErrors('email')}? 'error'">
Email</label>:
<input type="text" th:field="*{email}"
th:class="${#fields.hasErrors('email')}? 'error'" /><br/>
<label th:class="${#fields.hasErrors('username')}? 'error'">
Username</label>:
<input type="text" th:field="*{username}"
th:class="${#fields.hasErrors('username')}? 'error'" /><br/>
<label th:class="${#fields.hasErrors('password')}? 'error'">
Password</label>:
<input type="password" th:field="*{password}"
th:class="${#fields.hasErrors('password')}? 'error'" /><br/>
<input type="submit" value="Register" />
</form>
You may be wondering about the difference between the expressions wrapped with ${} and those wrapped with *{}. The ${} expressions (such as ${spitter}) are variable expressions. In the case of ${spitter}, it resolves to the model property whose key is spitter.
As for *{} expressions, they’re selection expressions.In the case of the form, the selected object is the one given in the <form> tag’s th:object attribute: a Spitter object from the model. Therefore the *{firstName} expression evaluates to the firstName property on the Spitter object.
6.5Summary
Chapter7.Advanced Spring MVC
In chapter 5, we looked at essential Spring MVC and how to write controllers to handle various kinds of requests. Then you built on that in chapter 6 to create the JSP and Thymeleaf views that present model data to the user. You might think you know everything about Spring MVC. But wait! There’s more!
7.1Alternate Spring MVC configuration
7.1.1Customizing DispatcherServlet configuration
7.1.2Adding additional servlets and filters
7.1.3 Declaring DispatcherServlet in web.xml
7.2Processing multipart form data
The Spittr application calls for file uploads in two places. When a new user registers with the application, you’d like them to be able to provide a picture to associate with their profile. And when a user posts a new Spittle, they may want to upload a photo to go along with their message.
Typical form fields have textual data in their parts, but when something is being uploaded, the part can be binary, as shown in the following multipart request body:
------WebKitFormBoundaryqgkaBn8IHJCuNmiW
Content-Disposition: form-data; name="username"
professorx
------WebKitFormBoundaryqgkaBn8IHJCuNmiW
Content-Disposition: form-data; name="password"
letmein01
------WebKitFormBoundaryqgkaBn8IHJCuNmiW
Content-Disposition: form-data; name="profilePicture"; filename="me.jpg"
Content-Type: image/jpeg
[[ Binary image data goes here ]]
------WebKitFormBoundaryqgkaBn8IHJCuNmiW--
Even though multipart requests look complex, handling them in a Spring MVC controller is easy. But before you can write controller methods to handle file uploads, you must configure a multipart resolver to tell DispatcherServlet how to read multipart requests.第一步
7.2.1Configuring a multipart resolver
DispatcherServlet doesn’t implement any logic for parsing the data in a multipart request. Instead, it delegates to an implementation of Spring’s MultipartResolver strategy interface to resolve the content in a multipart request. Since Spring 3.1,
Spring comes with two out-of-the-box implementations of MultipartResolver to
choose from:
1.CommonsMultipartResolver—Resolves multipart requests using Jakarta Commons FileUpload
2.StandardServletMultipartResolver—Relies on Servlet 3.0 support for multipart requests (since Spring 3.1)
Generally speaking, StandardServletMultipartResolver should probably be your first choice of these two.
RESOLVING MULTIPART REQUESTS WITH SERVLET 3.0
It’s extremely simple to declare StandardServletMultipartResolver as a bean in your Spring configuration, as shown here:
@Bean
public MultipartResolver multipartResolver() throws IOException {
return new StandardServletMultipartResolver();
}
As easy as that @Bean method is, you might be wondering how you can place constraints on the way StandardServletMultipartResolver works.What if you want to limit the maximum size of file that a user can upload? Or what if you’d like to specify the location where the uploaded files are temporarily written while they’re being uploaded?
没有properties和constructor arguments,StandardServletMultipartResolver好像没有办法,那就在DispatcherServlet中配置咯。
If you’re configuring DispatcherServlet in a servlet initializer class that implements WebApplicationInitializer, you can configure multipart details by calling setMultipartConfig() on the servlet registration, passing an instance of MultipartConfigElement. Here’s a minimal multipart configuration for DispatcherServlet that sets the temporary location to /tmp/spittr/uploads:
DispatcherServlet ds = new DispatcherServlet();
Dynamic registration = context.addServlet("appServlet", ds);
registration.addMapping("/");
registration.setMultipartConfig(
new MultipartConfigElement("/tmp/spittr/uploads"));
If you’ve configured DispatcherServlet in a servlet initializer class that extends AbstractAnnotationConfigDispatcherServletInitializer or AbstractDispatcherServletInitializer, you don’t create the instance of DispatcherServlet or register it with the servlet context directly.
Consequently, there’s no handy reference to the
Dynamic servlet registration to work with. But you can override the customizeRegistration() method (which is given a Dynamic as a parameter) to configure multipart details:
@Override
protected void customizeRegistration(Dynamic registration) {
registration.setMultipartConfig(
new MultipartConfigElement("/tmp/spittr/uploads"));
}
In addition to the temporary location path, the other constructor accepts the following,其他的构造方法:
1.The maximum size (in bytes) of any file uploaded. By default there is no limit.
2.The maximum size (in bytes) of the entire multipart request, regardless of how many parts or how big any of the parts are. By default there is no limit.
3.The maximum size (in bytes) of a file that can be uploaded without being written to the temporary location. The default is 0, meaning that all uploaded files will be written to disk.
For example, suppose you want to limit files to no more than 2 MB, to limit the entire request to no more than 4 MB, and to write all files to disk. The following use of MultipartConfigElement sets those thresholds:
@Override
protected void customizeRegistration(Dynamic registration) {
registration.setMultipartConfig(
new MultipartConfigElement("/tmp/spittr/uploads",
2097152, 4194304, 0));
}
7.2Handling multipart requests
The following snippet from the Thymeleaf registration form view (registrationForm.html) highlights the necessary changes to the form:
<form method="POST" th:object="${spitter}"
enctype="multipart/form-data">
...
<label>Profile Picture</label>:
<input type="file"
name="profilePicture"
accept="image/jpeg,image/png,image/gif" /><br/>
...
</form>
The <form> tag now has its enctype attribute set to multipart/form-data. This tells the browser to submit the form as multipart data instead of form data. Each field has its own part in the multipart request.
In addition to all the existing fields on the registration form, you’ve added a new field whose type is file. This lets the user select an image file to upload. The accept attribute is set to limit file types to JPEG, PNG, and GIF images. And according to its name attribute, the image data will be sent in the multipart request in the profilePicture part.
Now you just need to change the processRegistration() method to accept the
uploaded image. One way to do that is to add a byte array parameter that’s annotated with @RequestPart. Here’s an example:
@RequestMapping(value="/register", method=POST)
public String processRegistration(
@RequestPart("profilePicture") byte[] profilePicture,
@Valid Spitter spitter,
Errors errors) {
...
}
RECEIVING A MULTIPARTFILE
不再只得到byte[]数据,将得到更完善的文件信息。需要将
@RequestPart(“profilePicture”) byte[] profilePicture,改为@RequestPart(“profilePicture”) MultipartFile profilePicture,这应该是很显然的嘛。
Working with the uploaded file’s raw bytes is simple but limiting. Therefore, Spring also offers MultipartFile as a way to get a richer object for processing multipart data. The following listing shows what the MultipartFile interface looks like.
//Spring’s MultipartFile interface for working //with uploaded files
public interface MultipartFile {
String getName();
String getOriginalFilename();
String getContentType();
boolean isEmpty();
long getSize();
byte[] getBytes() throws IOException;
InputStream getInputStream() throws IOException;
void transferTo(File dest) throws IOException;
}
For example, you could add the following lines to processRegistration() to write the uploaded image file to the filesystem:
profilePicture.transferTo(
new File("/data/spittr/" + profilePicture.getOriginalFilename()));
SAVING FILES TO AMAZON S3
//Saving a MultipartFile to Amazon S3
private void saveImage(MultipartFile image)
throws ImageUploadException {
try {
AWSCredentials awsCredentials =
new AWSCredentials(s3AccessKey, s2SecretKey);
//Set up S3 service
S3Service s3 = new RestS3Service(awsCredentials);
//Create S3 bucket and object
S3Bucket bucket = s3.getBucket("spittrImages");
S3Object imageObject =
new S3Object(image.getOriginalFilename());
//Set image data
imageObject.setDataInputStream(
image.getInputStream());
imageObject.setContentLength(image.getSize());
imageObject.setContentType(image.getContentType());
//Set permissions
AccessControlList acl = new AccessControlList();
acl.setOwner(bucket.getOwner());
acl.grantPermission(GroupGrantee.ALL_USERS,
Permission.PERMISSION_READ);
imageObject.setAcl(acl);
//Save image
s3.putObject(bucket, imageObject);
} catch (Exception e) {
throw new ImageUploadException("Unable to save image", e);
}
}
RECEIVING THE UPLOADED FILE AS A PART
If you’re deploying your application to a Servlet 3.0 container, you have an alternative to MultipartFile.
改动:
@RequestMapping(value="/register", method=POST)
public String processRegistration(
@RequestPart("profilePicture") Part profilePicture,
@Valid Spitter spitter,
Errors errors) {
...
}
As you can see in the next listing, the Part interface has several methods that mirror the methods in MultipartFile.
//Part interface: an alternative to Spring’s //MultipartFile
public interface Part {
public InputStream getInputStream() throws IOException;
public String getContentType();
public String getName();
public String getSubmittedFileName();
public long getSize();
public void write(String fileName) throws IOException;
public void delete() throws IOException;
public String getHeader(String name);
public Collection<String> getHeaders(String name);
public Collection<String> getHeaderNames();
}
It’s worth noting that if you write your controller handler methods to accept file uploads via a Part parameter, then you don’t need to configure the StandardServletMultipartResolver bean. StandardServletMultipartResolver is required only
when you’re working with MultipartFile.用Part不需要额外的配置,用MultipartFile还需要配置StandardServletMultipartResolver。那就尽量用Part呗!
7.3Handling exceptions
No matter what happens, good or bad, the outcome of a servlet request is a servlet response. If an exception occurs during request processing, the outcome is still a servlet response. Somehow, the exception must be translated into a response.
Spring offers a handful of ways to translate exceptions to responses:
1.Certain Spring exceptions are automatically mapped to specific HTTP status codes.
2.An exception can be annotated with @ResponseStatus to map it to an HTTP status code.
3.A method can be annotated with @ExceptionHandler to handle the exception.
7.3.1Mapping exceptions to HTTP status codes
如果为null,就会SpittleNotFoundException:
@RequestMapping(value="/{spittleId}", method=RequestMethod.GET)
public String spittle(
@PathVariable("spittleId") long spittleId,
Model model) {
Spittle spittle = spittleRepository.findOne(spittleId);
if (spittle == null) {
throw new SpittleNotFoundException();
}
model.addAttribute(spittle);
return "spittle";
}
然后在SpittleNotFoundException中绑定code:
package spittr.web;
import org.springframework.http.HttpStatus;
import org.springframework.web.bind.annotation.ResponseStatus;
//Map exception to HTTP Status 404
@ResponseStatus(value=HttpStatus.NOT_FOUND,
reason="Spittle Not Found")
public class SpittleNotFoundException extends RuntimeException {
}
If a SpittleNotFoundException were to be thrown from a controller method, the response would have a status code of 404 and a reason of Spittle Not Found.
7.3.2Writing exception-handling methods
//Handling an exception directly in a
//request-handling method
@RequestMapping(method=RequestMethod.POST)
public String saveSpittle(SpittleForm form, Model model) {
try {
spittleRepository.save(
new Spittle(null, form.getMessage(), new Date(),
form.getLongitude(), form.getLatitude()));
return "redirect:/spittles";
} catch (DuplicateSpittleException e) {//Catch //the exception
return "error/duplicate";
}
}
It works fine, but the method is a bit complex. Two paths can be taken, each with a different outcome. It’d be simpler if saveSpittle() could focus on the happy path and let some other method deal with the exception.最好将exception处理方法拿出来,形成两个方法。
First, let’s rip the exception-handling code out of saveSpittle():
@RequestMapping(method=RequestMethod.POST)
public String saveSpittle(SpittleForm form, Model model) {
spittleRepository.save(
new Spittle(null, form.getMessage(), new Date(),
form.getLongitude(), form.getLatitude()));
return "redirect:/spittles";
}
Now let’s add a new method to SpittleController that will handle the case where DuplicateSpittleException is thrown:
@ExceptionHandler(DuplicateSpittleException.class)
public String handleDuplicateSpittle() {
return "error/duplicate";
}
这样,我们就将主要的逻辑代码与异常处理代码分开了。并且,@ExceptionHandler方法可以接收同一个controller下的任何handler method。如果每个方法都有可能出现这种exception,这样统一写无疑是最简单的。
If @ExceptionHandler methods can handle exceptions thrown from any handler method in the same controller class, you might be wondering if there’s a way they can handle exceptions thrown from handler methods in any controller. As of Spring 3.2
they certainly can, but only if they’re defined in a controller advice class.
7.4Advising controllers
Certain aspects of controller classes might be handier if they could be applied broadly across all controllers in a given application.Or, to avoid the duplication, you might create a base controller class that all of your controllers could extend to inherit the common @ExceptionHandler method.
Spring 3.2 brings another option to the table: controller advice. A controller advice is any class that’s annotated with @ControllerAdvice and has one or more of the following kinds of methods:
1.@ExceptionHandler-annotated
2.@InitBinder-annotated
3.@ModelAttribute-annotated
Those methods in an @ControllerAdvice-annotated class are applied globally across all @RequestMapping-annotated methods on all controllers in an application.
One of the most practical uses for @ControllerAdvice is to gather all @ExceptionHandler methods in a single class so that exceptions from all controllers are handled consistently in one place.
//Using @ControllerAdvice to handle exception //for all controllers
package spitter.web;
import org.springframework.web.bind.annotation.ControllerAdvice;
import org.springframework.web.bind.annotation.ExceptionHandler;
@ControllerAdvice  //Declare controller advice
public class AppWideExceptionHandler {
@ExceptionHandler(DuplicateSpittleException.class)
//Define exceptionhandler method
public String duplicateSpittleHandler() {
return "error/duplicate";
}
}
7.5Carrying data across redirect requests
在前面提交表单的POST请求时,我们用了重定向。如下:
return "redirect:/spitter/" + spitter.getUsername();但存在下面的问题,我们不能把在这个original request中得到的model中的数据传入到重定向的request中,如下:
Clearly, the model isn’t going to help you carry data across a redirect. But there are a couple of options to get the data from the redirecting method to the redirecthandling method:
1.Passing data as path variables and/or query parameters using URL templates
2.Sending data in flash attributes
7.5.1Redirecting with URL templates
It’s far
from bulletproof. String concatenation is dangerous business when constructing
things like URLs and SQL queries.
For example, the last line of processRegistration() could be written like this:
return "redirect:/spitter/{username}";All you need to do is set the value in the model.
@RequestMapping(value="/register", method=POST)
public String processRegistration(
Spitter spitter, Model model) {
spitterRepository.save(spitter);
model.addAttribute("username", spitter.getUsername());
return "redirect:/spitter/{username}";
}
What’s more, any other primitive values in the model are also added to the redirect URL as query parameters.
@RequestMapping(value="/register", method=POST)
public String processRegistration(
Spitter spitter, Model model) {
spitterRepository.save(spitter);
model.addAttribute("username", spitter.getUsername());
model.addAttribute("spitterId", spitter.getId());
return "redirect:/spitter/{username}";
}
Not much has changed with regard to the redirect String being returned. But because the spitterId attribute from the model doesn’t map to any URL placeholders in the redirect, it’s tacked on to the redirect automatically as a query parameter.
If the username attribute is habuma and the spitterId attribute is 42, then the resulting redirect path will be /spitter/habuma?spitterId=42.
7.5.2Working with flash attributes
Let’s say that instead of sending a username or ID in the redirect, you want to send the actual Spitter object. If you send just the ID, then the method that handles the redirect has to turn around and look up the Spitter from the database. But before the redirect, you already have the Spitter object in hand. Why not send it to the redirecthandling method to display?如果redirect传入ID,那么还得从database中读取Spitter,为什么不直接传递Spitter对象呢?既然我们已经有了Spitter数据在手里。
A Spitter object is a bit more complex than a String or an int. Therefore, it can’t easily be sent as a path variable or a query parameter. It can, however, be set as an attribute in the model.
But as we’ve already discussed, model attributes are ultimately copied into the request as request attributes and are lost when the redirect takes place. Therefore, you need to put the Spitter object somewhere that will survive the redirect.
One option is to put the Spitter into the session. A session is long-lasting, spanning multiple requests.Instead, Spring offers the capability of sending the data as flash attributes. Flash attributes, by definition, carry data until the next request; then they go away.
Spring offers a way to set flash attributes via RedirectAttributes, a sub-interface of Model added in Spring 3.1.
@RequestMapping(value="/register", method=POST)
public String processRegistration(
Spitter spitter, RedirectAttributes model) {
spitterRepository.save(spitter);
model.addAttribute("username", spitter.getUsername());
model.addFlashAttribute("spitter", spitter);
return "redirect:/spitter/{username}";
}
Before the redirect takes place, all flash attributes are copied into the session. After the redirect, the flash attributes stored in the session are moved out of the session and into the model. The method that handles the redirect request can then access the Spitter from the model, just like any other model object. Figure 7.2 illustrates how this works.
7.6Summary
Chapter8.Working with Spring Web Flow
Spring Web Flow is a web framework that enables the development of elements following a prescribed flow.
Spring Web Flow is an extension to Spring MVC that enables development of flowbased web applications. It does this by separating the definition of an application’s flow from the classes and views that implement the flow’s behavior.
8.1Configuring Web Flow in Spring
Spring Web Flow is built on a foundation of Spring MVC. That means all requests to a flow first go through Spring MVC’s DispatcherServlet. From there, a handful of special beans in the Spring application context must be configured to handle the flow request and execute the flow.
At this time, there’s no support for configuring Spring Web Flow in Java, so you have no choice but to configure it in XML.**只能在XML中config。**Therefore, you’ll need to add the namespace declaration to the context definition XML file:
<?xml version="1.0" encoding="UTF-8"?>
<beans xmlns="http://www.springframework.org/schema/beans"
xmlns:xsi="http://www.w3.org/2001/XMLSchema-instance"
xmlns:flow="http://www.springframework.org/schema/webflow-config"
xsi:schemaLocation=
"http://www.springframework.org/schema/webflow-config
http://www.springframework.org/schema/webflow-config/[CA]
spring-webflow-config-2.3.xsd
http://www.springframework.org/schema/beans
http://www.springframework.org/schema/beans/spring-beans.xsd">
8.1.1Wiring a flow executor
As its name implies, the flow executor drives the execution of a flow.The <flow:flow-executor> element creates a flow executor in Spring:<flow:flow-executor id="flowExecutor" />
Although the flow executor is responsible for creating and executing flows, it’s not responsible for loading flow definitions. That responsibility falls to a flow registry, which you’ll create next.
8.1.2Configuring a flow registry
You can configure a flow registry in the Spring configuration with the <flow:flow-registry> element like this:
<flow:flow-registry id="flowRegistry" base-path="/WEB-INF/flows">
<flow:flow-location-pattern value="*-flow.xml" />
</flow:flow-registry>
As declared here, the flow registry will look for flow definitions under the /WEB-INF/flows directory, as specified in the base-path attribute. Per the <flow: flow-location-pattern> element, any XML file whose name ends with -flow.xml will be considered a flow definition.
还可以显式定义:
<flow:flow-registry id="flowRegistry">
<flow:flow-location path="/WEB-INF/flows/springpizza.xml" />
</flow:flow-registry>
Here, the <flow:flow-location> element is used instead of <flow:flow-locationpattern>. The path attribute directly points at the /WEB-INF/flows/springpizza.xml file as the flow definition. When configured this way, the flow’s ID is derived from the base name of the flow definition file, springpizza in this case.
8.1.3 Handling flow requests
As you saw in the previous chapter, DispatcherServlet typically dispatches requests to controllers. But for flows, you need a FlowHandlerMapping to help DispatcherServlet know that it should send flow requests to Spring Web Flow. The FlowHandlerMapping is configured in the Spring application context like this:
<bean class=
"org.springframework.webflow.mvc.servlet.FlowHandlerMapping">
<property name="flowRegistry" ref="flowRegistry" />
</bean>
As you can see, the FlowHandlerMapping is wired with a reference to the flow registry so it knows when a request’s URL maps to a flow. For example, if you have a flow whose ID is pizza, then FlowHandlerMapping will know to map a request to that flow if the request’s URL pattern (relative to the application context path) is /pizza.
Whereas the FlowHandlerMapping’s job is to direct flow requests to Spring Web Flow, it’s the job of a FlowHandlerAdapter to answer that call.FlowHandlerAdapter在这点上相当于Spring MVC中的controller。The FlowHandlerAdapter is wired as a Spring bean like this:
<bean class=
"org.springframework.webflow.mvc.servlet.FlowHandlerAdapter">
<property name="flowExecutor" ref="flowExecutor" />
</bean>
You’ve configured all the beans and components that are needed for Spring Web Flow to work. What’s left is to define a flow. You’ll do that soon enough. But first, let’s get to know the elements that are put together to make up a flow.
8.2 The components of a flow
In Spring Web Flow, a flow is defined by three primary elements: states, transitions, and flow data. States are points in a flow where something happens. If you imagine a flow as being like a road trip, then states are the towns, truck stops, and scenic stops along the way. Instead of picking up a bag of Doritos and a Diet Coke, a state in a flow is where some logic is performed, some decision is made, or some page is presented to the user.比喻很形象
If flow states are like the points on a map where you might stop during a road trip, then transitions are the roads that connect those points. In a flow, you get from one state to another by way of a transition.
8.2.1 States
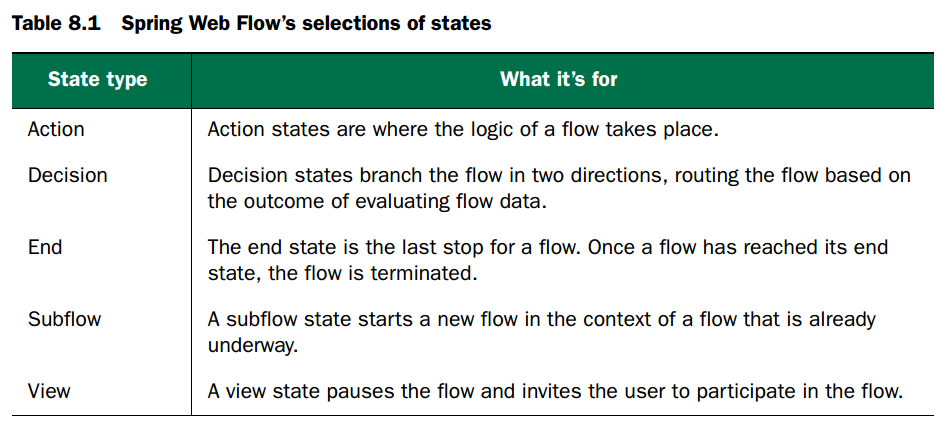
VIEW STATES
View states are used to display information to the user and to offer the user an opportunity to play an active role in the flow. The actual view implementation could be any of the views supported by Spring MVC but is often implemented in JSP.
//如果没有指定view名称,那么默认为与id同名
<view-state id="welcome" view="greeting" />
If a flow presents a form to the user, you may want to specify the object to which the form will be bound. To do that, set the model attribute:
<view-state id="takePayment" model="flowScope.paymentDetails"/>ACTION STATES
Whereas view states involve the users of the application in the flow, action states are where the application itself goes to work. Action states typically invoke some method on a Spring-managed bean and then transition to another state depending on the outcome of the method call.
<action-state id="saveOrder">
<evaluate expression="pizzaFlowActions.saveOrder(order)" />
<transition to="thankYou" />
</action-state>
DECISION STATES
有时候state需要分支。Decision states enable a binary branch in a flow execution. A decision state evaluates a Boolean expression and takes one of two transitions, depending on whether the expression evaluates to true or false.
<decision-state id="checkDeliveryArea">
<if test="pizzaFlowActions.checkDeliveryArea(customer.zipCode)"
then="addCustomer"
else="deliveryWarning" />
</decision-state>
SUBFLOW STATES
You probably wouldn’t write all of your application’s logic in a single method. Instead, you’ll break it up into multiple classes, methods, and other structures.在FLOW中也是一样,就像在一个方法中调用另一个方法。
<subflow-state id="order" subflow="pizza/order">
<input name="order" value="order"/>
<transition on="orderCreated" to="payment" />
</subflow-state>
Here, the <input> element is used to pass the order object as input to the subflow.And if the subflow ends with an <end-state> whose ID is orderCreated, then the flow will transition to the state whose ID is payment.
END STATES
<end-state id="customerReady" />When the flow reaches an <end-state>, the flow ends. What happens next depends
on a few factors:
1.If the flow that’s ending is a subflow, the calling flow will proceed from the <subflow-state>. The <end-state>’s ID will be used as an event to trigger the transition away from the <subflow-state>.有sub的情况,感觉与函数调用相似。
2.If the <end-state> has its view attribute set, the specified view will be rendered. The view may be a flow-relative path to a view template, prefixed with externalRedirect: to redirect to some page external to the flow, or prefixed with flowRedirect: to redirect to another flow.有view的情况。
3.If the ending flow isn’t a subflow and no view is specified, the flow ends(只有结束咯). The browser lands on the flow’s base URL, and, with no current flow active, a new instance of the flow begins.
8.2.2Transitions
As I’ve already mentioned, transitions connect the states within a flow. Every state in a flow, with the exception of end states, should have at least one transition so that the flow will know where to go once that state has completed. A state may have multiple transitions, each one representing a different path that could be taken on completion of the state.
<transition to="customerReady" />You can specify the event to trigger the transition in the on attribute:
<transition on="phoneEntered" to="lookupCustomer"/>In this example, the flow will transition to the state whose ID is lookupCustomer if a phoneEntered event is fired.
The flow can also transition to another state in response to some exception being thrown.
<transition
on-exception=
"com.springinaction.pizza.service.CustomerNotFoundException"
to="registrationForm" />
GLOBAL TRANSITIONS
<global-transitions>
<transition on="cancel" to="endState" />
</global-transitions>
8.2.3Flow data
Sometimes that data is only needed for a little while (maybe just long enough to display a page to the user). Other times, that data is carried through the entire flow and is ultimately used as the flow completes.所以应该需要定义生命周期?
DECLARING VARIABLES
The simplest way to create a variable in a flow is by using the <var> element:
<var name="customer" class="com.springinaction.pizza.domain.Customer"/>Here, a new instance of a Customer object is created and placed into the variable whose name is customer. This variable is available to all states in a flow.
还有其他定义方法,比如<evaluate>,<set>。
SCOPING FLOW DATA
The lifespan and visibility of data carried in a flow will vary depending on the scope of the variable it’s kept in. Spring Web Flow defines five scopes, as described in table 8.2.
When you declare a variable using the <var> element, the variable is always flowscoped in the flow defining the variable. When you use <set> or <evaluate>, the scope is specified as a prefix for the name or result attribute. For example, here’s how you would assign a value to a flow-scoped variable named theAnswer:
<set name="flowScope.theAnswer" value="42"/>8.3Putting it all together: the pizza flow
As it turns out, the process of ordering a pizza can be defined nicely in a flow.
You’ll start by building a high-level flow that defines the overall process of ordering a pizza. Then you’ll break that flow down into subflows that define the details at a lower level.
8.3.1Defining the base flow
先粗粒度的定义FLOW:
The following listing shows the high-level pizza order flow as defined using Spring Web Flow’s XML-based flow definition.
//Pizza order flow, defined as a Spring Web Flow
<?xml version="1.0" encoding="UTF-8"?>
<flow xmlns="http://www.springframework.org/schema/webflow"
xmlns:xsi="http://www.w3.org/2001/XMLSchema-instance"
xsi:schemaLocation="http://www.springframework.org/schema/webflow
http://www.springframework.org/schema/webflow/spring-webflow-2.3.xsd">
<var name="order"
class="com.springinaction.pizza.domain.Order"/>
//Call customer subflow
<subflow-state id="identifyCustomer" subflow="pizza/customer">
<output name="customer" value="order.customer"/>
<transition on="customerReady" to="buildOrder" />
</subflow-state>
//Call order subflow
<subflow-state id="buildOrder" subflow="pizza/order">
<input name="order" value="order"/>
<transition on="orderCreated" to="takePayment" />
</subflow-state>
//Call payment subflow
<subflow-state id="takePayment" subflow="pizza/payment">
<input name="order" value="order"/>
<transition on="paymentTaken" to="saveOrder"/>
</subflow-state>
//Save order
<action-state id="saveOrder">
<evaluate expression="pizzaFlowActions.saveOrder(order)" />
//Thank customer
<transition to="thankCustomer" />
</action-state>
<view-state id="thankCustomer">
<transition to="endState" />
</view-state>
<end-state id="endState" />
//Global cancel transition
<global-transitions>
<transition on="cancel" to="endState" />
</global-transitions>
</flow>
The first thing you see in the flow definition is the declaration of the order variable. Each time the flow starts, a new instance of Order is created. The Order class has properties for carrying all the information about an order, including the customer information, the list of pizzas ordered, and the payment details.
//Order: carries all the details pertaining to a //pizza order
package com.springinaction.pizza.domain;
import java.io.Serializable;
import java.util.ArrayList;
import java.util.List;
public class Order implements Serializable {
private static final long serialVersionUID = 1L;
private Customer customer;
private List<Pizza> pizzas;
private Payment payment;
public Order() {
pizzas = new ArrayList<Pizza>();
customer = new Customer();
}
public Customer getCustomer() {
return customer;
}
public void setCustomer(Customer customer) {
this.customer = customer;
}
public List<Pizza> getPizzas() {
return pizzas;
}
public void setPizzas(List<Pizza> pizzas) {
this.pizzas = pizzas;
}
public void addPizza(Pizza pizza) {
pizzas.add(pizza);
}
public float getTotal() {
return 0.0f;
}
public Payment getPayment() {
return payment;
}
public void setPayment(Payment payment) {
this.payment = payment;
}
}
At the end state, the flow ends. Because there are no further details on where to go after the flow ends, the flow will start over again at the identifyCustomer state, ready to take another pizza order.
That covers the general flow for ordering a pizza. But there’s more to the flow than what you see in listing 8.1. You still need to define the subflows for the identifyCustomer, buildOrder, and takePayment states. Let’s build those flows next, starting with the one that identifies the customer.分别定义三个sub-flow。
8.3.2Collecting customer information
The following listing shows the flow definition for identifying the customer.
//Identifying the hungry pizza customer with a //web flow
<?xml version="1.0" encoding="UTF-8"?>
<flow xmlns="http://www.springframework.org/schema/webflow"
xmlns:xsi="http://www.w3.org/2001/XMLSchema-instance"
xsi:schemaLocation="http://www.springframework.org/schema/webflow
http://www.springframework.org/schema/webflow/spring-webflow-2.3.xsd">
<var name="customer"
class="com.springinaction.pizza.domain.Customer"/>
//Welcome customer
<view-state id="welcome">
<transition on="phoneEntered" to="lookupCustomer"/>
</view-state>
//Look up customer
<actionstate id="lookupCustomer">
<evaluate result="customer" expression=
"pizzaFlowActions.lookupCustomer(requestParameters.phoneNumber)" />
<transition to="registrationForm" on-exception=
"com.springinaction.pizza.service.CustomerNotFoundException" />
<transition to="customerReady" />
</action-state>
//Register new customer
<view-state id="registrationForm" model="customer">
<on-entry>
<evaluate expression=
"customer.phoneNumber = requestParameters.phoneNumber" />
</on-entry>
<transition on="submit" to="checkDeliveryArea" />
</view-state>
//Check delivery area
<decision-state id="checkDeliveryArea">
<if test="pizzaFlowActions.checkDeliveryArea(customer.zipCode)"
then="addCustomer"
else="deliveryWarning"/>
</decision-state>
//Show delivery warning
<view-state id="deliveryWarning">
<transition on="accept" to="addCustomer" />
</view-state>
//Add customer
<action-state id="addCustomer">
<evaluate expression="pizzaFlowActions.addCustomer(customer)" />
<transition to="customerReady" />
</action-state>
<end-state id="cancel" />
<end-state id="customerReady">
<output name="customer" />
</end-state>
<global-transitions>
<transition on="cancel" to="cancel" />
</global-transitions>
</flow>
sub-flow与flow的关系很像android中的viewgroup与view的关系。
Where the welcome state gets interesting is in the view. The welcome view is defined in /WEB INF/flows/pizza/customer/welcome.jspx, as shown next.
//Welcoming the customer and asking for their //phone number
<html xmlns:jsp="http://java.sun.com/JSP/Page"
xmlns:form="http://www.springframework.org/tags/form">
<jsp:output omit-xml-declaration="yes"/>
<jsp:directive.page contentType="text/html;charset=UTF-8" />
<head><title>Spizza</title></head>
<body>
<h2>Welcome to Spizza!!!</h2>
<form:form>
<input type="hidden" name="_flowExecutionKey"
value="${flowExecutionKey}"/>//Flow execution //key
<input type="text" name="phoneNumber"/><br/>
<input type="submit" name="_eventId_phoneEntered"
value="Lookup Customer" />//Fire phoneEntered //event
</form:form>
</body>
</html>
Pay special attention to the submit button’s name. The _eventId_ portion of the button’s name is a clue to Spring Web Flow that what follows is an event that should be fired. When the form is submitted by clicking that button, a phoneEntered event is fired, triggering a transition to lookupCustomer.
LOOKING UP THE CUSTOMER
After the welcome form has been submitted, the customer’s phone number is among the request parameters and is ready to be used to look up a customer. The lookupCustomer state’s <evaluate> element is where that happens. It pulls the phone number off the request parameters and passes it to the lookupCustomer() method on the pizzaFlowActions bean.上面代码节选:
//选出phoneNumber
<evaluate result="customer" expression=
"pizzaFlowActions.lookupCustomer(requestParameters.phoneNumber)" />
The implementation of lookupCustomer() isn’t important right now. It’s sufficient to know that it will either return a Customer object or throw a CustomerNotFoundException.
REGISTERING A NEW CUSTOMER
CHECKING THE DELIVERY AREA
STORING THE CUSTOMER DATA
ENDING THE FLOW
Note that the customerReady end state includes an <output> element. This element is a flow’s equivalent of Java’s return statement. It passes back some data from a subflow to the calling flow. In this case, <output> returns the customer flow variable so that the identifyCustomer subflow state in the pizza flow can assign it to the order.
On the other hand, if a cancel event is triggered at any time during the customer flow, it exits the flow through the end state whose ID is cancel. That triggers a cancel event in the pizza flow and results in a transition (via the global transition) to the pizza flow’s end state.
8.3.3Building an order
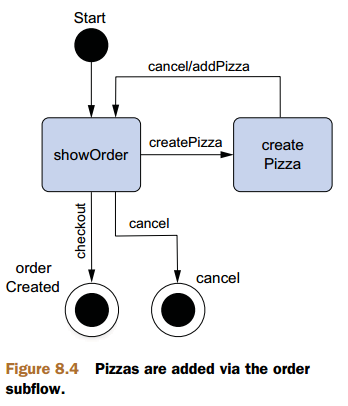
代码配置:
//Order subflow view shows states to display the //order and create a pizza
<?xml version="1.0" encoding="UTF-8"?>
<flow xmlns="http://www.springframework.org/schema/webflow"
xmlns:xsi="http://www.w3.org/2001/XMLSchema-instance"
xsi:schemaLocation="http://www.springframework.org/schema/webflow
http://www.springframework.org/schema/webflow/spring-webflow-2.3.xsd">
//Accept order as input
<input name="order" required="true" />
//Order display state
<view-state id="showOrder">
<transition on="createPizza" to="createPizza" />
<transition on="checkout" to="orderCreated" />
<transition on="cancel" to="cancel" />
</view-state>
//Pizza creation state
<viewstate id="createPizza" model="flowScope.pizza">
<on-entry>
<set name="flowScope.pizza"
value="new com.springinaction.pizza.domain.Pizza()" />
<evaluate result="viewScope.toppingsList" expression=
"T(com.springinaction.pizza.domain.Topping).asList()" />
</on-entry>
<transition on="addPizza" to="showOrder">
<evaluate expression="order.addPizza(flowScope.pizza)" />
</transition>
<transition on="cancel" to="showOrder" />
</view-state>
//Cancel end state
<end-state id="cancel" /
//Create order end state
<end-state id="orderCreated" />
</flow>
8.3.4 Taking payment
The payment subflow is defined in XML as shown next.
//Payment subflow, with one view state and one //action state
<?xml version="1.0" encoding="UTF-8"?>
<flow xmlns="http://www.springframework.org/schema/webflow"
xmlns:xsi="http://www.w3.org/2001/XMLSchema-instance"
xsi:schemaLocation="http://www.springframework.org/schema/webflow
http://www.springframework.org/schema/webflow/spring-webflow-2.3.xsd">
<input name="order" required="true"/>
<view-state id="takePayment" model="flowScope.paymentDetails">
<on-entry>
<set name="flowScope.paymentDetails"
value="new com.springinaction.pizza.domain.PaymentDetails()" />
<evaluate result="viewScope.paymentTypeList" expression=
"T(com.springinaction.pizza.domain.PaymentType).asList()" />
</on-entry>
<transition on="paymentSubmitted" to="verifyPayment" />
<transition on="cancel" to="cancel" />
</view-state>
<action-state id="verifyPayment">
<evaluate result="order.payment" expression=
"pizzaFlowActions.verifyPayment(flowScope.paymentDetails)" />
<transition to="paymentTaken" />
</action-state>
<end-state id="cancel" />
<end-state id="paymentTaken" />
</flow>
You’ve seen a lot of what Spring Web Flow is capable of. Before we finish with the Web Flow topic,
let’s take a quick look at what’s involved in securing access to a flow or any of its states.
8.4 Securing web flows
States, transitions, and entire flows can be secured in Spring Web Flow by using the <secured> element as a child of those elements. For example, to secure access to a view state, you might use <secured> like this:
<view-state id="restricted">
<secured attributes="ROLE_ADMIN" match="all"/>
</view-state>
As configured here, access to the view state will be restricted to only users who are granted ROLE_ADMIN access (per the attributes attribute). The attributes attribute takes a comma-separated list of authorities that the user must have to gain access to the state, transition, or flow. The match attribute can be set to either any or all. If it’s set to any, then the user must be granted at least one of the authorities listed in attributes. If it’s set to all, then the user must have been granted all the authorities.
8.5Summary
Not all web applications are freely navigable. Sometimes a user must be guided along, asked appropriate questions, and led to specific pages based on their responses. In these situations, an application feels less like a menu of options and more like a conversation between the application and the user.
A flow is made up of several states and transitions that define how the conversation traverses from state to state. The states themselves come in several varieties: action states that perform business logic, view states that involve the user in the flow, decision states that dynamically direct the flow, and end states that signify the end of a flow. In addition, there are subflow states, which are themselves defined by a flow.
Chapter9.Securing web applications
If you’re thinking that it’s starting to sound as if security is accomplished using aspect-oriented techniques, you’re right.But you won’t have to develop those aspects yourself—we’re going to look at Spring Security, a security framework implemented with Spring AOP and servlet filters.
9.1Getting started with Spring Security
Now at version 3.2, Spring Security tackles security from two angles. To secure web requests and restrict access at the URL level, Spring Security uses servlet filters. Spring Security can also secure method invocations using Spring AOP, **proxying objects and applying advice to ensure that the user has the proper authority to invoke secured
methods**.
We’ll focus on web-layer security with Spring Security in this chapter.
9.1.1Understanding Spring Security modules
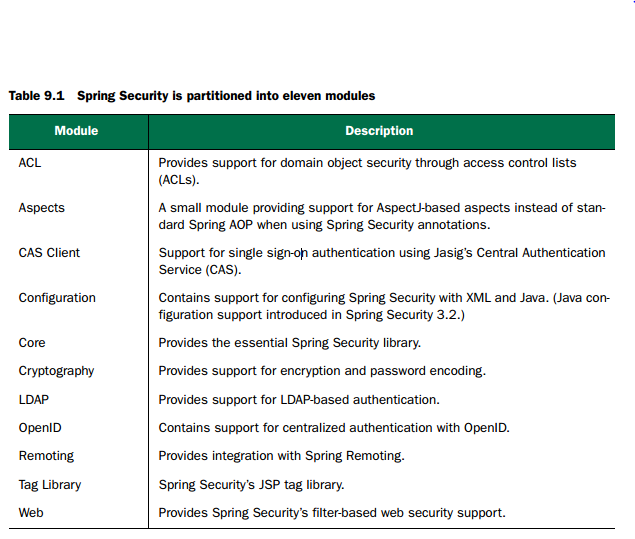
在这一章secure web中,我们只用Core,Configuration,Web,Tag Library。
9.1.2Filtering web requests
DelegatingFilterProxy is a special servlet filter that, by itself, doesn’t do much.
Instead, it delegates to an implementation of javax.servlet.Filter that’s registered as a <bean> in the Spring application context, as illustrated in figure 9.1.
If you’d rather configure DelegatingFilterProxy in Java with a WebApplicationInitializer, then all you need to do is create a new class that extends AbstractSecurityWebApplicationInitializer:
package spitter.config;
import org.springframework.security.web.context.
AbstractSecurityWebApplicationInitializer;
public class SecurityWebInitializer
extends AbstractSecurityWebApplicationInitializer {}
AbstractSecurityWebApplicationInitializer implements WebApplicationInitializer, so it will be discovered by Spring and be used to register DelegatingFilterProxy with the web container. Although you can override its appendFilters() or insertFilters() methods to register filters of your own choosing, you need not override anything to register DelegatingFilterProxy.
It will intercept requests coming into the application and delegate them to a bean whose ID is springSecurityFilterChain.
9.1.3Writing a simple security configuration
The following listing shows the simplest possible Java configuration for Spring Security.
//The simplest configuration class to enable web //security for Spring MVC
package spitter.config;
import org.springframework.context.annotation.Configuration;
import org.springframework.security.config.annotation.web.
configuration.EnableWebSecurity;
import org.springframework.security.config.annotation.web.
configuration.WebSecurityConfigurerAdapter;
@Configuration
//Enable web security
@EnableWebSecurity
public class SecurityConfig extends WebSecurityConfigurerAdapter {
}
Spring Security must be configured in a bean that 1.implements WebSecurityConfigurer or (for convenience) 2.extends WebSecurityConfigurerAdapter. Any bean in the Spring application context that implements WebSecurityConfigurer can contribute to Spring Security configuration, but it’s often most
convenient for the configuration class to extend WebSecurityConfigurerAdapter, as shown in listing 9.1.
@EnableWebSecurity适用于任何web安全,如果你要开发Spring MVC程序,那么就用@EnableWebMvcSecurity。
//The simplest configuration class to enable web //security for Spring MVC
package spitter.config;
import org.springframework.context.annotation.Configuration;
import org.springframework.security.config.annotation.web.
configuration.WebSecurityConfigurerAdapter;
import org.springframework.security.config.annotation.web.servlet.
configuration.EnableWebMvcSecurity;
@Configuration
//Enable Spring MVC security
@EnableWebMvcSecurity
public class SecurityConfig extends WebSecurityConfigurerAdapter {
}
You’re going to need to add a bit more configuration to bend Spring Security to fit your application’s needs. Specifically, you’ll need to…
1.Configure a user store
2.Specify which requests should and should not require authentication, as well as what authorities they require
3.Provide a custom login screen to replace the plain default login screen
9.2Selecting user details services
几周前,你跟餐馆定了座位,但是list中并没有你的名字。
That’s the scenario you have with your application at this point. There’s no way to get into the application because even if the user thinks they should be allowed in, there’s no record of them having access to the application. For lack of a user store, the application is so exclusive that it’s completely unusable.所以必须要有user store。
Spring Security’s Java configuration makes it easy to configure one or more data store options. We’ll start with the simplest user store: one that maintains its user store in memory.
9.2.1Working with an in-memory user store
For example, in the following listing, SecurityConfig overrides configure() to configure an in-memory user store with two users.
//Configuring Spring Security to use an
//in-memory user store
package spitter.config;
import org.springframework.beans.factory.annotation.Autowired;
import org.springframework.context.annotation.Configuration;
import org.springframework.security.config.annotation.
authentication.builders.AuthenticationManagerBuilder;
import org.springframework.security.config.annotation.web.
configuration.WebSecurityConfigurerAdapter;
import org.springframework.security.config.annotation.web.servlet.
configuration.EnableWebMvcSecurity;
@Configuration
@EnableWebMvcSecurity
public class SecurityConfig extends WebSecurityConfigurerAdapter {
@Override
protected void configure(AuthenticationManagerBuilder auth)
throws Exception {
//Enable an in-memory user store.
auth
.inMemoryAuthentication()
.withUser("user").password("password").roles("USER").and()
.withUser("admin").password("password").roles("USER", "ADMIN");
}
}
As you can see, the and() method is used to chain together multiple user configurations.
For production-ready purposes, it’s usually better to maintain user data in a database of some sort.
9.2.2Authenticating against database tables
用JDBC存入数据库:
@Autowired
DataSource dataSource;
@Override
protected void configure(AuthenticationManagerBuilder auth)
throws Exception {
auth
.jdbcAuthentication()
.dataSource(dataSource);
}
OVERRIDING THE DEFAULT USER QUERIES
WORKING WITH ENCODED PASSWORDS
No matter which password encoder you use, it’s important to understand that the password in the database is never decoded. Instead, the password that the user enters at login is encoded using the same algorithm and is then compared with the encoded password in the database. That comparison is performed in the PasswordEncoder’s matches() method.
9.2.3Applying LDAP-backed authentication
9.2.4Configuring a custom user service
Suppose that you need to authenticate against users in a non-relational database such as Mongo or Neo4j. In that case, you’ll need to implement a custom implementation of the UserDetailsService interface.
9.3Intercepting requests
In any given application, not all requests should be secured equally. Some may require authentication; some may not. Some requests may only be available to users with certain authorities and unavailable to those without those authorities.
The key to fine-tuning security for each request is to override the configure (HttpSecurity) method. The following code snippet shows how you might override configure(HttpSecurity) to selectively apply security to different URL paths.
@Override
protected void configure(HttpSecurity http) throws Exception {
http
.authorizeRequests()
.antMatchers("/spitters/me").authenticated()
.antMatchers(HttpMethod.POST, "/spittles").authenticated()
.anyRequest().permitAll();
}
通过上面的代码,可以看出组成元素有两个:1.request path,2.对path的方法。
要定义request path可以有很多方法:比如正则表达式.regexMatchers()等。
要定义对path的方法,有如下几种:
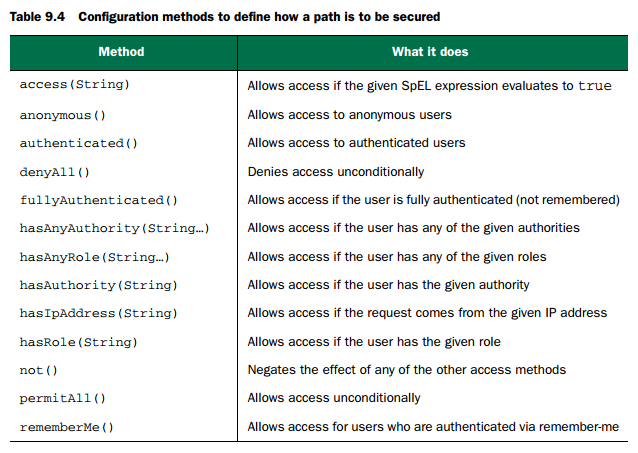
The authenticated() method demands that the user have logged into the application to perform the request. If the user isn’t authenticated, Spring Security’s filters will capture the request and redirect the user to the application’s login page. Meanwhile, the permitAll() method allows the requests without any security demands.
You can chain as many calls to antMatchers(), regexMatchers(), and anyRequest() as you need to fully establish the security rules around your web application.
You should know, however, that they’ll be applied in the order given. 他们是按照顺序来执行的。
For that reason, it’s important to configure the most specific request path patterns first and the least specific ones (such as anyRequest()) last. If not, then the least specific paths will trump the more specific ones.
9.3.1Securing with Spring Expressions
Most of the methods in table 9.4 are one-dimensional. That is, you can use hasRole() to require a certain role, but you can’t also use hasIpAddress() to require a specific IP address on the same path.也就是说table 9.4中的方法不能链式调用。
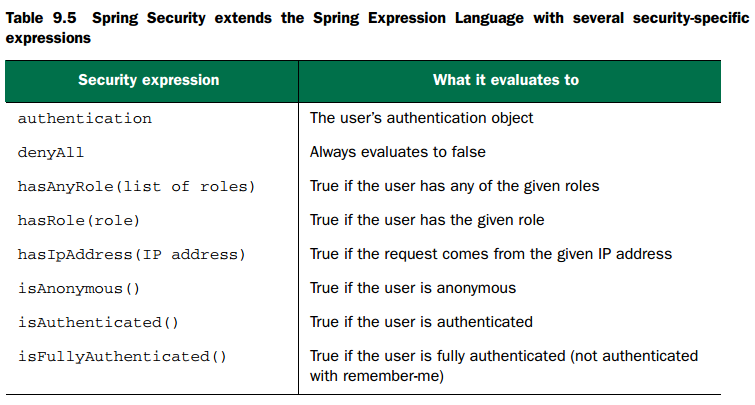
For example, if you wanted to lock down the /spitter/me URLs to not only require ROLE_SPITTER, but to also only be allowed from a given IP address, you might call the access() method like this:
.antMatchers("/spitter/me")
.access("hasRole('ROLE_SPITTER') and hasIpAddress('192.168.1.2')")
9.3.2Enforcing channel security
That’s why sensitive information should be sent encrypted over HTTPS.
If you have several links in your app that require HTTPS, chances are good that you’ll forget to add an s or two.
On the other hand, you might overcorrect and use HTTPS in places where it’s unnecessary.
To ensure that the registration form is sent over HTTPS, you can add requiresChannel() to the configuration, as in the following listing.
//The requiresChannel() method enforces HTTPS //for select URLs
@Override
protected void configure(HttpSecurity http) throws Exception {
http
.authorizeRequests()
.antMatchers("/spitter/me").hasRole("SPITTER")
.antMatchers(HttpMethod.POST, "/spittles").hasRole("SPITTER")
.anyRequest().permitAll();
.and()
.requiresChannel()
.antMatchers("/spitter/form").requiresSecure();
//Require HTTPS
}
Conversely, some pages don’t need to be sent over HTTPS. The home page, for example, doesn’t carry any sensitive information and should be sent over HTTP. You can declare that the home page always be sent over HTTP by using requiresInsecure() instead of requiresSecure.
9.3.3Preventing cross-site request forgery
Basically, a CSRF attack happens when one site tricks a user into submitting a request to another server,possibly having a negative outcome.
Spring Security implements CSRF protection with a synchronizer token. Statechanging requests (for example, any request that is not GET, HEAD, OPTIONS, or TRACE) will be intercepted and checked for a CSRF token. If the request doesn’t carry a CSRF token, or if the token doesn’t match the token on the server, the request will fail with a CsrfException.
Fortunately, Spring Security makes this easy for you by putting the token into the request under the request attributes. If you’re using Thymeleaf for your page template, you’ll get the hidden _csrf field automatically, as long as the <form> tag’s action attribute is prefixed to come from the Thymeleaf namespace:
<form method="POST" th:action="@{/spittles}">
...
</form>
Another way of dealing with CSRF is to not deal with it at all. You can disable Spring Security’s CSRF protection by calling csrf().disable() in the configuration, as shown in the next listing.
@Override
protected void configure(HttpSecurity http) throws Exception {
http
...
.csrf()
.disable();//Disable CSRF protection
}


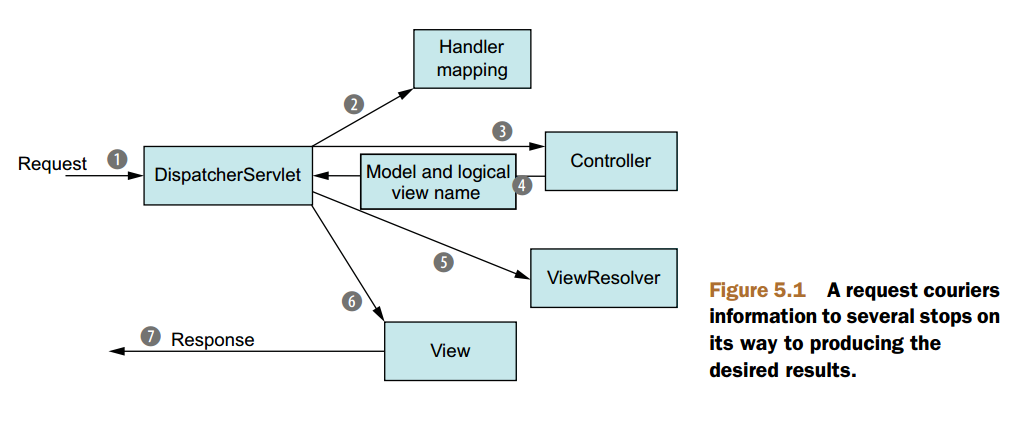
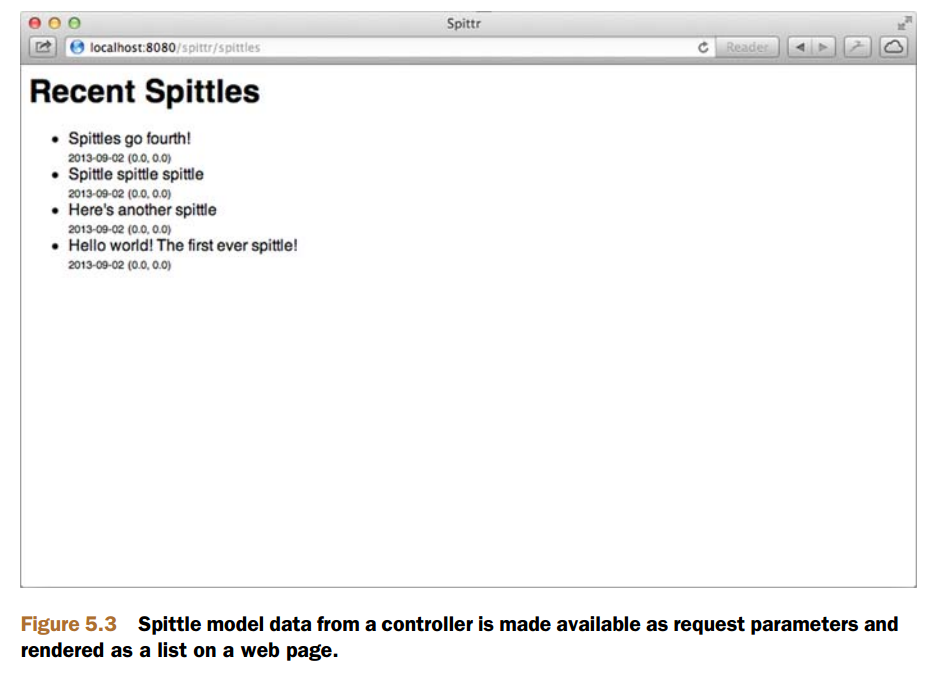


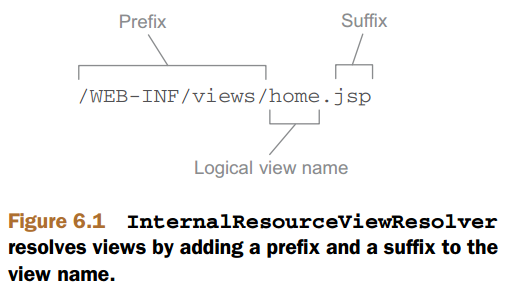


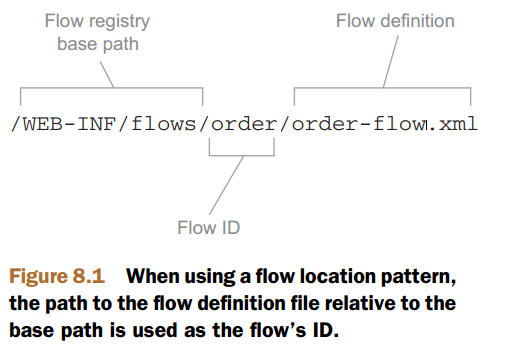
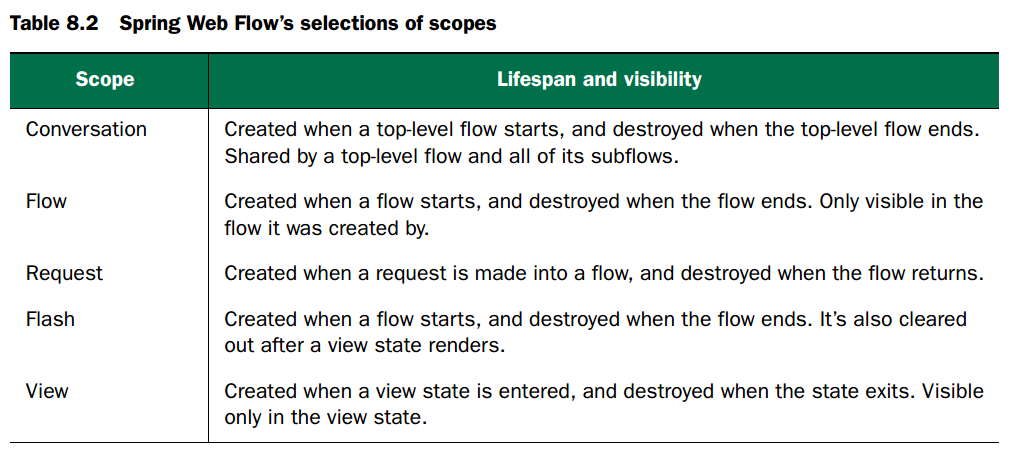
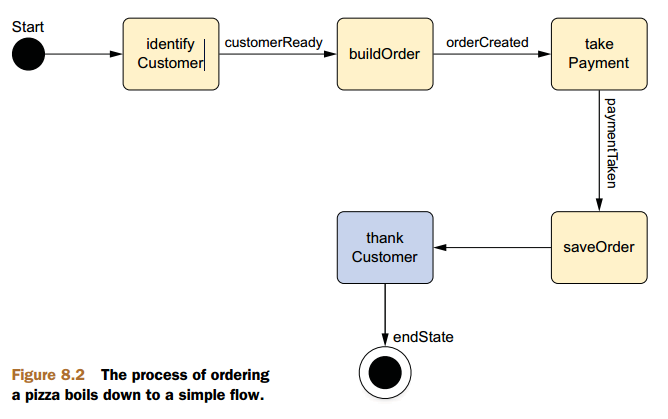
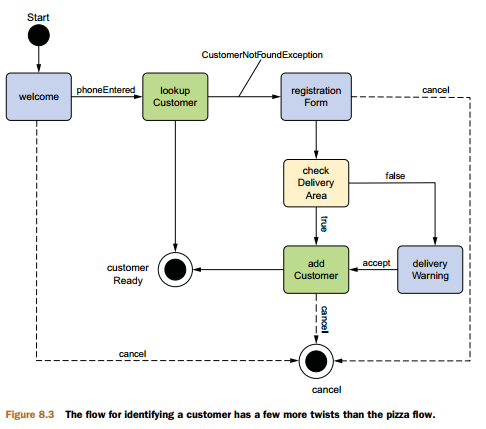
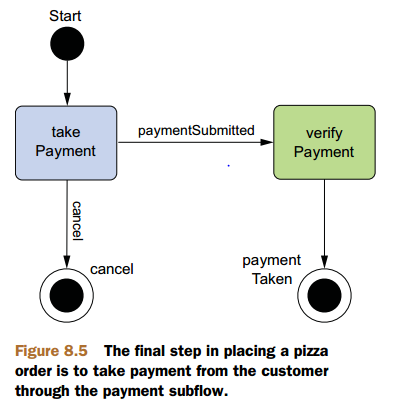


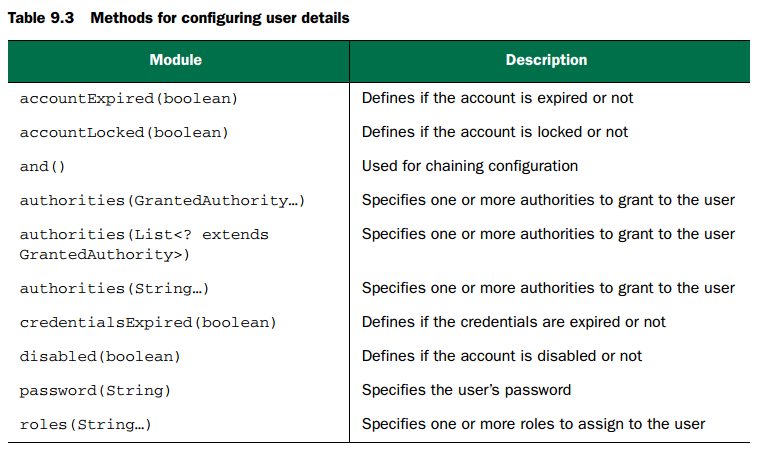


 3762
3762

 被折叠的 条评论
为什么被折叠?


