


Chapter10.Hitting the database with Spring and JDBC
You have probably dealt with database access in an application in the past. In practice, you’ll know that data access has many pitfalls. You have to initialize your data-access framework, open connections, handle various exceptions, and close connections. 没有Spring等框架的繁琐的工作。
Because we strive for Good Things, we turn to Spring. Spring comes with a family of data-access frameworks that integrate with a variety of data-access technologies.
As you develop the persistence layer of the Spittr application, you’re faced with some choices. You could use JDBC, Hibernate, the Java Persistence API (JPA), or any of a number of persistence frameworks. Or you might consider one of the new breed of NoSQL databases (or schemaless databases, as I prefer to call them) that are popular these days.
10.1Learning Spring’s data-access philosophy
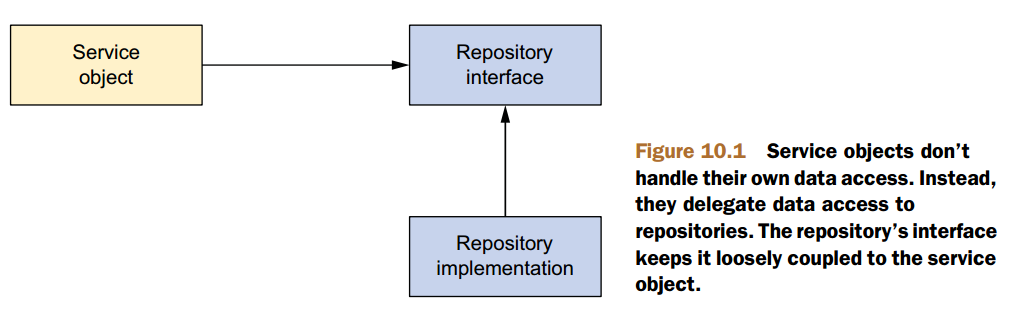
To avoid coupling the application to any particular data-access strategy, properly written repositories should expose their functionality through interfaces. Figure 10.1 shows the proper approach to designing your data-access tier.
INTERFACES AND SPRING
I believe that interfaces are key to writing loosely coupled code and that they should be used at all layers of an application, not just at the data-access layer. 接口的重要性。
One way Spring helps you insulate your data-access tier from the rest of your application is by providing a consistent exception hierarchy that’s used across all of its supported persistence options.
10.1.1Getting to know Spring’s data-access exception hierarchy
Some common problems that might cause a SQLException to be thrown include these:
1.The application is unable to connect to the database.
2.The query being performed has errors in its syntax.
3.The tables and/or columns referred to in the query don’t exist.
4.An attempt was made to insert or update values that violate a database constraint.
这些错误都会导致SQLException,但是我们不能很好的定位到底是哪个错误,意味着在catch中也不能统一的处理。
Some persistence frameworks offer a richer hierarchy of exceptions. Hibernate, for example, offers almost two dozen different exceptions, each targeting a specific data-access problem. This makes it possible to write catch blocks for the exceptions that you want to deal with.
Even so, Hibernate’s exceptions are specific to Hibernate. 这些异常只是对Hibernate适用。
On one hand, JDBC’s exception hierarchy is too generic—it’s not much of a hierarchy at all. On the other hand, Hibernate’s exception hierarchy is proprietary to Hibernate. What we need is a hierarchy of data-access exceptions that are descriptive but not directly associated with a specific persistence framework.能够有这种中等颗粒度的异常就非常合适了。于是就有了SPRING PERSISTENCE EXCEPTIONS.
SPRING’S PERSISTENCE PLATFORM–AGNOSTIC EXCEPTIONS
Even though Spring’s exception hierarchy is far richer than JDBC’s simple SQLException, it isn’t associated with any particular persistence solution. This means you can count on Spring to throw a consistent set of exceptions, regardless of which persistence provider you choose. This helps to keep your persistence choice confined to the data-access layer.
Instead of forcing developers to write catch blocks (which are often left empty), Spring promotes the use of unchecked exceptions. 有些异常捕获没有意义。This leaves the decision of whether or not to catch an exception in your hands.
To take advantage of Spring’s data-access exceptions, you must use one of Spring’s supported data-access templates.
10.1.2Templating data access
A template method defines the skeleton of a process. In the example, the process is moving luggage from departure city to arrival city. The process itself is fixed; it never changes. The overall sequence of events for handling luggage occurs the same way every time: luggage is checked in, luggage is loaded onto the plane, and so forth.
Some steps of the process are fixed as well—they happen the same way every time. When the plane arrives at its destination, every piece of luggage is unloaded one at a time and placed on a carousel to be taken to baggage claim.
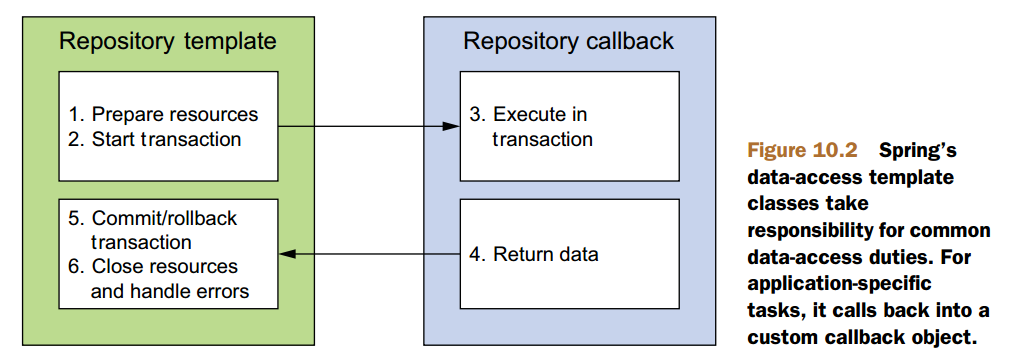
In software terms, a template method delegates the implementation-specific portions of the process to an interface. Different implementations of this interface define specific implementations of this portion of the process.步骤固定,但是如果有些步骤需要我们干预的话,那么我们就是实现其接口,系统会调用接口,代理至我们具体的implementations。
Spring separates the fixed and variable parts of the data-access process into two distinct classes: templates and callbacks.Templates manage the fixed part of the process, whereas your custom data-access code is handled in callbacks. Figure 10.2 shows the responsibilities of both classes.
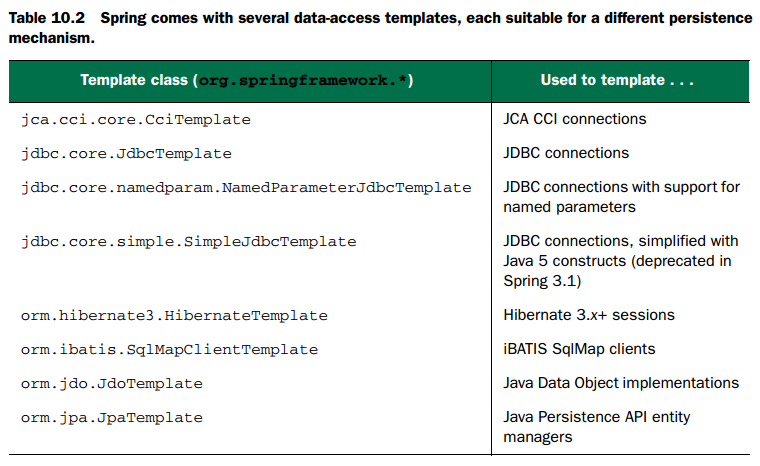
不可能全讲啊,用时再找对应的template。
Most of Spring’s persistence support options depend on a data source, so before you can get started with declaring templates and repositories, you need to configure Spring with a data source to be able to connect to the database.
10.2Configuring a data source
Spring offers several options for configuring data-source beans in your Spring application, including these:
1.Data sources that are defined by a JDBC driver
2.Data sources that are looked up by JNDI
3.Data sources that pool connections
10.2.1Using JNDI data sources
The benefit of configuring data sources in this way is that they can be managed completely external to the application, allowing the application to ask for a data source when it’s ready to access the database.Moreover, data sources managed in an application server are often pooled for greater performance and can be hot-swapped by system administrators.
For example, if your application’s data source were configured in JNDI, you might use <jee:jndi-lookup> like this to wire it into Spring:XML配置
<jee:jndi-lookup id="dataSource"
jndi-name="/jdbc/SpitterDS"
resource-ref="true" />
If the application is running in a Java application server, you’ll want to set the resource-ref property to true so that the value given in jndi-name will be prepended with java:comp/env/.
Alternatively, if you’re using Java configuration, you can use JndiObjectFactoryBean to look up the DataSource from JNDI:
@Bean
public JndiObjectFactoryBean dataSource() {
JndiObjectFactoryBean jndiObjectFB = new JndiObjectFactoryBean();
jndiObjectFB.setJndiName("jdbc/SpittrDS");
jndiObjectFB.setResourceRef(true);
jndiObjectFB.setProxyInterface(javax.sql.DataSource.class);
return jndiObjectFB;
}
10.2.2Using a pooled data source
Although Spring doesn’t provide a pooled data source, plenty of suitable ones are available, including the following open source options:
1.Apache Commons DBCP
2.c3p0
3.BoneCP
For example, here’s how you might configure DBCP’s BasicDataSource:
<bean id="dataSource" class="org.apache.commons.dbcp.BasicDataSource"
p:driverClassName="org.h2.Driver"
p:url="jdbc:h2:tcp://localhost/~/spitter"
p:username="sa"
p:password=""
p:initialSize="5"
p:maxActive="10" />
java配置:
@Bean
public BasicDataSource dataSource() {
BasicDataSource ds = new BasicDataSource();
ds.setDriverClassName("org.h2.Driver");
ds.setUrl("jdbc:h2:tcp://localhost/~/spitter");
ds.setUsername("sa");
ds.setPassword("");
ds.setInitialSize(5);
ds.setMaxActive(10);
return ds;
}
10.2.3Using JDBC driver-based data sources
The simplest data source you can configure in Spring is one that’s defined through a JDBC driver. Spring offers three such data-source classes to choose from (all in the org.springframework.jdbc.datasource package):
1.DriverManagerDataSource—Returns a new connection every time a connection is requested. Unlike DBCP’s BasicDataSource, the connections provided by DriverManagerDataSource aren’t pooled.
2.SimpleDriverDataSource—Works much the same as DriverManagerDataSource except that it works with the JDBC driver directly to overcome class loading issues that may arise in certain environments, such as in an OSGi container.
3.SingleConnectionDataSource—Returns the same connection every time a connection is requested. Although SingleConnectionDataSource isn’t exactly a pooled data source, you can think of it as a data source with a pool of exactly one connection.
XML配置:
<bean id="dataSource"
class="org.springframework.jdbc.datasource.DriverManagerDataSource"
p:driverClassName="org.h2.Driver"
p:url="jdbc:h2:tcp://localhost/~/spitter"
p:username="sa"
p:password="" />
java配置:
@Bean
public DataSource dataSource() {
DriverManagerDataSource ds = new DriverManagerDataSource();
ds.setDriverClassName("org.h2.Driver");
ds.setUrl("jdbc:h2:tcp://localhost/~/spitter");
ds.setUsername("sa");
ds.setPassword("");
return ds;
}
跟池化数据库的区别:
The only significant difference with these data source beans as compared to the pooling data-source beans is that because they don’t provide a connection pool, there are no pool configuration properties to set.
但是非池化的数据库性能上有很大的劣势:
Because SingleConnectionDataSource has one and only one database connection to work with, it doesn’t work well in multithreaded applications
and is best limited to use in testing.只有一个数据库连接,所以不适合用在多线程,最好只用来test。
At the same time, even though DriverManagerDataSource and SimpleDriverDataSource are both capable of supporting multiple threads, they incur a performance cost for creating a new connection each time a connection is requested. Because of these limitations, I strongly recommend using pooled data sources.在性能这一点上,推荐使用池化数据库。
10.2.4Using an embedded data source
10.2.5Using profiles to select a data source
10.3Using JDBC with Spring
JDBC doesn’t require mastering another framework’s query language. It’s built on top of SQL, which is the data-access language. Plus, you can more finely tune the performance of your data access when you use JDBC than with practically any other technology. And JDBC allows you to take advantage of your database’s proprietary features, where other frameworks may discourage or flat-out prohibit this.
What’s more, JDBC lets you work with data at a much lower level than the persistence frameworks. You’re in full control of how your application reads and manipulates data. This includes allowing you to access and manipulate individual columns in a database. This fine-grained approach to data access comes in handy in applications, such as reporting applications, where it doesn’t make sense to organize the data into objects just to then unwind it back into raw data.
10.3.1Tackling runaway JDBC code
10.3.2Working with JDBC templates
10.4Summary
Chapter11.Persisting data with object-relational mapping
JDBC is the bike of the persistence world. It’s great for what it does, and for some jobs it works fine. But as applications become more complex, so do our persistence requirements. We need to be able to map object properties to database columns and have our statements and queries created for us, freeing us from typing an endless string of question marks. We also need features that are more sophisticated:(当项目变得复杂时,我们需要:)
1.Lazy loading—As object graphs become more complex, you sometimes don’t want to fetch entire relationships immediately. To use a typical example, suppose you’re selecting a collection of PurchaseOrder objects, and each of these objects contains a collection of LineItem objects. If you’re only interested in PurchaseOrder attributes, it makes no sense to grab the LineItem data. That could be expensive. Lazy loading allows you to grab data only as it’s needed. 只取我们所需要的。
2.Eager fetching—This is the opposite of lazy loading. Eager fetching allows you to grab an entire object graph in one query. In the cases where you know you need a PurchaseOrder object and its associated LineItems, eager fetching lets you get this from the database in one operation, saving you from costly round-trips.与1正好相反。
3.Cascading—Sometimes changes to a database table should result in changes to other tables as well. Going back to the purchase order example, when an Order object is deleted, you also want to delete the associated LineItems from the database.能够动态的更新一些改动对另一些东西的影响。
Several frameworks are available that provide these services. The general name for these services is object-relational mapping (ORM).
Spring provides support for several persistence frameworks, including Hibernate, iBATIS, Java Data Objects (JDO), and the Java Persistence API (JPA). As with Spring’s JDBC support, Spring’s support for ORM frameworks provides integration points to the frameworks as well as some additional services:
11.1Integrating Hibernate with Spring
11.1.1Declaring a Hibernate session factory
Through the Hibernate Session, an application’s repository performs all of its persistence needs.
The standard way to get a reference to a Hibernate Session object is through an implementation of Hibernate’s SessionFactory interface. Among other things, SessionFactory is responsible for opening, closing, and managing Hibernate Sessions.
In Spring, the way to get a Hibernate SessionFactory is through one of Spring’s Hibernate session-factory beans. As of version 3.1, Spring comes with three sessionfactory beans to choose from:(从三个spring已经实现了SessionFactory接口的实现中选一种)
1.org.springframework.orm.hibernate3.LocalSessionFactoryBean
2.org.springframework.orm.hibernate3.annotation.AnnotationSessionFactoryBean
3.org.springframework.orm.hibernate4.LocalSessionFactoryBean
在具体的版本中怎么配置就略了。
With a Hibernate session factory bean declared in the Spring application context, you’re ready to start creating your repository classes.
11.1.2Building Spring-free Hibernate
In the early days of Spring and Hibernate, writing a repository class would involve working with Spring’s HibernateTemplate. HibernateTemplate would ensure that only one Hibernate session would be used per transaction. The downside of this approach is that your repository implementation would be directly coupled to Spring.
The best practice now, however, is to take advantage of Hibernate contextual sessions and not use HibernateTemplate at all. This can be done by wiring a Hibernate SessionFactory directly into your repository and using it to obtain a session, as shown in the following listing.
//Spring-free Hibernate repositories, enabled by //Hibernate sessions
public HibernateSpitterRepository(SessionFactory sessionFactory) {
//Inject SessionFactory
this.sessionFactory = sessionFactory;
}
private Session currentSession() {
//Retrieve current Session from SessionFactory
return sessionFactory.getCurrentSession();
}
public long count() {
return findAll().size();
}
public Spitter save(Spitter spitter) {
//Use current Session
Serializable id = currentSession().save(spitter);
return new Spitter((Long) id,
spitter.getUsername(),
spitter.getPassword(),
spitter.getFullName(),
spitter.getEmail(),
spitter.isUpdateByEmail());
}
public Spitter findOne(long id) {
return (Spitter) currentSession().get(Spitter.class, id);
}
public Spitter findByUsername(String username) {
return (Spitter) currentSession()
.createCriteria(Spitter.class)
.add(Restrictions.eq("username", username))
.list().get(0);
}
public List<Spitter> findAll() {
return (List<Spitter>) currentSession()
.createCriteria(Spitter.class).list();
}
}
11.2Spring and the Java Persistence API
11.3Automatic JPA repositories with Spring Data
11.4Summary
感觉hibernate和iBATIS就是简化了一些SQL语句。
Chapter12.Working with NoSQL databases
Spring Data also supports several NoSQL databases, including MongoDB, Neo4j, and Redis.
12.1Persisting documents with MongoDB
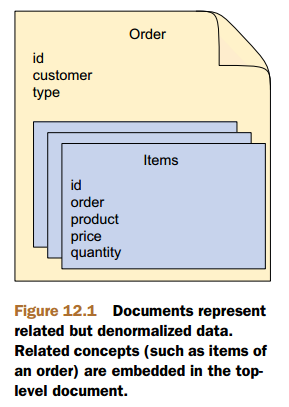
Some kinds of data are best represented as documents. That is, rather than spread the data across multiple tables, nodes, or entities, it may make more sense to collect the information into denormalized structures (known as documents). Although two or more of these documents may be related to each other, generally documents are standalone entities. Databases that are finely tuned to work with documents in this way are known as document databases.
What document databases aren’t good for:
这里待总结非关系型数据库的优缺点。
Spring Data MongoDB brings MongoDB to Spring applications in three ways:
1.Annotations for object-to-document mapping
2.Template-based database access with MongoTemplate
3.Automatic runtime repository generation
12.1.1Enabling MongoDB
12.1.2Annotating model types for MongoDB persistence
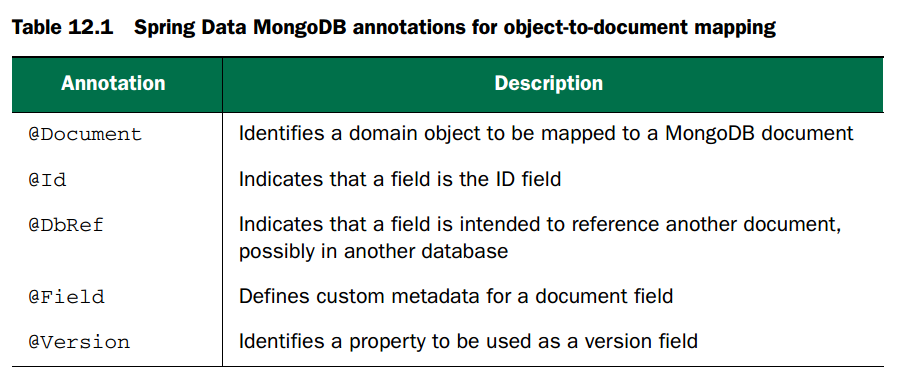
MongoDB, however, doesn’t come with its own object-to-document mapping annotations. Spring Data MongoDB seized the opportunity to fill that gap with a handful of annotations that you can use to map your Java types to MongoDB documents(一个java对象对应一个documents). Table 12.1 describes these annotations.
The next listing shows how you might annotate an Order class to be persisted in MongoDB.
//Spring Data MongoDB annotations map Java types //to documents.
package orders;
import java.util.Collection;
import java.util.LinkedHashSet;
import org.springframework.data.annotation.Id;
import org.springframework.data.mongodb.core.mapping.Document;
import org.springframework.data.mongodb.core.mapping.Field;
@Document//This is a document
public class Order {
@Id
private String id;//Designate the ID
@Field("client")
private String customer;//Override the default //field name
private String type;
private Collection<Item> items = new LinkedHashSet<Item>();
public String getCustomer() {
return customer;
}
public void setCustomer(String customer) {
this.customer = customer;
}
public String getType() {
return type;
}
public void setType(String type) {
this.type = type;
}
public Collection<Item> getItems() {
return items;
}
public void setItems(Collection<Item> items) {
this.items = items;
}
public String getId() {
return id;
}
}
As you can see, Order is annotated with @Document, enabling it to be persisted using MongoTemplate, an automatically generated repository, or both. Its id property is annotated with @Id to designate it as the ID of the document. In addition, the customer property is annotated with @Field so that when the document is persisted,
the customer property will be mapped to a field named client.相当于取别名。
Notice that no other properties are annotated. Unless they’re marked as transient(这样就不会存入数据库),all fields of the Java object will be persisted as fields of the document. And unless otherwise indicated with @Field(如果不取别名,所有name跟属性名是一样的。), the document fields will have the same names as their Java property counterparts.
As I said earlier, documents can be related to other documents, but that’s not what document databases are especially good at. In the case of the relationship between a purchase order and its line items, the line items are merely a nested part of the same order document (as shown in figure 12.1).
Therefore, there’s no need for any annotations to designate the relationship. In fact, the Item class itself isn’t annotated at all:因为非关系型数据库在关系上的表达力很弱,所以我们对于一个订单中的关联的items,我们并没有用非关系存储。
package orders;
public class Item {
private Long id;
private Order order;
private String product;
private double price;
private int quantity;
public Order getOrder() {
return order;
}
public String getProduct() {
return product;
}
public void setProduct(String product) {
this.product = product;
}
public double getPrice() {
return price;
}
public void setPrice(double price) {
this.price = price;
}
public int getQuantity() {
return quantity;
}
public void setQuantity(int quantity) {
this.quantity = quantity;
}
public Long getId() {
return id;
}
}
It’s not necessary to annotate Item with @Document, nor is it necessary to annotate one of its fields with @Id. That’s because you’ll never persist an Item as an independent document. It will always be a member of the Order document’s Item list and a nested element in that document.
Now we have a Java domain type annotated for MongoDB persistence. Let’s see how you can use MongoTemplate to store a few of them.
12.1.3Accessing MongoDB with MongoTemplate
12.1.4Writing a MongoDB repository
12.2Working with graph data in Neo4j
Whereas document databases store data in coarse grained documents, graph databases store data in several fine-grained nodes that are connected with each other through relationships. A node in a graph database typically represents a concept in the database, having properties that describe the state of the node. Relationships connect two nodes and may carry properties of their own.
At their simplest, graph databases are more general purpose than document databases, potentially being a schemaless alternative to relational databases. But because data is structured as a graph, it’s possible to traverse relationships to discover things about your data that would be difficult or even impossible with other kinds of databases.
12.2.1Configuring Spring Data Neo4j
12.2.2Annotating graph entities
Neo4j defines two kinds of entities: nodes and relationships. Node entities typically represent the things in your application, whereas relationship entities define how those things are related.
12.2.3Working with Neo4jTemplate
12.2.4Creating automatic Neo4j repositories
One of the most awesome things that most Spring Data projects do is automatically generate implementations for a repository interface. You’ve already seen this with Spring Data JPA and Spring Data MongoDB. Not to be left out, Spring Data Neo4j also supports automatic repository generation.
12.3Working with key-value data in Redis
Redis is a special kind of database known as a key value store. As the name implies, key-value stores keep key-value pairs. In fact, key-value stores share a lot in common with hash maps. To call them persistent hash maps would not be too great of an oversimplification.
When you think about it, there aren’t too many kinds of queries that you can perform against a hash map … or a key-value store. You can store a value at a particular key, and you can fetch the value for a particular key. That’s about it. Consequently, Spring Data’s automatic repository support doesn’t make a lot of sense when applied to Redis. On the other hand, Spring Data’s other key feature, template-oriented data access, can come in handy when working with Redis.
Spring Data Redis comes with a couple of template implementations for storing data to and fetching it from a Redis database. You’ll see how to use them soon. But to create one of Spring Data Redis’s templates, you’ll need a Redis connection factory.Fortunately, Spring Data Redis offers four to choose from.
12.3.1Connecting to Redis
A Redis connection factory produces connections to a Redis database server.
12.3.2Working with RedisTemplate
12.3.3Setting key and value serializers
12.4Summary
No matter what kind of database you choose, fetching data from the database is a costly operation. In fact, database queries are often the biggest performance bottlenecks in any application. Now that you’ve seen how to store and fetch data from a variety of data sources, let’s look at how to avoid that bottleneck. In the next chapter, you’ll see how to apply declarative caching to prevent unnecessary database fetches.
Chapter13.Caching data
Instead of asking the same question over and over, only to arrive at the same answer each time, it makes sense to ask once and remember that answer when it’s needed later.
Caching is a way to store frequently needed information so that it’s readily available when needed. In this chapter, we’ll look at Spring’s cache abstraction. Although Spring doesn’t implement a cache solution, it offers declarative support for caching that integrates with several popular caching implementations.
13.1Enabling cache support
Spring’s cache abstraction comes in two forms:
1.Annotation-driven caching
2.XML-declared caching
The most common way to use Spring’s cache abstraction is to annotate methods with annotations like @Cacheable and @CacheEvict.
If you’re using Java configuration, you can enable annotation-driven caching by adding @EnableCaching to one of your configuration classes. The following listing shows the @EnableCaching annotation in action.
//Enabling annotation-driven caching with //@EnableCaching
package com.habuma.cachefun;
import org.springframework.cache.CacheManager;
import org.springframework.cache.annotation.EnableCaching;
import org.springframework.cache.concurrent.ConcurrentMapCacheManager;
import org.springframework.context.annotation.Bean;
import org.springframework.context.annotation.Configuration;
@Configuration
@EnableCaching//Enable caching
public class CachingConfig {
@Bean
//Declare a cache manager
public CacheManager cacheManager() {
return new ConcurrentMapCacheManager();
}
}
Fortunately, several great cache-manager options are available. Let’s look at a few of the most commonly used cache managers.
13.1.1Configuring a cache manager
Out of the box, Spring 3.1 comes with five cache manager implementations:
1.SimpleCacheManager
2.NoOpCacheManager
3.ConcurrentMapCacheManager
4.CompositeCacheManager
5.EhCacheCacheManager
Spring 3.2 introduced another cache manager for working with JCache (JSR-107) based cache providers. Outside of the core Spring Framework, Spring Data offers two more cache managers:
1.RedisCacheManager (from Spring Data Redis)
2.GemfireCacheManager (from Spring Data GemFire)
You must select and configure a cache manager as a bean in your Spring application context.
Now let’s see how to configure some of Spring’s other cache managers, starting with EhCacheCacheManager.
CACHING WITH EHCACHE
EhCacheCacheManager is easily configured in Spring:
//Configuring EhCacheCacheManager in Java //configuration
package com.habuma.cachefun;
import net.sf.ehcache.CacheManager;
import org.springframework.cache.annotation.EnableCaching;
import org.springframework.cache.ehcache.EhCacheCacheManager;
import org.springframework.cache.ehcache.EhCacheManagerFactoryBean;
import org.springframework.context.annotation.Bean;
import org.springframework.context.annotation.Configuration;
import org.springframework.core.io.ClassPathResource;
@Configuration
@EnableCaching
public class CachingConfig {
@Bean
public EhCacheCacheManager cacheManager(CacheManager cm) {//Configure
//EhCacheCacheManager
return new EhCacheCacheManager(cm);
}
@Bean
//EhCacheManagerFactoryBean
public EhCacheManagerFactoryBean ehcache() {
EhCacheManagerFactoryBean ehCacheFactoryBean =
new EhCacheManagerFactoryBean();
ehCacheFactoryBean.setConfigLocation(
new ClassPathResource("com/habuma/spittr/cache/ehcache.xml"));//缓存策略的配置文件
return ehCacheFactoryBean;
}
}
上述代码有点难懂,请阅读分析:
The cacheManager() method in listing 13.3 creates an instance of EhCacheCacheManager by passing in an instance of an Ehcache CacheManager(这个是Ehcache的Manager). This particular bit of injection can be confusing because both Spring and Ehcache define a CacheManager type. To be clear, Ehcache’s CacheManager is being injected into Spring’s EhCacheCacheManager (which implements Spring’s CacheManager implementation).
So that you’ll have an Ehcache CacheManager to inject, you must also declare a CacheManager bean. To make that easy, Spring provides an EhCacheManagerFactoryBean that generates an Ehcache CacheManager. The ehcache() method creates and returns an instance of EhCacheManagerFactoryBean. Because it’s a factory bean (that is, it implements Spring’s FactoryBean interface), the bean that is registered in the Spring
application context isn’t an instance of EhCacheManagerFactoryBean but rather is an instance of CacheManager, suitable for injection into EhCacheCacheManager.
The contents of the ehcache.xml file vary from application to application, but you need to declare at least a minimal cache. For example, the following Ehcache configuration declares a cache named spittleCache with 50 MB of maximum heap storage and a time-to-live of 100 seconds.
<ehcache>
<cache name="spittleCache"
maxBytesLocalHeap="50m"
timeToLiveSeconds="100">
</cache>
</ehcache>
更多关于缓存配置的选项:
http://ehcache.org/documentation/configuration
USING REDIS FOR CACHING
When you think about it, a cache entry is nothing more than a key-value pair where the key describes the operation and parameters from which the value was produced(天然合适做缓存).
Therefore, it isn’t surprising to learn that Redis, which is a key-value store, is perfectly suited to be a cache store.
So that Redis can be used to store cache entries for Spring’s caching abstraction, Spring Data Redis offers RedisCacheManager, an implementation of CacheManager.RedisCacheManager works with a Redis server via a RedisTemplate to store cache entries in Redis.
//Configuring a cache manager that stores cache //entries in a Redis server
package com.myapp;
import org.springframework.cache.CacheManager;
import org.springframework.cache.annotation.EnableCaching;
import org.springframework.context.annotation.Bean;
import org.springframework.data.redis.cache.RedisCacheManager;
import org.springframework.data.redis.connection.jedis
.JedisConnectionFactory;
import org.springframework.data.redis.core.RedisTemplate;
@Configuration
@EnableCaching
public class CachingConfig {
@Bean
public CacheManager cacheManager(RedisTemplate redisTemplate) {
//Redis cache manager bean
return new RedisCacheManager(redisTemplate);
}
@Bean
//Redis connection factory bean
public JedisConnectionFactory redisConnectionFactory() {
JedisConnectionFactory jedisConnectionFactory =
new JedisConnectionFactory();
jedisConnectionFactory.afterPropertiesSet();
return jedisConnectionFactory;
}
@Bean
//RedisTemplate bean
public RedisTemplate<String, String> redisTemplate(
RedisConnectionFactory redisCF) {
RedisTemplate<String, String> redisTemplate =
new RedisTemplate<String, String>();
redisTemplate.setConnectionFactory(redisCF);
redisTemplate.afterPropertiesSet();
return redisTemplate;
}
}
WORKING WITH MULTIPLE CACHE MANAGERS
如果要使用多种缓存策略,那么可以配置 CompositeCacheManager。
The following listing shows how to create a CompositeCacheManager bean that iterates over a JCacheCacheManager, an EhCacheCacheManager, and a RedisCacheManager.
//CompositeCacheManager iterates over a list of //cache managers
@Bean
public CacheManager cacheManager(
net.sf.ehcache.CacheManager cm,
javax.cache.CacheManager jcm) {
//Create CompositeCacheManager
CompositeCacheManager cacheManager = new CompositeCacheManager();
List<CacheManager> managers = new ArrayList<CacheManager>();
managers.add(new JCacheCacheManager(jcm));
managers.add(new EhCacheCacheManager(cm))
managers.add(new RedisCacheManager(redisTemplate()));
//Add individual cache managers
cacheManager.setCacheManagers(managers);
return cacheManager;
}
Now that you have a cache manager configured and caching enabled, you’re ready to start applying caching rules to your bean methods. Let’s see how to use Spring’s caching annotations to define cache boundaries.
13.2Annotating methods for caching
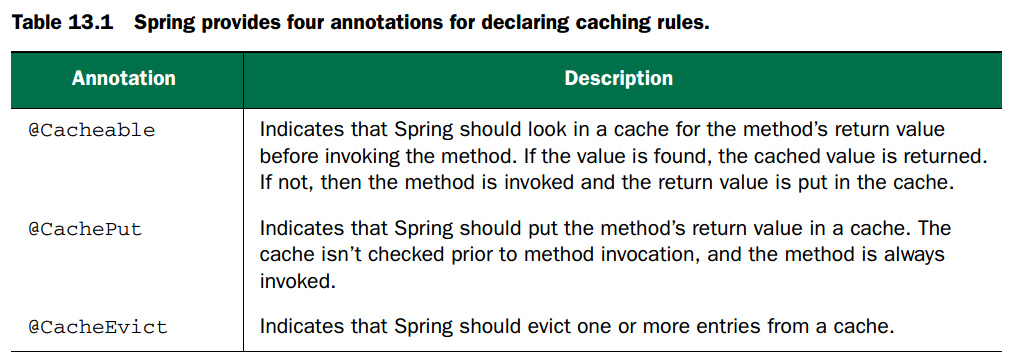

All the annotations in table 13.1 can be placed either on a method or on a class. When placed on a single method, the caching behavior prescribed by the annotation applies only to that method. If the annotation is placed at the class level, however, the caching behavior is applied to all methods in that class(如果是class级别则对全部的方法有效).
3.2.1Populating the cache
As you can see, the @Cacheable and @CachePut annotations can both populate a
cache. They work in slightly different ways, though.
@Cacheable looks for an entry in the cache first, preempting the method invocation if a matching entry is found. If no matching entry is found, the method is invoked and the value returned is put in the cache.先查找cache,有的话就不调用改方法了
@CachePut, on the other hand, never checks for a matching value in the cache, always allows the target method to be invoked, and adds the returned value to the cache.总会被调用,并把结果添加到cache中
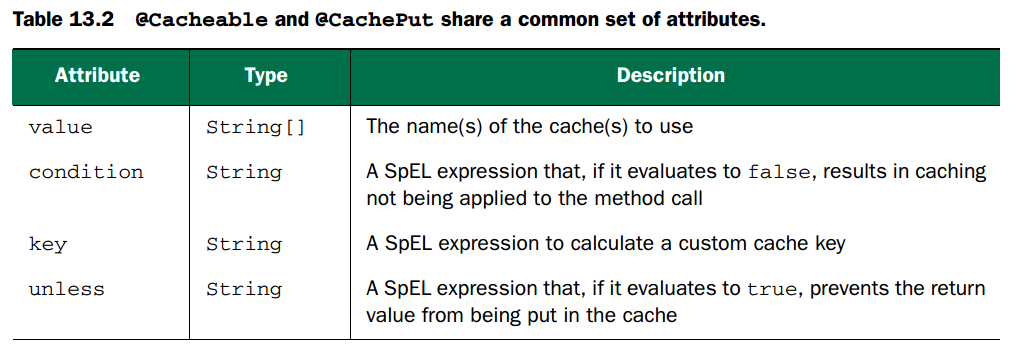
@Cacheable and @CachePut share a common set of attributes, which are listed in table 13.2.
一个例子:
//Using @Cacheable to store and fetch values in //a cache
//Cache this method's results
@Cacheable("spittleCache")
public Spittle findOne(long id) {
try {
return jdbcTemplate.queryForObject(
SELECT_SPITTLE_BY_ID,
new SpittleRowMapper(),
id);
} catch (EmptyResultDataAccessException e) {
return null;
}
}
The cache key is the id parameter passed to the findOne() method.默认的cache key是:the default cache key is based on the parameters to the method .
If a value is found for that key, the found value will be returned and the method won’t be invoked.
如果是接口的话,可以在接口方法上添加注解来说明一些策略,这样在所有实现了该方法的类中,对应的方法都将应用该策略。
PUTTING VALUES IN THE CACHE
An @CachePut-annotated method is always invoked and its return value is placed in the cache. This offers a handy way to preload a cache before anyone comes asking.
@CachePut("spittleCache")
Spittle save(Spittle spittle);
There’s only one problem: the cache key. As I mentioned earlier, the default cache key is based on the parameters to the method. Because the only parameter to save() is a Spittle, it’s used as the cache key. Doesn’t it seem odd to place a Spittle in a
cache where the key is the same Spittle?
Clearly, the default cache key isn’t what you want in this case. You need the cache key to be the ID of the newly saved Spittle, not the Spittle itself. So, you need to specify a key other than the default key. Let’s see how you can customize the cache key.
CUSTOMIZING THE CACHE KEY
上面的代码中,我们想要其方法返回的对象的id作为cache key,那么怎么得到return value中的id属性呢?
For the save() method, you need the key to be the id property from the Spittle that is returned. The #result expression will give you the returned Spittle. From that, you can reference the id property by setting the key attribute to #result.id:
@CachePut(value="spittleCache", key="#result.id")
Spittle save(Spittle spittle);
CONDITIONAL CACHING
@Cacheable and @CachePut offer two attributes for conditional caching: unless and condition. Both are given a SpEL expression. If the unless attribute’s SpEL expression evaluates to true, then the data returned from the cached method isn’t
placed in the cache. Similarly, if the condition attribute’s SpEL expression evaluates to false, then caching is effectively disabled for the method.
As an example (albeit a contrived one), suppose you don’t want to cache any Spittle objects whose message property contains the text “NoCache”. To prevent such Spittles from being cached, you can set the unless attribute like this:
@Cacheable(value="spittleCache"
unless="#result.message.contains('NoCache')")
Spittle findOne(long id);
The unless attribute prevents values from being written to the cache. But you may wish to disable caching altogether. That is, you may not want values added to the cache or fetched from the cache under certain conditions.
@Cacheable(value="spittleCache"
unless="#result.message.contains('NoCache')"
condition="#id >= 10")
Spittle findOne(long id);
If findOne() is called with any value less than 10 as the parameter, the cache will not be searched, nor will the returned Spittle be placed in the cache(既不在cache中找,也不把结果放在cache中). It will be as if there is no @Cacheable annotation on the method.
总结unless与condition的不同与用法:
As you’ve seen in these examples, the unless attribute expression can refer to the return value by referring to #result. This is possible and useful because unless doesn’t start doing its job until a value is returned from the cached method. On the
other hand, condition has the job of disabling caching on the method. Therefore, it can’t wait until the method has completed to decide if it needs to shut down caching.This means its expression must be evaluated on the way into the method and that you can’t refer to the return value with #result(condition在方法调用之前就要判断,所以肯定不能引用#result).
已经能够像cache中写入了,那怎么将写入的值进行删除呢?看@CacheEvict。
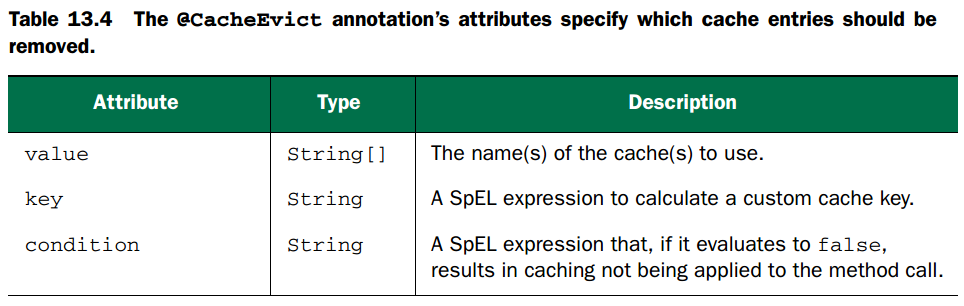
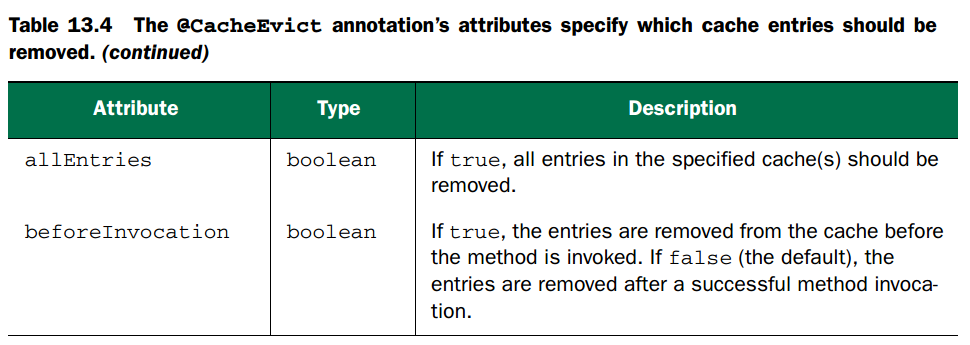
13.2.2Removing cache entries
@CacheEvict doesn’t add anything to the cache. On the contrary, if an @CacheEvict annotated method is called, one or more entries are removed from the cache.
什么时候会用到呢?
Any time a cached value is no longer valid, you should make sure it’s removed from the cache so that future cache hits won’t return stale or otherwise nonexistent data.
13.3Declaring caching in XML
13.4Summary
Chapter14.Securing methods
14.1Securing methods with annotations
Spring Security provides three different kinds of security annotations:
1.Spring Security’s own @Secured
2.JSR-250’s @RolesAllowed
3.Expression-driven annotations, with @PreAuthorize, @PostAuthorize, @PreFilter, and @PostFilter
The @Secured and @RolesAllowed annotations are the simplest options, restricting access based on what authorities have been granted to the user. When you need more flexibility in defining security rules on methods, Spring Security offers @PreAuthorize
and @PostAuthorize. And @PreFilter/@PostFilter filter elements out of collections returned from or passed into a method.
14.1.1Restricting method access with @Secured
The key to enabling annotation-based method security in Spring is to annotate a configuration class with @EnableGlobalMethodSecurity, like this:先配置
@Configuration
@EnableGlobalMethodSecurity(securedEnabled=true)
public class MethodSecurityConfig
extends GlobalMethodSecurityConfiguration {
}
For example, if you haven’t already configured authentication in the web-layer security configuration, you may want to do that here by overriding the GlobalMethodSecurityConfiguration’s configure() method:重写configure方法
@Override
protected void configure(AuthenticationManagerBuilder auth)
throws Exception {
auth
.inMemoryAuthentication()
.withUser("user").password("password").roles("USER");
}
除了override configure外,you’ll see how to override the GlobalMethodSecurityConfiguration’s createExpressionHandler() method to provide some custom security expression-handling behavior.
When securedEnabled is true, a pointcut is created such that the Spring Security aspects will wrap bean methods that are annotated with @Secured. For example, consider this addSpittle() method that’s been annotated with @Secured:
@Secured("ROLE_SPITTER")
public void addSpittle(Spittle spittle) {
// ...
}
By passing in ROLE_SPITTER, you tell Spring Security to not allow the addSpittle() method to be invoked unless the authenticated user has ROLE_SPITTER as one of their granted authorities.如果string有多个,意思是必须满足至少其中的一个。如:@Secured({"ROLE_SPITTER", "ROLE_ADMIN"})
如果不被授权的用户访问该方法,the aspect wrapping the method will throw one of Spring Security’s exceptions (probably a subclass of AuthenticationException or AccessDeniedException).
If the secured method is invoked in the course of a web request(这种情况spring会自动处理), the exception will be automatically handled by Spring Security’s filters. Otherwise, you’ll need to write the code to handle the exception.其他情况需要自己处理异常。
One drawback of the @Secured annotation is that it’s a Spring-specific annotation.
If you’re more comfortable using annotations defined in Java standards, then perhaps you should consider using @RolesAllowed instead.
14.1.2Using JSR-250’s @RolesAllowed with Spring Security
它的配置方法和使用方法跟@secured很相似。但是它无法使用SpEL语法来定义某些策略。
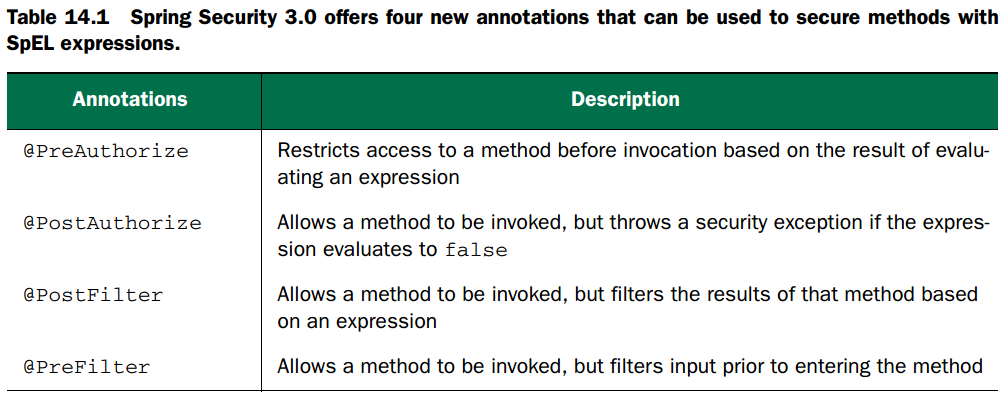
14.2Using expressions for method-level security
Sometimes security constraints depend on more than just whether a user has privileges or not.前面两种方式不能。
Spring Security 3.0 introduced a handful of new annotations that use SpEL to enable even more interesting security constraints on methods. These new annotations are described in table 14.1.
14.2.1Expressing method access rules
PREAUTHORIZING METHOD ACCESS
可以基于入口参数定义策略
The String argument to @PreAuthorize is a SpEL expression. With SpEL expressions guiding access decisions, far more advanced security constraints can be written.
For example, suppose that the average Spittr user can only write spittles of 140 characters or less, but premium users are allowed unlimited spittle lengths.
@PreAuthorize(
"(hasRole('ROLE_SPITTER') and #spittle.text.length() <= 140)"
+"or hasRole('ROLE_PREMIUM')")
public void addSpittle(Spittle spittle) {
// ...
}
The #spittle portion of the expression refers directly to the method parameter of the same name.
POSTAUTHORIZING METHOD ACCESS
可以基于返回值定义策略
For example, suppose that you wanted to secure the getSpittleById() method so that it only authorizes access if the Spittle object returned belongs to the authenticated user. There’s no way of knowing if a Spittle belongs to the current user until you’ve already fetched it. Therefore, getSpittleById() must execute first. If, after fetching the Spittle, it turns out to not belong to the current user, then a security
exception should be thrown.
例如:
@PostAuthorize("returnObject.spitter.username == principal.username")
public Spittle getSpittleById(long id) {
// ...
}
If the Spittle object has a Spitter whose username property is the same as the principal’s username, the Spittle will be returned to the caller. Otherwise, 1.an AccessDeniedException will be thrown, and 2.the caller won’t get to see the Spittle.
14.2.2Filtering method inputs and outputs
POSTFILTERING METHOD RETURN VALUES
@PostFilter evaluates that expression against each member of a collection being returned from the method, removing those members for whom the expression evaluates to false.
@PreAuthorize("hasAnyRole({'ROLE_SPITTER', 'ROLE_ADMIN'})")
@PostFilter( "hasRole('ROLE_ADMIN') || "
+ "filterObject.spitter.username == principal.name")
public List<Spittle> getOffensiveSpittles() {
...
}
PREFILTERING METHOD PARAMETERS
@PreAuthorize("hasAnyRole({'ROLE_SPITTER', 'ROLE_ADMIN'})")
@PreFilter( "hasRole('ROLE_ADMIN') || "
+ "targetObject.spitter.username == principal.name")
public void deleteSpittles(List<Spittle> spittles) { ... }
DEFINING A PERMISSION EVALUATOR
14.3Summary
Method-level security is an important complement to Spring Security’s web-level security, which we discussed in chapter 9. For non-web applications, method-level security is the front line of defense. When applied in a web application, method-level security backs up the security rules declared to secure web requests.


 3万+
3万+


 被折叠的 条评论
为什么被折叠?
被折叠的 条评论
为什么被折叠?
 到【灌水乐园】发言


