


Swagger学习
1.什么是Swagger?
了解一下Swagger存在的原因
Swagger产生的一个大背景是前后端分离,前后端分离使得前端开发人员需要与后端开发人员通过接口进行沟通交流,由于经常性的会出现业务上的需求改动,使得前后端沟通可能会出现不及时而引发一系列的问题,早起可能会使用word 文档进行沟通,但是实时性是一个很重要的东西,一旦有新的需求改动,需要能够大家及时发现并作出调整,而Swagger的出现就很好的解决了这个问题。
Swagger特点:
- 是一款让你更好的书写API文档的规范且完整框架。API框架
- 提供描述、生产、消费和可视化RESTful Web Service。
- 是由庞大工具集合支撑的形式化规范。这个集合涵盖了从终端用户接口、底层代码库到商业API管理的方方面面。
- 可以在线测试
Swagger和Swagger2区别
-
Swagger 是一种规范。
-
springfox-swagger2 是基于 Spring 生态系统的该规范的实现。
-
springfox-swagger-ui 是对 swagger-ui 的封装,使其可以使用 Spring 的服务。
2.SpringBoot初步集成Swagger2
第一步:创建SpringBootweb项目导入swagger依赖
-
第一个是API获取的包,第二是官方给出的一个ui界面。这个界面可以自定义,默认是官方的
-
springfox-swagger2 :检测spring的web请求信息,生成检测结果(
json格式)。 -
springfox-swagger-ui:根据springfox-swagger2生成的数据,生成
可视化的友好页面。
<!-- https://mvnrepository.com/artifact/io.springfox/springfox-swagger2 -->
<dependency>
    <groupId>io.springfox</groupId>
    <artifactId>springfox-swagger2</artifactId>
    <version>2.9.2</version>
</dependency>
<!-- https://mvnrepository.com/artifact/io.springfox/springfox-swagger-ui -->
<dependency>
    <groupId>io.springfox</groupId>
    <artifactId>springfox-swagger-ui</artifactId>
    <version>2.9.2</version>
</dependency>
<dependency>
第二步:通过配置SwaggerConfig使SpringBoot支持Swagger
- @EnableSwagger2 :加上这个注解就能在SpringBoot使用了
- @Configuration:表示这是一个配置类
@Configuration
@EnableSwagger2
public class Swagger2Config {

}
第三步:访问页面 localhost:端口号/swagger-ui.html
- 页面展示

3.Swagger2核心类Docket介绍
Swagger2核心Docket相关配置信息
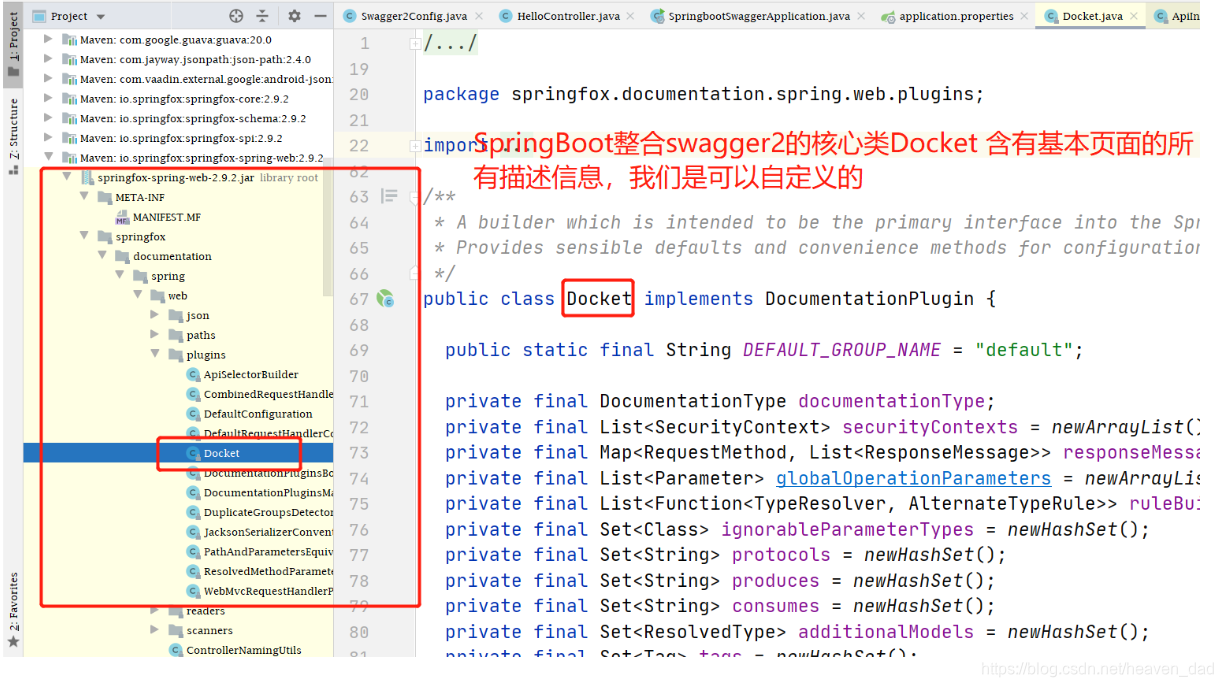
对比一下Docket默认为我们提供了什么,我们能自定义什么
- Docket参数是DocumentationType
public Docket(DocumentationType documentationType) {
  this.documentationType = documentationType;
}
- 而DocumentationType创建方式如下
- 也就是说DocumentationType.SWAGGER_2就能创建DocumentationType对象
public static final DocumentationType SWAGGER_2 = new DocumentationType("swagger", "2.0");
- 默认分组为default
public static final String DEFAULT_GROUP_NAME = "default";
- Docket里面提到的ApiInfo类包含了基本全部的Swagger2描述信息
- Contact可以指定用户的信息(“作者名字”, “url路径”, “邮箱”)
- urn:tos(默认) 这里需要填的是Terms of serviceURl(服务条款路径)
public static final Contact DEFAULT_CONTACT = new Contact("作者名字", "url路径", "邮箱");
public static final ApiInfo DEFAULT = new ApiInfo("标题", "描述", "版本信息", "urn:tos",
        DEFAULT_CONTACT, "Apache 2.0", "http://www.apache.org/licenses/LICENSE-2.0", new ArrayList<VendorExtension>());
4.Swagger2的Swagger2Config配置类书写(完整版)
-
把注册的Docket添加到SpringIOC容器中
-
配置了两组swagger环境 第二组对每一个配置做了详细的解释
-
第二组配置了相应的环境,设置默认有swagger文档生成的环境是dev和test
-
结合配置信息 展示页面效果
package com.xaun.config;

import org.springframework.context.annotation.Bean;
import org.springframework.context.annotation.Configuration;
import org.springframework.core.env.Environment;
import org.springframework.core.env.Profiles;
import springfox.documentation.builders.PathSelectors;
import springfox.documentation.builders.RequestHandlerSelectors;
import springfox.documentation.service.ApiInfo;
import springfox.documentation.service.Contact;
import springfox.documentation.service.VendorExtension;
import springfox.documentation.spi.DocumentationType;
import springfox.documentation.spring.web.plugins.Docket;
import springfox.documentation.swagger2.annotations.EnableSwagger2;

import java.util.ArrayList;

@Configuration
@EnableSwagger2
public class Swagger2Config {

    @Bean
    public Docket getDocket1() {

        return new Docket(DocumentationType.SWAGGER_2)
                .apiInfo(apiInfo())
                .groupName("分组1")
                .select()
                .apis(RequestHandlerSelectors.basePackage("com.xaun.controller"))
                .build();
    }

    @Bean
    public Docket getDocket2(Environment environment) {

        //判断自己是否是处于开发或者上线环境中
        Profiles profiles=Profiles.of("dev","test");
        boolean flag = environment.acceptsProfiles(profiles);

        return new Docket(DocumentationType.SWAGGER_2)
                .apiInfo(apiInfo())
                .groupName("分组2") //文档分组 要配置多个就需要写多个docket
                //enable 默认是true 设置问false相当于关闭该分组 只有一个组的话配置的所有东西都无法显示
                .enable(flag)
                .select()
                //RequestHandlerSelectors 配置要扫描接口的方式
                //basePackage配置要扫描的包
                //any 扫描全部
                //none 都不扫描
                //withClassAnnotation() 扫描类上注解 需要传Class对象 Controller.class
                //withClassAnnotation() 扫描方法上的注解 GetMapping.class
                .apis(RequestHandlerSelectors.basePackage("com.xaun.controller"))
                //过滤路径
                //any 过滤全部路径
                //ant 配置适配路径(没有则返回No operations defined in spec!)
                .paths(PathSelectors.any())
                .build();
    }


    public static ApiInfo apiInfo(){
        return  new ApiInfo("杨堦深的SwaggerAPI文档",
                "学而不思则罔,思而不学则殆",
                "1.0",
                "https://mp.csdn.net/console/home",
                DEFAULT_CONTACT,
                "Apache 2.0",//许可证
                "http://www.apache.org/licenses/LICENSE-2.0",
                new ArrayList<VendorExtension>()
        );
    }


    //作者
    public static final Contact DEFAULT_CONTACT = new Contact("xuan-study ", "https://www.cnblogs.com/xuan-study/", "1870136088@qq.com");

}

yml配置不同的环境 并激活dev环境
spring:
  profiles:
    active: dev

---
server:
  port: 8001
spring:
  profiles: dev

---
server:
  port: 8002
spring:
  profiles: test

---
server:
  port: 8003
spring:
  profiles: pro
5.编写实体类User讲解注解使用
相关注解描述
| 注解 | 使用的地方 | 用途 |
|---|---|---|
| @Api | 类/接口 | 描述类/接口主要用途 |
| @ApiOperation | 方法 | 描述方法的用途 |
| @ApiImplicitParam | 方法 | 用于描述接口的非对象参数 |
| @ApiImplicitParams | 方法 | 用于描述接口的非对象参数集 |
| @ApiIgnore | 类/方法/参数 | Swagger 文档不会显示拥有该注解的接口 |
| @ApiModel | 参数实体类 | 可设置接口相关实体的描述 |
| @ApiModelProperty | 参数实体类属性 | 可设置实体属性的相关描述 |
| @ApiParam | 参数 | 可设置实体类的相关描述 |
- 对应实体类
package com.xaun.pojo;
import io.swagger.annotations.ApiModel;
import io.swagger.annotations.ApiModelProperty;
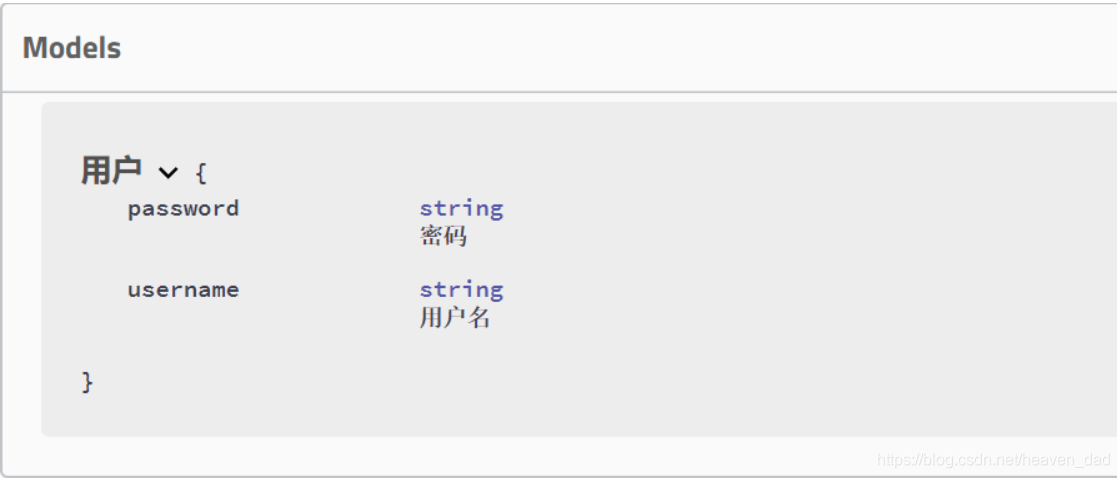
@ApiModel("用户")
public class User {
@ApiModelProperty("用户名")
private String username;
@ApiModelProperty("密码")
private String password;
public String getUsername() {
return username;
}
public void setUsername(String username) {
this.username = username;
}
public String getPassword() {
return password;
}
public void setPassword(String password) {
this.password = password;
}
@Override
public String toString() {
return "User{" +
"username='" + username + '\'' +
", password='" + password + '\'' +
'}';
}
}
controller接口
package com.xaun.controller;
import com.xaun.pojo.User;
import io.swagger.annotations.ApiOperation;
import io.swagger.annotations.ApiParam;
import org.springframework.web.bind.annotation.GetMapping;
import org.springframework.web.bind.annotation.PostMapping;
import org.springframework.web.bind.annotation.RestController;
@RestController
public class HelloController {
@GetMapping("/hello")
public String hello(){
return "hello!";
}
//只要我们在这个接口下 返回值中存在实体类 就会被扫描到swagger中
@PostMapping("/user")
public User user(){
return new User();
}
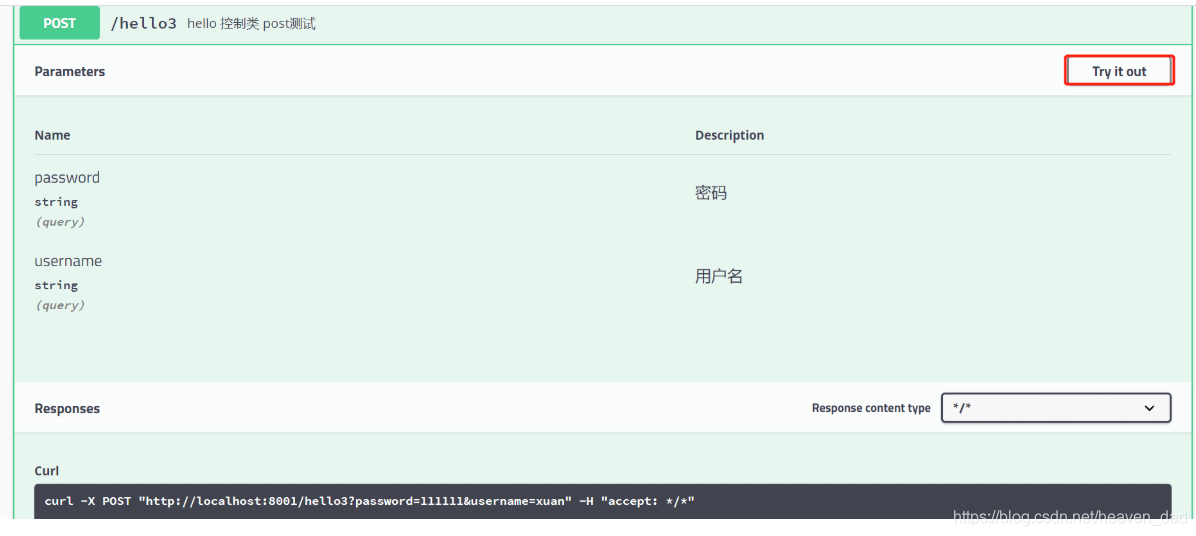
@ApiOperation("hello 控制类")
@GetMapping("/hello2")
public String hello2(@ApiParam("用户名") String username){
return "hello!"+username;
}
@ApiOperation("hello 控制类 post测试")
@PostMapping("/hello3")
public User hello3(@ApiParam("用户") User user){
return user;
}
}
model封装的用户信息
- 只要我们在这个接口下 返回值中存在实体类 就会被扫描到swagger中
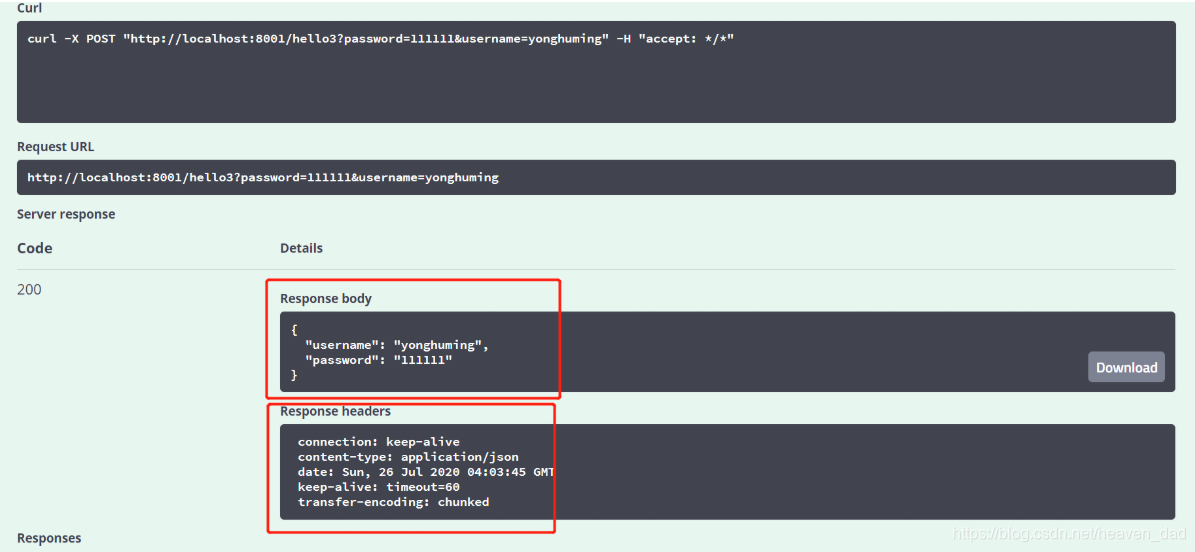
6.Swagger2在线测试
Swagger可以直接在线测试右上角try it out
输入用户名密码执行
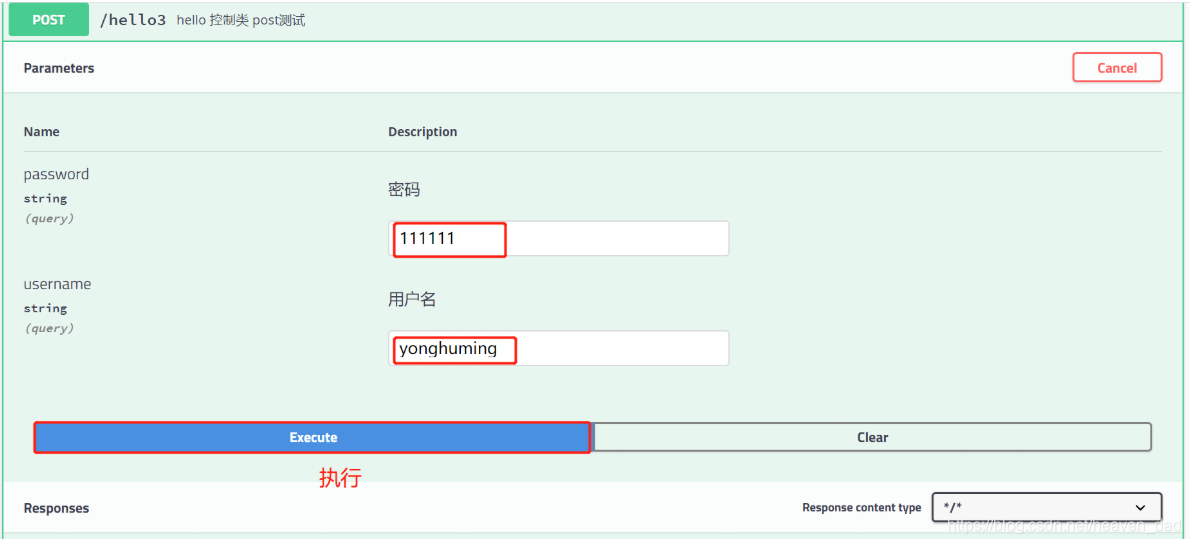
可以看到封装的数据结果以及请求头信息
7.Swagger2总结
-
我们可以通过Swagger2给一些字段添加注释信息
-
Swagger2的接口文档可以实时更新
-
Swagger2提供在线测试
所以基于以上在前后端分离的开发中Swagger2是一个很好的选择


 3806
3806


 被折叠的 条评论
为什么被折叠?
被折叠的 条评论
为什么被折叠?
 到【灌水乐园】发言


