


1、构建RESTful工程

gradle的build.gradle还要修改一下内容(只标注了要添加和修改的代码):
	//添加social
	implementation 'org.springframework.social:spring-social-core:1.1.6.RELEASE'
	implementation 'org.springframework.social:spring-social-web:1.1.6.RELEASE'
	implementation 'org.springframework.social:spring-social-security:1.1.6.RELEASE'
	implementation 'org.springframework.social:spring-social-config:1.1.6.RELEASE'
	//springsecurity与thymeleaf的整合
	implementation 'org.thymeleaf.extras:thymeleaf-extras-springsecurity4:3.0.2.RELEASE'

	//添加junit testImplementation下载的包不完整 用implementation下载
	implementation 'junit:junit:4.12'

	//修改这里:test与junit配合测试  testImplementation改为implementation
	implementation 'org.springframework.boot:spring-boot-starter-test'
然后就gradle build,再导入eclipse中即可。
2、测试类和响应类
测试类模仿客户端请求,com.zzz.rss是我工程的根包,添加测试类com.zzz.rss.controller.MainController,代码如下:
package com.zzz.rss.controller;


import org.junit.Before;
import org.junit.Test;
import org.junit.runner.RunWith;
import org.springframework.beans.factory.annotation.Autowired;
import org.springframework.boot.test.context.SpringBootTest;
import org.springframework.http.MediaType;
import org.springframework.test.context.junit4.SpringRunner;
import org.springframework.test.web.servlet.MockMvc;
import org.springframework.test.web.servlet.request.MockMvcRequestBuilders;
import org.springframework.test.web.servlet.result.MockMvcResultMatchers;
import org.springframework.test.web.servlet.setup.MockMvcBuilders;
import org.springframework.web.context.WebApplicationContext;

//spring测试类
@RunWith(SpringRunner.class)
@SpringBootTest
public class MainController {

	@Autowired
	private WebApplicationContext webApplicationContext;

	//SpringMVC单元的独立测试类
	private MockMvc mockMvc;

	@Before
	public void before() {
		//创建独立测试类
		mockMvc = MockMvcBuilders.webAppContextSetup(webApplicationContext).build();
	}

	//模拟客户端网址发送请求,查询user
	//@Test
	public void test() throws Exception {
		//发起一个Get请求
		String str = mockMvc.perform(MockMvcRequestBuilders.get("/user")
				//传入参数
				.param("username", "xing")
				//json形式发送请求
				.contentType(MediaType.APPLICATION_JSON))
					//期待服务器返回什么 期待返回状态码为200
					.andExpect(MockMvcResultMatchers.status().isOk())
					//期待服务器返回json中数组长度为3
					.andExpect(MockMvcResultMatchers.jsonPath("$.length()").value(3))
					.andReturn().getResponse().getContentAsString();

		System.out.println(str);

		//网页地址/user/1不存在,则返回404
	}

	//模拟客户端,发送请求,匹配用户信息
	//@Test
	public void getInfo() throws Exception {
		//发起一个Get请求
		String str = mockMvc.perform(MockMvcRequestBuilders.get("/user/1")
				//json形式发送请求
				.contentType(MediaType.APPLICATION_JSON))
					//期待服务器返回什么 期待返回状态码为200
					.andExpect(MockMvcResultMatchers.status().isOk())
					//期待服务器返回json的username值为xing
					.andExpect(MockMvcResultMatchers.jsonPath("$.username").value("xing"))
					.andReturn().getResponse().getContentAsString();

		System.out.println(str);
	}

	//模拟客户端,发送添加用户请求
	//@Test
	public void addUser() throws Exception {

		//发起一个post请求
		mockMvc.perform(MockMvcRequestBuilders.post("/user/1")
			//json形式发送请求
			.contentType(MediaType.APPLICATION_JSON)
			.content("{\"username\":\"xing\"}"))
				//期待服务器返回什么 期待返回状态码为200
				.andExpect(MockMvcResultMatchers.status().isOk())
				//期待服务器返回json值的id为1
				.andExpect(MockMvcResultMatchers.jsonPath("$.id").value("1"));

	}

	//模拟客户端,发送修改用户请求  put
	//@Test
	public void updateUser() throws Exception {

		//发起一个put请求
		mockMvc.perform(MockMvcRequestBuilders.put("/user/1")
			//json形式发送请求
			.contentType(MediaType.APPLICATION_JSON)
			.content("{\"username\":\"xing\",\"id\":\"1\"}"))
				//期待服务器返回什么 期待返回状态码为200
				.andExpect(MockMvcResultMatchers.status().isOk())
				//期待服务器返回json值的id为1
				.andExpect(MockMvcResultMatchers.jsonPath("$.id").value("1"));

	}

	//模拟客户端,发送删除用户请求
	@Test
	public void deleteUser() throws Exception {

		//发起一个delete请求
		mockMvc.perform(MockMvcRequestBuilders.delete("/user/1")
			//json形式发送请求
			.contentType(MediaType.APPLICATION_JSON))
				//期待服务器返回什么 期待返回状态码为200
				.andExpect(MockMvcResultMatchers.status().isOk());

	}
}
响应类是服务器端对请求响应处理,添加响应类com.zzz.rss.controller.UserController,代码如下:
package com.zzz.rss.controller;

import java.util.ArrayList;
import java.util.List;

import org.springframework.web.bind.annotation.DeleteMapping;
import org.springframework.web.bind.annotation.GetMapping;
import org.springframework.web.bind.annotation.PathVariable;
import org.springframework.web.bind.annotation.PostMapping;
import org.springframework.web.bind.annotation.PutMapping;
import org.springframework.web.bind.annotation.RequestBody;
import org.springframework.web.bind.annotation.RequestMapping;
import org.springframework.web.bind.annotation.RequestParam;
import org.springframework.web.bind.annotation.RestController;

import com.fasterxml.jackson.annotation.JsonView;
import com.zzz.rss.dto.User;

//为Controller提供RestAPI
@RestController
@RequestMapping("/user")  //简化@RequestMapping(value="/user",method=RequestMethod.GET)代码
public class UserController {

	/**
	 * @Title: query
	 * @Description: 完成查询响应
	 * @param: @return 参数
	 * @return: List<User> 返回类型
	 * @throws
	 */
	//@RequestParam
	//defaultValue 默认值
	//name 传入参数的名字 ,对应上方法的参数,如果相同可以省略
	//required 是否必须对应传入参数,默认true,没对应上报400错误
	//value name别名相当于name
	//@RequestMapping(value="/user",method=RequestMethod.GET)
	@GetMapping
	//JsonView 步骤3、在controller上指定视图
	@JsonView(User.UserSimpleView.class)
	public List<User> query(@RequestParam(defaultValue="xingge",name="username") String username) {

		System.out.println(username);

		List<User> list = new ArrayList<User>();
		list.add(new User());
		list.add(new User());
		list.add(new User());

		return list;
	}

	//响应/user/{id}的请求
	//@RequestMapping(value="/user/{id}",method=RequestMethod.GET)
	@GetMapping("/{id}")
	//JsonView 步骤3、在controller上指定视图
	@JsonView(User.UserDetailView.class)
	//@PathVariable 映射{id}到id  可选填name value required属性
	public User getInfo(@PathVariable() String id) {
		User user = new User();
		user.setUsername("xing");
		return user;
	}

	//响应添加用户请求  如果POST改为GET,会显示405错误,响应和请求格式不同
	//@RequestMapping(value="/user/{id}",method=RequestMethod.POST)
	@PostMapping("/{id}")
	public User addUser(@RequestBody User user) {

		System.out.println(user.getUsername());
		System.out.println(user.getPassword());
		user.setId("1");

		return user;
	}

	//响应修改用户请求
	//@RequestMapping(value="/user/{id}",method=RequestMethod.PUT)
	@PutMapping("/{id}")
	public User updateUser(@RequestBody User user) {

		System.out.println(user.getId());
		System.out.println(user.getUsername());
		System.out.println(user.getPassword());

		return user;
	}

	//响应删除用户请求
	//@RequestMapping(value="/user/{id}",method=RequestMethod.DELETE)
	@DeleteMapping("/{id}")
	public User deleteUser(@PathVariable String id) {

		System.out.println(id);
		return null;
	}
}
dto类com.zzz.rss.dto.User:
package com.zzz.rss.dto;

import com.fasterxml.jackson.annotation.JsonView;

public class User {

	//JsonView 步骤1、使用接口声明多种视图,例如是否包含密码信息
	public interface UserSimpleView{};
	public interface UserDetailView extends UserSimpleView{};

	private String id;
	private String username;
	private String password;

	//JsonView 步骤2、在值的get方法上指定视图
	@JsonView(UserSimpleView.class)
	public String getUsername() {
		return username;
	}
	public void setUsername(String username) {
		this.username = username;
	}
	@JsonView(UserDetailView.class)
	public String getPassword() {
		return password;
	}
	public void setPassword(String password) {
		this.password = password;
	}
	@JsonView(UserSimpleView.class)
	public String getId() {
		return id;
	}
	public void setId(String id) {
		this.id = id;
	}

}
3、扩展
RESTful的增删改查对应 post delete put get。
在浏览器中输入的地址只能是get请求。而用测试类可以测试四种情况。用根包下的主函数运行Java Application程序后,在浏览器登录http://localhost:8080/ ,默认登录用户名为user,密码在console控制台有显示。
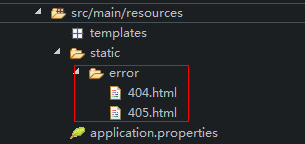
默认异常处理页面(404、405)换成自定义页面,添加如下目录结构即可:


 1858
1858


 被折叠的 条评论
为什么被折叠?
被折叠的 条评论
为什么被折叠?
 到【灌水乐园】发言


