


配置环境
安装Eclipse插件
springsource-tool-suite-3.4.0.RELEASE-e4.3.1-updatesite.zip
只选择4个Spring IDE即可。
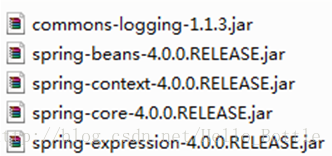
导入jar包
HelloWorld
HelloWorld.java
public class HelloWorld {
	private String name;

	public void setName(String name) {
		this.name = name;
	}

	public void hello(){
		System.out.println("hello:" + name);
	}
}
applicationContext.xml
<?xml version="1.0" encoding="UTF-8"?>
<beans xmlns="http://www.springframework.org/schema/beans"
	xmlns:xsi="http://www.w3.org/2001/XMLSchema-instance"
	xsi:schemaLocation="http://www.springframework.org/schema/beans http://www.springframework.org/schema/beans/spring-beans.xsd">

	<bean id="helloWorld" class="com.atguigu.spring.beans.HelloWorld">
		<property name="name" value="Spring"></property>
	</bean>
</beans>
Main.java
public static void main(String[] args) {
	//1. 创建Spring的IOC容器
	ApplicationContext ctx = new ClassPathXmlApplicationContext("applicationContext.xml");
	//2. 从容器中获取Bean
	HelloWorld helloWorld = (HelloWorld) ctx.getBean("helloWorld");
	//3. 调用方法
	helloWorld.hello();
}
配置bean
配置bean有两种形式:
- 基于XML文件的方式
- 基于注解的方式
基于XML文件的方式
Bean的配置方式:
- 通过全类名(反射)
- 通过工厂方法(静态工厂方法&实例工厂方法)
- FactoryBean
在xml文件中通过bean节点来配置bean
<bean id="helloWorld" class="com.atguigu.spring.beans.HelloWorld">
</bean>
id:Bean的名称
- 在IOC容器中必须是唯一的
- 若id没有指定,Spring自动将全类名的首字母小写作为Bean的名字
- id可以指定多个名字,名字之间可用逗号、分号或空格分隔
在 Spring IOC 容器读取 Bean 配置创建 Bean 实例之前, 必须对它进行实例化. 只有在容器实例化后, 才可以从 IOC 容器里获取 Bean 实例并使用。(我们在HelloWorld中创建Spring的IOC容器的时候,已经对HelloWorld.java进行了实例化,所以必须要先创建IOC容器的实例化对象才能获取到Bean实例)
Spring提供了两种类型的IOC容器实现
- BeanFactory:IOC容器的基本实现,是 Spring 框架的基础设施,面向 Spring 本身
- ApplicationContext:提供了更多的高级特性,是BeanFactory的子接口。面向使用 Spring 框架的开发者,几乎所有的应用场合都直接使用 ApplicationContext 而非底层的 BeanFactory。
无论使用何种方式,配置文件时相同
ApplicationContext
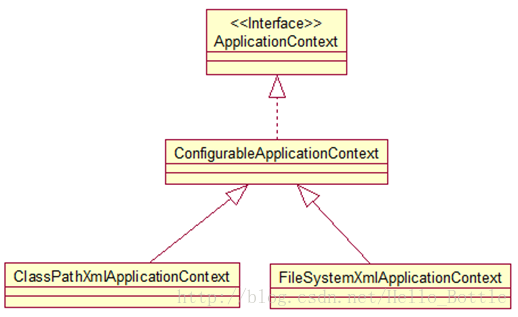
ApplicationContext代表了IOC容器。
ApplicationContext的主要实现类:
- ClassPathXmlApplicationContext:从类路径下加载配置文件
- FileSystemXmlApplicationContext:从文件系统中加载配置文件
- WebApplicationContext:是专门为 WEB 应用而准备的,它允许从相对于 WEB 根目录的路径中完成初始化工作
ConfigurableApplicationContext 扩展于 ApplicationContext,新增加两个主要方法:refresh() 和 close(), 让 ApplicationContext 具有启动、刷新和关闭上下文的能力
ApplicationContext 在初始化上下文时就实例化所有单例的 Bean。
applicationContext.xml
<bean id="helloWorld" class="com.atguigu.spring.beans.HelloWorld">
	<property name="name" value="Spring"></property>
</bean>
Main.java
public static void main(String[] args) {
	//1. 创建Spring的IOC容器
	ApplicationContext ctx = new ClassPathXmlApplicationContext("applicationContext.xml");
	//2. 从容器中获取Bean,ApplicationContext提供了多种获取bean的方法
	//利用类型返回IOC容器中的Bean,但要求IOC容器中必须只能有一个该类型的Bean,不然IOC容器不知道到底返回哪个Bean
	HelloWorld helloWorld = ctx.getBean(HelloWorld.class);
	//3. 调用方法
	helloWorld.hello();
}
依赖注入
Spring支持三种依赖注入的方式
- 属性注入
- 构造器注入
- 工厂方法注入(很少使用,不推荐)
属性注入
属性注入即通过 setter 方法注入Bean 的属性值或依赖的对象
属性注入使用 <property> 元素, 使用 name 属性指定 Bean 的属性名称,value 属性或 <value> 子节点指定属性值
属性注入是实际应用中最常用的注入方式
<bean id="helloWorld" class="com.atguigu.spring.beans.HelloWorld">
	<property name="name" value="Spring"></property>
</bean>
构造器注入
通过构造方法注入Bean 的属性值或依赖的对象,它保证了 Bean 实例在实例化后就可以使用。
构造器注入在 <constructor-arg> 元素里声明属性, <constructor-arg> 中没有 name 属性
使用构造方法注入有两种入参方式:
- 按索引匹配入参
- 按类型匹配入参
Car.java
public class Car {
	private String brand;
	private String corp;
	private double price;
	private int maxSpeed;

	public Car(String brand, String corp, double price) {
		super();
		this.brand = brand;
		this.corp = corp;
		this.price = price;
	}

	public Car(String brand, String corp, int maxSpeed) {
		super();
		this.brand = brand;
		this.corp = corp;
		this.maxSpeed = maxSpeed;
	}

	public String toString() {
		return "Car [brand=" + brand + ", corp=" + corp + ", price=" + price
				+ ", maxSpeed=" + maxSpeed + "]";
	}
}
applicationContext.xml
<bean id="car" class="com.atguigu.spring.beans.Car">
	<constructor-arg value="Audi" index="0"></constructor-arg>
	<constructor-arg value="ShangHai" index="1"></constructor-arg>
	<constructor-arg value="30000" type="double"></constructor-arg>
</bean>

<bean id="car2" class="com.atguigu.spring.beans.Car">
	<constructor-arg value="BaoMa" type="java.lang.String"></constructor-arg>
	<constructor-arg value="ShangHai" type="java.lang.String"></constructor-arg>
	<constructor-arg value="240" type="int"></constructor-arg>
</bean>
Main.java
public class Main {
	public static void main(String[] args) {
		//1. 创建Spring的IOC容器
		ApplicationContext ctx = new ClassPathXmlApplicationContext("applicationContext.xml");
		//2. 从容器中获取Bean
		//3. 调用方法
		Car car = (Car) ctx.getBean("car");
		System.out.println(car);

		Car car2 = (Car) ctx.getBean("car2");
		System.out.println(car2);
	}
}
字面值
字面值:可用字符串表示的值,可以通过 <value> 元素标签或 value 属性进行注入。
基本数据类型及其封装类、String 等类型都可以采取字面值注入的方式
若字面值中包含特殊字符,可以使用 <![CDATA[]]> 把字面值包裹起来。
<bean id="car2" class="com.atguigu.spring.beans.Car">
	<constructor-arg value="BaoMa" type="java.lang.String"></constructor-arg>
	<constructor-arg type="java.lang.String">
		<value><![CDATA[<ShangHai>]]></value>
	</constructor-arg>
	<constructor-arg type="int">
		<value>250</value>
	</constructor-arg>
</bean>
引用其他Bean
组成应用程序的 Bean 经常需要相互协作以完成应用程序的功能. 要使 Bean 能够相互访问, 就必须在 Bean 配置文件中指定对 Bean 的引用
在 Bean 的配置文件中, 可以通过 <ref> 元素或 ref 属性为 Bean 的属性或构造器参数指定对 Bean 的引用.
也可以在属性或构造器里包含 Bean 的声明, 这样的 Bean 称为内部 Bean
Person.java
public class Person {
	private String name;
	private int age;

	private Car car;
	... ...
}
applicationContext.xml
<bean id="car2" class="com.atguigu.spring.beans.Car">
	<constructor-arg value="BaoMa" type="java.lang.String"></constructor-arg>
	<constructor-arg value="ShangHai" type="java.lang.String"></constructor-arg>
	<constructor-arg type="int">
		<value>250</value>
	</constructor-arg>
</bean>

<bean id="person" class="com.atguigu.spring.beans.Person">
	<property name="name" value="Tom"></property>
	<property name="age" value="24"></property>
	<!-- 可以使用property的ref属性建立bean之间的引用关系,ref指向ioc容器中的其他的bean -->
	<property name="car" ref="car2"></property>
	<!--
		<property name="car">
			<ref bean="car2"/>
		</property>
	-->
</bean>
Main.java
Person person = ctx.getBean(Person.class);
System.out.println(person);
内部Bean
当 Bean 实例仅仅给一个特定的属性使用时, 可以将其声明为内部 Bean. 内部 Bean 声明直接包含在 <property> 或 <constructor-arg> 元素里, 不需要设置任何 id 或 name 属性
内部 Bean 不能使用在任何其他地方
applicationContext.xml
<bean id="person" class="com.atguigu.spring.beans.Person">
	<property name="name" value="Tom"></property>
	<property name="age" value="24"></property>
	<property name="car">
		<bean class="com.atguigu.spring.beans.Car">
			<constructor-arg value="Ford"></constructor-arg>
			<constructor-arg value="Changan"></constructor-arg>
			<constructor-arg value="200000" type="double"></constructor-arg>
		</bean>
	</property>
</bean>
null值和级联属性
null值
可以使用专用的 <null/> 元素标签为 Bean 的字符串或其它对象类型的属性注入 null 值
<bean id="person" class="com.atguigu.spring.beans.Person">
	<property name="name" value="Tom"></property>
	<property name="age" value="24"></property>
	<property name="car"></null></property>
</bean>
其实只要不赋值,在person.java中默认也是null
级联属性
和 Struts、Hiberante 等框架一样,Spring 支持级联属性的配置。
<bean id="car" class="com.atguigu.spring.beans.Car">
	<constructor-arg value="Audi" index="0"></constructor-arg>
	<constructor-arg value="ShangHai" index="1"></constructor-arg>
	<constructor-arg value="30000" type="double"></constructor-arg>
</bean>

<bean id="person" class="com.atguigu.spring.beans.Person">
	<property name="name" value="Tom"></property>
	<property name="age" value="24"></property>
	<property name="car" ref="car"></property>
	<!-- car的maxSpeed属性没有赋值,可以使用级联属性为其赋值,Car类中必须有setSpeed方法 -->
	<property name="car.maxSpeed" value="250"></property>
</bean>
集合属性
在 Spring中可以通过一组内置的 xml 标签(例如: <list>, <set> 或 <map>) 来配置集合属性.
List集合
配置 java.util.List 类型的属性, 需要指定 <list> 标签, 在标签里包含一些元素. 这些标签可以通过 <value> 指定简单的常量值, 通过 <ref> 指定对其他 Bean 的引用. 通过<bean> 指定内置 Bean 定义. 通过 <null/> 指定空元素. 甚至可以内嵌其他集合.
给Person类添加List<Car>属性
修改Spring配置文件
<bean id="person3" class="com.atguigu.spring.beans.collection.Person">
	<property name="name" value="Mike"></property>
	<property name="age" value="25"></property>
	<property name="cars" >
		<list>
			<ref bean="car"/>
			<ref bean="car2"/>
			<bean class="com.atguigu.spring.beans.Car">
				<constructor-arg value="Ford" type="java.lang.String"></constructor-arg>
				<constructor-arg value="Changan" type="java.lang.String"></constructor-arg>
				<constructor-arg type="int">
					<value>270</value>
				</constructor-arg>
			</bean>
		</list>
	</property>
</bean>
数组和Set集合
数组使用<array>标签,或者和 List 一样, 都使用 <list>
配置 java.util.Set 需要使用 <set> 标签, 定义元素的方法与 List 一样.
Map集合
Java.util.Map 通过 <map> 标签定义, <map> 标签里可以使用多个 <entry> 作为子标签. 每个条目包含一个键和一个值.
必须在 <key> 标签里定义键
因为键和值的类型没有限制, 所以可以自由地为它们指定 <value>, <ref>, <bean> 或 <null> 元素.
可以将 Map 的键和值作为 <entry> 的属性定义: 简单常量使用 key 和 value 来定义; Bean 引用通过 key-ref 和 value-ref 属性定义
新建NewPerson类,添加字段Map<String, Car> cars
修改配置文件
<bean class="com.atguigu.spring.beans.collection.NewPerson" id="newPerson">
	<property name="name" value="Rose"></property>
	<property name="age" value="30"></property>
	<property name="cars">
		<map>
			<entry key="AA" value-ref="car"></entry>
			<entry key="BB" value-ref="car2"></entry>
		</map>
	</property>
</bean>
Properties
使用 <props> 定义 java.util.Properties, 该标签使用多个 <prop> 作为子标签. 每个 <prop> 标签必须定义 key 属性
DataSource.java
public class DataSource {
	private Properties properties;
	··· ···
}
applicationContext.xml
<bean class="com.atguigu.spring.beans.collection.DataSource" id="dataSource">
	<property name="properties">
		<props>
			<prop key="user">root</prop>
			<prop key="password">123</prop>
			<prop key="jdbcUrl">jdbc:mysql:///test</prop>
			<prop key="driverClass">com.mysql.jdbc.Driver</prop>
		</props>
	</property>
</bean>
其实结构相同,标签可以互换。array、list、set标签可以互换,map、props标签可以互换。
使用utility scheme定义集合
使用基本的集合标签定义集合时, 不能将集合作为独立的 Bean 定义, 导致其他 Bean 无法引用该集合, 所以无法在不同 Bean 之间共享集合.
可以使用 util schema 里的集合标签定义独立的集合 Bean. 需要注意的是, 必须在 <beans> 根元素里添加 util schema 定义
点击Namespaces添加util名称空间
applicationContext.xml
<util:list id="cars">
	<ref bean="car"/>
	<ref bean="car2"/>
</util:list>

<bean class="com.atguigu.spring.beans.collection.Person" id="person4">
	<property name="name" value="Jack"></property>
	<property name="age" value="35"></property>
	<property name="cars" ref="cars"></property>
</bean>
使用p命名空间
为了简化 XML 文件的配置,越来越多的 XML 文件采用属性而非子元素配置信息。
Spring 从 2.5 版本开始引入了一个新的 p 命名空间,可以通过 <bean> 元素属性的方式配置 Bean 的属性。
使用 p 命名空间后,基于 XML 的配置方式将进一步简化
点击Namespaces添加p命名空间
applicationContext.xml
<util:list id="cars">
	<ref bean="car"/>
	<ref bean="car2"/>
</util:list>

<bean class="com.atguigu.spring.beans.collection.Person" id="person5" p:name="Queen" p:age="40" p:cars-ref="cars"></bean>
自动装配
Spring IOC 容器可以自动装配 Bean. 需要做的仅仅是在 <bean> 的 autowire 属性里指定自动装配的模式
byType(根据类型自动装配): 若 IOC 容器中有多个与目标 Bean 类型一致的 Bean. 在这种情况下, Spring 将无法判定哪个 Bean 最合适该属性, 所以不能执行自动装配.
byName(根据名称自动装配): 必须将目标 Bean 的名称和属性名设置的完全相同.
constructor(通过构造器自动装配): 当 Bean 中存在多个构造器时, 此种自动装配方式将会很复杂. 不推荐使用
Address.java
public class Address {
	private String city;
	private String street;
	... ...
}
Car.java
public class Car {
	private String brand;
	private double price;
	... ...
}
Person.java
public class Person {
	private String name;
	private Address address;
	private Car car;
	... ...
}
beans-autowire.xml
<bean class="com.atguigu.spring.beans.autowire.Address" id="address" p:city="ShiJiaZhuang" p:street="PingAnDaJie"></bean>

<bean class="com.atguigu.spring.beans.autowire.Car" id="car" p:brand="Audo" p:price="300000"></bean>

<bean class="com.atguigu.spring.beans.autowire.Person" id="person" p:name="Tom" autowire="byName"></bean>
bean之间的关系
bean之间有两种关系:
- 继承
- 依赖
继承Bean配置
Spring 允许继承 bean 的配置, 被继承的 bean 称为父 bean. 继承这个父 Bean 的 Bean 称为子 Bean
子 Bean 从父 Bean 中继承配置, 包括 Bean 的属性配置
子 Bean 也可以覆盖从父 Bean 继承过来的配置
父 Bean 可以作为配置模板, 也可以作为 Bean 实例. 若只想把父 Bean 作为模板, 可以设置 的abstract 属性为 true, 这样 Spring 将不会实例化这个 Bean
并不是 <bean> 元素里的所有属性都会被继承. 比如: autowire, abstract 等.
也可以忽略父 Bean 的 class 属性, 让子 Bean 指定自己的类, 而共享相同的属性配置. 但此时 abstract 必须设为 true
beans-relation.xml
<bean class="com.atguigu.spring.beans.autowire.Address" id="address" p:city="ShiJiaZhuang" p:street="PingAnDaJie"></bean>
<bean class="com.atguigu.spring.beans.autowire.Address" id="address2" p:street="ZhongShanLu" parent="address"></bean>
Main.java
public static void main(String[] args) {
	ApplicationContext ctx = new ClassPathXmlApplicationContext("beans-relation.xml");
	Address address = (Address) ctx.getBean("address");
	Address address2 = (Address) ctx.getBean("address2");
	System.out.println(address);
	System.out.println(address2);
}
依赖Bean配置
Spring 允许用户通过 depends-on 属性设定 Bean 前置依赖的Bean,前置依赖的 Bean 会在本 Bean 实例化之前创建好
如果前置依赖于多个 Bean,则可以通过逗号,空格或的方式配置 Bean 的名称
beans-relation.xml
<bean class="com.atguigu.spring.beans.autowire.Car" id="car" p:brand="Audo" p:price="250000"></bean>
<!-- 要求在配置Person时,必须有一个关联的car,换句话说,person这个bean依赖于Car这个bean -->
<bean class="com.atguigu.spring.beans.autowire.Person" id="person" p:address-ref="address" p:name="Tom" depends-on="car"></bean>
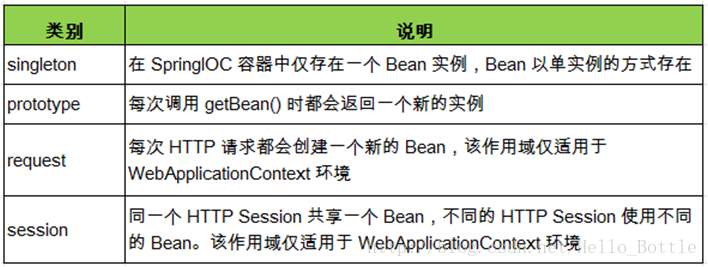
Bean的作用域
在 Spring 中, 可以在 元素的 scope 属性里设置 Bean 的作用域.
默认情况下, Spring 只在初始化时为每个在 IOC 容器里声明的 Bean 创建唯一一个实例,单例的,整个 IOC 容器范围内都能共享该实例:所有后续的 getBean() 调用和 Bean 引用都将返回这个唯一的 Bean 实例.该作用域被称为 singleton, 它是所有 Bean 的默认作用域.
使用外部属性文件
在配置文件里配置 Bean 时, 有时需要在 Bean 的配置里混入系统部署的细节信息(例如: 文件路径, 数据源配置信息等). 而这些部署细节实际上需要和 Bean 配置相分离,否则修改的时候需要在大量的bean配置文件中进行查找,过于麻烦。
Spring 提供了一个 PropertyPlaceholderConfigurer 的 BeanFactory 后置处理器, 这个处理器允许用户将 Bean 配置的部分内容外移到属性文件中. 可以在 Bean 配置文件里使用形式为 ${var} 的变量, PropertyPlaceholderConfigurer 从属性文件里加载属性, 并使用这些属性来替换变量.
Spring 还允许在属性文件中使用 ${propName},以实现属性之间的相互引用。
Spring2.5之后,可通过引入context命名空间来注册 PropertyPlaceholderConfigurer
- <beans> 中添加 context Schema 定义
- 在配置文件中加入如下配置:<context:property-placeholder location=“classpath:db.properties”/>
db.properties
user=root
password=1230
driverclass=com.mysql.jdbc.Driver
jdbcurl=jdbc:mysql:///test
beans-properties.xml
<context:property-placeholder location="classpath:db.properties"/>
<bean class="com.mchange.v2.c3p0.ComboPooledDataSource" id="dataSource">
	<property name="user" value="${user}"></property>
	<property name="password" value="${password}"></property>
	<property name="driverClass" value="${driverclass}"></property>
	<property name="jdbcUrl" value="${jdbcurl}"></property>
</bean>
Main.java
public static void main(String[] args) throws SQLException {
	ApplicationContext ctx = new ClassPathXmlApplicationContext("beans-properties.xml");
	DataSource dataSource = (DataSource) ctx.getBean("dataSource");

	System.out.println(dataSource.getConnection());
}
SpEL
Spring 表达式语言(简称SpEL):是一个支持运行时查询和操作对象图的强大的表达式语言。
语法类似于 EL:SpEL 使用 #{…} 作为定界符,所有在大框号中的字符都将被认为是 SpEL
SpEL 为 bean 的属性进行动态赋值提供了便利
Bean的生命周期
Spring IOC 容器可以管理 Bean 的生命周期, Spring 允许在 Bean 生命周期的特定点执行定制的任务.
Spring IOC 容器对 Bean 的生命周期进行管理的过程:
- 通过构造器或工厂方法创建 Bean 实例
- 为 Bean 的属性设置值和对其他 Bean 的引用
- 调用 Bean 的初始化方法
- Bean 可以使用了
- 当容器关闭时, 调用 Bean 的销毁方法
在 Bean 的声明里设置 init-method 和 destroy-method 属性, 为 Bean 指定初始化和销毁方法.
Car.java
public class Car {
	private String brand;

	public void init(){
		System.out.println("init...");
	}

	public void destory(){
		System.out.println("destory...");
	}

	... ...
}
beans-cycle.xml
<bean class="com.atguigu.spring.beans.cycle.Car" id="car" init-method="init" destroy-method="destory">
	<property name="brand" value="Audi"></property>
</bean>
Main.java
public static void main(String[] args) {
	ClassPathXmlApplicationContext ctx = new ClassPathXmlApplicationContext("beans-cycle.xml");
	Car car = (Car) ctx.getBean("car");
	System.out.println(car);
	ctx.close();
}
Bean后置处理器
Bean 后置处理器允许在调用初始化方法前后对 Bean 进行额外的处理.
Bean 后置处理器对 IOC 容器里的所有 Bean 实例逐一处理, 而非单一实例. 其典型应用是: 检查 Bean 属性的正确性或根据特定的标准更改 Bean 的属性.
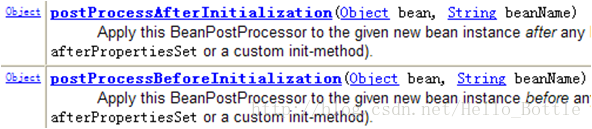
对Bean 后置处理器而言, 需要实现 org.springframework.beans.factory.config.BeanPostProcessor 接口. 在初始化方法被调用前后, Spring 将把每个 Bean 实例分别传递给上述接口的以下两个方法:
Spring IOC 容器对 Bean 的生命周期进行管理的过程:
- 通过构造器或工厂方法创建 Bean 实例
- 为 Bean 的属性设置值和对其他 Bean 的引用
- 将 Bean 实例传递给 Bean 后置处理器的 postProcessBeforeInitialization 方法
- 调用 Bean 的初始化方法
- 将 Bean 实例传递给 Bean 后置处理器的 postProcessAfterInitialization方法
- Bean 可以使用了
- 当容器关闭时, 调用 Bean 的销毁方法
bean-cycle.xml
<bean class="com.atguigu.spring.beans.cycle.Car" id="car" init-method="init" destroy-method="destory">
	<property name="brand" value="Audi"></property>
</bean>
<!-- 配置bean的后置处理器,不需要配置id,IOC容器自动识别是一个BeanPostProcessor -->
<bean class="com.atguigu.spring.beans.cycle.MyBeanPostProcessor"></bean>
MyBeanPostProcessor.java
public class MyBeanPostProcessor implements BeanPostProcessor {

	@Override
	public Object postProcessAfterInitialization(Object bean, String beanName)
			throws BeansException {
		System.out.println("postProcessAfterInitialization: " + bean + ", " + beanName);
		return bean;
	}

	@Override
	public Object postProcessBeforeInitialization(Object bean, String beanName)
			throws BeansException {
		System.out.println("postProcessBeforeInitialization: " + bean + ", " + beanName);
		//bean:bean实例本身
		//beanName:IOC容器配置的bean的名字
		//返回值:是实际上返回给用户的那个Bean,注意:可以在以上两个方法中修改返回的bean,甚至返回一个新的bean
		Car car = new Car("Ford");
		return car;
	}
}
通过工厂方法配置Bean
通过调用静态工厂方法创建Bean
调用静态工厂方法创建 Bean是将对象创建的过程封装到静态方法中. 当客户端需要对象时, 只需要简单地调用静态方法, 而不同关心创建对象的细节.
要声明通过静态方法创建的 Bean, 需要在 Bean 的 class 属性里指定拥有该工厂的方法的类, 同时在 factory-method 属性里指定工厂方法的名称. 最后, 使用 <constrctor-arg> 元素为该方法传递方法参数
Car.java
public class Car {
	private String brand;
	private double price;
	... ...
}
StaticCarFactory.java
public class StaticCarFactory {
	private static Map<String, Car> cars = new HashMap<String, Car>();

	static{
		cars.put("audi", new Car("audi", 300000));
		cars.put("ford", new Car("ford", 400000));
	}

	public static Car getCar(String name){
		return cars.get(name);
	}
}
beans-factory.xml
<!-- 通过静态工厂方法配置Bean,注意不是配置静态工厂方法实例,而是配置bean的实例 -->
<!--
	class属性:指向静态工厂方法的全类名
	factory-method:指向静态工厂方法的名字
	constructor-arg:如果工厂方法需要传入参数,则使用constructor-arg来配置参数
 -->
<bean class="com.atguigu.spring.beans.factory.StaticCarFactory" id="car" factory-method="getCar">
	<constructor-arg value="audi"></constructor-arg>
</bean>
Main.java
public static void main(String[] args) {
	ApplicationContext ctx = new ClassPathXmlApplicationContext("beans-factory.xml");
	Car car = (Car) ctx.getBean("car");
	System.out.println(car);
}
通过调用实例工厂方法创建Bean
实例工厂方法: 将对象的创建过程封装到另外一个对象实例的方法里. 当客户端需要请求对象时, 只需要简单的调用该实例方法而不需要关心对象的创建细节.
要声明通过实例工厂方法创建的 Bean
- 在 bean 的 factory-bean 属性里指定拥有该工厂方法的 Bean
- 在 factory-method 属性里指定该工厂方法的名称
- 使用 construtor-arg 元素为工厂方法传递方法参数
InstanceCarFactory.java
public class InstanceCarFactory {
	private Map<String, Car> cars = null;
	public InstanceCarFactory() {
		cars = new HashMap<String, Car>();
		cars.put("audi", new Car("audi", 300000));
		cars.put("ford", new Car("ford", 400000));
	}

	public Car getCar(String brand) {
		return cars.get(brand);
	}
}
beans-factory.xml
<!-- 配置工厂的实例 -->
<!--
	class属性:指向实例工厂方法的全类名
	factory-method:指向实例工厂方法的名字
	constructor-arg:如果工厂方法需要传入参数,则使用constructor-arg来配置参数
 -->
<bean class="com.atguigu.spring.beans.factory.InstanceCarFactory" id="instanceCarFactory"></bean>
<!-- 通过实例工厂方法来配置bean -->
<bean id="car2" factory-bean="instanceCarFactory" factory-method="getCar">
	<constructor-arg value="ford"></constructor-arg>
</bean>
Main.java
public class Main {
	public static void main(String[] args) {
		ApplicationContext ctx = new ClassPathXmlApplicationContext("beans-factory.xml");

		Car car2 = (Car) ctx.getBean("car2");
		System.out.println(car2);
	}
}
通过FactoryBean配置Bean
Spring 中有两种类型的 Bean, 一种是普通Bean, 另一种是工厂Bean, 即FactoryBean.
工厂 Bean 跟普通Bean不同, 其返回的对象不是指定类的一个实例, 其返回的是该工厂 Bean 的 getObject 方法所返回的对象
Car.java
public class Car {
	private String brand;
	private double price;
	... ...
}
CarFactoryBean.java
public class CarFactoryBean implements FactoryBean<Car> {

	private String brand;

	public void setBrand(String brand) {
		this.brand = brand;
	}

	public Car getObject() throws Exception {
		return new Car(brand, 500000);
	}

	public Class<?> getObjectType() {
		return Car.class;
	}

	public boolean isSingleton() {
		return true;
	}
}
beans-factorybean.xml
<!--
	通过FactoryBean来配置Bean的实例
	class:指向FactoryBean的全类名
	property:配置FactoryBean的属性

	但实际返回的实例确实FactoryBean的getObject()方法返回的实例
 -->
 <bean class="com.atguigu.spring.beans.factorybean.CarFactoryBean" id="car">
 	<property name="brand" value="BMW"></property>
 </bean>
Main.java
public class Main {
	public static void main(String[] args) {
		ApplicationContext ctx = new ClassPathXmlApplicationContext("beans-factorybean.xml");
		Car car = (Car) ctx.getBean("car");
		System.out.println(car);
	}
}
基于注解的方式
需要加入jar包:spring-aop-5.0.2.RELEASE.jar
组件扫描(component scanning): Spring 能够从 classpath 下自动扫描, 侦测和实例化具有特定注解的组件.
特定组件包括:
- @Component: 基本注解, 标识了一个受 Spring 管理的组件
- @Respository: 标识持久层组件
- @Service: 标识服务层(业务层)组件
- @Controller: 标识表现层组件
对于扫描到的组件, Spring 有默认的命名策略: 使用非限定类名, 第一个字母小写. 也可以在注解中通过 value 属性值标识组件的名称
当在组件类上使用了特定的注解之后, 还需要在 Spring 的配置文件中声明 <context:component-scan> :
- base-package 属性指定一个需要扫描的基类包,Spring 容器将会扫描这个基类包里及其子包中的所有类.
- 当需要扫描多个包时, 可以使用逗号分隔.
- 如果仅希望扫描特定的类而非基包下的所有类,可使用 resource-pattern 属性过滤特定的类
- <context:include-filter> 子节点表示要包含的目标类
- <context:exclude-filter> 子节点表示要排除在外的目标类
- <context:component-scan> 下可以拥有若干个 <context:include-filter> 和 <context:exclude-filter> 子节点
- <context:include-filter> 和 <context:exclude-filter> 子节点支持多种类型的过滤表达式:
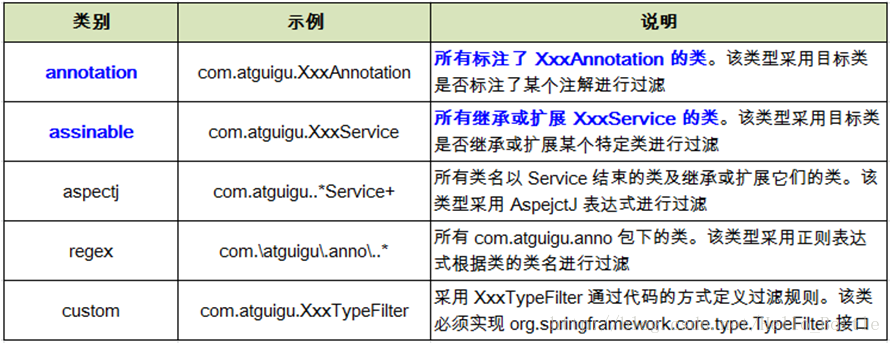
UsreRepository.java
package com.atguigu.spring.beans.annotation.repository;

public interface UserRepository {
	void save();
}
UserRepositoryImpl.java
package com.atguigu.spring.beans.annotation.repository;
import org.springframework.stereotype.Repository;

@Repository(value="userRepository")
public class UserRepositoryImpl implements UserRepository {
	@Override
	public void save() {
		System.out.println("UserRepositoryImpl's save...");
	}
}
UserService.java
package com.atguigu.spring.beans.annotation.service;
import org.springframework.stereotype.Service;

@Service
public class UserService {
	public void add() {
		System.out.println("UserService add...");
	}
}
UserController.java
package com.atguigu.spring.beans.annotation.controller;
import org.springframework.stereotype.Controller;

@Controller
public class UserController {
	public void execute(){
		System.out.println("UserController execute...");
	}
}
TestObject.java
package com.atguigu.spring.beans.annotation;
import org.springframework.stereotype.Component;

@Component
public class TestObject {
}
beans-annotation.xml
	<!--
	<context:component-scan base-package="com.atguigu.spring.beans.annotation">
	</context:component-scan>
	 -->

	<!-- 添加resource-pattern属性表示只扫描该路径下的类 -->
	<!--
	<context:component-scan base-package="com.atguigu.spring.beans.annotation"
		resource-pattern="controller/*.class"
	></context:component-scan>
	-->
	<!-- context:exclude-filter子节点指定排除哪些指定表达式的组件 -->
	<!--
	<context:component-scan base-package="com.atguigu.spring.beans.annotation">
		<context:exclude-filter type="annotation" expression="org.springframework.stereotype.Repository"/>
	</context:component-scan>
	 -->
	<!-- context:include-filter子节点指定包含哪些指定表达式的组件,该组件需配合use-default-filters使用 -->
	<!--
	<context:component-scan base-package="com.atguigu.spring.beans.annotation" use-default-filters="false">
		<context:include-filter type="annotation" expression="org.springframework.stereotype.Repository"/>
	</context:component-scan>
	 -->

	<!-- 过滤使用assignable类型 -->
	<context:component-scan base-package="com.atguigu.spring.beans.annotation" use-default-filters="false">
		<context:include-filter type="assignable" expression="com.atguigu.spring.beans.annotation.repository.UserRepository"/>
	</context:component-scan>
Main.java
public class Main {
	public static void main(String[] args) {
		ApplicationContext ctx = new ClassPathXmlApplicationContext("beans-annotation.xml");

		TestObject to = (TestObject) ctx.getBean("testObject");
		System.out.println(to);

		UserRepository userRepository = (UserRepository) ctx.getBean("userRepository");
		System.out.println(userRepository);

		UserService userService = (UserService) ctx.getBean("userService");
		System.out.println(userService);

		UserController userController = (UserController) ctx.getBean("userController");
		System.out.println(userController);
	}
}
组件装配
当Bean之间存在有关联关系的时候,我们就可以使用组件的自动装配
<context:component-scan> 元素会自动注册 AutowiredAnnotationBeanPostProcessor 实例, 该实例可以自动装配具有 @Autowired 和 @Resource 、@Inject注解的属性.
使用 @Autowired 自动装配 Bean
@Autowired 注解自动装配具有兼容类型的单个 Bean属性
-
构造器, 普通字段(即使是非 public), 一切具有参数的方法都可以应用@Authwired 注解
-
默认情况下, 所有使用 @Authwired 注解的属性都需要被设置. 当 Spring 找不到匹配的 Bean 装配属性时, 会抛出异常, 若某一属性允许不被设置, 可以设置 @Authwired 注解的 required 属性为 false
-
默认情况下, 当 IOC 容器里存在多个类型兼容的 Bean 时, 通过类型的自动装配将无法工作. 此时可以在 @Qualifier 注解里提供 Bean 的名称. Spring 允许对方法的入参标注 @Qualifiter 已指定注入 Bean 的名称
-
@Authwired 注解也可以应用在数组类型的属性上, 此时 Spring 将会把所有匹配的 Bean 进行自动装配.
-
@Authwired 注解也可以应用在集合属性上, 此时 Spring 读取该集合的类型信息, 然后自动装配所有与之兼容的 Bean.
-
@Authwired 注解用在 java.util.Map 上时, 若该 Map 的键值为 String, 那么 Spring 将自动装配与之 Map 值类型兼容的 Bean, 此时 Bean 的名称作为键值
UserRepository.java
public interface UserRepository {
	void save();
}
UserRepositoryImpl.java
//@Repository(value="userRepository")
@Repository
public class UserRepositoryImpl implements UserRepository {

	@Autowired(required=false)
	private TestObject testObject;

	public void save() {
		System.out.println("UserRepositoryImpl's save...");
		System.out.println(testObject);
	}

}
UserJdbcRepository.java
@Repository
public class UserJdbcRepository implements UserRepository{

	public void save() {
		System.out.println("UserJdbcRepository save...");
	}
}
UserService.java
@Service
public class UserService {
	//@Autowired
	//@Qualifier("userRepositoryImpl")
	private UserRepository userRepository;

	@Autowired
	public void setUserRepository(@Qualifier("userRepositoryImpl") UserRepository userRepository) {
		this.userRepository = userRepository;
	}

	public void add() {
		System.out.println("UserService add...");
		userRepository.save();
	}
}
UserController.java
@Controller
public class UserController {
	@Autowired
	private UserService userService;

	public void execute(){
		System.out.println("UserController execute...");
		userService.add();
	}
}
TestObject.java
//@Component
public class TestObject {

}
Main.java
public class Main {
	public static void main(String[] args) {
		ApplicationContext ctx = new ClassPathXmlApplicationContext("beans-annotation.xml");
		UserController userController = (UserController) ctx.getBean("userController");

		System.out.println(userController);
		userController.execute();
	}
}
注意:
1.当bean之间存在关联关系的时候,只要在属性private UserService userService;前加@Autowired注解就可以自动装配;如果存在set方法,在set方法前加上注解也可以自动装配。
2.如果IOC容器中bean不存在,即如果调用了ObjectTest并且加上了自动装配,但ObjectTest前并没有加@Component注释,就会报错
3.如果IOC容器中找不到bean,但是注释自动装配的时候添加了属性required=false,name结果是null,但不会报错
4.如果IOC有好几个类型匹配的bean,既有UserRespositoryImpl也有UserJdbcRespository,那么会先匹配名字
- 如果注释的时候添加了属性@Repository(value=“userRepository”),那么会匹配它;
- 如果没有添加属性,只有一个注释@Repository,那么会报错;
- 或者在自动装配的时候添加注释的时候提供bean的名称@Qualifier(“userRepositoryImpl”),或者在入参的时候进行指定
即:
@AutoWired:
作用:自动按照类型注入。只要容器中有唯一的类型匹配,则可以直接注入成功。如果没有匹配的类型就报错。
如果有多个匹配类型时,会先按照配型找到符合条件的对象,然后再用变量名称作为bean的id,从里面继续查找,如果找到仍然可以注入成功,如果没有匹配的id,则报错。
细节:当使用此注解注入时,set方法就可以省略了
属性:
required:是否必须注入成功,取值是true(默认值)/false。当取值是true时,没有匹配的对象就报错
@Qualifier
作用:再自动按照配型注入的基础之上,再按照bean的id注入,在给类成员注入时,它不能够独立使用。
属性:value:用于指定bean的id。
@Resource
作用:直接按照bean的id注入
属性:name:用于指定bean的id
泛型依赖注入
Spring 4.x 中可以为子类注入子类对应的泛型类型的成员变量的引用
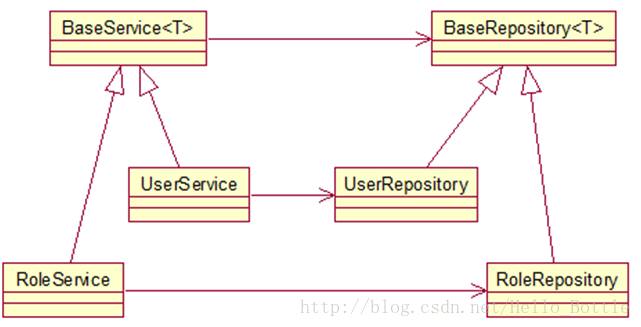
BaseRepository.java
public class BaseRepository<T> {
}
BaseService.java
public class BaseService<T> {

	@Autowired
	protected BaseRepository<T> repository;

	public void add(){
		System.out.println("add...");
		System.out.println(repository);
	}
}
UserRepository.java
@Repository
public class UserRepository extends BaseRepository<User> {
}
UserService.java
@Service
public class UserService extends BaseService<User> {
}
beans-generic.xml
<context:component-scan base-package="com.atguigu.spring.beans.generic.di"></context:component-scan>
Main.java
	public static void main(String[] args) {
		ApplicationContext ctx = new ClassPathXmlApplicationContext("beans-generic.xml");
		UserService userService = (UserService) ctx.getBean("userService");
		userService.add();
	}
输出结果:
add...
com.atguigu.spring.beans.generic.di.UserRepository@6632060c
当BaseService中有BaseRepository的引用变量,并且这个引用变量被@Autowired标识,
UserService类中添加注解@Service,交给IOC容器来管理
UserRepository类中注解@Repository,交给IOC容器来管理
这样当我们在Main中使用UserService中的方法时,会自动注入泛型
AOP
AOP基础
AOP(Aspect-Oriented Programming, 面向切面编程): 是一种新的方法论, 是对传统 OOP(Object-Oriented Programming, 面向对象编程) 的补充.
AOP 的主要编程对象是切面(aspect), 而切面模块化横切关注点.
在应用 AOP 编程时, 仍然需要定义公共功能, 但可以明确的定义这个功能在哪里, 以什么方式应用, 并且不必修改受影响的类. 这样一来横切关注点就被模块化到特殊的对象(切面)里.
AOP 的好处:
- 每个事物逻辑位于一个位置, 代码不分散, 便于维护和升级
- 业务模块更简洁, 只包含核心业务代码.
AOP术语
切面(Aspect): 横切关注点(跨越应用程序多个模块的功能)被模块化的特殊对象
通知(Advice): 切面必须要完成的工作
目标(Target): 被通知的对象
代理(Proxy): 向目标对象应用通知之后创建的对象
连接点(Joinpoint):程序执行的某个特定位置:如类某个方法调用前、调用后、方法抛出异常后等。连接点由两个信息确定:方法表示的程序执行点;相对点表示的方位。例如 ArithmethicCalculator#add() 方法执行前的连接点,执行点为 ArithmethicCalculator#add(); 方位为该方法执行前的位置
切点(pointcut):每个类都拥有多个连接点:例如 ArithmethicCalculator 的所有方法实际上都是连接点,即连接点是程序类中客观存在的事务。AOP 通过切点定位到特定的连接点。类比:连接点相当于数据库中的记录,切点相当于查询条件。切点和连接点不是一对一的关系,一个切点匹配多个连接点,切点通过 org.springframework.aop.Pointcut 接口进行描述,它使用类和方法作为连接点的查询条件。
注解通知
前置通知
1.加入jar包
com.springsource.org.aopalliance-1.0.0.jar
com.springsource.org.aspectj.weaver-1.6.8.RELEASE.jar
spring-aop-4.0.0.RELEASE.jar
spring-aspects-4.0.0.RELEASE.jar
commons-logging-1.1.1.jar
spring-beans-4.0.0.RELEASE.jar
spring-context-4.0.0.RELEASE.jar
spring-core-4.0.0.RELEASE.jar
spring-expression-4.0.0.RELEASE.jar
2.在配置文件中加入aop的命名空间
3.基于注解的方式:
①在配置文件中加入如下配置:
<aop:aspectj-autoproxy></aop:aspectj-autoproxy>
②把横切关注点的代码抽象到切面的类中
i. 切面首先是一个IOC中的bean,即加入@Component注解
ii.切面还需要加入@Aspect注解
③在类中声明各种通知
AspectJ 支持 5 种类型的通知注解:
- @Before: 前置通知, 在方法执行之前执行
- @After: 后置通知, 在方法执行之后执行
- @AfterRunning: 返回通知, 在方法返回结果之后执行
- @AfterThrowing: 异常通知, 在方法抛出异常之后
- @Around: 环绕通知, 围绕着方法执行
i.声明一个方法
ii.在方法前加入@Before注释
④可以在通知方法中声明一个类型为JoinPoint的参数,然后就能访问链接细节,如方法名称和参数值
ArithmeticCaculator.java
public interface ArithmeticCalculator {

	int add(int i, int j);
	int sub(int i, int j);

	int mul(int i, int j);
	int div(int i, int j);
}
ArithmeticCalculatorImpl.java
@Component("arithmeticCalculator")
public class ArithmeticCalculatorImpl implements ArithmeticCalculator {

	@Override
	public int add(int i, int j) {
		int result = i + j;
		return result;
	}

	@Override
	public int sub(int i, int j) {
		int result = i - j;
		return result;
	}

	@Override
	public int mul(int i, int j) {
		int result = i * j;
		return result;
	}

	@Override
	public int div(int i, int j) {
		int result = i / j;
		return result;
	}
}
LoggingAspect.java
//把这个类声明为一个切面:需要把该类放入到IOC容器中,再声明为一个切面
@Aspect
@Component
public class LoggingAspect {

	//声明该方法是一个前置通知: 在目标方法开始之前执行
	//* 代表匹配任意修饰符及任意返回值, 参数列表中的 .. 匹配任意数量的参数

	//@Before("execution(public int com.atguigu.spring.aop.impl.ArithmeticCalculator.add(int, int))")
	@Before("execution(* com.atguigu.spring.aop.impl.*.*(..))")
	public void beforeMethod(JoinPoint joinPoint){
		String methodName = joinPoint.getSignature().getName();
		List<Object> args = Arrays.asList(joinPoint.getArgs());
		System.out.println("The method " + methodName + " begins with " + args);
	}
}
applicationContext.xml
<context:component-scan base-package="com.atguigu.spring.aop.impl"></context:component-scan>

<!-- 使AspjectJ注释起作用:自动为匹配的类生成代理对象 -->
<aop:aspectj-autoproxy></aop:aspectj-autoproxy>
Main.java
public class Main {

	public static void main(String[] args) {
		//1. 创建 Spring 的IOC容器
		ApplicationContext ctx = new ClassPathXmlApplicationContext("applicationContext.xml");
		//2. 从IOC容器中获取 bean 的实例
		ArithmeticCalculator arithmeticCalculator = ctx.getBean(ArithmeticCalculator.class);
		//3. 使用bean
		int result = arithmeticCalculator.add(1, 3);
		System.out.println("result: " + result);

		result = arithmeticCalculator.div(6, 2);
		System.out.println("result: " + result);
	}
}
后置通知
LoggingAspect.java
@Aspect
@Component
public class LoggingAspect {

	//后置通知:在目标方法执行后(无论是否发生异常),执行的通知
	//在后置通知中还不能访问目标方法执行的结果
	@After("execution(* com.atguigu.spring.aop.impl.*.*(..))")
	public void afterMethod(JoinPoint joinPoint){
		String methodName = joinPoint.getSignature().getName();
		System.out.println("The method " + methodName + " ends");
	}
}
返回通知
LoggingAspect.java
@Aspect
@Component
public class LoggingAspect {

	/**
	 * 返回通知
	 * 在方法正常结束后执行的代码
	 * 返回通知是可以访问到方法的返回值的
	 * @param joinPoint
	 * @param result
	 */
	@AfterReturning(value="execution(public int com.atguigu.spring.aop.impl.ArithmeticCalculator.*(..))", returning="result")
	public void afterReturning(JoinPoint joinPoint, Object result){
		String methodName = joinPoint.getSignature().getName();
		System.out.println("The method " + methodName + " ends with " + result);
	}
}
异常通知
LoggingAspect.java
@Aspect
@Component
public class LoggingAspect {

	/**
	 * 异常通知
	 * 在目标方法出现异常时会执行的代码
	 * 可以访问到异常对象,且可以指定在出现特定异常时再执行通知代码
	 * @param joinPoint
	 * @param e
	 */
	@AfterThrowing(value="execution(public int com.atguigu.spring.aop.impl.ArithmeticCalculator.*(..))", throwing="e")
	public void afterThrowing(JoinPoint joinPoint, Exception e){
		String methodName = joinPoint.getSignature().getName();
		System.out.println("The method " + methodName + " occurs excetion " + e);
	}
}
环绕通知
LoggingAspect.java
@Aspect
@Component
public class LoggingAspect {

	/**
	 * 环绕通知需要携带ProceedingJoinPoint类型的参数
	 * 环绕通知类似于动态代理的全过程:ProceedingJpinPoint 类型的参数可以决定是否执行目标方法
	 * 且环绕通知必须有返回值,返回值即为目标方法的返回值
	 */

	@Around("execution(public int com.atguigu.spring.aop.impl.ArithmeticCalculator.*(..))")
	public Object arroundMethod(ProceedingJoinPoint pjd){

		Object result = null;
		String methodName = pjd.getSignature().getName();
		try {
			//前置通知
			System.out.println("The method " + methodName + " begins with " + Arrays.asList(pjd.getArgs()));
			//执行目标方法
			result = pjd.proceed();
			//返回通知
			System.out.println("The method ends with " + result);
		} catch (Throwable e) {
			// TODO Auto-generated catch block
			//异常通知
			System.out.println("The method " + methodName + " occurs exception:" + e);
			throw new RuntimeException(e);
		}
		//后置通知
		System.out.println("The method " + methodName + " ends");
		return result;
	}
}
切面优先级
如果有两个或多个切面,可以通过在类上添加Order注解来表示优先级,即切面的先后顺序
VlidationAspect.java
//可以使用@Order注解指定切面的优先级,值越小优先级越高
@Order(1)
@Aspect
@Component
public class VlidationAspect {
	@Before(value="execution(public int com.atguigu.spring.aop.impl.ArithmeticCalculator.*(..))")
	public void beforeMethod(JoinPoint joinPoint){
		System.out.println("validate:" + Arrays.asList(joinPoint.getArgs()));
	}
}
重用切点表达式
LoggingAspect.java
@Order(2)
@Aspect
@Component
public class LoggingAspect {

	/**
	 * 定义一个方法,用于声明切入点表达式,一般的,该方法中再不需要填入其他的代码
	 * 使用@Pointcut来声明切入点表达式
	 */
	@Pointcut(value="execution(public int com.atguigu.spring.aop.impl.ArithmeticCalculator.*(..))")
	public void declareJointPointExpression(){}

	//声明该方法是一个前置通知: 在目标方法开始之前执行
	//* 代表匹配任意修饰符及任意返回值, 参数列表中的 .. 匹配任意数量的参数

	//@Before("execution(public int com.atguigu.spring.aop.impl.ArithmeticCalculator.add(int, int))")
	@Before("declareJointPointExpression()")
	public void beforeMethod(JoinPoint joinPoint){
		String methodName = joinPoint.getSignature().getName();
		List<Object> args = Arrays.asList(joinPoint.getArgs());
		System.out.println("The method " + methodName + " begins with " + args);
	}

	//后置通知:在目标方法执行后(无论是否发生异常),执行的通知
	//在后置通知中还不能访问目标方法执行的结果
	@After("declareJointPointExpression()")
	public void afterMethod(JoinPoint joinPoint){
		String methodName = joinPoint.getSignature().getName();
		System.out.println("The method " + methodName + " ends");
	}
}
如果在其他类中使用添加类名,如果在其他包中使用添加包名和类名
VlidationAspect.java
@Order(1)
@Aspect
@Component
public class VlidationAspect {
	@Before(value="com.atguigu.spring.aop.impl.LoggingAspect.declareJointPointExpression()")
	public void beforeMethod(JoinPoint joinPoint){
		System.out.println("validate:" + Arrays.asList(joinPoint.getArgs()));
	}
}
基于配置文件的方式配置AOP
除了使用 AspectJ 注解声明切面, Spring 也支持在 Bean 配置文件中声明切面. 这种声明是通过 aop schema 中的 XML 元素完成的.
正常情况下, 基于注解的声明要优先于基于 XML 的声明. 通过 AspectJ 注解, 切面可以与 AspectJ 兼容, 而基于 XML 的配置则是 Spring 专有的. 由于 AspectJ 得到越来越多的 AOP 框架支持, 所以以注解风格编写的切面将会有更多重用的机会.
当使用 XML 声明切面时, 需要在 <beans> 根元素中导入 aop Schema
applicationContext-xml.xml
<!-- 配置bean -->
<bean class="com.atguigu.spring.aop.impl.ArithmeticCalculatorImpl" id="arithmeticCalculator"></bean>

<!-- 配置切面的bean -->
<bean class="com.atguigu.spring.aop.impl.LoggingAspect" id="loggingAspect"></bean>
<bean class="com.atguigu.spring.aop.impl.VlidationAspect" id="vlidationAspect"></bean>

<!-- 配置AOP -->
<aop:config>
	<!-- 配置切点表达式 -->
	<aop:pointcut expression="execution(* com.atguigu.spring.aop.impl.ArithmeticCalculator.*(..))" id="pointcut"/>
	<!-- 配置切面及通知 -->
	<aop:aspect ref="loggingAspect" order="2">
		<aop:before method="beforeMethod" pointcut-ref="pointcut"/>
		<aop:after method="afterMethod" pointcut-ref="pointcut"/>
		<aop:after-throwing method="afterThrowing" pointcut-ref="pointcut" throwing="e"/>
		<aop:after-returning method="afterReturning" pointcut-ref="pointcut" returning="result"/>
		<!--
		<aop:around method="arroundMethod" pointcut-ref="pointcut"/>
		 -->
	</aop:aspect>
	<aop:aspect ref="vlidationAspect" order="1">
		<aop:before method="beforeMethod" pointcut-ref="pointcut"/>
	</aop:aspect>
</aop:config>


 869
869


 被折叠的 条评论
为什么被折叠?
被折叠的 条评论
为什么被折叠?
 到【灌水乐园】发言


