


centos安装elasticsearch
前言
本系列学习笔记测试环境基于liunx系统搭建,系统环境为centos7.9,elasticsearch版本为7.13.4,水平有限,欢迎指导

安装elasticsearch
1. 下载Elasticsearch
到官网下载对应文件并解压 https://www.elastic.co/cn/downloads/elasticsearch
wget https://artifacts.elastic.co/downloads/elasticsearch/elasticsearch-7.13.4-linux-aarch64.tar.gz

2. 解压文件
tar -zxvf elasticsearch-7.13.4-linux-aarch64.tar.gz -C /opt/elasticsearch/

3. 修改配置文件
主要配置文件在config文件夹中jvm.options和elasticsearch.yml
修改jvm.options中-Xms4g和-Xmsx4g,根据自己主机内存调整大小
path.data: /opt/elasticsearch/data
path.log: /opt/elasticsearch/logs
4. 启动Elasticsearch
./bin/elasticsearch -d

不能用 root账号启动es,
创建账号 例如 elastic
启动:
报错
ElasticsearchException[Failure running machine learning native code. This could be due to running on an unsupported OS or distribution, missing OS libraries, or a problem with the temp directory. To bypass this problem by running Elasticsearch without machine learning functionality set [xpack.ml.enabled: false].]

编辑elasticsearch.yml
末尾添加:
xpack.ml.enabled: false
启动es

报错 :the default discovery settings are unsuitable for production use; at least one of [discovery.seed_hosts, discovery.seed_providers, cluster.initial_master_nodes] must be configured
解决:
discovery.seed_hosts, discovery.seed_providers, cluster.initial_master_nodes 至少设置一个
报错 : max virtual memory areas vm.max_map_count [65530] is too low, increase to at least [262144]
解决:修改一个进程能拥有最大内存区域限制 编辑 /etc/sysctl.conf加入下面内容 ,保存后 执行 sysctl -p.
vm.max_map_count = 262144
vm.swappiness = 1
再次启动
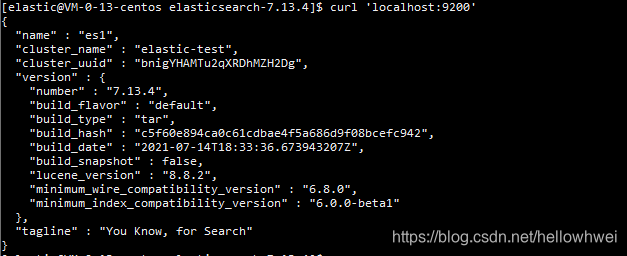
执行curl 'localhost:9200'


 1万+
1万+


 被折叠的 条评论
为什么被折叠?
被折叠的 条评论
为什么被折叠?
 到【灌水乐园】发言


