


FFmpeg is a powerful command line tool for handling video, audio and other multimedia files and streams. It is any video developer's utility for editing, transcoding, and remuxing virtually any format. It is developed in C and available for most platforms.
FFmpeg is not just a command line tool, though. It is powered by the FFmpeg libraries known as libav. These libraries enable FFmpeg to read, write and manipulate multimedia files. These libraries provide functionality for remuxing, encoding and decoding, filtering, scaling, colorspace conversion and device interfacing. You can use these libraries directly if you're writing an application in C/C++. There are also libav bindings available for most common languages.
What if you could use FFmpeg's libraries in the browser?
JavaScript in the browser is a different story. It is not designed to run system applications in the browser environment. So how can we run FFmpeg in the browser? WebAssembly!
WebAssembly (or Wasm) has been gaining popularity recently allowing us to run binary instructions in the browser, along with a compiler toolchain, Emscripten to help us build and port C/C++ code to Wasm.
This has already been done before. You can check out ffmpeg.wasm for running the FFmpeg CLI in the browser environment.
However, this guide's focus will step through the process on building FFmpeg's libav libraries for use in the browser via Web Assembly, rather than the FFmpeg CLI application.
Why? 🤔
FFmpeg in the browser won't have the greatest performance compared to running it natively on a system that can take advantage of threaded processing and hardware acceleration.
Normally, you would just build a back-end that wraps FFmpeg or libav and relay to the front-end to provide results.
However, we can still take advantage of the vast features of FFmpeg's libraries such as parsing format and codec information, decoding frames, applying filters and more. Imagine if we can do this purely in JavaScript, within the browser environment on a static webpage.
Hello World in libav
Let's start by writing a simple program in C to print out basic media information using libav. Let's name it mp4info.c.
If you are not familiar with libav, ffmpeg-libav-tutorial is a great introduction.
#include <stdio.h>
#include <libavformat/avformat.h>

static AVFormatContext *fmt_ctx;

int main(int argc, const char *argv[])
{
  if (argc < 2) {
    printf("Please specify a media file.\n");
    return -1;
  }

  // Open the file and read header.
  int ret;
  if ((ret = avformat_open_input(&fmt_ctx, argv[1], NULL, NULL)) < 0) {
      printf("%s", av_err2str(ret));
      return ret;
  }

  // Read container data.
  printf("format: %s, duration: %ld us, streams: %d\n",
    fmt_ctx->iformat->name,
    fmt_ctx->duration,
    fmt_ctx->nb_streams);

  return 0;
}
This is a basic program that takes a media file as an argument and prints out the format name, duration and stream count.
Compile and run the program:
Download Tears of Steel 10s Example
gcc src/mp4info.c -lavformat -lavutil -o bin/mp4info
./bin/mp4info tears-of-steel-10s.mp4
gcc, ffmpeg and ffmpeg-dev are required to build.
You should get the following output.
format: mov,mp4,m4a,3gp,3g2,mj2, duration: 10000000 us, streams: 2
Great! Now we can move onto the next step using Emscripten to compile FFmpeg, and build a wrapper for use within a JavaScript environment.
Emscripten
Emscripten is a compiler toolchain for for WebAssembly. We will use Docker and emscripten to build FFmpeg's libav and our custom wrapper code to Wasm. Let's start with FFmpeg first.
Compiling FFmpeg to Web Assembly
In our Dockerfile, we will use the base emscripten emsdk to build FFmpeg from source, along with the latest stable libx264 version.
Since we are compiling to WebAssembly, we will make a minimal build by disabling all programs and only enabling the features we are likely to use. This will help keep the binary size small and optimal.
FROM emscripten/emsdk:2.0.16 as build

ARG FFMPEG_VERSION=4.3.2
ARG X264_VERSION=20170226-2245-stable

ARG PREFIX=/opt/ffmpeg
ARG MAKEFLAGS="-j4"

# Build dependencies.
RUN apt-get update && apt-get install -y autoconf libtool build-essential

# Download and build x264.
RUN cd /tmp && \
  wget https://download.videolan.org/pub/videolan/x264/snapshots/x264-snapshot-${X264_VERSION}.tar.bz2 && \
  tar xvfj x264-snapshot-${X264_VERSION}.tar.bz2

RUN cd /tmp/x264-snapshot-${X264_VERSION} && \
  emconfigure ./configure \
  --prefix=${PREFIX} \
  --host=i686-gnu \
  --enable-static \
  --disable-cli \
  --disable-asm \
  --extra-cflags="-s USE_PTHREADS=1"

RUN cd /tmp/x264-snapshot-${X264_VERSION} && \
  emmake make && emmake make install

# Download ffmpeg release source.
RUN cd /tmp/ && \
  wget http://ffmpeg.org/releases/ffmpeg-${FFMPEG_VERSION}.tar.gz && \
  tar zxf ffmpeg-${FFMPEG_VERSION}.tar.gz && rm ffmpeg-${FFMPEG_VERSION}.tar.gz

ARG CFLAGS="-s USE_PTHREADS=1 -O3 -I${PREFIX}/include"
ARG LDFLAGS="$CFLAGS -L${PREFIX}/lib -s INITIAL_MEMORY=33554432"

# Configure and build FFmpeg with emscripten.
# Disable all programs and only enable features we will use.
# https://github.com/FFmpeg/FFmpeg/blob/master/configure
RUN cd /tmp/ffmpeg-${FFMPEG_VERSION} && \
  emconfigure ./configure \
  --prefix=${PREFIX} \
  --target-os=none \
  --arch=x86_32 \
  --enable-cross-compile \
  --disable-debug \
  --disable-x86asm \
  --disable-inline-asm \
  --disable-stripping \
  --disable-programs \
  --disable-doc \
  --disable-all \
  --enable-avcodec \
  --enable-avformat \
  --enable-avfilter \
  --enable-avdevice \
  --enable-avutil \
  --enable-swresample \
  --enable-postproc \
  --enable-swscale \
  --enable-filters \
  --enable-protocol=file \
  --enable-decoder=h264,aac,pcm_s16le \
  --enable-demuxer=mov,matroska \
  --enable-muxer=mp4 \
  --enable-gpl \
  --enable-libx264 \
  --extra-cflags="$CFLAGS" \
  --extra-cxxflags="$CFLAGS" \
  --extra-ldflags="$LDFLAGS" \
  --nm="llvm-nm -g" \
  --ar=emar \
  --as=llvm-as \
  --ranlib=llvm-ranlib \
  --cc=emcc \
  --cxx=em++ \
  --objcc=emcc \
  --dep-cc=emcc

RUN cd /tmp/ffmpeg-${FFMPEG_VERSION} && \
  emmake make -j4 && \
  emmake make install
docker build -t mp4info .
This will build and install ffmpeg libraries to /opt/ffmpeg. However, we still need to write our wrapper using the Hello World example we wrote earlier.
Writing the Wrapper
Now that we can build the FFmpeg libraries to Wasm, we need to create a wrapper that integrates the functionality of emscipten so we can import and use in JavaScript within the browser.
We will write our custom wrapper in C++ to take advantage of Embind.
From the documentation:
Embind is used to bind C++ functions and classes to JavaScript, so that the compiled code can be used in a natural way by “normal” JavaScript.
This will allow us to easily create bindings from C++ constructs. So let's get started!
Update our Hello World example to C++:
mp4info-wrapper.cpp:
#include <emscripten.h>
#include <emscripten/bind.h>
#include <inttypes.h>

#include <string>
#include <vector>

using namespace emscripten;

extern "C"
{
#include <libavformat/avformat.h>
};

typedef struct Response
{
  std::string format;
  int duration;
  int streams;
} Response;

static AVFormatContext *fmt_ctx;

Response run(std::string filename)
{
  // Open the file and read header.
  int ret;
  if ((ret = avformat_open_input(&fmt_ctx, filename.c_str(), NULL, NULL)) < 0)
  {
    printf("%s", av_err2str(ret));
  }

  // Read container data.
  printf("format: %s, duration: %lld us, streams: %d\n",
         fmt_ctx->iformat->name,
         fmt_ctx->duration,
         fmt_ctx->nb_streams);

  // Initialize response struct with format data.
  Response r = {
      .format = fmt_ctx->iformat->name,
      .duration = (int)fmt_ctx->duration,
      .streams = (int)fmt_ctx->nb_streams,
  };

  return r;
}

EMSCRIPTEN_BINDINGS(structs)
{
  emscripten::value_object<Response>("Response")
      .field("format", &Response::format)
      .field("duration", &Response::duration)
      .field("streams", &Response::streams);
  function("run", &run);
}
Some notable changes:
- C to C++
- Included the
emscriptenheaders - Created a
Responsetypedef - Updated
maintorun, taking a filename argument and returns aResponsestruct with format, duration and streams. - Added
EMSCRIPTEN_BINDINGSto export therunfunction with theResponsetype bindings.
Add a Makefile for emcc to build the wrapper:
dist/mp4info.wasm.js:
    mkdir -p dist && \
    emcc --bind \
    -O3 \
    -L/opt/ffmpeg/lib \
    -I/opt/ffmpeg/include/ \
    -s EXTRA_EXPORTED_RUNTIME_METHODS="[FS, cwrap, ccall, getValue, setValue, writeAsciiToMemory]" \
    -s INITIAL_MEMORY=268435456 \
    -s ASSERTIONS=1 \
    -s STACK_OVERFLOW_CHECK=2 \
    -s PTHREAD_POOL_SIZE_STRICT=2 \
    -s ALLOW_MEMORY_GROWTH=1 \
    -lavcodec -lavformat -lavfilter -lavdevice -lswresample -lpostproc -lswscale -lavutil -lm \
    -pthread \
    -lworkerfs.js \
    -o dist/mp4info.js \
    src/mp4info-wrapper.cpp
And add the following lines to our Dockerfile:
COPY ./src/mp4info-wrapper.cpp /build/src/mp4info-wrapper.cpp
COPY ./Makefile /build/Makefile

WORKDIR /build
Now let's build via Docker with a mounted volume. This is so we can easily build the artifact from the container to our host:
docker run -v ${pwd}:/build -it mp4info make
This will build the following files into dist/:
dist
├───mp4info.js
├───mp4info.wasm
└───mp4info.worker.js
Your WebAssembly artifacts are now ready for use within JavaScript! 🎉
Writing the JavaScript
In this next step, we'll be creating a static webpage using just HTML and JavaScript.
Let's create a basic index.html page with a file input and an empty results div:
<!DOCTYPE html>
<html>
<head>
    <meta charset='utf-8'>
    <meta http-equiv='X-UA-Compatible' content='IE=edge'>
    <title>FFmpeg WebAssembly Example</title>
    <meta name='viewport' content='width=device-width, initial-scale=1'>
</head>
<body>
    <div>
        <input id="file" type="file">
    </div>
    <div id="results"></div>
</body>
</html>
Since our mp4info wrapper is compiled from synchronous C++ code, it can block the browser's main thread when executing on larger files. This can lead to the browser's UI locking up and a bad experience for the user.
However, we can take advantage of Web Workers to handle background tasks and simply relay the response to the main thread to prevent any blocking code.
Let's create a new worker.js file with the following:
// Run this script as a Web Worker so it doesn't block the
// browser's main thread.
// See: index.html.
onmessage = (e) => {
    const file = e.data[0];
    let data;

    // Create and mount FS work directory.
    if (!FS.analyzePath('/work').exists) {
        FS.mkdir('/work');
    }
    FS.mount(WORKERFS, { files: [file] }, '/work');

    // Run the Wasm function we exported.
    const info = Module.run('/work/' + file.name);
    console.log(info);

    // Post message back to main thread.
    postMessage(info);

    // Unmount the work directory.
    FS.unmount('/work');
}

// Import the Wasm loader generated from our Emscripten build.
self.importScripts('mp4info.js');
This contains a message listener to create a virtual file system using the Emscripten Filesystem API, runs our Wasm module code, and send the results back using postMessage.
So let's also add the following code to your index.html right before the </html> line:
<script>
    // Create a worker for running Wasm code without blocking main thread.
    const worker = new Worker('worker.js');

    const input = document.querySelector('input');
    input.addEventListener('change', onFileChange);

    // Listen for messages back from worker and render to DOM.
    worker.onmessage = (e) => {
        const data = e.data;
        const results = document.getElementById('results');
        const ul = document.createElement('ul');
        const li = document.createElement('li');
        li.textContent = "format: " + data.format;
        const li2 = document.createElement('li');
        li2.textContent = "duration: " + data.duration;
        const li3 = document.createElement('li');
        li3.textContent = "streams: " + data.streams;
        ul.appendChild(li);
        ul.appendChild(li2);
        ul.appendChild(li3);
        results.appendChild(ul);
    }

    // Send file to worker.
    function onFileChange(event) {
        const file = input.files[0];
        worker.postMessage([ file ]);
    }

</script>
This creates a listener on the input form element and sends it to the Web Worker. It also creates a listener for messages relayed back from worker.js so we can render the results back to the DOM.
Let's add our index.html, worker.js and Wasm related files into a new directory www:
www
├───index.html
├───worker.js
├───mp4info.js
├───mp4info.wasm
└───mp4info.worker.js
Before we load up index.html into the browser, our Wasm build uses PTHREADS, which raises a security issue with some browsers. From the Emscripten documentation:
Browsers are currently shipping SharedArrayBuffer gated behind Cross Origin Opener Policy (COOP) and Cross Origin Embedder Policy (COEP) headers. Pthreads code will not work in deployed environment unless these headers are correctly set.
So we need to include the proper response headers when serving the webpage:
Cross-Origin-Opener-Policy: same-origin
Cross-Origin-Embedder-Policy: require-corp
We can do this by running simple NodeJS server using Express, easily:
const express = require('express');
const app = express();
const port = process.env.PORT || 8080;

app.use((req, res, next) => {
    // CORS headers.
    res.append('Access-Control-Allow-Origin', ['*']);
    res.append('Access-Control-Allow-Methods', 'GET,PUT,POST,DELETE');
    res.append('Access-Control-Allow-Headers', 'Content-Type');

    // Required headers for SharedArrayBuffer.
    // See: https://developer.mozilla.org/en-US/docs/Web/JavaScript/Reference/Global_Objects/SharedArrayBuffer#security_requirements
    res.append('Cross-Origin-Opener-Policy', 'same-origin');
    res.append('Cross-Origin-Embedder-Policy', 'require-corp');
    next();
});
app.use(express.static(__dirname));
app.listen(port);
However, keep in mind you will need to add these response headers if deploying to any static webpage provider.
Demo Time!
Run the server (requires NodeJS):
npm install express
node server.js
Load up http://localhost:8080/www in the browser and select an MP4 file.
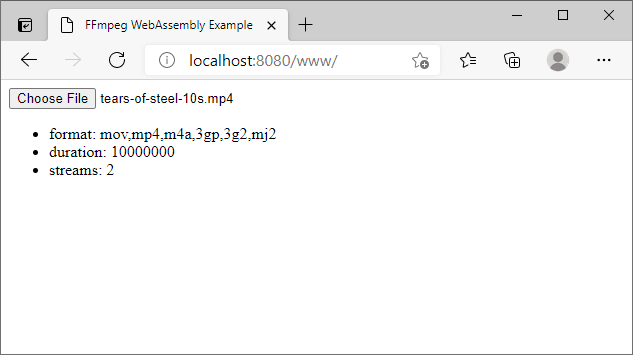
And that's how you run FFmpeg's libav in the browser! ⚡
This just scratches the surface into the capabilities of FFmpeg + WebAssembly. You can use libav to do more than just read format details. Check out more libav examples and try porting them to WebAssembly.
Thanks for reading!
Check out https://github.com/alfg/ffmpeg-webassembly-example for the full demo files in this guide.
I also have a more advanced example of using FFProbe via Wasm:
https://github.com/alfg/ffprobe-wasm
Find me on GitHub at: https://github.com/alfg
References and Resources
- WebAssembly
- Main — Emscripten 3.1.45-git (dev) documentation
- FFmpeg: Examples
- https://github.com/alfg/libav-examples
- https://github.com/alfg/ffprobe-wasm
- https://github.com/alfg/ffmpeg-webassembly-example
Happy Hacking!


 450
450


 被折叠的 条评论
为什么被折叠?
被折叠的 条评论
为什么被折叠?
 到【灌水乐园】发言


