


文章目录
前言:
上一篇文章我们介绍了Kotlin中协程的使用以及协程的执行流程。这篇文章我们来详细分析一下协程的上下文。
一、协程上下文
上下文的概念很常见,例如Android的Context,Spring中的ApplicationContext,它们在各自的场景下主要承载了资源获取、配置管理等工作,是执行环境相关的通用数据资源的统一管理提供者。协程上下文也是如此,CoroutineContext是Kotlin协程库中的一个接口,它的源代码如下:
public interface CoroutineContext {
    // 返回具有此上下文中给定 key 的元素或 null
    public operator fun <E : Element> get(key: Key<E>): E?

    // 累积此上下文的条目,从 initial 值开始, operation 从左到右应用于当前累加器值和此上下文的每个元素。
    public fun <R> fold(initial: R, operation: (R, Element) -> R): R
    ...

    // 返回一个上下文,其中包含来自此上下文的元素和来自其他 context的元素。此上下文中具有与另一个上下文中键相同的元素将被删除。
    public operator fun plus(context: CoroutineContext): CoroutineContext

    // 返回包含此上下文中的元素的上下文,但没有指定 key.
    public fun minusKey(key: Key<*>): CoroutineContext

    // 带有上届Element的泛型接口
    public interface Key<E : Element>

    public interface Element : CoroutineContext
    ...
public interface Element : CoroutineContext {
    // 当前协程上下文的键
    public val key: Key<*>

    public override operator fun <E : Element> get(key: Key<E>): E? =
        if (this.key == key) this as E else null

    public override fun <R> fold(initial: R, operation: (R, Element) -> R): R =
        operation(initial, this)

    public override fun minusKey(key: Key<*>): CoroutineContext =
        if (this.key == key) EmptyCoroutineContext else this
}
在CoroutineContext接口中声明了一个内嵌接口Element,并且实现了CoroutineContext。在接口Element中我们声明了一个Key<*>类型的抽象属性key,然后我们将在其子类中去初始化这个key。key是唯一的,我们可以把它看作是当前上下文的一个标识。在get、minusKey方法中我们都需要使用这个key来做相应的逻辑处理,这就好像我们在Map中使用key获取value一样。
关于key的初始化,我们可以关注下AbstractCoroutineContextElement这个抽象类,其具体源码如下:
public abstract class AbstractCoroutineContextElement(
public override val key: Key<*>) : Element
该类在Kotlin协程库中有诸多的实现类,例如CoroutineExceptionHandler、 CoroutineDispatcher、CoroutineName等,这里我们主要来分析下CoroutineName这个类:
public data class CoroutineName(
    // 定义协程的名称
    val name: String
) : AbstractCoroutineContextElement(CoroutineName) {
    // 定义伴生对象Key
    public companion object Key : CoroutineContext.Key<CoroutineName>

    // toString
    override fun toString(): String = "CoroutineName($name)"
}
这里我们有必要来解释一下这行代码AbstractCoroutineContextElement(CoroutineName)。AbstractCoroutineContextElement的主构造函数中需要传入一个Key<*>类型的参数key,为什么这里我们直接可以传递一个CoroutineName的类名作为参数的实例传入呢?
这是因为我们可以将外部类的类名作为伴生对象的引用来使用。当然这也是Kotlin中的一个语法糖,其具体的原因,我们可以通过一个简单的示例来理解,如下代码示例:
class Test {
    companion object Key
}

fun main() {
    Test
}
反编译后得到的Java代码如下:
public final class Test {
   public static final Key Key = new Key((DefaultConstructorMarker)null);

   public static final class Key {
      private Key() { }

      public Key(DefaultConstructorMarker $constructor_marker) {
         this();
      }
   }
}

public final class TestKt {
   public static final void main() {
      Test.Key var10000 = Test.Key;
   }

   ...
}
为了方便阅读这里将反编译后的代码做了一些简化。Test.Key var10000 = Test.Key;
由这行代码我们可以看出一个伴生对象的外部类类名确实也是该伴生对象的类引用。只是Kotlin编译器在背后又默默帮我做了一些额外的工作。
如果你经常看Kotlin反编译后的Java代码,你会发现,Kotlin语言就好像是Java语言的一个简化版本一样,可读性不高,但代码量却大幅度减少了,这背后都是Kotlin编译器在默默付出啊~
二、Element
讲解完了key的初始化,我们再来看下Element中几个重写方法的实现。
1.Element中的get方法。
public override operator fun <E : Element> get(key: Key<E>): E? =
    if (this.key == key) this as E else null
这里的get方法还是比较简单的,根据我们传入的参数key来判断get方法的返回值。如果传入的key和当前上下文中的key相等我们就返回当前上下文,如果不相等,也就是没有找到,我们返回一个null。
2.Element中的fold方法
public override fun <R> fold(initial: R, operation: (R, Element) -> R): R =
    operation(initial, this)
fold方法同样也比较简单,将当前上下文this和参数initial,作为函数类型参数operation的参数,并将operation的计算结果做为fold方法的返回值。这在CoroutineContext中的plus方法中会用到,后面我们会来详细分析这个plus方法。
3.Element中的minusKey方法
public override fun minusKey(key: Key<*>): CoroutineContext =
    if (this.key == key) EmptyCoroutineContext else this
从方法的命名和实现来看minsuKey方法,和我们想象中的可能并不太一样。翻译成中文的意思是:减号键。不得不说一下,这是啥?或许使用removeKey这样的命名我们会更加习惯。
事实上这个方法也比较简单,就是根据我们传入的key来和当前上下文中的key做对比,如果相等就返回EmptyCoroutineContext,如果不相等就返回当前上下文,这个方法在plus函数中起到很关键的作用。
三、plus方法
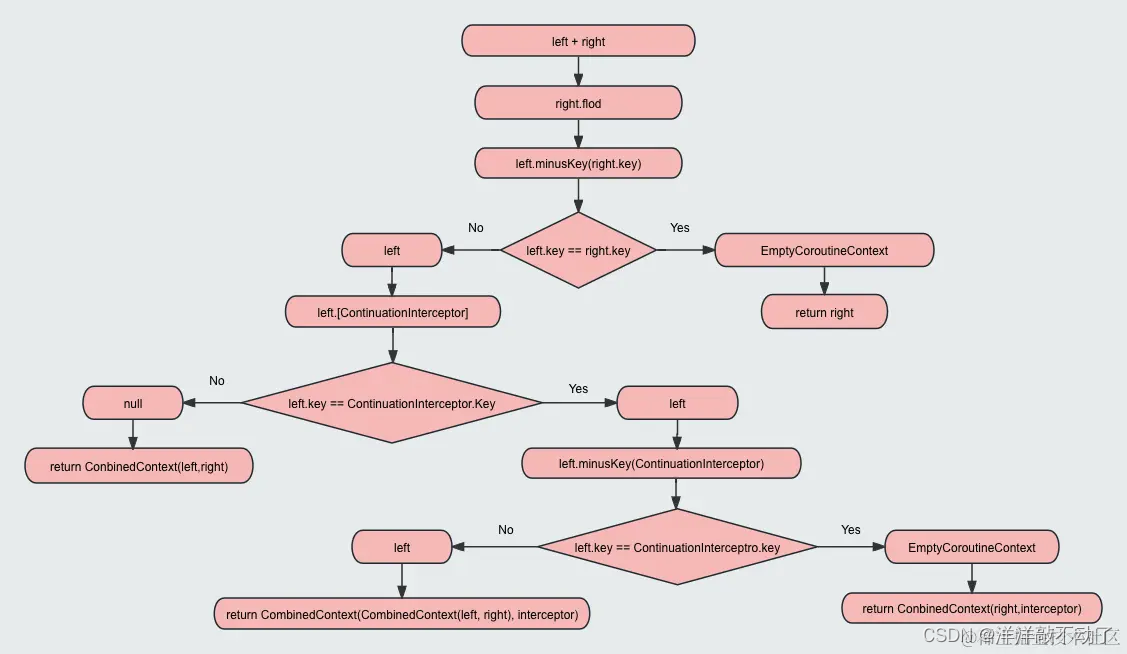
public operator fun plus(context: CoroutineContext): CoroutineContext =
    if (context === EmptyCoroutineContext) this else
        context.fold(this) { acc, element ->
            val removed = acc.minusKey(element.key)
            if (removed === EmptyCoroutineContext) element else {
                val interceptor = removed[ContinuationInterceptor]
                if (interceptor == null) CombinedContext(removed, element) else {
                    val left = removed.minusKey(ContinuationInterceptor)
                    if (left === EmptyCoroutineContext) CombinedContext(element, interceptor) else
                        CombinedContext(CombinedContext(left, element), interceptor)
                }
            }
        }
这里我们直接贴出了plus方法的源码,这也是CoroutineContext接口中最复杂的方法了。第一次看的时候感觉确实不太好理解,但是我们只要把get、minusKey、fold这几个方法搞清楚理解起来就比较简单了。下面我们就来详细的分析一下这个方法。
第一行:
public operator fun plus(context: CoroutineContext): CoroutineContext
在操作符重载的文章中我们介绍了常用的操作符和对应的重载函数。而plus函数重载的是 + 操作符,这也是为什么我们可以在launch函数中让多个上下文对象直接相加的原因,如下代码示例:
CoroutineScope(Dispatchers.Main + SupervisorJob() + CoroutineExceptionHandler { _, _ -> })
事实上我们也可以这么写:
CoroutineScope(Dispatchers.Main.plus(SupervisorJob()).plus(CoroutineExceptionHandler { _, _ -> }))
第二行:
if (context === EmptyCoroutineContext) this else
如果plus中传入的参数context的引用和EmptyCoroutineContext相等,直接返回context,这说明context本身也是一个EmptyCoroutineContext。EmptyCoroutineContext是一个单例类,所以我们直接比较引用是否相等是没有问题的,它实现了CoroutineContext接口,具体代码如下:
public object EmptyCoroutineContext : CoroutineContext, Serializable {
    ...
    // 直接返回null
    public override fun <E : Element> get(key: Key<E>): E? = null

    // 直接返回initial
    public override fun <R> fold(initial: R, operation: (R, Element) -> R): R = initial

    // 直接返回参数context
    public override fun plus(context: CoroutineContext): CoroutineContext = context

    // 直接返回EmptyCoroutineContext
    public override fun minusKey(key: Key<*>): CoroutineContext = this
    ...
}
其中的实现也比较简单。
第三行:
context.fold(this) { acc, element -> ... }
这里调用了context的fold函数:
public override fun <R> fold(initial: R, operation: (R, Element) -> R): R =
    operation(initial, this)
fold函数中的第一个参数initial,和函数类型参数opration中的第一个参数是相同的类型。因此这里我们可以将initial作为opration函数实例的第一个参数传入。所以调用fold函数传入的第一个参数,和函数类型opration初始化的Lambda中的第一参数是同一个对象。例如:
contextRight.fold(contextLeft) { contextLeft,contextRight -> }
                  1               2
第四行:
val removed = acc.minusKey(element.key)
前面我们讲解了Element中的minusKey方法。这里其实就是用来判断:
acc和element是否相等,如果相等我们的removed就是EmptyCoroutineContext,如果不相等就返回acc。
第五行:
if (removed === EmptyCoroutineContext) element else ...
也就是说如果我们的acc == element,最后我们会返回element。也就是说contextRight会覆盖contextLeft。
第六行:
// 确保拦截器在上下文中始终排在最后(以便在存在时可以快速获取)
val interceptor = removed[ContinuationInterceptor]
查找上下文removed中是否包含拦截器。
第七行:
if (interceptor == null) CombinedContext(removed, element) else ...
如果不包含,直接返回CombinedContext,如果包含则走else的逻辑。
第八行:
val left = removed.minusKey(ContinuationInterceptor)
这里会有两种情况,就是我们的removed[contextLeft]是否是CombinedContext。如果不是,那么minusKey返回的就是acc;如果是,那么就会走CombinedContext中的minusKey。和上面第一次调用minusKey方法是一样的,只是我们先按照不涉及CombinedContext + CoroutineContext的场景来分析。
第九行:
if (left === EmptyCoroutineContext) CombinedContext(element, interceptor) else
left === EmptyCoroutineContext也就是我们上面说的第一种情况,这里将拦截器放到最右边。最后一行代码我们需要结合CombinedContext的源码来分析了,所以下面我们先来看下CobinedContext的实现。
四、CombinedContext
internal class CombinedContext(
    private val left: CoroutineContext,
    private val element: Element
) : CoroutineContext, Serializable {

    override fun <E : Element> get(key: Key<E>): E? {
        var cur = this
        while (true) {
            // 如果key和element中的key相等,则直接返回element
            // let函数是内联函数,支持裸return
            cur.element[key]?.let { return it }

            // 将cur.left赋值给next
            val next = cur.left

            // 如果是CombinedContext,
            if (next is CombinedContext) {
                // 将next复制给cur,进入下一轮循环
                cur = next
            } else {
                // 如果不是则从left中查找key,找到就返回,找不到就返回null
                return next[key]
            }
        }
    }

    // fold方法的返回值类型是类型参数R,在plus函数中就是CoroutineContext。
    // 这里使用了递归来计算fold的结果值
    public override fun <R> fold(initial: R, operation: (R, Element) -> R): R =
        operation(left.fold(initial, operation), element)

    public override fun minusKey(key: Key<*>): CoroutineContext {
        // 从elment中查找key,如果找到了直接返回left
        element[key]?.let { return left }

        val newLeft = left.minusKey(key)
        return when {
            // 如果left.minusKey === left,说明传入的key和left的key不相等
            // 直接返回当前CombinedContext
            // 对应第6行代码就是:CombinedContext(CombinedContext(left, element), element)

            newLeft === left -> this

            // 如果left.minusKey == EmptyCoroutineContext,说明传入的key和left的key相等
            // 直接返回element
            // 对应第6行代码就是,右边element替换左边left + 新的element
            newLeft === EmptyCoroutineContext -> element

            // 返回一个重新创建的CombinedContext
            else -> CombinedContext(newLeft, element)
        }
    }
}
...
关于CombinedContext中重写的3个方法get、flod、minusKey,我们已经在代码中详细备注了。因为想要彻底理解plus方法,我们必须要把这3个方法搞明白。
plus中的最后一行代码:
CombinedContext(CombinedContext(left, element), interceptor)
如果在CombinedContext中找到了拦截器则把拦截器放到最后的位置。下面我们贴出plus方法的流程图,便于大家的理解:
总结:
我们先来回顾下协程上下文中几个比较重要的方法:
1.Element接口中的get方法,根据指定的key查找上下文,如果找到了就返回,如果没有查找到就返回null
2.Element接口中的minusKey方法,根据指定key来返回一个上下文,如果找到了就返回
EmptyCoroutineContext,如果没有找到就返回当前上下文
3.CombinedContext中的get、minusKey方法也是类似的思想,只是逻辑上要稍微复杂点
4.fold方法返回函数类型参数operation计算的结果值,在CombinedContext中使用了递归来计算
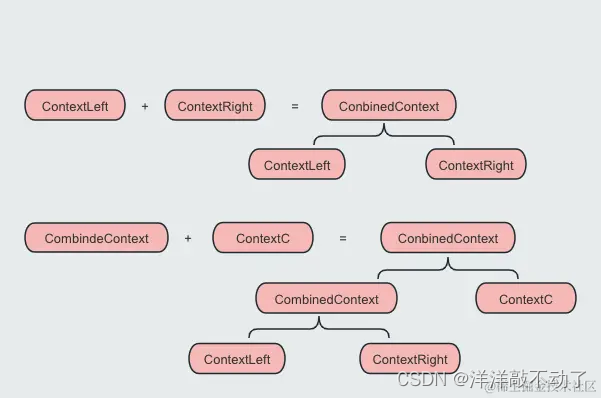
5.CoroutineContext的数据结构使用起来像个Map,但是如果画图来表示的话更像个二叉树
协程上下文的设计在整个协程框架中来说还是比较简单的,理解起来并不难,但是这种设计思想却很难,不得不说Google大佬写出来的代码确实牛啊~望尘莫及的感觉!。


 427
427


 被折叠的 条评论
为什么被折叠?
被折叠的 条评论
为什么被折叠?
 到【灌水乐园】发言


