


上篇写了通过Espresso测试Button这样的普通view和AdpterView类型的view,及Espresso基本使用方式
http://blog.csdn.net/hexingen/article/details/51971427(有兴趣的可以查看)
本篇写通过Espresso测试Intents,WebView
(一)Espresso测试Intent的开启和返回值:
 使用配置:espresso-intents.jar
        espresso-intents包是  Espresso的一个扩展包。(介绍)
        espresso-intents包是用在Espresso 2.1+和0.3以上的testing library上(注意点)

 使用步骤:
    1.安装Espresso-Intents(前提是开发工具ide中已经安装Android Support Repository )

       在gradle中原本的依赖包上多添加:
      androidTestCompile 'com.android.support.test.espresso:espresso-intents:2.2.2'

    2.IntentsTestRule是替代 ActivityTestRule ,
           它是 ActivityTestRule的延伸( 具备ActivityTestRule的特性),
           初始化 Espresso-Intents是在注解 @Test之前,释放是测试运行完后。

    3.Intent validation:验证intent

    4.Intent stubbing:给intent添加返回值

    5.Intent matchers:intending()和intended ()中参数都是一个Matcher<Intent>
guithub上对应案例:
https://github.com/googlesamples/android-testing/tree/master/ui/espresso/IntentsBasicSample
开始编写:
1.在项目的,xxx.gridle中添加依赖包:
dependencies {
    testCompile 'junit:junit:4.12'
    compile 'com.android.support:appcompat-v7:23.3.0'
    //添加注解,包含test
    compile 'com.android.support:support-annotations:23.3.0'
    //解决冲突
    androidTestCompile 'com.android.support:support-annotations:23.3.0'
    // Android JUnit Runner
    androidTestCompile 'com.android.support.test:runner:0.5'
    // JUnit4 Rules
    androidTestCompile 'com.android.support.test:rules:0.5'
    // Espresso core
    androidTestCompile 'com.android.support.test.espresso:espresso-core:2.2.2'
    //Espresso-Intents只支持 Espresso 2.1+和0.3以上版本的test包以上
    androidTestCompile 'com.android.support.test.espresso:espresso-intents:2.2.2'

}
2.编写开启intent,和intent返回值的代码:
MainActivity.java中代码:
    public static final int REQUESTCODE=1;
    //开启intent
    public void openIntentActiivty(View view){
        Intent intent=new Intent(this,IntentActivity.class);
        startActivityForResult(intent,REQUESTCODE);
    }
    //接受intent的返回数据
    @Override
    protected void onActivityResult(int requestCode, int resultCode, Intent data) {
        switch (requestCode){
            case REQUESTCODE:
                if(resultCode== AppCompatActivity.RESULT_OK){
                   String s= data.getStringExtra(IntentActivity.TAG);
                    showToas("intent test "+s);
                }
                break;

        }
        super.onActivityResult(requestCode, resultCode, data);
    }
IntentActivity.java:
public class IntentActivity extends AppCompatActivity {
    public static final String TAG=IntentActivity.class.getSimpleName();
    @Override
    protected void onCreate(@Nullable Bundle savedInstanceState) {
        super.onCreate(savedInstanceState);
        setContentView(new TextView(this));
        setResult(AppCompatActivity.RESULT_OK,createResultData("sucess"));
        this.finish();
    }
    @VisibleForTesting
    static Intent  createResultData(String s){
        Intent intent  =new Intent();
        intent.putExtra(TAG,s);
        return  intent;
    }
}
3.最重要的步骤:编写测试代码:
MainActivityTest.java:
@RunWith(AndroidJUnit4.class)
@LargeTest
public class MainActivityTest {
    /**
     * IntentsTestRule替代ActivityTestRule
     * @Rule是在   @Test之前运行,进行初始化
     */
    @Rule
    public IntentsTestRule<MainActivity> activityTestRule=
             new IntentsTestRule<MainActivity>(MainActivity.class);

    @Test //测试intent返回结果
    public void testIntentActivity(){
        //默认Intent是不带有返回值(两个actviity间互传数据)的
        //为IntentActivity添加存根,即返回值
        intending(hasComponent(hasShortClassName(".IntentActivity")))
                 .respondWith(new Instrumentation.ActivityResult(
                  Activity.RESULT_OK,
                 IntentActivity.createResultData("testIntent sucess")));

        activityTestRule.getActivity().openIntentActiivty(null);

       // intended();记录app在调用intent的结果
    }
}
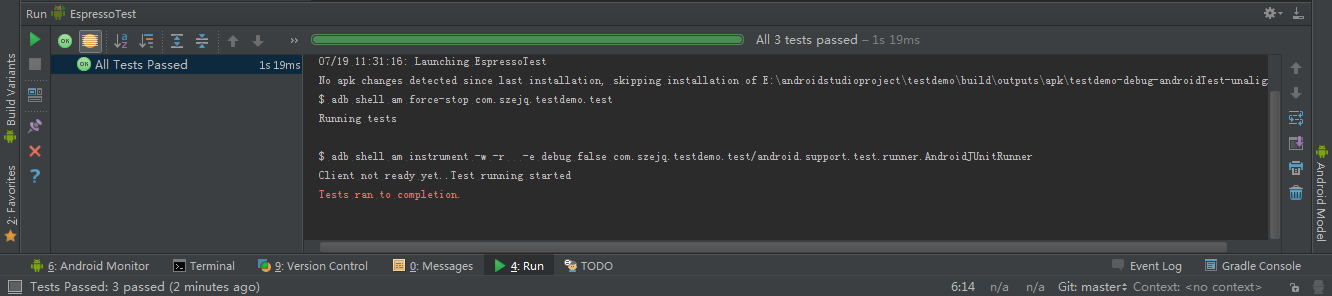
4.创建运行的Config(不懂的,看上一篇,有详细解说),然后运行测试项目,结果如下:
(二)Espresso测试Webview交互:
Espresso-web : 是一个切入点,在webview中,通过Atoms来操作webview的交互(介绍)

使用步骤:
   1.安装Espresso-Web:

     在gradle中原本的依赖包上多添加:
     androidTestCompile 'com.android.support.test.espresso:espresso-web:2.2.2'

   2.Common WebInteractions(web交互):

       用于获取webView中加载的html,html中的标签元素:
           withElement(ElementReference):
           withContextualElement(Atom<ElementReference>)

       查看标签的 assertion:
               check(WebAssertion)

       html中事件执行:
           perform(Atom)

       reset():当事先操作无效时,使用
guithub上对应案例:
https://github.com/googlesamples/android-testing/tree/master/ui/espresso/WebBasicSample
开始编写:
1.在项目的,xxx.gridle中添加依赖包:
dependencies {
    testCompile 'junit:junit:4.12'
    compile 'com.android.support:appcompat-v7:23.3.0'
    //添加注解,包含test
    compile 'com.android.support:support-annotations:23.3.0'
    //解决冲突
    androidTestCompile 'com.android.support:support-annotations:23.3.0'
    // Android JUnit Runner
    androidTestCompile 'com.android.support.test:runner:0.5'
    // JUnit4 Rules
    androidTestCompile 'com.android.support.test:rules:0.5'
    // Espresso core
    androidTestCompile 'com.android.support.test.espresso:espresso-core:2.2.2'

    //Espresso web
    androidTestCompile 'com.android.support.test.espresso:espresso-web:2.2.2'

}
2.编写WebView加载的html
这里是本地加载html,进行js交互,在assets下创建一个html的文件:
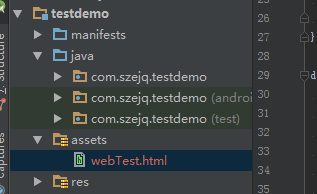
webTest.html:
<html>
<head>
    <title>Espresso test Web</title>
    <meta charset="utf-8"/>


</head>
<body>

<h1  >Hello Espresso Web!</h1>

<p id="changContent">没有改变</p>

<input type="button" id="web_btn" value="button" onclick="testClick()" />
<script type="text/javascript">
            function testClick() {
                document.getElementById("changContent").innerHTML = "Espresso test";
                  android.showToast("Espresso test");
            }
</script>
</body>

</html>
3. 设置webview可以js交互:
WebActivity.java:
public class WebActivity  extends AppCompatActivity {

    private WebView  webView;
    private  static final String LOCAL_URL="file:///android_asset/webTest.html";

    @Override
    protected void onCreate(@Nullable Bundle savedInstanceState) {
        super.onCreate(savedInstanceState);
        webView=new WebView(this);
        setContentView(webView);
        //允许js交互
        webView.getSettings().setJavaScriptEnabled(true);
        webView.loadUrl(LOCAL_URL);
        webView.setWebViewClient(new WebViewClient(){
            @Override
            public boolean shouldOverrideUrlLoading(WebView view, String url) {
                return false;
            }
        });

        //设置js与android 交互的接口名,接口名为android
        webView.addJavascriptInterface(new WebInterface(),"android");
    }

    //检查联网权限
    public boolean checkPermission(){
        //获取到mamifest中的权限状态
        int permission=  ContextCompat.checkSelfPermission(
                         this, Manifest.permission.INTERNET);
        //权限同意
        int granted= PackageManager.PERMISSION_GRANTED;
        return(permission==granted);
    }

    protected   class WebInterface{
        public WebInterface(){}
        @JavascriptInterface//js回调android端的方法
        public void showToast(String s){
            Toast.makeText(WebActivity.this,
                  s , Toast.LENGTH_SHORT).show();
        }
    }

}
4. 最重要的步骤:编写测试代码:
创建一个测试类,WebActivityTest.java:
import android.content.Intent;
import android.support.test.espresso.web.webdriver.Locator;
import android.support.test.rule.ActivityTestRule;
import android.support.test.runner.AndroidJUnit4;
import android.test.suitebuilder.annotation.LargeTest;

import org.junit.Rule;
import org.junit.Test;
import org.junit.runner.RunWith;

import static android.support.test.espresso.web.sugar.Web.onWebView;
import static android.support.test.espresso.web.webdriver.DriverAtoms.findElement;
import static android.support.test.espresso.web.webdriver.DriverAtoms.webClick;


@RunWith(AndroidJUnit4.class)

@LargeTest

public class WebActivityTest {

    @Rule
    public ActivityTestRule<WebActivity> activityTestRule=
         new ActivityTestRule<WebActivity>(WebActivity.class,false,false){
            @Override
            protected void afterActivityLaunched() {
              //Javascript能通过Espresso web 操作webview:
              //覆盖afterActivityLaunched()

              // Enable JS!
              onWebView().forceJavascriptEnabled();
          }
      };

    @Test
    public void testWeb(){
         //开启WebActivity
         activityTestRule.launchActivity(new Intent());

         onWebView() .withElement(findElement(Locator.ID,"web_btn"))
                     .perform(webClick());//执行点击动作
    }
}
4.创建运行的Config(不懂的,看上一篇,有详细解说),然后运行测试项目,结果如下:
马上就要出成绩,结果运行时遇到异常:

com.android.build.api.transform.TransformException: com.android.builder.packaging.DuplicateFileException: Duplicate files copied in APK META-INF/maven/com.google.guava/guava/pom.properties
解决方式: 忽略包中异常
 //在在gradle中添加:
 android {
     packagingOptions {
        exclude('META-INF/maven/com.google.guava/guava/pom.properties');
        exclude('META-INF/maven/com.google.guava/guava/pom.xml');
     }
  }
运行完成,展现成果:


 729
729

 被折叠的 条评论
为什么被折叠?
被折叠的 条评论
为什么被折叠?
 到【灌水乐园】发言


