


1 SpringBoot简介
Spring Boot 是由 Pivotal 团队提供的全新框架,其设计目的是用来简化新 Spring 全家桶的初始搭建以及开发过程。
Spring Boot最主要的就是解决了Spring全家桶的配置,整合框架,类似于pom整合所有包一样的。
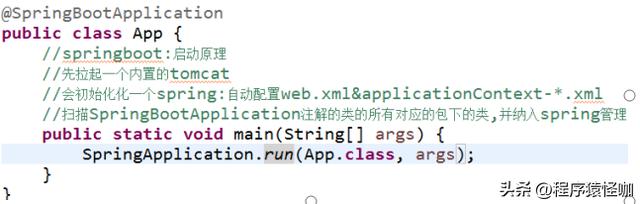
2 SpringBoot执行流程
1、启动SpringBoot的main(0时
2、然后拉起一个内置的tomcat
3、初始化一个Spring容器,自动的配置web.xml、applicationContext-*.xml配置文件
4、扫描@SpringBootApplication注解所在的类对应的所有包下的类,并交给Spring管理。
图例解释:
3 SpringBoot中21大核心注解
- @SpringBootConfiguration
该注解表示该应用是一个Springboot应用,最核心的注解。
看过底层源码的都知道实际@SpringBootApplication是@Configuration,@EnableAutoConfiguration,@ComponentScan三个注解合体。
@EnableDiscoveryClient@RefreshScope@EnableCustomConfig@EnableRyFeignClients@SpringBootApplication(exclude = {GsonAutoConfiguration.class})@EnableConfigurationProperties@EnableAsyncpublic class MerchantServiceApplication { public static void main(String[] args) { SpringApplication.run(MerchantServiceApplication.class, args); }}- @EnableAutoConfiguration
使用该注解注后,Spring Boot 可以根据当前类路径下的包或者类来配置 Spring Bean。
该注解源码:
package org.springframework.boot.autoconfigure;import java.lang.annotation.Documented;import java.lang.annotation.ElementType;import java.lang.annotation.Inherited;import java.lang.annotation.Retention;import java.lang.annotation.RetentionPolicy;import java.lang.annotation.Target;import org.springframework.context.annotation.Import;@Target({ElementType.TYPE})@Retention(RetentionPolicy.RUNTIME)@Documented@Inherited@AutoConfigurationPackage@Import({AutoConfigurationImportSelector.class})public @interface EnableAutoConfiguration { String ENABLED_OVERRIDE_PROPERTY = "spring.boot.enableautoconfiguration"; Class<?>[] exclude() default {}; String[] excludeName() default {};}- @EnableConfigurationProperties
如果你用了@EnableConfigurationProperties 和 @Configuration 时,那么所有使用了@ConfigurationProperties注解的beans都会自动被Environment配置。
使用示例:
@Configuration@EnableConfigurationProperties({ UnionpayQrCodeProperties.class,})@AutoConfigureOrderpublic class UnionpayQrCodeConfiguration { @Value("${spring.application.name}") private String applicationName;}- @AutoConfigureAfter
用在自动配置类上面,表示该自动配置类需要在另外指定的自动配置类配置完之后。
如 Mybatis 的自动配置类,需要在数据源自动配置类之后。
使用示例:
@AutoConfigureAfter(DataSourceAutoConfiguration.class)public class MybatisAutoConfiguration {}- @AutoConfigureBefore
用在自动配置类上面,表示该自动配置类需要在另外指定的自动配置类配置之前。
- @AutoConfigureOrder
该注解用来确定配置加载的优先级顺序。
- @SpringBootConfiguration
该注解其实就是@Configuration 注解的升级版,就只是标识是Springboot中的注解而已。
- @ConditionalOnJndi
如果指定的 JNDI 存在时该注解才会生效。
- @ConditionalOnMissingClass
使用该注解后,当classpath中没有指定的 Class才生效。
- @ConditionalOnWebApplication
如果项目是一个 WEB 项目,使用该注解才会生效。
- @ConditionalOnNotWebApplication
如果项目不是一个 WEB 项目,使用该注解才会生效。
- @ConditionalOnCloudPlatform
如果指定的云平台激活时,此时该注解才会生效。
- @ConditionalOnBean
@ConditionalOnBean(Product.class),只有Product.class 在Spring的ApplicationContext(上下文)中存在时,才能创建该bean。
- @ConditionalOnMissingBean
@ConditionalOnMissingBean(Product.class),只有Product.class 在Spring的ApplicationContext(上下文)中不存在时,才能创建该bean。
- @ConditionalOnClass
使用该注解后,当类存在于classpath上时,才会创建Bean。
- @ConditionalOnProperty
使用该注解时,需指定其属性该注解才会生效。
该注解和其属性使用示例:
@ConditionalOnProperty(value = "rocketmq.producer.enabled", havingValue = "true", matchIfMissing = true)其中name用来从application.properties中读取某个属性值,如果该值为空,则返回false;如果值不为空,则将该值与havingValue指定的值进行比较,如果一样则返回true;否则返回false。如果返回值为false,则该configuration不生效;为true则生效。- @ConditionalOnExpression
如果SpEL 表达式值为 true 时该注解才生效。
该注解使用示例:
@ConditionalOnExpression("${enabled:false}")- @ConditionalOnJava
如果你当前运行的 Java JVM 版本,在设定的版本内该注解才生效。
- @ConditionalOnResource
如果类路径下有指定的资源使用该注解才生效。
该注解使用示例;
@ConditionalOnResource(resources="classpath:shiro.ini")- @ConditionalOnSingleCandidate
如果指定的 class 在Spring中就一个 Bean,或为首选bean时,该注解才会生效。
- @ConfigurationProperties
使用该注解可以把自定义的properties文件映射到实体bean中。
使用示例:
@Data@Configuration@ConfigurationProperties(prefix = "test.qrcode")public class UnionpayQrCodeProperties { private Integer merchantId; private String instMid; private String mid; private String tid; private String notifyUrl; private String returnUrl; private String appId; private String appKey; private String sourceCode; private String payUrl; private String queryUrl; private String refundUrl; private String refundQueryUrl; private String closeUrl;}4 Spring中6大核心注解
因为SpringBoot主要就是整合Spring全家桶框架的,这里也聊一聊SpringBoot和Spring最紧密的6个注解。
- @ComponentScan
这个注解大家应该很熟悉了吧,最常用的注解之一。@ComponentScan注解默认会装配标识了@Controller,@Service,@Repository,@Component注解的类到spring容器中。
注意:@SpringBootApplication注解已经包含了@ComponentScan注解。因此Springboot中不需要再单独使用@ComponentScan注解。
使用示例:
@ComponentScan(value = "com.sllt.qyg.test.mapper")public class MyApiApplication { public static void main(String[] args) { SpringApplication.run(MyApplication.class, args); }}- @Conditional
Spring4才支持该注解,该注解主要功能是根据设置的条件来装载不同的bean,因此该注解又称为条件注解。
使用该注解后首先把装载的bean对应的类实现Condition接口,再对该接口实现类设置是否装载,最后才是设置条件注解
SpringBoot中以@Conditional*开头的注解,都是已经集成了@Conditional注解相应功能的。
- @Component
@Component是一个元注解,即可以注解其他类注解。
比如@Controller、@Service、@Repository等注解就使用该注解。
源码示例:
@Target({ElementType.TYPE})@Retention(RetentionPolicy.RUNTIME)@Documented@Componentpublic @interface Service { @AliasFor( annotation = Component.class ) String value() default "";}- @ImportResource
通过导入的方式实现把实例加入springIOC容器中,使用该注解后导入的是配置文件。
使用示例:
@ImportResource("classpath:spring-redis.xml") //导入xml配置public class MyApplication { public static void main(String[] args) { SpringApplication.run(MyApplication.class, args); }}- @Import
通过导入的方式实现把实例加入springIOC容器中。
使用示例:
//定义两个类public class A {}public class B {}//导入类@Import({A.class,B.class})@Configurationpublic class TestConfig{}- @Configuration
该注解仅持支Spring3.0+,它用来定义配置类,可替换xml配置文件,被注解的类内部包含有一个或多个被@Bean注解的方法,这些方法将会被AnnotationConfigApplicationContext或AnnotationConfigWebApplicationContext类进行扫描,并用于构建bean定义,初始化Spring容器。
使用示例:
import org.apache.ibatis.reflection.MetaObject;import org.apache.ibatis.reflection.wrapper.MapWrapper;import org.apache.ibatis.reflection.wrapper.ObjectWrapper;import org.apache.ibatis.reflection.wrapper.ObjectWrapperFactory;import org.mybatis.spring.boot.autoconfigure.ConfigurationCustomizer;import org.springframework.context.annotation.Bean;import org.springframework.context.annotation.Configuration;import java.util.Map;@Configurationpublic class MybatisConfig { /** * 自定义Mybatis输出处理 * 需配套配置 mybatis.configuration.map-underscore-to-camel-case=true * @return */ @Bean public ConfigurationCustomizer mybatisConfigurationCustomizer(){ return new ConfigurationCustomizer() { @Override public void customize(org.apache.ibatis.session.Configuration configuration) { configuration.setObjectWrapperFactory(new MapWrapperFactory()); } }; } /** * 自定义ObjectWrapperFactory * 实现接口 ObjectWrapperFactory,通过包装工厂来创建自定义的包装类,通过hasWrapperFor判断参数不为空,并且类型是Map的时候才使用自己扩展的ObjectWrapper * @date 2020年6月22日 * */ static class MapWrapperFactory implements ObjectWrapperFactory { @Override public boolean hasWrapperFor(Object object) { return object != null && object instanceof Map; } @Override public ObjectWrapper getWrapperFor(MetaObject metaObject, Object object) { return new MyMapWrapper(metaObject, (Map) object); } } /** * 自定义MapWrapper * 承类 MapWrapper,重写findProperty, 通过useCamelCaseMapping来判断是否开启使用驼峰 * @date 2020年6月22日 * */ static class MyMapWrapper extends MapWrapper { MyMapWrapper(MetaObject metaObject, Map<String, Object> map) { super(metaObject, map); } @Override public String findProperty(String name, boolean useCamelCaseMapping) { if (useCamelCaseMapping && ((name.charAt(0) >= 'A' && name.charAt(0) <= 'Z') || name.contains("_"))) { return underlineToCamelhump(name); } return name; } /** * 将下划线风格替换为驼峰风格 * * @param inputString * @return */ private String underlineToCamelhump(String inputString) { StringBuilder sb = new StringBuilder(); boolean nextUpperCase = false; for (int i = 0; i < inputString.length(); i++) { char c = inputString.charAt(i); if (c == '_') { if (sb.length() > 0) { nextUpperCase = true; } } else { if (nextUpperCase) { sb.append(Character.toUpperCase(c)); nextUpperCase = false; } else { sb.append(Character.toLowerCase(c)); } } } return sb.toString(); } }}


 181
181


 被折叠的 条评论
为什么被折叠?
被折叠的 条评论
为什么被折叠?
 到【灌水乐园】发言


