


分享一下我老师大神的人工智能教程!零基础,通俗易懂!http://blog.csdn.net/jiangjunshow
也欢迎大家转载本篇文章。分享知识,造福人民,实现我们中华民族伟大复兴!
在Android系统中,键盘按键事件是由WindowManagerService服务来管理的,然后再以消息的形式来分发给应用程序处理,不过和普通消息不一样,它是由硬件中断触发的;在上一篇文章《Android应用程序消息处理机制(Looper、Handler)分析》中,我们分析了Android应用程序的消息处理机制,本文将结合这种消息处理机制来详细分析Android应用程序是如何获得键盘按键消息的。
《Android系统源代码情景分析》一书正在进击的程序员网(http://0xcc0xcd.com)中连载,点击进入!
在系统启动的时候,SystemServer会启动窗口管理服务WindowManagerService,WindowManagerService在启动的时候就会通过系统输入管理器InputManager来总负责监控键盘消息。这些键盘消息一般都是分发给当前激活的Activity窗口来处理的,因此,当前激活的Activity窗口在创建的时候,会到WindowManagerService中去注册一个接收键盘消息的通道,表明它要处理键盘消息,而当InputManager监控到有键盘消息时,就会分给给它处理。当当前激活的Activity窗口不再处于激活状态时,它也会到WindowManagerService中去反注册之前的键盘消息接收通道,这样,InputManager就不会再把键盘消息分发给它来处理。
由于本文的内容比较多,在接下面的章节中,我们将分为五个部分来详细描述Android应用程序获得键盘按键消息的过程,每一个部分都是具体描述键盘消息处理过程中的一个过程。结合上面的键盘消息处理框架,这四个过程分别是InputManager的启动过程、应用程序注册键盘消息接收通道的过程、InputManager分发键盘消息给应用程序的过程以及应用程序注销键盘消息接收通道的过程。为了更好地理解Android应用程序获得键盘按键消息的整个过程,建议读者首先阅读Android应用程序消息处理机制(Looper、Handler)分析一文,理解了Android应用程序的消息处理机制后,就能很好的把握本文的内容。
1. InputManager的启动过程分析
前面说过,Android系统的键盘事件是由InputManager来监控的,而InputManager是由窗口管理服务WindowManagerService来启动的。
从前面一篇文章Android系统进程Zygote启动过程的源代码分析中,我们知道在Android系统中,Zygote进程负责启动系统服务进程SystemServer,而系统服务进程SystemServer负责启动系统中的各种关键服务,例如我们在前面两篇文章Android应用程序安装过程源代码分析和Android系统默认Home应用程序(Launcher)的启动过程源代码分析中提到的Package管理服务PackageManagerService和Activity管理服务ActivityManagerService。这里我们所讨论的窗口管理服务WindowManagerService也是由SystemServer来启动的,具体的启动过程这里就不再详述了,具体可以参考PackageManagerService和ActivityManagerService的启动过程。
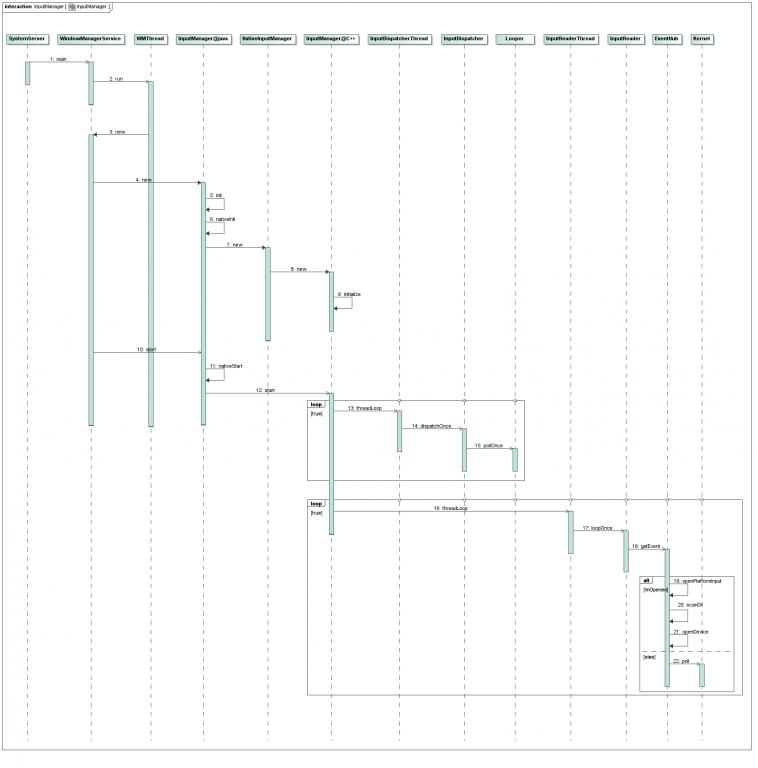
了解了WindowManagerService的启动过程之后,我们就可以继续分析InputManager的启动过程了。我们先来看一下InputManager启动过程的序列图,然后根据这个序列图来一步步分析它的启动过程:
Step 1. WindowManagerService.main
这个函数定义在frameworks/base/services/java/com/android/server/WindowManagerService.java文件中:
public class WindowManagerService extends IWindowManager.Stub implements Watchdog.Monitor { ...... public static WindowManagerService main(Context context, PowerManagerService pm, boolean haveInputMethods) { WMThread thr = new WMThread(context, pm, haveInputMethods); thr.start(); synchronized (thr) { while (thr.mService == null) { try { thr.wait(); } catch (InterruptedException e) { } } return thr.mService; } } ......}Step 2. WMThread.run
这个函数定义在frameworks/base/services/java/com/android/server/WindowManagerService.java文件中:
public class WindowManagerService extends IWindowManager.Stub implements Watchdog.Monitor { ...... static class WMThread extends Thread { ...... public void run() { ...... WindowManagerService s = new WindowManagerService(mContext, mPM, mHaveInputMethods); ...... } } ......}Step 3. WindowManagerService<init>
WindowManagerService类的构造函数定义在frameworks/base/services/java/com/android/server/WindowManagerService.java文件中:
public class WindowManagerService extends IWindowManager.Stub implements Watchdog.Monitor { ...... final InputManager mInputManager; ...... private WindowManagerService(Context context, PowerManagerService pm, boolean haveInputMethods) { ...... mInputManager = new InputManager(context, this); ...... mInputManager.start(); ...... } ......}Step 4. InputManager<init>@java
Java层的InputManager类的构造函数定义在frameworks/base/services/java/com/android/server/InputManager.java文件中:
public class InputManager { ...... public InputManager(Context context, WindowManagerService windowManagerService) { this.mContext = context; this.mWindowManagerService = windowManagerService; this.mCallbacks = new Callbacks(); init(); } ......}Step 5. InputManager.init
这个函数定义在frameworks/base/services/java/com/android/server/InputManager.java文件中:
public class InputManager { ...... private void init() { Slog.i(TAG, "Initializing input manager"); nativeInit(mCallbacks); } ......}Step 6. InputManager.nativeInit
这个函数定义在frameworks/base/services/jni$ vi com_android_server_InputManager.cpp文件中:
static void android_server_InputManager_nativeInit(JNIEnv* env, jclass clazz, jobject callbacks) { if (gNativeInputManager == NULL) { gNativeInputManager = new NativeInputManager(callbacks); } else { LOGE("Input manager already initialized."); jniThrowRuntimeException(env, "Input manager already initialized."); }}Step 7. NativeInputManager<init>
NativeInputManager类的构造函数定义在frameworks/base/services/jni$ vi com_android_server_InputManager.cpp文件中:
NativeInputManager::NativeInputManager(jobject callbacksObj) : mFilterTouchEvents(-1), mFilterJumpyTouchEvents(-1), mVirtualKeyQuietTime(-1), mMaxEventsPerSecond(-1), mDisplayWidth(-1), mDisplayHeight(-1), mDisplayOrientation(ROTATION_0) { JNIEnv* env = jniEnv(); mCallbacksObj = env->NewGlobalRef(callbacksObj); sp<EventHub> eventHub = new EventHub(); mInputManager = new InputManager(eventHub, this, this);}Step 8. InputManager<init>@C++
C++层的InputManager类的构造函数定义在frameworks/base/libs/ui/InputManager.cpp 文件中:
InputManager::InputManager( const sp<EventHubInterface>& eventHub, const sp<InputReaderPolicyInterface>& readerPolicy, const sp<InputDispatcherPolicyInterface>& dispatcherPolicy) { mDispatcher = new InputDispatcher(dispatcherPolicy); mReader = new InputReader(eventHub, readerPolicy, mDispatcher); initialize();}Step 9. InputManager.initialize
这个函数定义在frameworks/base/libs/ui/InputManager.cpp 文件中:
void InputManager::initialize() { mReaderThread = new InputReaderThread(mReader); mDispatcherThread = new InputDispatcherThread(mDispatcher);}至此,InputManager的初始化工作就完成了,在回到Step 3中继续分析InputManager的进一步启动过程之前,我们先来作一个小结,看看这个初始化过程都做什么事情:
A. 在Java层中的WindowManagerService中创建了一个InputManager对象,由它来负责管理Android应用程序框架层的键盘消息处理;
B. 在C++层也相应地创建一个InputManager本地对象来负责监控键盘事件;
C. 在C++层中的InputManager对象中,分别创建了一个InputReader对象和一个InputDispatcher对象,前者负责读取系统中的键盘消息,后者负责把键盘消息分发出去;
D. InputReader对象和一个InputDispatcher对象分别是通过InputReaderThread线程实例和InputDispatcherThread线程实例来实键盘消息的读取和分发的。
有了这些对象之后,万事就俱备了,回到Step 3中,调用InputManager类的start函数来执行真正的启动操作。
Step 10. InputManager.start
这个函数定义在frameworks/base/services/java/com/android/server/InputManager.java文件中:
public class InputManager { ...... public void start() { Slog.i(TAG, "Starting input manager"); nativeStart(); } ......}Step 11. InputManager.nativeStart
这个函数定义在frameworks/base/services/jni$ vi com_android_server_InputManager.cpp文件中:
static void android_server_InputManager_nativeStart(JNIEnv* env, jclass clazz) { if (checkInputManagerUnitialized(env)) { return; } status_t result = gNativeInputManager->getInputManager()->start(); if (result) { jniThrowRuntimeException(env, "Input manager could not be started."); }}Step 12. InputManager.start
这个函数定义在frameworks/base/libs/ui/InputManager.cpp 文件中:
status_t InputManager::start() { status_t result = mDispatcherThread->run("InputDispatcher", PRIORITY_URGENT_DISPLAY); if (result) { LOGE("Could not start InputDispatcher thread due to error %d.", result); return result; } result = mReaderThread->run("InputReader", PRIORITY_URGENT_DISPLAY); if (result) { LOGE("Could not start InputReader thread due to error %d.", result); mDispatcherThread->requestExit(); return result; } return OK;}我们先来分析InputDispatcherThread线程分发消息的过程,然后再回过头来分析InputReaderThread线程读取消息的过程。
Step 13. InputDispatcherThread.threadLoop
这个函数定义在frameworks/base/libs/ui/InputDispatcher.cpp文件中:
bool InputDispatcherThread::threadLoop() { mDispatcher->dispatchOnce(); return true;}Step 14. InputDispatcher.dispatchOnce
这个函数定义在frameworks/base/libs/ui/InputDispatcher.cpp文件中:
void InputDispatcher::dispatchOnce() { nsecs_t keyRepeatTimeout = mPolicy->getKeyRepeatTimeout(); nsecs_t keyRepeatDelay = mPolicy->getKeyRepeatDelay(); nsecs_t nextWakeupTime = LONG_LONG_MAX; { // acquire lock AutoMutex _l(mLock); dispatchOnceInnerLocked(keyRepeatTimeout, keyRepeatDelay, & nextWakeupTime); if (runCommandsLockedInterruptible()) { nextWakeupTime = LONG_LONG_MIN; // force next poll to wake up immediately } } // release lock // Wait for callback or timeout or wake. (make sure we round up, not down) nsecs_t currentTime = now(); int32_t timeoutMillis; if (nextWakeupTime > currentTime) { uint64_t timeout = uint64_t(nextWakeupTime - currentTime); timeout = (timeout + 999999LL) / 1000000LL; timeoutMillis = timeout > INT_MAX ? -1 : int32_t(timeout); } else { timeoutMillis = 0; } mLooper->pollOnce(timeoutMillis);}Step 15. Looper.pollOnce
这个函数定义在frameworks/base/libs/utils/Looper.cpp文件中,具体可以参考前面Android应用程序消息处理机制(Looper、Handler)分析一文,这里就不再详述了。总的来说,就是在Looper类中,会创建一个管道,当调用Looper类的pollOnce函数时,如果管道中没有内容可读,那么当前线程就会进入到空闲等待状态;当有键盘事件发生时,InputReader就会往这个管道中写入新的内容,这样就会唤醒前面正在等待键盘事件发生的线程。
InputDispatcher类分发消息的过程就暂时分析到这里,后面会有更进一步的分析,现在,我们回到Step 12中,接着分析InputReader类读取键盘事件的过程。在调用了InputReaderThread线程类的run就函数后,同样会进入到InputReaderThread线程类的threadLoop函数中去。
Step 16. InputReaderThread.threadLoop
这个函数定义在frameworks/base/libs/ui/InputReader.cpp文件中:
bool InputReaderThread::threadLoop() { mReader->loopOnce(); return true;}Step 17. InputReader.loopOnce
这个函数定义在frameworks/base/libs/ui/InputReader.cpp文件中:
void InputReader::loopOnce() { RawEvent rawEvent; mEventHub->getEvent(& rawEvent);#if DEBUG_RAW_EVENTS LOGD("Input event: device=0x%x type=0x%x scancode=%d keycode=%d value=%d", rawEvent.deviceId, rawEvent.type, rawEvent.scanCode, rawEvent.keyCode, rawEvent.value);#endif process(& rawEvent);}Step 18. EventHub.getEvent
这个函数定义在frameworks/base/libs/ui/EventHub.cpp文件中:
bool EventHub::getEvent(RawEvent* outEvent){ outEvent->deviceId = 0; outEvent->type = 0; outEvent->scanCode = 0; outEvent->keyCode = 0; outEvent->flags = 0; outEvent->value = 0; outEvent->when = 0; // Note that we only allow one caller to getEvent(), so don't need // to do locking here... only when adding/removing devices. if (!mOpened) { mError = openPlatformInput() ? NO_ERROR : UNKNOWN_ERROR; mOpened = true; mNeedToSendFinishedDeviceScan = true; } for (;;) { // Report any devices that had last been added/removed. if (mClosingDevices != NULL) { device_t* device = mClosingDevices; LOGV("Reporting device closed: id=0x%x, name=%s\n", device->id, device->path.string()); mClosingDevices = device->next; if (device->id == mFirstKeyboardId) { outEvent->deviceId = 0; } else { outEvent->deviceId = device->id; } outEvent->type = DEVICE_REMOVED; outEvent->when = systemTime(SYSTEM_TIME_MONOTONIC); delete device; mNeedToSendFinishedDeviceScan = true; return true; } if (mOpeningDevices != NULL) { device_t* device = mOpeningDevices; LOGV("Reporting device opened: id=0x%x, name=%s\n", device->id, device->path.string()); mOpeningDevices = device->next; if (device->id == mFirstKeyboardId) { outEvent->deviceId = 0; } else { outEvent->deviceId = device->id; } outEvent->type = DEVICE_ADDED; outEvent->when = systemTime(SYSTEM_TIME_MONOTONIC); mNeedToSendFinishedDeviceScan = true; return true; } if (mNeedToSendFinishedDeviceScan) { mNeedToSendFinishedDeviceScan = false; outEvent->type = FINISHED_DEVICE_SCAN; outEvent->when = systemTime(SYSTEM_TIME_MONOTONIC); return true; } // Grab the next input event. for (;;) { // Consume buffered input events, if any. if (mInputBufferIndex < mInputBufferCount) { const struct input_event& iev = mInputBufferData[mInputBufferIndex++]; const device_t* device = mDevices[mInputDeviceIndex]; LOGV("%s got: t0=%d, t1=%d, type=%d, code=%d, v=%d", device->path.string(), (int) iev.time.tv_sec, (int) iev.time.tv_usec, iev.type, iev.code, iev.value); if (device->id == mFirstKeyboardId) { outEvent->deviceId = 0; } else { outEvent->deviceId = device->id; } outEvent->type = iev.type; outEvent->scanCode = iev.code; if (iev.type == EV_KEY) { status_t err = device->layoutMap->map(iev.code, & outEvent->keyCode, & outEvent->flags); LOGV("iev.code=%d keyCode=%d flags=0x%08x err=%d\n", iev.code, outEvent->keyCode, outEvent->flags, err); if (err != 0) { outEvent->keyCode = AKEYCODE_UNKNOWN; outEvent->flags = 0; } } else { outEvent->keyCode = iev.code; } outEvent->value = iev.value; // Use an event timestamp in the same timebase as // java.lang.System.nanoTime() and android.os.SystemClock.uptimeMillis() // as expected by the rest of the system. outEvent->when = systemTime(SYSTEM_TIME_MONOTONIC); return true; } // Finish reading all events from devices identified in previous poll(). // This code assumes that mInputDeviceIndex is initially 0 and that the // revents member of pollfd is initialized to 0 when the device is first added. // Since mFDs[0] is used for inotify, we process regular events starting at index 1. mInputDeviceIndex += 1; if (mInputDeviceIndex >= mFDCount) { break; } const struct pollfd& pfd = mFDs[mInputDeviceIndex]; if (pfd.revents & POLLIN) { int32_t readSize = read(pfd.fd, mInputBufferData, sizeof(struct input_event) * INPUT_BUFFER_SIZE); if (readSize < 0) { if (errno != EAGAIN && errno != EINTR) { LOGW("could not get event (errno=%d)", errno); } } else if ((readSize % sizeof(struct input_event)) != 0) { LOGE("could not get event (wrong size: %d)", readSize); } else { mInputBufferCount = readSize / sizeof(struct input_event); mInputBufferIndex = 0; } } } ...... mInputDeviceIndex = 0; // Poll for events. Mind the wake lock dance! // We hold a wake lock at all times except during poll(). This works due to some // subtle choreography. When a device driver has pending (unread) events, it acquires // a kernel wake lock. However, once the last pending event has been read, the device // driver will release the kernel wake lock. To prevent the system from going to sleep // when this happens, the EventHub holds onto its own user wake lock while the client // is processing events. Thus the system can only sleep if there are no events // pending or currently being processed. release_wake_lock(WAKE_LOCK_ID); int pollResult = poll(mFDs, mFDCount, -1); acquire_wake_lock(PARTIAL_WAKE_LOCK, WAKE_LOCK_ID); if (pollResult <= 0) { if (errno != EINTR) { LOGW("poll failed (errno=%d)\n", errno); usleep(100000); } } }}首先,如果是第一次进入到这个函数中时,成员变量mOpened的值为false,于是就会调用openPlatformInput函数来打开系统输入设备,在本文中,我们主要讨论的输入设备就是键盘了。打开了这些输入设备文件后,就可以对这些输入设备进行是监控了。如果不是第一次进入到这个函数,那么就会分析当前有没有输入事件发生,如果有,就返回这个事件,否则就会进入等待状态,等待下一次输入事件的发生。在我们这个场景中,就是等待下一次键盘事件的发生了。
我们先分析openPlatformInput函数的实现,然后回过头来分析这个getEvent函数的具体的实现。
Step 19. EventHub.openPlatformInput
这个函数定义在frameworks/base/libs/ui/EventHub.cpp文件中:
bool EventHub::openPlatformInput(void){ ...... res = scanDir(device_path); if(res < 0) { LOGE("scan dir failed for %s\n", device_path); } return true;}static const char *device_path = "/dev/input";Step 20. EventHub.scanDir
这个函数定义在frameworks/base/libs/ui/EventHub.cpp文件中:
int EventHub::scanDir(const char *dirname){ char devname[PATH_MAX]; char *filename; DIR *dir; struct dirent *de; dir = opendir(dirname); if(dir == NULL) return -1; strcpy(devname, dirname); filename = devname + strlen(devname); *filename++ = '/'; while((de = readdir(dir))) { if(de->d_name[0] == '.' && (de->d_name[1] == '\0' || (de->d_name[1] == '.' && de->d_name[2] == '\0'))) continue; strcpy(filename, de->d_name); openDevice(devname); } closedir(dir); return 0;} Step 21. EventHub.openDevice
这个函数定义在frameworks/base/libs/ui/EventHub.cpp文件中:
int EventHub::openDevice(const char *deviceName) { int version; int fd; struct pollfd *new_mFDs; device_t **new_devices; char **new_device_names; char name[80]; char location[80]; char idstr[80]; struct input_id id; LOGV("Opening device: %s", deviceName); AutoMutex _l(mLock); fd = open(deviceName, O_RDWR); if(fd < 0) { LOGE("could not open %s, %s\n", deviceName, strerror(errno)); return -1; } ...... int devid = 0; while (devid < mNumDevicesById) { if (mDevicesById[devid].device == NULL) { break; } devid++; } ...... mDevicesById[devid].seq = (mDevicesById[devid].seq+(1<<SEQ_SHIFT))&SEQ_MASK; if (mDevicesById[devid].seq == 0) { mDevicesById[devid].seq = 1<<SEQ_SHIFT; } new_mFDs = (pollfd*)realloc(mFDs, sizeof(mFDs[0]) * (mFDCount + 1)); new_devices = (device_t**)realloc(mDevices, sizeof(mDevices[0]) * (mFDCount + 1)); if (new_mFDs == NULL || new_devices == NULL) { LOGE("out of memory"); return -1; } mFDs = new_mFDs; mDevices = new_devices; ...... device_t* device = new device_t(devid|mDevicesById[devid].seq, deviceName, name); if (device == NULL) { LOGE("out of memory"); return -1; } device->fd = fd; mFDs[mFDCount].fd = fd; mFDs[mFDCount].events = POLLIN; mFDs[mFDCount].revents = 0; // Figure out the kinds of events the device reports. uint8_t key_bitmask[sizeof_bit_array(KEY_MAX + 1)]; memset(key_bitmask, 0, sizeof(key_bitmask)); LOGV("Getting keys..."); if (ioctl(fd, EVIOCGBIT(EV_KEY, sizeof(key_bitmask)), key_bitmask) >= 0) { // See if this is a keyboard. Ignore everything in the button range except for // gamepads which are also considered keyboards. if (containsNonZeroByte(key_bitmask, 0, sizeof_bit_array(BTN_MISC)) || containsNonZeroByte(key_bitmask, sizeof_bit_array(BTN_GAMEPAD), sizeof_bit_array(BTN_DIGI)) || containsNonZeroByte(key_bitmask, sizeof_bit_array(KEY_OK), sizeof_bit_array(KEY_MAX + 1))) { device->classes |= INPUT_DEVICE_CLASS_KEYBOARD; device->keyBitmask = new uint8_t[sizeof(key_bitmask)]; if (device->keyBitmask != NULL) { memcpy(device->keyBitmask, key_bitmask, sizeof(key_bitmask)); } else { delete device; LOGE("out of memory allocating key bitmask"); return -1; } } } ...... if ((device->classes & INPUT_DEVICE_CLASS_KEYBOARD) != 0) { char tmpfn[sizeof(name)]; char keylayoutFilename[300]; // a more descriptive name device->name = name; // replace all the spaces with underscores strcpy(tmpfn, name); for (char *p = strchr(tmpfn, ' '); p && *p; p = strchr(tmpfn, ' ')) *p = '_'; // find the .kl file we need for this device const char* root = getenv("ANDROID_ROOT"); snprintf(keylayoutFilename, sizeof(keylayoutFilename), "%s/usr/keylayout/%s.kl", root, tmpfn); bool defaultKeymap = false; if (access(keylayoutFilename, R_OK)) { snprintf(keylayoutFilename, sizeof(keylayoutFilename), "%s/usr/keylayout/%s", root, "qwerty.kl"); defaultKeymap = true; } status_t status = device->layoutMap->load(keylayoutFilename); if (status) { LOGE("Error %d loading key layout.", status); } // tell the world about the devname (the descriptive name) if (!mHaveFirstKeyboard && !defaultKeymap && strstr(name, "-keypad")) { // the built-in keyboard has a well-known device ID of 0, // this device better not go away. mHaveFirstKeyboard = true; mFirstKeyboardId = device->id; property_set("hw.keyboards.0.devname", name); } else { // ensure mFirstKeyboardId is set to -something-. if (mFirstKeyboardId == 0) { mFirstKeyboardId = device->id; } } char propName[100]; sprintf(propName, "hw.keyboards.%u.devname", device->id); property_set(propName, name); // 'Q' key support = cheap test of whether this is an alpha-capable kbd if (hasKeycodeLocked(device, AKEYCODE_Q)) { device->classes |= INPUT_DEVICE_CLASS_ALPHAKEY; } // See if this device has a DPAD. if (hasKeycodeLocked(device, AKEYCODE_DPAD_UP) && hasKeycodeLocked(device, AKEYCODE_DPAD_DOWN) && hasKeycodeLocked(device, AKEYCODE_DPAD_LEFT) && hasKeycodeLocked(device, AKEYCODE_DPAD_RIGHT) && hasKeycodeLocked(device, AKEYCODE_DPAD_CENTER)) { device->classes |= INPUT_DEVICE_CLASS_DPAD; } // See if this device has a gamepad. for (size_t i = 0; i < sizeof(GAMEPAD_KEYCODES)/sizeof(GAMEPAD_KEYCODES[0]); i++) { if (hasKeycodeLocked(device, GAMEPAD_KEYCODES[i])) { device->classes |= INPUT_DEVICE_CLASS_GAMEPAD; break; } } LOGI("New keyboard: device->id=0x%x devname='%s' propName='%s' keylayout='%s'\n", device->id, name, propName, keylayoutFilename); } ...... mDevicesById[devid].device = device; device->next = mOpeningDevices; mOpeningDevices = device; mDevices[mFDCount] = device; mFDCount++; return 0;}fd = open(deviceName, O_RDWR);mDevicesById[devid].seq = (mDevicesById[devid].seq+(1<<SEQ_SHIFT))&SEQ_MASK;if (mDevicesById[devid].seq == 0) { mDevicesById[devid].seq = 1<<SEQ_SHIFT;}mDevicesById[devid].seq = (mDevicesById[devid].seq+(1<<SEQ_SHIFT))&SEQ_MASK;if (mDevicesById[devid].seq == 0) { mDevicesById[devid].seq = 1<<SEQ_SHIFT;}new_mFDs = (pollfd*)realloc(mFDs, sizeof(mFDs[0]) * (mFDCount + 1));new_devices = (device_t**)realloc(mDevices, sizeof(mDevices[0]) * (mFDCount + 1));if (new_mFDs == NULL || new_devices == NULL) { LOGE("out of memory"); return -1;}mFDs = new_mFDs;mDevices = new_devices;......device_t* device = new device_t(devid|mDevicesById[devid].seq, deviceName, name);if (device == NULL) { LOGE("out of memory"); return -1;}device->fd = fd;同时,这个设备文件还会保存在数组mFDs中:
mFDs[mFDCount].fd = fd;mFDs[mFDCount].events = POLLIN;mFDs[mFDCount].revents = 0;// Figure out the kinds of events the device reports.uint8_t key_bitmask[sizeof_bit_array(KEY_MAX + 1)];memset(key_bitmask, 0, sizeof(key_bitmask));LOGV("Getting keys...");if (ioctl(fd, EVIOCGBIT(EV_KEY, sizeof(key_bitmask)), key_bitmask) >= 0) { // See if this is a keyboard. Ignore everything in the button range except for // gamepads which are also considered keyboards. if (containsNonZeroByte(key_bitmask, 0, sizeof_bit_array(BTN_MISC)) || containsNonZeroByte(key_bitmask, sizeof_bit_array(BTN_GAMEPAD), sizeof_bit_array(BTN_DIGI))给我老师的人工智能教程打call!http://blog.csdn.net/jiangjunshow


 5418
5418

 被折叠的 条评论
为什么被折叠?
被折叠的 条评论
为什么被折叠?
 到【灌水乐园】发言


