


1.springboot整合security
1.1介绍
Spring Security是Spring、家族中的成员。基于Spring框架,提供了一套 Web 应用
安全性的完整解决方案。
主要功能:认证(Authentication)和授权(Authorization)
用户认证指的是:系统通过用户提供的用户名和密码实现认证。
用户授权指的是:系统判断当前用户是否对某个角色具有操作权限。
1.2导入security的依赖
<dependency>
            <groupId>org.springframework.boot</groupId>
            <artifactId>spring-boot-starter-security</artifactId>
        </dependency>
也可以再创建springboot工程的时候直接选择security。
1.3配置信息
1.3.1固定密码
再yml1文件中或者propotise文件中配置:
spring.security.user.name=user
spring.security.user.password=123456
然后再配置config配置类:
@Configuration
public class SecurityConfig{
    /*@Bean
    SecurityFilterChain filterChain(HttpSecurity httpSecurity) throws Exception{
        return httpSecurity.build();
    }*/
    @Bean
    PasswordEncoder passwordEncoder() {
        String encodingId = "bcrypt";
        Map<String, PasswordEncoder> encoders = new HashMap();
        encoders.put(encodingId, new BCryptPasswordEncoder(12));
        encoders.put("ldap", new LdapShaPasswordEncoder());
        encoders.put("MD4", new Md4PasswordEncoder());
        encoders.put("MD5", new MessageDigestPasswordEncoder("MD5"));
        encoders.put("noop", NoOpPasswordEncoder.getInstance());
        encoders.put("pbkdf2", new Pbkdf2PasswordEncoder());
        encoders.put("scrypt", new SCryptPasswordEncoder());
        encoders.put("SHA-1", new MessageDigestPasswordEncoder("SHA-1"));
        encoders.put("SHA-256", new MessageDigestPasswordEncoder("SHA-256"));
        encoders.put("sha256", new StandardPasswordEncoder());
        encoders.put("argon2", new Argon2PasswordEncoder());
        return new DelegatingPasswordEncoder(encodingId, encoders);
    }

    @Autowired
    public void configureGlobal(AuthenticationManagerBuilder auth) throws Exception {
        System.out.println("============1=============");
        BCryptPasswordEncoder encoder = new BCryptPasswordEncoder();
        auth
                .inMemoryAuthentication()
                .withUser("user").password(encoder.encode("1234")).roles("USER").and()
                .withUser("admin").password(encoder.encode("456")).roles("USER", "ADMIN")
                .and().passwordEncoder(encoder);
    }
}
前面一个bean是密码的加密方式,使用只要选择其中一个就行。
1.3.2连接数据库查找(这里使用的是mybatis和mysql数据库,和springjdbc)
这里的连接操作和mybatis的配置我不在说明了。
配置config配置类:
package com.it.springbootactivit01.config;

import org.springframework.beans.factory.annotation.Autowired;
import org.springframework.context.annotation.Bean;
import org.springframework.context.annotation.Configuration;
import org.springframework.security.config.annotation.web.builders.HttpSecurity;
import org.springframework.security.web.SecurityFilterChain;
import org.springframework.security.web.authentication.rememberme.JdbcTokenRepositoryImpl;
import org.springframework.security.web.authentication.rememberme.PersistentTokenRepository;

import javax.sql.DataSource;

@Configuration
public class securityconfig {


    @Autowired
    private DataSource dataSource;

    //配置开启记住我功能
    @Bean
    public PersistentTokenRepository persistentTokenRepository(){
        JdbcTokenRepositoryImpl jdbcTokenRepository=new JdbcTokenRepositoryImpl();
        jdbcTokenRepository.setDataSource(dataSource);
        return jdbcTokenRepository;
    }


    @Bean
    public SecurityFilterChain securityFilterChain(HttpSecurity http) throws Exception {
        http.authorizeHttpRequests((auth) -> {
                    try {
                        auth
                                .antMatchers("/toLoginHtml").permitAll()
                                .antMatchers("/login").permitAll()
                                //.antMatchers("/test").hasAuthority("admin")
                                //.antMatchers("/test").hasAnyAuthority(new String[]{"zhou","jia"})
                                //.antMatchers("/test").hasRole("jun")
                                //.antMatchers("/test").hasAnyRole(new String[]{"love","liu","yi","fei"})
                                // 所有的请求
                                .anyRequest().authenticated()
                                .and().rememberMe().tokenRepository(persistentTokenRepository())
                                .tokenValiditySeconds(60);

                    } catch (Exception e) {
                        throw new RuntimeException(e);
                    }

                }).formLogin()
                // 自定义登录页面地址
                .loginPage("/login.html")
                .loginProcessingUrl("/login")//登录接口自定义,系统自动生成
                .usernameParameter("username")
                .passwordParameter("password")
                .defaultSuccessUrl("/index.html")
                // 放行登录地址(访问登录地址无需已登录状态)
                .permitAll()
                .and().csrf().disable();


        http.exceptionHandling().accessDeniedPage("/unauth.html");
        http.logout().logoutUrl("/logout").logoutSuccessUrl("/logout.html").permitAll();
        // 构建过滤链并返回
        return http.build();
    }


}
解释一下上述代码:
    @Autowired
    private DataSource dataSource;

    //配置开启记住我功能
    @Bean
    public PersistentTokenRepository persistentTokenRepository(){
        JdbcTokenRepositoryImpl jdbcTokenRepository=new JdbcTokenRepositoryImpl();
        jdbcTokenRepository.setDataSource(dataSource);
        return jdbcTokenRepository;
    }
这里是开启记住我功能,英文要往数据库里写登录的token,使用要告诉security使用的那个数据源。当然开启记住我也要再页面提供一个记住我的按钮和再securityfilterchain开启这个功能。
<input type="checkbox" name="remember-me"/>自动登录.and().rememberMe().tokenRepository(persistentTokenRepository())
.tokenValiditySeconds(60);当然还有登出操作:
再页面给一个按钮,和再配置类配置相关信息:
<a href="/logout">注销登录</a> http.logout().logoutUrl("/logout").logoutSuccessUrl("/logout.html").permitAll();1.3.3实现数据库密码的查找
package com.it.springbootactivit01.service;
import com.it.springbootactivit01.bean.role;
import org.slf4j.Logger;
import org.slf4j.LoggerFactory;
import org.springframework.security.core.GrantedAuthority;
import org.springframework.security.core.authority.AuthorityUtils;
import org.springframework.security.core.userdetails.User;
import org.springframework.security.core.userdetails.UserDetails;
import org.springframework.security.core.userdetails.UserDetailsService;
import org.springframework.security.core.userdetails.UsernameNotFoundException;
import org.springframework.security.crypto.bcrypt.BCryptPasswordEncoder;
import org.springframework.stereotype.Component;
import com.it.springbootactivit01.mapper.roleMapper;
import javax.annotation.Resource;
import java.util.List;
@Component
public class roleservice implements UserDetailsService {
@Resource
roleMapper roleMapper;
Logger logger = LoggerFactory.getLogger(getClass());
@Override
public UserDetails loadUserByUsername(String username) throws UsernameNotFoundException {
logger.info("=====roleservice进入=====");
logger.info("=====username==="+username);
/* QueryWrapper queryWrapper = new QueryWrapper();
queryWrapper.like("role_name",username);*/
//role roles=roleMapper.selectOne(queryWrapper);
role roles=roleMapper.fandone(username);
List<GrantedAuthority> auths =
AuthorityUtils.commaSeparatedStringToAuthorityList("admin,ROLE_manager");
String encode ="{bcrypt}"+new BCryptPasswordEncoder().encode(roles.getRole_state());
return new User(roles.getRole_name(),encode,auths);
}
}
好了认证就到这里,下面介绍授权。
1.4授权
1.4.1
授权的操作是再认证的里面给出那些权限,接下来只是看有没有这个权限。
有两种配置方式一个注解一个再配置类里面配置:
public SecurityFilterChain securityFilterChain(HttpSecurity http) throws Exception {
http.authorizeHttpRequests((auth) -> {
try {
auth
.antMatchers("/toLoginHtml").permitAll()
.antMatchers("/login").permitAll()
//.antMatchers("/test").hasAuthority("admin")
//.antMatchers("/test").hasAnyAuthority(new String[]{"zhou","jia"})
//.antMatchers("/test").hasRole("jun")
//.antMatchers("/test").hasAnyRole(new String[]{"love","liu","yi","fei"})
// 所有的请求
.anyRequest().authenticated()
.and().rememberMe().tokenRepository(persistentTokenRepository())
                                .tokenValiditySeconds(60);
} catch (Exception e) {
throw new RuntimeException(e);
}
其中注释掉的地方介绍权限的授权方式。
也可以使用注解的方式,注解的方式要在启动类里加入这个注解来开启这些注解
@EnableGlobalMethodSecurity(securedEnabled = true,prePostEnabled = true)
:
@RequestMapping("/myPage")
    @ResponseBody
    //@Secured({"zhou"})
    //@PreAuthorize("hasAnyAuthority(new String[]{'zhou','li'})")
    //@PostAuthorize("hasAnyRole(new String[]{'zhou','LI'})")
    //@PostFilter(value="filterObject.userid=='1'")
    //@PreFilter(value="filterObject.userid=='1'")
    public void myPage(){
        //测试自定义分页
        Page<role> page=new Page<>(1,3);
        roleMapper.selectPage(page,"1");//调用自定义的查询
        System.out.println("==records=="+page.getRecords());//获取当前页数据 3条记录
        System.out.println(page.getSize());//获取每页的条数 3
        System.out.println(page.getCurrent()); //获取当前页码 1
        System.out.println(page.getPages());//获取总页数 2
        System.out.println(page.getTotal());//获取总记录数 4
        System.out.println(page.hasNext());//获取有没有下一页 true
        System.out.println(page.hasPrevious());//获取是否有上一页 false
    }
}
注释的地方就是。
1.4.2有哪些注解和授权配置
hasAnyAuthority
在4.5.1配置基础上修改代码如下:
.antMatchers("/test").hasAnyAuthority(new String[]{"admin","admin1"})
hasRole
在使用角色的时候需要注意,hasRole方法会在内部紫铜的为角色添加一个前缀:ROLE_,源码如下:
【添加角色判断】
.antMatchers("/test").hasRole("manager")
【在UserService中配置用户角色查询】
List<GrantedAuthority> auths = AuthorityUtils.commaSeparatedStringToAuthorityList("admin,ROLE_manager");
hasAnyRole
【定义访问/test需要的角色】
.antMatchers("/test").hasAnyRole(new String[]{"manager","sale"})
注解:
@Secured注解-判断是否有某角色
判断是否具有角色,注意这里匹配的字符串需要添加前缀“ROLE_”
【注解使用方式】
@RequestMapping("/testSecured")
@Secured({"ROLE_manager","ROLE_sale"})
public String testSecured(){
System.out.println("=============test============");
return "/show";
}
@PreAuthorize注解
@PreAuthorize注解会在方法执行前进行权限验证,支持Spring EL表达式,它是基于方法注解的权限解决方案。只有当@EnableGlobalMethodSecurity(prePostEnabled=true)的时候,@PreAuthorize才可以使用
【在启动类中开启注解】
@SpringBootApplication
@MapperScan("com.txc.securitydemo1.mapper")
@EnableGlobalMethodSecurity(securedEnabled = true,prePostEnabled = true)
public class SecurityDemo1Application {
public static void main(String[] args) {
SpringApplication.run(SecurityDemo1Application.class, args);
}
}
【具体使用】
//@PreAuthorize("hasAuthority("")")
//@PreAuthorize("hasAnyRole()")
//@PreAuthorize("hasAnyRole(new String[]{'manager','sale'})")
//@PreAuthorize("hasAnyAuthority('manager')")
@RequestMapping("/testPreAuthorize")
public String testPreAuthorize(){
System.out.println("=============test============");
return "/show";
}
@PostAuthorize注解
在方法执行后再进行权限校验,适合验证带有返回值的权限
需要开启prePostEnabled = true才可使用
@PostAuthorize注解的作用:在访问控制器中的相关方法之后(方法的return先不访问),进行权限认证,去看看UserDetailsService用户细节实现类中用户是否有对应的权限,如果有的话,那么控制器方法的最后一句return语句会执行,否则,控制器方法的最后一句return语句不会执行;
【详细使用方式】
//@PostAuthorize("hasAuthority("")")
//@PostAuthorize("hasAnyRole()")
//@PostAuthorize("hasAnyRole(new String[]{'manager','sale'})")
//@PostAuthorize("hasAnyAuthority('manager')")
@PostAuthorize("hasAnyRole('manager1')")
@RequestMapping("/testPostAuthorize")
@ResponseBody
public String testPostAuthorize(){
System.out.println("=============test============");
return "/PostAuthorize";
}
@PostFilter注解
如果控制器方法的return返回值是一个集合,此注解可以对return的这个集合进行过滤输出;
【详细使用方式】
@PostFilter(value="filterObject.userid=='1'")
@RequestMapping("/testPostFilter")
@ResponseBody
public String testPostFilter(){
System.out.println("=============test============");
return "/PostAuthorize";
}
@PreFilter注解
只有在控制器方法的参数是集合类型的时候才能使用@PreFilter注解
【详细使用方式】
RequestBody注解的主要作用就是用于接收前端的参数,当我们使用post请求的时候,我们会将参数放在request body中,此时我们就需要在Controller的方法的参数前面加上@RequestBody用来接受到前端传过来的request body中的值
@PreFilter(value = "filterObject.username='123'")
@RequestMapping("/testPreFilter")
@ResponseBody
public String testPreFilter(@RequestBody List<Users> list){
list.forEach(u->{
System.out.println(u.getUsername());
});
return "/PostAuthorize";
}
2springboot整合rabbitmq(默认账号密码都是guest)
1.1什么是RabbitMQ?
RabbitMQ是实现了高级消息队列协议(AMQP)的开源消息代理软件(亦称面向消息的中间件)。
RabbitMQ服务器是用Erlang语言编写的,而集群和故障转移是构建在开放电信平台框架上的。
RabbitMQ是一个消息代理:它接受和转发消息。
你可以把它想象成一个邮局:当你把你想要发布的邮件放在邮箱中时,你可以确定邮差先生最终将邮件发送给
你的收件人。在这个比喻中,RabbitMQ是邮政信箱,邮局和邮递员。
RabbitMQ和邮局的主要区别在于它不处理纸张,而是接受,存储和转发二进制数据块
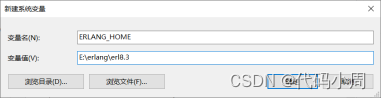
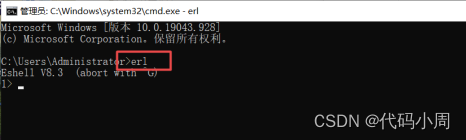
1.2安装erlong和rabbitmq
1.2.1安装Erlang
官网下载地址:https://www.erlang.org/downloads
【安装后,配置环境变量】

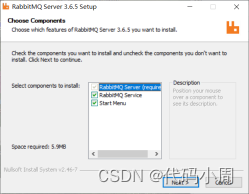
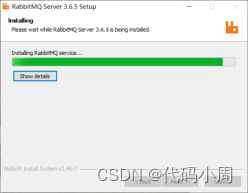
1.2.2安装RabbitMQ
下载地址:https://www.rabbitmq.com/download.html
1.2.3激活RabbitMQ's Management Plugin
【激活方式--启动管理界面】
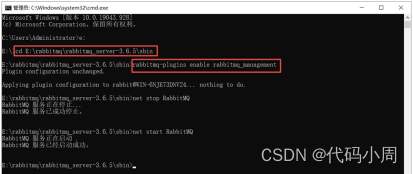
新版可以不配置
命令:rabbitmq-plugins enable rabbitmq_management
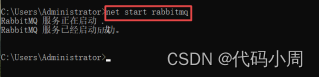
1.2.4安装后启动RabbitMQ命令
net start rabbitmq
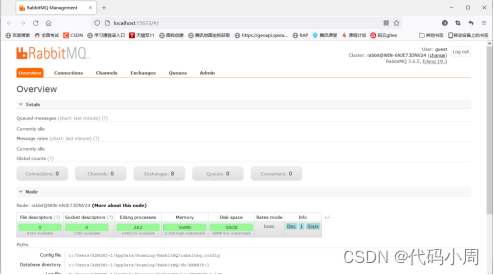
1.2.5通过测试账号测试
用户名:guest 密码:guest
1.3开启rabbit
再配置类里加上开启的注解:
package com.it.springbootrabbitmq;

import org.springframework.amqp.rabbit.annotation.EnableRabbit;
import org.springframework.boot.SpringApplication;
import org.springframework.boot.autoconfigure.SpringBootApplication;

@SpringBootApplication
@EnableRabbit
public class SpringbootrabbitmqApplication {

    public static void main(String[] args) {
        SpringApplication.run(SpringbootrabbitmqApplication.class, args);
    }

}
@EnableRabbit
1.3配置yml文件
spring:
  datasource:
    username: root
    password: 123456
    url: jdbc:mysql://localhost:3306/xianmu?useSSL=false
    driver-class-name: com.mysql.jdbc.Driver

  rabbitmq:
    addresses: localhost #IP??
    username: guest   #???
    password: guest   #??
    dynamic: true     #??????AmqpAdmin?Bean ??:true
1.4创建生产者
 @RequestMapping("/test2")
          @ResponseBody
          public String test2(){
              logger.info("test====初始化成功");

              amqpTemplate.convertAndSend("testDirectExchange","message","{\"code\":\"周加俊\",\"data\":\"测试数据\"}");

              return "hhh";
          }
1.5创建消费者
package com.it.springbootrabbitmq.MabbitMQCustomer;

import org.springframework.amqp.core.ExchangeTypes;
import org.springframework.amqp.rabbit.annotation.Exchange;
import org.springframework.amqp.rabbit.annotation.Queue;
import org.springframework.amqp.rabbit.annotation.QueueBinding;
import org.springframework.amqp.rabbit.annotation.RabbitListener;
import org.springframework.stereotype.Component;

@Component
public class MabbitMQCustomer {


    @RabbitListener(queuesToDeclare = @Queue("singleQueue"))
    public void process(String message){
        System.out.println("===消费者消费了消息===="+message);
    }


    @RabbitListener(
            bindings = {
                    @QueueBinding(
                            value = @Queue("messageQueue"),
                            exchange = @Exchange(value = "testDirectExchange", type = ExchangeTypes.DIRECT),
                            key = "message")})
    public void process1(String message){
        System.out.println("===消费者消费了消息(direct)===="+message);
    }


}
1.6介绍rabbitmq的四种交换机
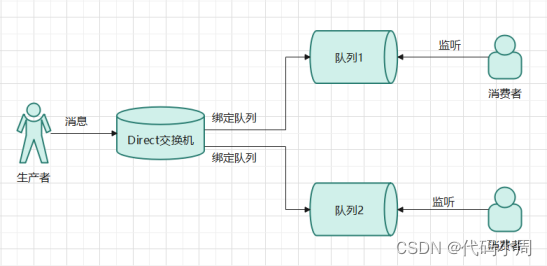
1.6.1Direct Exchange交换器
Direct Exchange可以通过routing key属性实现交换机与队列的精准绑定。可以绑定一个也可以绑定多个。绑定的每个队列都能收到相同条数的信息。
如下图所示:队列1与队列2会收到同样条数的信息。
创建Direct Exchange消费者
1、@RabbitListener:指定消费消息的方法。
2、@Queue("messageQueue")项目启动的时候创建名称为messageQueue队列
3、@Exchange(value="testDirectExchange",type= ExchangeTypes.DIRECT):
项目启动的时候,创建名称为testDirectExchange交换机,类型是direct
4、key = "message"):使用message将交换机testDirectExchange和messageQueue队列绑定
以此类推我们可以实现通过mail将交换机testDirectExchangemailQueu队列绑定
@Component
public class MabbitMQCustomer {

    @RabbitListener(
        bindings = {
           @QueueBinding(
               value = @Queue("messageQueue"),
               exchange = @Exchange(value="testDirectExchange",type= ExchangeTypes.DIRECT),
               key = "message")})
    public void process1(String message){
        System.out.println("===消费者消费了消息(direct)===="+message);
    }

}创建Direct Exchange生产者
@RunWith(SpringRunner.class)
@SpringBootTest
public class RabbitMQProducer {
        @Autowired
        private AmqpTemplate amqpTemplate;
        @Test
        public void send(){
amqpTemplate.convertAndSend("testDirectExchange",
"message","{\"code\":\"200\",\"data\":\"测试数据\"}");
        }
}1.6.2Topic Exchange交换机
Direct Exchange是精准匹配,而Topic Exchange是模糊匹配。
routing key 可以是类似 *.orange.* 或者 lazy.# 的表达式。其中,* (星) 代表一个单词,# (hash) 代表0个或多个单词
创建Topic Exchange消费者
@RabbitListener(
    bindings = {
      @QueueBinding(
        value = @Queue("topic.Queue1"),
        exchange = @Exchange(value="testTopicExchange",
        type= ExchangeTypes.TOPIC),
        key = "topic.*")})
public void process2(String message){
    System.out.println("===消费者消费了消息(topic)===="+message);
}创建Topic Exchange生产者
@RunWith(SpringRunner.class)
@SpringBootTest
public class RabbitMQProducer {
        @Autowired
        private AmqpTemplate amqpTemplate;
        @Test
        public void send(){
            amqpTemplate.convertAndSend("testTopicExchange","topic.queue1",
"{\"code\":\"200\",\"data\":\"测试topic\"}");
        }
}1.6.3Fanout Exchange交换机
和direct exchange、topic exchange不同,fanout exchange不使用routing key,它会将消息路由到所有与其绑定的队列。
fanout exchange是消息广播路由的理想选择。
和direct exchange的一个交换机绑定多个队列的情况一样,绑定了fanout exchange的队列,都会接收到一份全量的消息。
创建Fanout Exchange消费者
@RabbitListener(
    bindings = {
      @QueueBinding(
         value = @Queue("fanout.Queue1"),
         exchange = @Exchange(value="testFanoutExchange",
           type= ExchangeTypes.FANOUT),
         key = "fanout.*")})
public void process3(String message){
    System.out.println("===消费者消费了消息(fanout)===="+message);
}
创建Fanout Exchange生产者
@RunWith(SpringRunner.class)
@SpringBootTest
public class RabbitMQProducer {
@Autowired
private AmqpTemplate amqpTemplate;
@Test
public void send(){
amqpTemplate.convertAndSend("testFanoutExchange","fanout.queue1",
"{\"code\":\"200\",\"data\":\"测试fanout\"}");
}
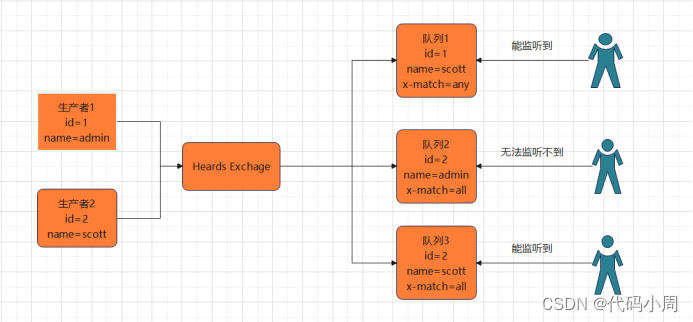
}1.6.4Headers Exchange交换机
和上面三种交换机类型不同,headers exchange是根据Message的一些头部信息来分发过滤Message的,它会忽略routing key的属性,如果Header信息和message消息的头信息相匹配,那么这条消息就匹配上了。
有一个重要参数x-match:当“x-match”参数设置为“any”时,只要一个匹配的header 属性值就足够了;当“x-match”设置为“all”时,意味着所有值都必须匹配,才能将交换机和队列绑定上。
创建Headers Exchange配置类
用于实例化Queue, HeadersExchange以及队列和交换机的绑定关系
@Configuration
public class HeadersConfig {

    @Bean
    public Queue createQueue(){
        return new Queue("headersQueue1");
    }

    @Bean
    public HeadersExchange headersExchange(){
        return new HeadersExchange("headerExchange");
    }


    @Bean
    public Binding binding1(){
        Map<String,Object> header=new HashMap<>();
        header.put("type","1");
        header.put("name","send1");
        return BindingBuilder
                .bind(new Queue("headersQueue1"))
                .to(headersExchange())
                .whereAny(header)
                //.whereAll(header)
                .match();
    }
}创建Headers Exchange消费者
@Component
public class MabbitMQCustomer {
    @RabbitListener(queues ="headersQueue1")
    public void process4(String message){
        System.out.println("===消费者消费了消息(headers)===="+message);
    }
}
创建Headers Exchange生产者
@RunWith(SpringRunner.class)
@SpringBootTest
public class RabbitMQProducer {
        @Autowired
        private AmqpTemplate amqpTemplate;

        @Test
        public void send(){
            MessageProperties messageProperties=new MessageProperties();
            messageProperties.setHeader("type","1");
            messageProperties.setHeader("name","send1");
            Message message=new Message("这是消息内容".getBytes(StandardCharsets.UTF_8)
,messageProperties);
            amqpTemplate.convertAndSend("headerExchange","",message);
        }
}
好了几天的介绍就到这里了!!!!!!!!!


 614
614


 被折叠的 条评论
为什么被折叠?
被折叠的 条评论
为什么被折叠?
 到【灌水乐园】发言


