


打开MyEclipse,file——new——web project,在弹出框输入项目名字
点击WebRoot前面的+号,展开项目
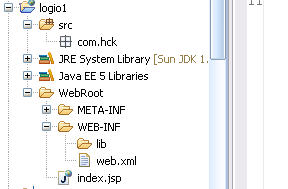
lib文件夹里面,放我们需要的外部包,比如连接数据库的,或者一些框架如Struts2的,后面介绍。
web.xml ,index.jsp,创建项目自动生成的。
web.xml
<?xml version="1.0" encoding="UTF-8"?>
<web-app version="2.5"
xmlns="http://java.sun.com/xml/ns/javaee"
xmlns:xsi="http://www.w3.org/2001/XMLSchema-instance"
xsi:schemaLocation="http://java.sun.com/xml/ns/javaee
http://java.sun.com/xml/ns/javaee/web-app_2_5.xsd">
<welcome-file-list>
<welcome-file>index.jsp</welcome-file>
</welcome-file-list>
</web-app>
里面的index.jsp就是上面那个jsp文件了,在这里配置后,到我们启动服务器,在浏览器访问我们的项目时候,在我们没有指名访问哪个特定jsp文件或者servlet,或者action时候,会默认访问这个文件,当然可以是其他的jsp文件或者其它html压面。它里面进行一些初始化的配置,向Struts2,servlet,spring,都需要在里面配置的。(这些后面讲)
2.打开index.jsp页面,打开可以有几种方式,可以直接双击,用默认打开,也可以右键——open with,选择打开方式。
打开后,我们写入下面代码,主要在<boday>里面
<%@ page language="java" import="java.util.*" pageEncoding="UTF-8"%>
<%
String path = request.getContextPath();
String basePath = request.getScheme()+"://"+request.getServerName()+":"+request.getServerPort()+path+"/";
%>
<%
request.setCharacterEncoding("UTF-8");
%>
<!DOCTYPE HTML PUBLIC "-//W3C//DTD HTML 4.01 Transitional//EN">
<html>
<head>
<base href="<%=basePath%>">
<title>My JSP 'index.jsp' starting page</title>
<meta http-equiv="pragma" content="no-cache">
<meta http-equiv="cache-control" content="no-cache">
<meta http-equiv="expires" content="0">
<meta http-equiv="keywords" content="keyword1,keyword2,keyword3">
<meta http-equiv="description" content="This is my page">
<!--
<link rel="stylesheet" type="text/css" href="styles.css">
-->
</head>
<body>
<div align="center">
<form action="login.jsp" method="post">
<table>
<tr>
<td>账号:<input name="userName" type="text"/></td>
</tr>
<tr><td>密码:<input name="userPassword" type="password"/></td></tr>
<tr>
<td ><input type="submit" value="登陆"/>
<input type="reset" value="取消"/></td>
</tr>
</table>
</form>
</div>
</body>
</html>
就一个很简单的表单,让填入账号和密码后,然后点击登录后,就会触发action,跳到login.jsp页面,把我们填入的信息显示出来,很简单,没用数据库。
login.jsp
<%@ page language="java" import="java.util.*" pageEncoding="UTF-8"%>
<%
String path = request.getContextPath();
String basePath = request.getScheme()+"://"+request.getServerName()+":"+request.getServerPort()+path+"/";
%>
<%
request.setCharacterEncoding("UTF-8");
%>
<!DOCTYPE HTML PUBLIC "-//W3C//DTD HTML 4.01 Transitional//EN">
<html>
<head>
<base href="<%=basePath%>">
<title>My JSP 'login.jsp' starting page</title>
<meta http-equiv="pragma" content="no-cache">
<meta http-equiv="cache-control" content="no-cache">
<meta http-equiv="expires" content="0">
<meta http-equiv="keywords" content="keyword1,keyword2,keyword3">
<meta http-equiv="description" content="This is my page">
<!--
<link rel="stylesheet" type="text/css" href="styles.css">
-->
</head>
<body>
<p>你输入的账号是:<%=request.getParameter("userName") %></p>
<p>你输入的密码是:<%=request.getParameter("userPassword") %></p>
</body>
</html>
就加了红色部分代码:requese是jsp的一个内置对象,用它的request.getParameter() 方法,就可以获取我们从index.jsp传过来的数据了。括号里面是字符串,就是index.jsp页面对应的 name的值,必须对应,才能获取数据。
代码完成,现在发布到tomcat服务器上面,看效果了。部署有多种方式
右键项目,点击run as——Myeclipse server application
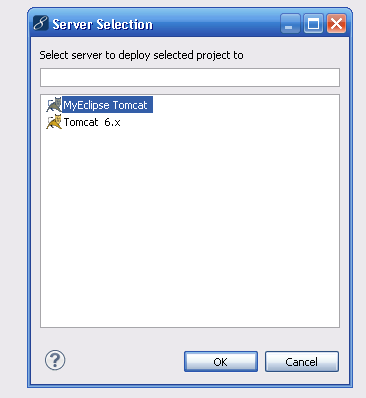
点击第一,ok,我上面另外一个tomcat是自己配置的,第一个是myeclipse自带的 ,启动完成,出现这个页面。
我们还可以打开IE浏览器,在里面输入http://127.0.0.1:8888/logio1/ 我的修改过tomcat端口号,默认为8080,因为8080端口可能被占用,所以可以自己改下端口号,可以这样改,
依次打开文件:Workspaces\.metadata\.me_tcat\conf 右键点击server.xml,以记事本方式打开,红色为修改的代码,就是把port里面的值改为8888,可以是其他:
我们启动tomcat后,访问我们的项目,输入浏览器的地址就是:http://localhost:8888/logio1/index.jsp 注:localhost和127.0.0.1都行,2者内涵一样的,都是我们本机回环ip。8888你tomcat的端口号,logio1,你创建的项目名字,index.jsp,访问哪个页面。
<!-- A "Connector" represents an endpoint by which requests are received
and responses are returned. Documentation at :
Java HTTP Connector: /docs/config/http.html (blocking & non-blocking)
Java AJP Connector: /docs/config/ajp.html
APR (HTTP/AJP) Connector: /docs/apr.html
Define a non-SSL HTTP/1.1 Connector on port 8888
-->
<Connector connectionTimeout="20000" port="8888" protocol="HTTP/1.1"
URIEncoding="GBK" redirectPort="8443"/>
<!-- A "Connector" using the shared thread pool-->
<!--
<Connector executor="tomcatThreadPool"
port="8080" protocol="HTTP/1.1"
connectionTimeout="20000"
redirectPort="8443" />
-->

填入信息,点击登录
得到下面页面:

完成,很简单。
注意:在页面里面加入:
<%
request.setCharacterEncoding("UTF-8");
%>
防止中文乱码
统一编码:我这里全部使用的UTF-8,web开发基本用该编码,它支持所有的文字编码。你创建的jsp页面一般默认不是utf-8的,需要去修改,很麻烦,我们可以进行设置,让它默认为utf-8编码的,具体如下:点击菜单栏window——Prefereces——Myeclipse——Files and Editors——JSP,在右边选择相应编码后,点击ok。下次创建的jsp默认就是utf-8的格式了。


 897
897

 被折叠的 条评论
为什么被折叠?
被折叠的 条评论
为什么被折叠?
 到【灌水乐园】发言


