


账号登录成功,您需要创建应用才可正式调用AI能力。应用是您调用API服务的基本操作单元,您可以基于应用创建成功后获取的API Key及Secret Key,进行接口调用操作,及相关配置。
第一步:去百度智能云注册账号登录:链接:百度智能云-登录 (baidu.com)
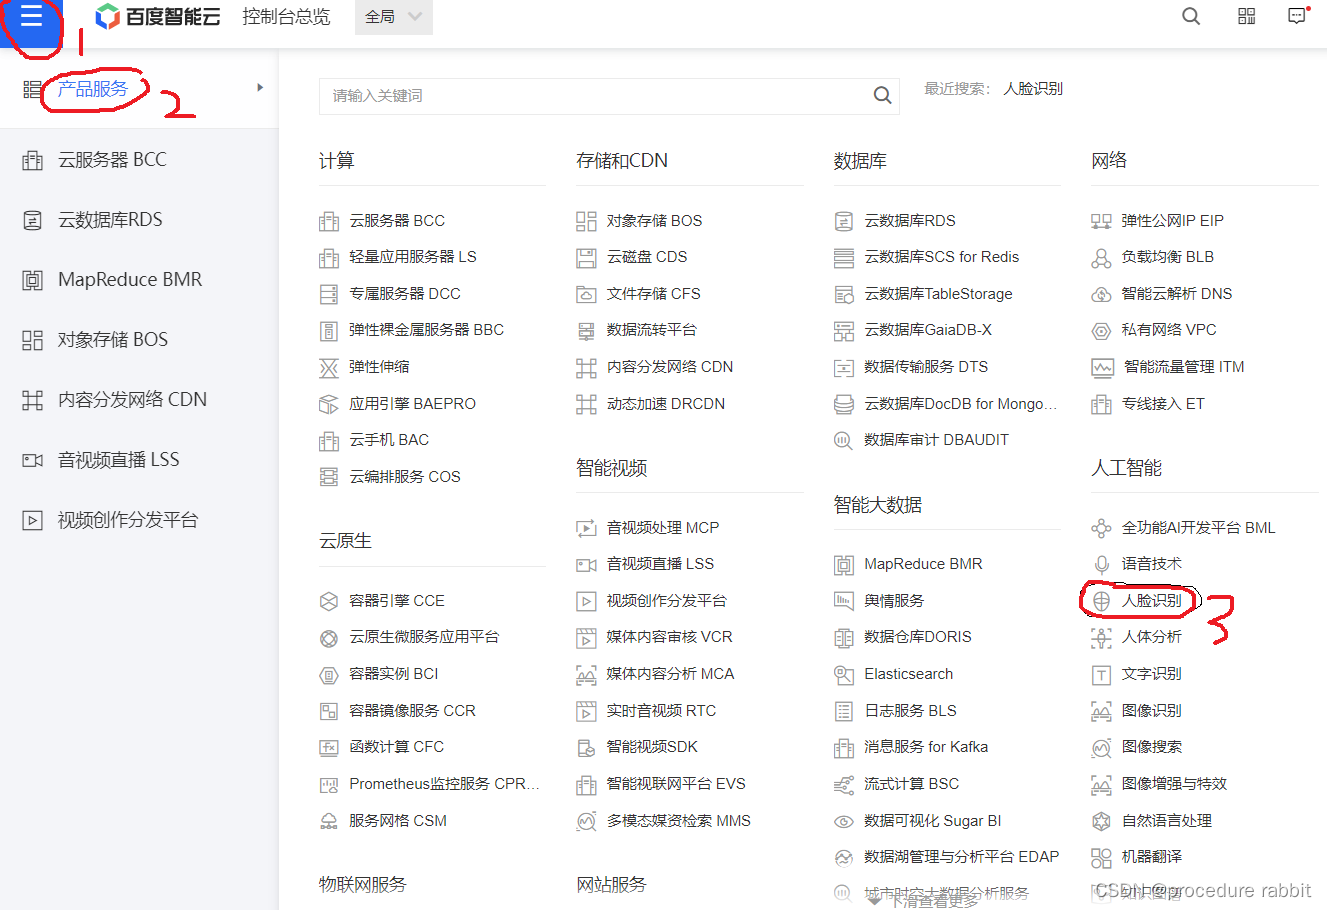
第二步:找到右侧顶部蓝色三条杠点击-->产品服务-->人工智能-->人脸识别
第三步:按照首页概括操作
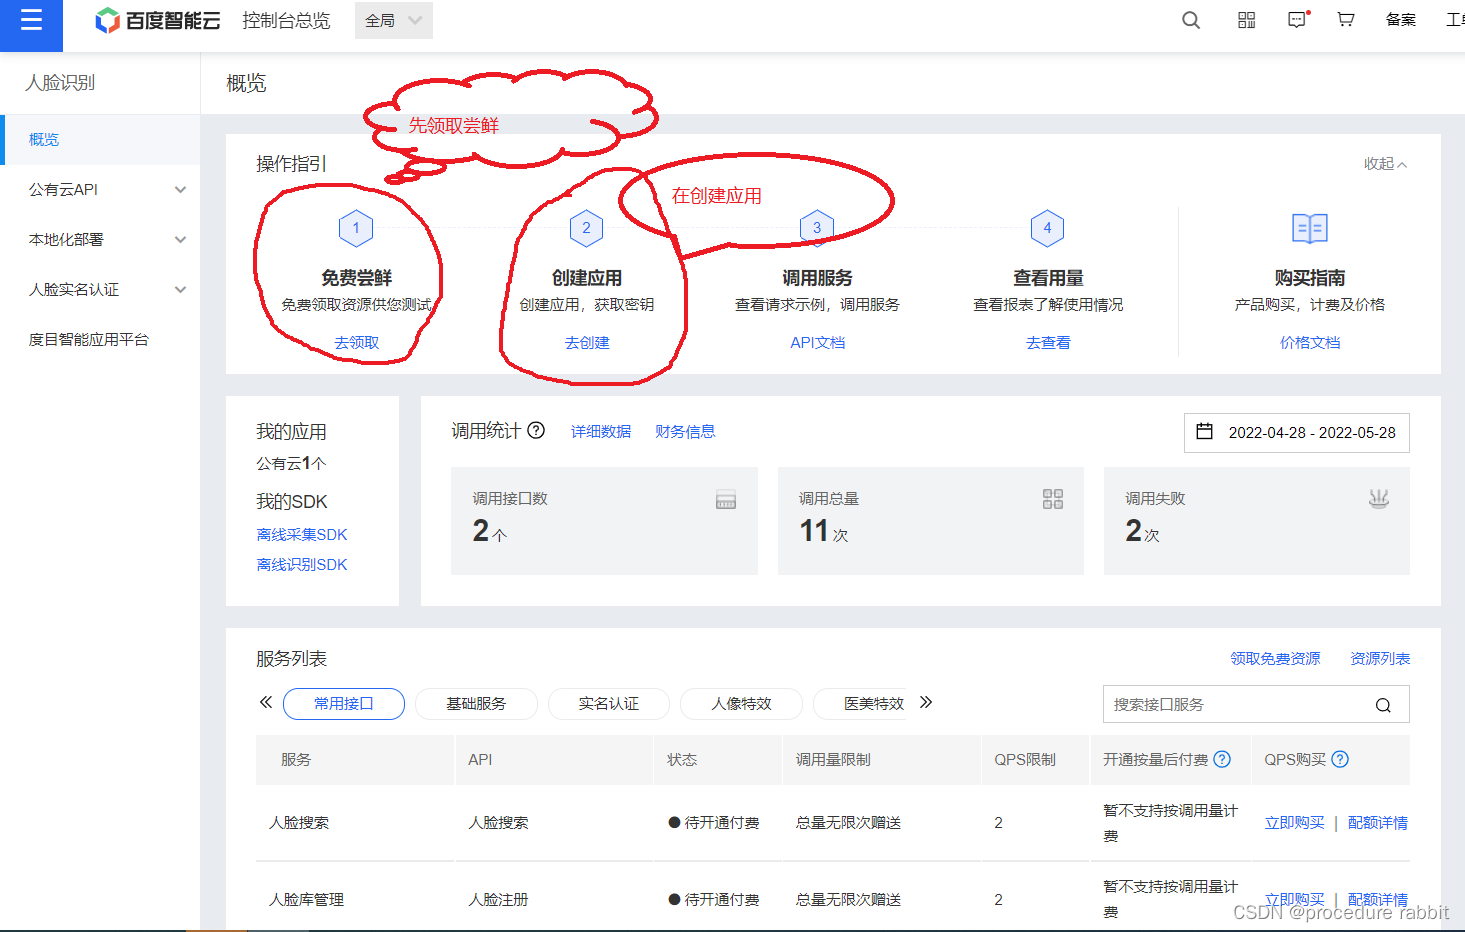
关于创建应用教程:
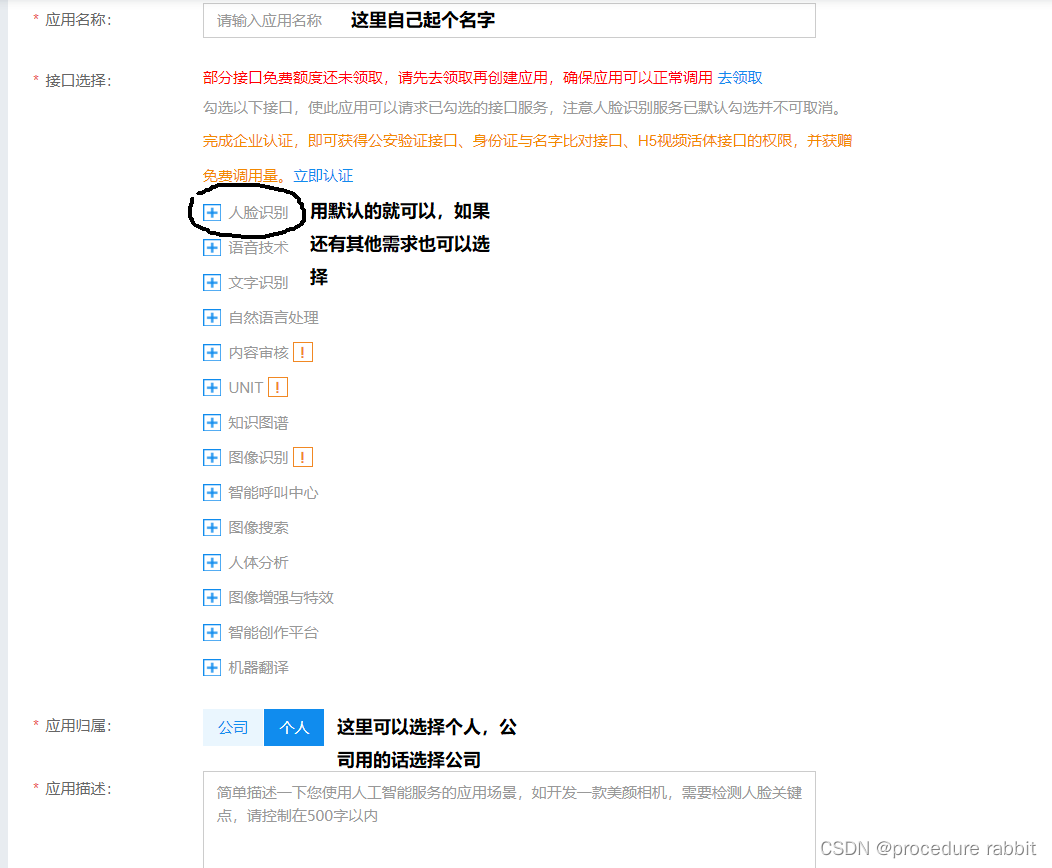
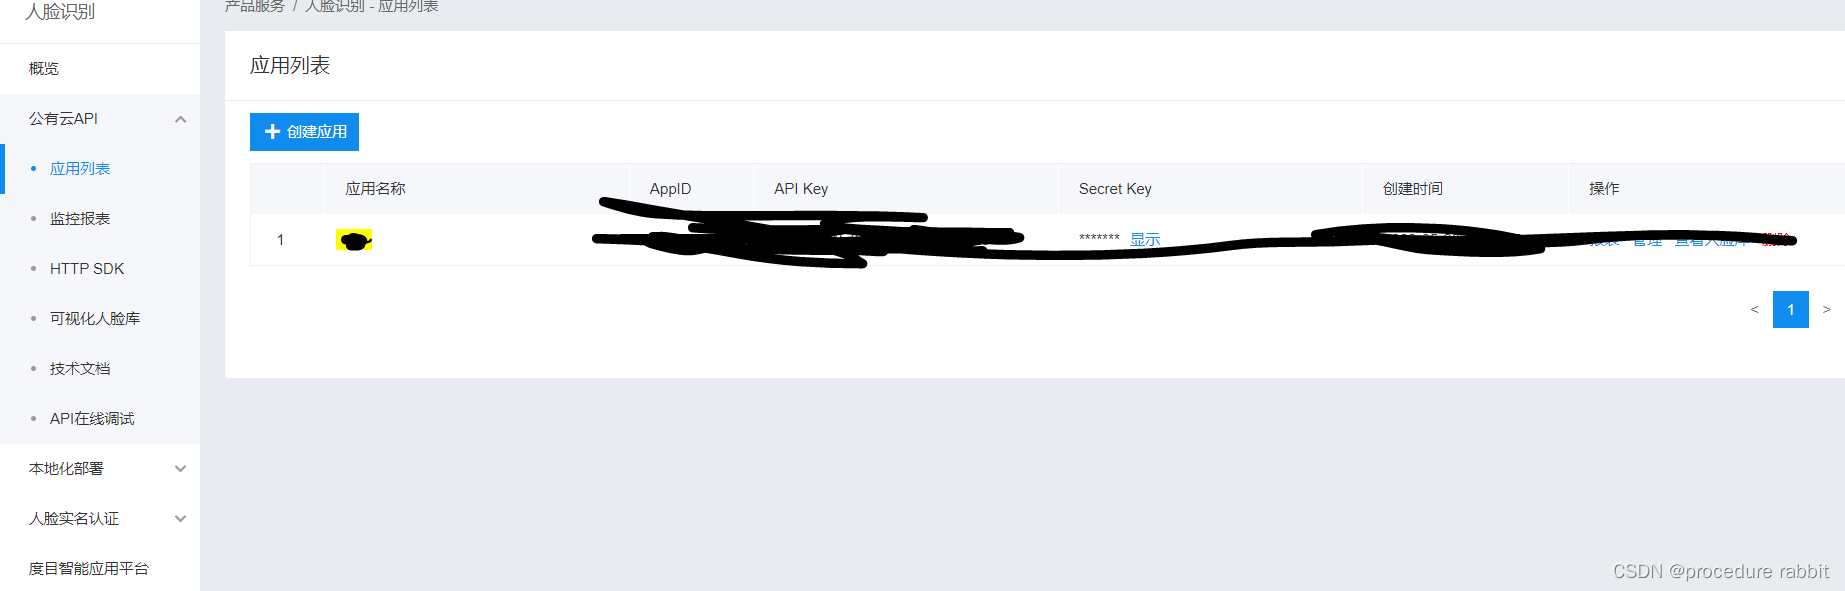
第四步创建好后保留以下三个字段
| AppID | API Key | Secret Key |
|---|
废话不多说直接上代码
1.创建一个spring boot项目
2.导入maven依赖
<dependency>
<groupId>com.baidu.aip</groupId>
<artifactId>java-sdk</artifactId>
<version>4.16.7</version>
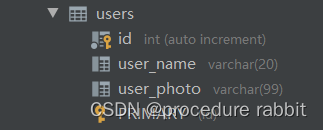
</dependency>3.创建数据库,如下图所示
4.配置yml
baidu:
  appId: 刚刚创建号应用保存的appId
  key: 刚刚创建号应用保存的key
  secret: 刚刚创建号应用保存的secret
如图所示:
5.
import com.baidu.aip.face.AipFace;
import org.springframework.beans.factory.annotation.Value;
import org.springframework.context.annotation.Bean;
import org.springframework.context.annotation.Configuration;

@Configuration
public class BaiduConfig {

    @Value("${baidu.appId}")
    private String appId;

    @Value("${baidu.key}")
    private String key;

    @Value("${baidu.secret}")
    private String secret;

    @Bean
    public AipFace aipFace(){
        return new AipFace(appId,key,secret);
    }
}
6.
import lombok.AllArgsConstructor;
import lombok.Builder;
import lombok.Data;
import lombok.NoArgsConstructor;

@Data
@NoArgsConstructor
@AllArgsConstructor
@Builder
public class Users {

  private Integer id;
  private String userName;
  private String userPhoto;

}


----------------------------------都在代码块中了哈------------------------------------------
第七步:

import com.baidu.aip.face.AipFace;
import com.face.config.BaiduConfig;
import com.face.dao.UsersMapper;
import com.face.pojo.Users;
import org.json.JSONObject;
import org.springframework.beans.factory.annotation.Autowired;
import org.springframework.util.StringUtils;
import org.springframework.web.bind.annotation.CrossOrigin;
import org.springframework.web.bind.annotation.RequestMapping;
import org.springframework.web.bind.annotation.RequestMethod;
import org.springframework.web.bind.annotation.RestController;
import sun.misc.BASE64Decoder;

import java.io.File;
import java.io.FileOutputStream;
import java.io.IOException;
import java.io.OutputStream;
import java.util.HashMap;
@RestController
@CrossOrigin
public class FaceController {

    /*上传路径*/
    private String filePath="路径";

    @Autowired
    private BaiduConfig baiduConfig;
    /*数据库*/
    @Autowired
    private UsersMapper usersMapper;
    @RequestMapping(value = "register",method = RequestMethod.POST)
    public String register(String userName,String faceBase) throws IOException {
        if(!StringUtils.isEmpty(userName) && !StringUtils.isEmpty(faceBase)) {
            // 文件上传的地址
            System.out.println(filePath);
            // 图片名称
            String fileName = userName + System.currentTimeMillis() + ".png";
            System.out.println(filePath + "\\" + fileName);
            File file = new File(filePath + "\\" + fileName);

            // 往数据库里插入一条用户数据
            Users user = new Users();
            user.setUserName(userName);
            user.setUserPhoto(filePath + "\\" + fileName);
            Users exitUser = usersMapper.selectUserByName(user);
            if(exitUser != null) {
                return "2";
            }
            usersMapper.addUsers(user);

            // 保存上传摄像头捕获的图片
            saveLocalImage(faceBase, file);
            // 向百度云人脸库插入一张人脸
            faceSetAddUser(baiduConfig.aipFace(),faceBase,userName);
        }
        return "1";
    }


    public boolean saveLocalImage(String imgStr, File file) {
        // 图像数据为空
        if (imgStr == null) {
            return false;
        }else {
            BASE64Decoder decoder = new BASE64Decoder();
            try {
                // Base64解码
                byte[] bytes = decoder.decodeBuffer(imgStr);
                for (int i = 0; i < bytes.length; ++i) {
                    if (bytes[i] < 0) {
                        bytes[i] += 256;
                    }
                }
                // 生成jpeg图片
                if(!file.exists()) {
                    file.getParentFile().mkdir();
                    OutputStream out = new FileOutputStream(file);
                    out.write(bytes);
                    out.flush();
                    out.close();
                    return true;
                }

            } catch (Exception e) {
                e.printStackTrace();
                return false;
            }
        }
        return false;
    }

    public boolean faceSetAddUser(AipFace client, String faceBase, String username) {
        // 参数为数据库中注册的人脸
        HashMap<String, String> options = new HashMap<String, String>();
        options.put("user_info", "user's info");
        JSONObject res = client.addUser(faceBase, "BASE64", "user_01", username, options);
        return true;
    }
    @RequestMapping(value = "login",method = RequestMethod.POST)
    public String login(String faceBase) {
        String faceData = faceBase;
        // 进行人像数据对比
        Double num = checkUser(faceData,baiduConfig.aipFace());
        if( num > 80) {
            return "1";
        }else {
            return "2";
        }
    }

    public Double checkUser(String imgBash64,AipFace client) {
        // 传入可选参数调用接口
        HashMap<String, Object> options = new HashMap<String, Object>();
        JSONObject res = client.search(imgBash64, "BASE64", "user_01", options);
        JSONObject user = (JSONObject) res.getJSONObject("result").getJSONArray("user_list").get(0);
        Double score = (Double) user.get("score");
        return score;
    }

}
----------------------------------------------------------------------------------------
第八步:
import com.face.pojo.Users;
import org.apache.ibatis.annotations.Insert;
import org.apache.ibatis.annotations.Mapper;
import org.apache.ibatis.annotations.Select;

@Mapper
public interface UsersMapper {
    @Insert("insert into users values (#{id},#{userName},#{userPhoto})")
    Integer addUsers(Users users);

    @Select("select*from users where user_name=#{userName}")
    Users selectUserByName(Users users);
}


第九步:注册前端页面
<!DOCTYPE html>
<html>
<head>
<meta charset="UTF-8">
<title>Insert title here</title>
 <style type="text/css">
   /**解决浏览器兼容性问题**/
  *{margin: 0;padding: 0;}
  html,body{width: 100%;height: 100%;}/**/
  /*body{background: url(ac.jpg) no-repeat center;}*/
  h1{color: #fff;text-align: center;line-height: 80px;}
  .media{width: 534px;height: 400px;margin: 40px auto 0;
    }
  #register{width: 200px;height:50px;background-color: #2196f3; margin-left: 640px;
  text-align: center;line-height: 50px;color: #fff;border-radius: 10px;}
  #canvas{display: none;}
  /*#shuru{width: 200px;height:50px;background-color: #2196f3; margin: 20px auto 0;}*/
   #shuru{width: 200px;height:30px; margin: 0 auto;}
 </style>
</head>
<body>
 <h1>注册</h1>
 <div id="shuru">
 用户名:<input type="text" name="username" id="username"/>
 </div>

 <div class="media">
  <video id="video" width="450" height="300" src="" autoplay></video>
  <canvas id="canvas" width="450" height="300"></canvas>

 </div>
 <button id="register" >确定注册</button>
 <script type="text/javascript" src="https://libs.baidu.com/jquery/2.1.4/jquery.min.js"></script>
 <script type="text/javascript">
 /**调用摄像头,获取媒体视频流**/
 var video = document.getElementById('video');
 //返回画布二维画图环境
 var userContext = canvas.getContext("2d");
 var getUserMedia =
  //浏览器兼容,表示在火狐、Google、IE等浏览器都可正常支持
  (navigator.getUserMedia || navigator.webkitGetUserMedia || navigator.mozGetUserMedia || navigator.msGetUserMedia)
  //getUserMedia.call(要调用的对象,约束条件,调用成功的函数,调用失败的函数)
  getUserMedia.call(navigator,{video: true,audio: false},function(localMediaStream){
   //获取摄像头捕捉的视频流
   video.srcObject=localMediaStream;
  },function(e){
   console.log("获取摄像头失败!!")
  });
 //点击按钮注册事件
  var btn = document.getElementById("register");

 btn.onclick = function () {
  var username = $("#username").val();
  alert($("#username").val());
   if(username != null){
    //点击按钮时拿到登陆者面部信息
             userContext.drawImage(video,0,0,450,300);
             var userImgSrc = document.getElementById("canvas").toDataURL("img/png");
             //拿到bash64格式的照片信息
             var faceBase = userImgSrc.split(",")[1];

             //ajax异步请求
             $.ajax({
              url: "http://127.0.0.1:8080/register",
              type: "post",
              data: {"faceBase": faceBase,
               "userName": username
              },
              success: function(result){
               if(result === '1'){
                alert("注册成功!!,点击确认跳转至登录页面");
                window.location.href="fac2.html";
               }else if(result === '2'){
                alert("您已经注册过啦!!");
               }else{
                alert("系统错误!!");
               }

              }
             })
   }else{
    alert("用户名不能为空");
   }

       }
 </script>
</body>
</html>

----------------------------------------------------------------------------------------
第十步:登录前端页面
<!DOCTYPE html>
<html>
<head>
    <meta charset="UTF-8">
    <title>Insert title here</title>
    <style type="text/css">
        *{margin: 0;padding: 0;}
        html,body{width: 100%;height: 100%;}/**/
        h1{text-align: center;line-height: 80px;}
        .media{width: 450px;height: 300px;line-height: 300px;margin: 40px auto;}
        .btn{width: 250px;height:50px; line-height:50px; margin: 20px auto; text-align: center;}
        #login{width: 200px;height:50px;background-color: skyblue;text-align: center;line-height: 50px;color: #fff;}
        #canvas{display: none;}

    </style>
</head>
<body>
<h1>登录</h1>
<div class="media">
    <video id="video" width="450" height="300" src="" autoplay></video>
    <canvas id="canvas" width="450" height="300"></canvas>

</div>
<div class="btn"><button id="login" >登录按钮</button></div>
<script type="text/javascript" src="https://libs.baidu.com/jquery/2.1.4/jquery.min.js"></script>
<script type="text/javascript">
    /**调用摄像头,获取媒体视频流**/
    var video = document.getElementById('video');
    //返回画布二维画图环境
    var userContext = canvas.getContext("2d");
    var getUserMedia =
        //浏览器兼容,表示在火狐、Google、IE等浏览器都可正常支持
        (navigator.getUserMedia || navigator.webkitGetUserMedia || navigator.mozGetUserMedia || navigator.msGetUserMedia)
    //getUserMedia.call(要调用的对象,约束条件,调用成功的函数,调用失败的函数)
    getUserMedia.call(navigator,{video: true,audio: false},function(localMediaStream){
        //获取摄像头捕捉的视频流
        video.srcObject=localMediaStream;
    },function(e){
        console.log("获取摄像头失败!!")
    });
    //点击按钮登录事件
    var btn = document.getElementById("login");
    btn.onclick = function () {
        //点击按钮时拿到登陆者面部信息
        userContext.drawImage(video,0,0,450,300);
        var userImgSrc = document.getElementById("canvas").toDataURL("img/png");
        //拿到bash64格式的照片信息
        var faceBase = userImgSrc.split(",")[1];
        //ajax异步请求
        $.ajax({
            url: "http://127.0.0.1:8080/login",
            type: "post",
            data: {"faceBase": faceBase},
            success: function(result){
                if(result==='1'){
                    alert("登录成功!!")
                    //跳转至登录页面
                    // window.location.href="toSuccess";
                }else{
                    alert("人脸识别失败!!");
                    //跳转至登录失败页面
                    // window.location.href="toErro";

                }
            }
        })
    }
</script>
</body>
</html>


 1002
1002


 被折叠的 条评论
为什么被折叠?
被折叠的 条评论
为什么被折叠?
 到【灌水乐园】发言


