


创建好spring boot项目后加入依赖 注意依赖版本和你的IotDB版本保持一致
    <!--iotdb依赖-->
<dependency>
    <groupId>org.apache.iotdb</groupId>
    <artifactId>iotdb-session</artifactId>
    <version>0.13.2</version>
</dependency>
<dependency>
    <groupId>org.apache.iotdb</groupId>
    <artifactId>iotdb-jdbc</artifactId>
    <version>0.13.2</version>
</dependency>
<!--mybatis依赖-->
<dependency>
    <groupId>org.mybatis.spring.boot</groupId>
    <artifactId>mybatis-spring-boot-starter</artifactId>
    <version>2.2.0</version>
</dependency>
方案一:利用mybatis整合
在配置文件中加入
server:
  port: 8080
#iotdb
spring:
  datasource:
    username: root
    password: root
    driver-class-name: org.apache.iotdb.jdbc.IoTDBDriver
    url: jdbc:iotdb://110.110.110.xxx:6667/
    #mybatis
mybatis:
  mapper-locations: classpath*:/mappers/*.xml
自行创建controller,mapper,service(impl)等包
controller
@RestController
public class OrderController {
    @Autowired
    OrderService orderService;

    @GetMapping("/test")
    public void test(){
        Integer test = orderService.test();
        System.out.println(test);
    }
}
mapper
@Mapper
public interface OrderMapper {
    Integer test();
}
service
public interface OrderService {
    Integer test ();
}
serviceImpl
@Service
public class OrderServiceImpl implements OrderService {
    @Autowired
    OrderMapper orderMapper;

    @Override
    public Integer test() {
        return orderMapper.test();
    }
}
mappers下的映射文件 记得修改语句喔
<?xml version="1.0" encoding="UTF-8"?>
<!DOCTYPE mapper PUBLIC "-//mybatis.org//DTD Mapper 3.0//EN" "http://mybatis.org/dtd/mybatis-3-mapper.dtd">
<mapper namespace="com.huangke.iotdbtest.mapper.OrderMapper">
<select id="test" resultType="Integer">
select count(*) from root.ln.wf01.wt01
</select>
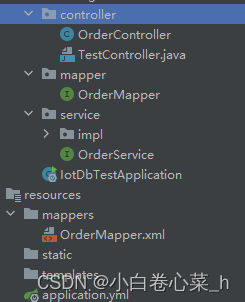
</mapper>大致结构如下
接下来运行访问即可得到结果
方案二:使用IotSession
注意:使用此方法就先把mybatis的依赖注释掉不然没有注入数据库会报错

配置文件如下
#iotdb
spring:
  iotdb:
    ip: 192.168.110.10
    port: 6667
    user: root
    password: root
    fetchSize:  10000
    maxActive: 10
server:
  port: 8080
在config包下创建配置文件
@Configuration
public class IotConfigSession {

    @Value("${spring.iotdb.ip}")
    private String ip;

    @Value("${spring.iotdb.port}")
    private int port;

    @Value("${spring.iotdb.user}")
    private String user;

    @Value("${spring.iotdb.password}")
    private String password;

    @Value("${spring.iotdb.fetchSize}")
    private int fetchSize;

    @Bean
    public Session iotSession(){
        Session session = new Session(ip, port, user, password, fetchSize);
        try {
            session.open();
        } catch (IoTDBConnectionException e) {
            throw new RuntimeException(e);
        }
        return session;
    }
}
创建controller
小伙伴们也可以自己写一些简单的测试用例 直接用session去 “.” 就行
可以不用在以下方法里使用
Session session = iotConfigSession.iotSession();可以直接用iotConfigSession去做,我这样做只是因为要实现不同的session连接去测试压力
@RestController
public class TestController {
@Autowired
private IotConfigSession iotConfigSession ;
//批量插入 第一个参数是每次插入多少 第二个是插入总量
@GetMapping("insert/{BATCH_INSERT_SIZE}/{TOTAL_INSERT_ROW_COUNT}")
public String insertTablet(@PathVariable int BATCH_INSERT_SIZE,@PathVariable int TOTAL_INSERT_ROW_COUNT) throws IoTDBConnectionException, StatementExecutionException {
// 设置设备名字,设备下面的传感器名字,各个传感器的类型
Session session = iotConfigSession.iotSession();
List<MeasurementSchema> schemaList = new ArrayList<>();
//指定物理量(字段也叫属性) 传感器并 设置类型
schemaList.add(new MeasurementSchema("status", TSDataType.BOOLEAN));
schemaList.add(new MeasurementSchema("temperature", TSDataType.DOUBLE));
schemaList.add(new MeasurementSchema("speed", TSDataType.INT64));
/* 默认前两级是storage group maxRowNumber 单次插入多少条*/
Tablet tablet = new Tablet("root.ln.wf01.wt01", schemaList, BATCH_INSERT_SIZE);
// 以当前时间戳作为插入的起始时间戳
long timestamp = System.currentTimeMillis();
long beginTime = System.currentTimeMillis();
for (long row = 0; row < TOTAL_INSERT_ROW_COUNT; row++) {
int rowIndex = tablet.rowSize++;
tablet.addTimestamp(rowIndex, timestamp);//批量插入的时间戳是数组 rowIndex为下标
// 随机生成数据 物理量对应的值
tablet.addValue("status", rowIndex, (row & 1) == 0);
tablet.addValue("temperature", rowIndex, (double) row);
tablet.addValue("speed", rowIndex, row);
if (tablet.rowSize == tablet.getMaxRowNumber()) {//拼接到BATCH_INSERT_SIZE 后执行一次
long bg = System.currentTimeMillis();
session.insertTablet(tablet);
tablet.reset();
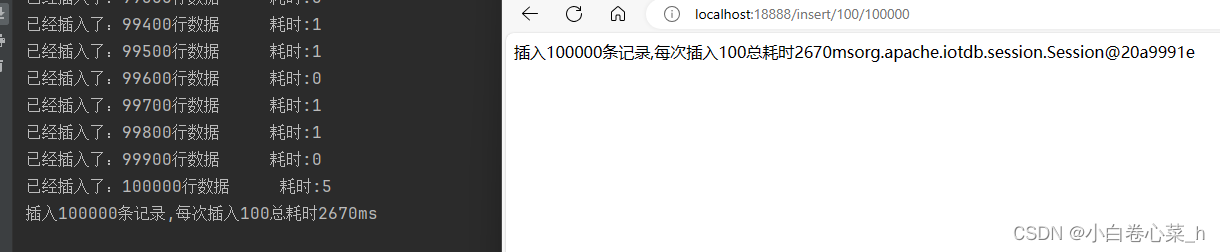
System.out.println("已经插入了:" + (row + 1) + "行数据 "+ "耗时:"+(System.currentTimeMillis()-bg));
}
timestamp++;
}
// 插入剩余不足 BATCH_INSERT_SIZE的数据再次插入一次 例如单次允许插入20行 有25条记录 就插入2次(20+5)
if (tablet.rowSize != 0) {
session.insertTablet(tablet);
System.out.println("最后插入"+tablet.rowSize);
tablet.reset();
}
long endTime =System.currentTimeMillis();
System.out.println("插入"+TOTAL_INSERT_ROW_COUNT+"条记录,每次插入"+BATCH_INSERT_SIZE+"总耗时"+(endTime-beginTime)+"ms");
// session.close();
return "插入"+TOTAL_INSERT_ROW_COUNT+"条记录,每次插入"+BATCH_INSERT_SIZE+"总耗时"+(endTime-beginTime)+"ms"+session;
}
//删除存储组
@GetMapping("deleteStorageGroup")
public String deleteStorageGroup() throws IoTDBConnectionException, StatementExecutionException {
Session session = iotConfigSession.iotSession();
session.deleteStorageGroup("root.ln");
// session.close();
return "删除存储组root.ln";
}
//批量插入 num是数量
@GetMapping("insertRecords/{num}")
public String insertRecords(@PathVariable("num") int num) throws IoTDBConnectionException, StatementExecutionException {
Session session = iotConfigSession.iotSession();
//设备/实体
String deviceId="root.ln";
//属性 物理量
List<String> schemaList=new ArrayList<>();
schemaList.add("capacity");
schemaList.add("price");
schemaList.add("status");
List<TSDataType> types=new ArrayList<>();
types.add(TSDataType.TEXT);
types.add(TSDataType.DOUBLE);
types.add(TSDataType.BOOLEAN);
List<Object> value=new ArrayList<>();
value.add("1000");
value.add(88.5);
value.add(false);
List<String> deviceIds=new ArrayList<>();
List<Long> times=new ArrayList<>();
List<List<String>> measurementsList=new ArrayList<>();
List<List<TSDataType>> typesList=new ArrayList<>();
List<List<Object>> valueList=new ArrayList<>();
for (int i=1;i<=num;i++){
deviceIds.add(deviceId+".F"+i+"."+"k"+(i%10));
times.add((long) i%150+1);
measurementsList.add(schemaList);
typesList.add(types);
valueList.add(value);
}
long begin = System.currentTimeMillis();
//List<String> deviceIds, List<Long> times, List<List<String>> measurementsList, List<List<TSDataType>> typesList, List<List<Object>> values
session.insertRecords(deviceIds,times,measurementsList,typesList,valueList);
long end = System.currentTimeMillis();
session.close();
return "插入"+num+"条记录耗时:"+(end-begin)+"ms";
}
//查询
@GetMapping("select")
public String select() throws IoTDBConnectionException, StatementExecutionException {
Session session = iotConfigSession.iotSession();
long l = System.currentTimeMillis();
String sql="select * from root.ln.wf01.wt01 limit 100";
SessionDataSet sessionDataSet = session.executeQueryStatement(sql);
while(sessionDataSet.hasNext()){
RowRecord rowRecord = sessionDataSet.next();
System.out.println("timeStamp:"+rowRecord.getTimestamp());
List<Field> fields = rowRecord.getFields();
for (Field field:fields){
System.out.println(field);
}
System.out.println("------------------------------------------------------");
}
long l1 = System.currentTimeMillis();
session.close();
return "查询耗时:"+(l1-l)+session;
}
}测试


 1万+
1万+


 被折叠的 条评论
为什么被折叠?
被折叠的 条评论
为什么被折叠?
 到【灌水乐园】发言


