vue3 ts element-plus el-tree添加树节点 删除树节点 修改树节点

本文介绍了如何在Vue应用中使用el-tree组件,展示了如何实现节点的编辑、添加和删除功能,以及相关的状态管理方法。
摘要由CSDN通过智能技术生成

                    <el-tree
                      ref="treeRef"
                      :data="data"
                      :expand-on-click-node="false"
                      :highlight-current="true"
                      :props="defaultProps"
                      class="menu-tree"
                      default-expand-all
                      draggable
                      node-key="id"
                      @node-click="handleNodeClick"
                    >

                      <template #default="{ node, data }">
                        <span class="custom-tree-node">
                           <template v-if="!isEditing || editingNodeId !== data.id">
                             {{ node.label }}
                           </template>
                           <template v-else>
                             <el-input
                               v-model="editingNodeLabel"
                               @blur="cancelEdit"
                               @keyup.enter="updateNodeLabel(data)"
                             ></el-input>
                           </template>
                          <span>
                            <a :style="{marginRight: '0.5rem'}" @click="append(data)">
                              <el-icon :style="{color:'#0000FF'}">
                                <Plus />
                              </el-icon>
                            </a>
                            <a :style="{marginRight: '0.5rem'}" @click="remove(node, data)">
                              <el-icon :style="{color:'#DA3434'}">
                                <Delete />
                              </el-icon>
                            </a>
                            <a :style="{marginRight: '0.5rem'}" @click="edit(node,data)">
                              <el-icon :style="{color:'#0000FF'}">
                                <Edit />
                              </el-icon>
                            </a>
                          </span>
                        </span>
                      </template>

                    </el-tree>


/** 树节点id */
let id = 1000;
/** 单击节点的数据 */
const nodeData = ref({});
/** 节点是否修改 */
const isEditing = ref(false);
/** 保存正在编辑的节点ID */
const editingNodeId = ref<number | null>(null);
/** 临时存储编辑中的节点名称 */
const editingNodeLabel = ref<string>("");
/** 树形结构数据 */
const defaultProps = {
  children: "children",
  label: "label"
};

/** 树形结构数据 */
interface Tree {
  [key: string]: any;
}

/** 树形结构数据 */
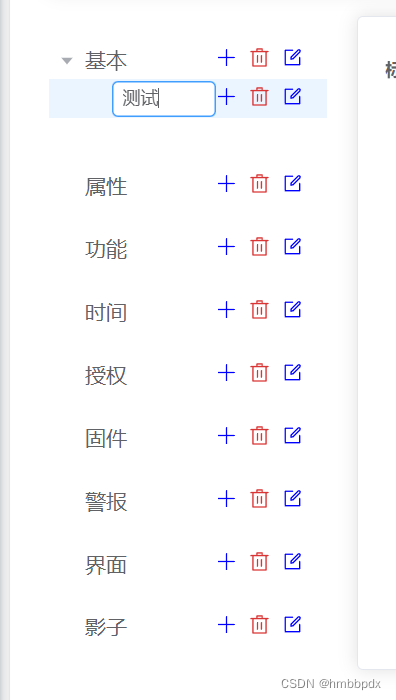
const data: Tree[] = [
  {
    id: 1,
    label: "基本"
  },
  {
    id: 2,
    label: "属性",
    data: [
      {
        id: 1,
        label: "电池电压"
      },
      {
        id: 2,
        label: "正在充电"
      },
      {
        id: 3,
        label: "固件版本"
      },
      {
        id: 4,
        label: "输入电压"
      },
      {
        id: 5,
        label: "信号质量"
      },
      {
        id: 6,
        label: "位置"
      },
      {
        id: 7,
        label: "服务器地址"
      },
      {
        id: 8,
        label: "服务器用户名"
      },
      {
        id: 9,
        label: "通讯协议"
      },
      {
        id: 11,
        label: "产品令牌"
      },
      {
        id: 12,
        label: "设备令牌"
      }
    ]
  },
  {
    id: 3,
    label: "功能"
  },
  {
    id: 4,
    label: "时间"
  },
  {
    id: 5,
    label: "授权"
  },
  {
    id: 6,
    label: "固件"
  },
  {
    id: 7,
    label: "警报"
  },
  {
    id: 8,
    label: "界面"
  },
  {
    id: 9,
    label: "影子"
  }
];

/** 修改树节点 */
const edit = (node: Node, data: Tree) => {
  isEditing.value = true;
  editingNodeId.value = data.id;
  editingNodeLabel.value = data.label;
};

/** 点击树节点 */
const handleNodeClick = (data: Tree) => {
  nodeData.value = data.data;
};

/** 添加树节点 */
const append = (data: Tree) => {
  const newChild = { id: id++, label: "testtest", children: [] };
  if (!data.children) {
    data.children = [];
  }
  data.children.push(newChild);
  data.value = [...data.value];
};

/** 删除树节点 */
const remove = (node: Node, data: Tree) => {
  const parent = node.parent;
  const children: Tree[] = parent.data.children || parent.data;
  const index = children.findIndex((d) => d.id === data.id);
  children.splice(index, 1);
  data.value = [...data.value];
};

/** 更新节点名称 */
const updateNodeLabel = (data: Tree) => {
  if (editingNodeId.value === data.id) {
    data.label = editingNodeLabel.value;
    isEditing.value = false;
    editingNodeId.value = null;
  }
};

/** 取消节点编辑 */
const cancelEdit = () => {
  isEditing.value = false;
  editingNodeId.value = null;
};

  • 3
    点赞
  • 4
    收藏
    觉得还不错? 一键收藏
  • 0
    评论
最近在使用 Vue3 和 TypeScript 开发项目时,遇到了一个需要进行文件上传的场景,于是就使用了 Element-Plus 的上传组件来完成这个功能。 Element-Plus 是基于 Vue3 的 UI 组件库,提供了一些比较常用的组件,其中包括了文件上传组件。在使用文件上传组件时,需要传入文件上传的API地址和文件上传的前缀,可以通过props属性进行传值。例如: ``` <el-upload :action="url" :auto-upload="false" :before-upload="beforeUpload" :file-list="fileList" list-type="text" ref="upload" :on-success="handleSuccess" :on-error="handleError" > <el-button type="primary" :loading="uploading" size="small" > 上传文件 </el-button> <div slot="tip" class="el-upload__tip">只能上传jpg/png文件,且不超过500kb</div> </el-upload> ``` 其中,`:action` 表示文件上传的 API 地址,`:before-upload` 表示文件上传之前的钩子函数,用于限制上传文件类型和大小,`:file-list` 表示已上传的文件列表,`:on-success` 和 `:on-error` 表示上传成功和上传失败的回调函数。 在使用 TypeScript 进行开发时,需要对元素进行类型定义,以便更好地使用。例如,定义一个类型为 `FileList` 的变量 fileList,就可以在上传组件中使用: ``` const fileList: Ref<UploadFile[]> = ref([]); <el-upload ... :file-list="fileList" ... > </el-upload> ``` 这里,`Ref<UploadFile[]>` 表示定义一个 `Ref` 类型的变量 fileList,其值为 `UploadFile` 类型的数组。 在上传文件时,在 `before-upload` 钩子函数中,可以限制上传文件的格式和大小。例如: ``` beforeUpload(file: File) { const isJPG = file.type === 'image/jpeg' const isPNG = file.type === 'image/png' const isLt2M = file.size / 1024 / 1024 < 2 if (!isJPG && !isPNG || !isLt2M) { this.$message.error('上传文件只能是 JPG/PNG 格式,且不超过 2MB!') } else { this.uploading = true return true } } ``` 这里,判断文件的类型是否为 jpg/png,判断文件的大小是否小于 2MB。如果不满足条件,就会弹出提示,否则开始上传。 在上传成功和上传失败的回调函数中,可以对上传结果进行处理。例如: ``` handleSuccess(response: UploadSuccessResponse, file: UploadFile) { this.uploading = false this.fileList.push(file) this.$message.success('上传成功') }, handleError(error: Error, response: UploadFile, file: UploadFile) { this.uploading = false this.$message.error('上传失败') } ``` 这里,当上传成功时,将文件添加到已上传的文件列表中,并弹出提示;当上传失败时,弹出提示。 综上所述,实现 Vue3 TS Element-Plus 文件上传的主要步骤包括:引入 Element-Plus 组件库,传入 API地址和前缀,进行类型定义,限制上传文件类型和大小,处理上传结果等。
评论
添加红包

请填写红包祝福语或标题

红包个数最小为10个

红包金额最低5元

当前余额3.43前往充值 >
需支付:10.00
成就一亿技术人!
领取后你会自动成为博主和红包主的粉丝 规则
hope_wisdom
发出的红包
实付
使用余额支付
点击重新获取
扫码支付
钱包余额 0

抵扣说明:

1.余额是钱包充值的虚拟货币,按照1:1的比例进行支付金额的抵扣。
2.余额无法直接购买下载,可以购买VIP、付费专栏及课程。

余额充值